Setting up commodity classes and commodities
Commodity classifications and commodities can be set up on the Commodity Profile window in the Fuel Dispatch application or in the TMWSuite File Maintenance application.
Follow this sequence when setting up commodity classes and commodities in Fuel Dispatch:
-
Add commodities. If applicable, identify components of splash blends.
|
Maintaining commodity classes
Before a commodity can be recorded on an order, it must be assigned to a commodity class. You assign commodities to classes in their profiles.
Commodities are classified for multiple reasons:
-
In Fuel Dispatch, you can use classes to limit order entry to commodities belonging to a type that a consignee can accept.
-
Commodity-based product classes allow you to map commodities to technical product names. This eliminates naming confusion with external inventory management systems.
-
You can bill and pay based on the Commodity Class 1 to which a commodity belongs.
You set up classes in the Commodity Profile Classes window. You access it from the Commodity Profile window.
| In Fuel Dispatch, you can use only one of the two commodity class categories. For details on selecting a category, see How to use commodity classes in Fuel Dispatch. |
How to use commodity classes in Fuel Dispatch
Although there are two commodity class categories, you can use only one of them in Fuel Dispatch. By default, Fuel Dispatch uses Commodity Class 2 classifications.
Commodity Class 2
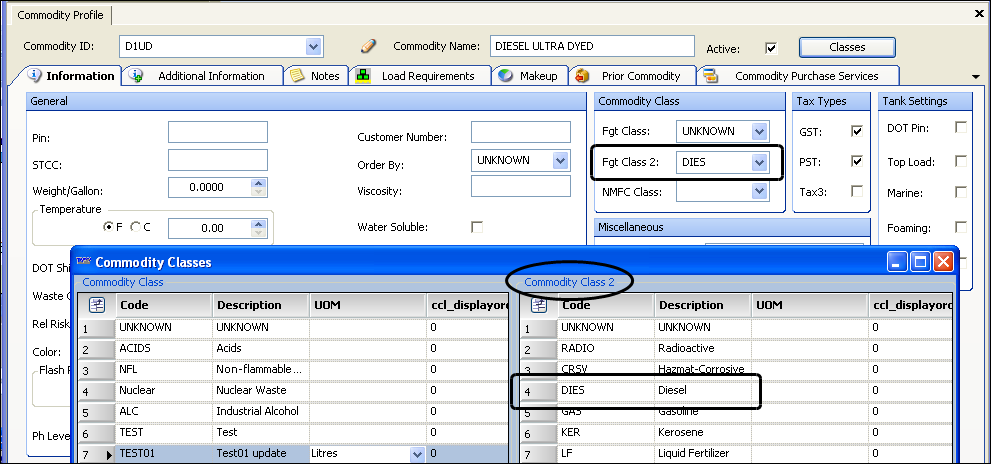
In the default mode, when you set up commodity profiles for the products your consignees can receive, you select the Commodity Class 2 option in the Fgt Class 2 field.
You also associate commodities with each consignee in the Company Relations Profile window. This ensures that as orders are entered, only commodities valid for a consignee can be specified.
However, you cannot use Commodity Class 2 classifications as restrictions on billing and pay rates.
Commodity Class 1
If you defined your commodity classes using Commodity Class 1 before you started using Fuel Dispatch, you may want to continue to use it. To use only Commodity Class 1, you must use the [FuelDispatch]CommoditySubclass setting in your TTS50 to switch from the default, which is Commodity Class 2.
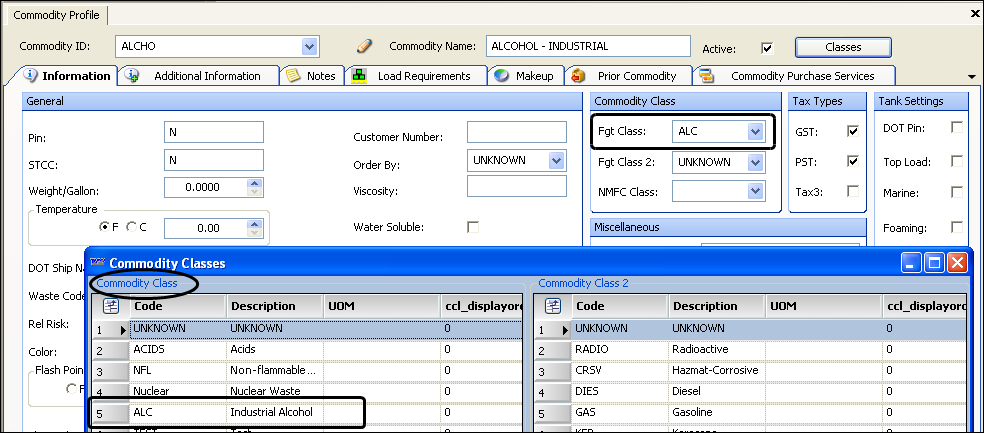
When you use Commodity Class 1, use the Fgt Class field in a commodity’s profile to record the appropriate Commodity Class 1 selection.
Commodity Class 2 and Commodity Class 1
While using Commodity Class 2 to categorize commodities for Fuel Dispatch, you may also want to specify a Commodity Class 1 value for each commodity for rating purposes.
You can use:
-
Commodity Class 1 to identify the commodity class
-
Commodity Class 2 to identify sub classes
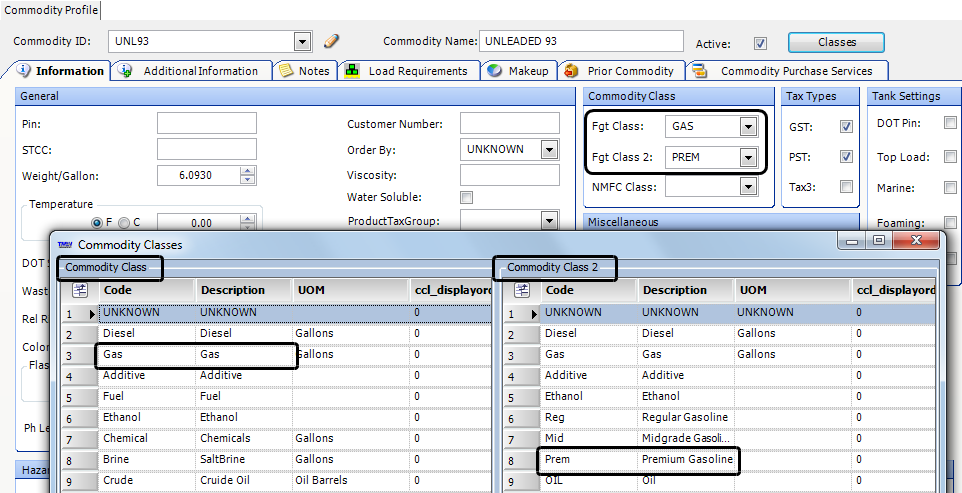
For example, suppose that Commodity Class 1 includes these classifications:
-
Gasoline
-
Diesel
-
Additives
Suppose also that Commodity Class 2 defines these sub classes for the Gasoline classification:
-
Unleaded
-
Midgrade
-
Premium
In the profile for 93-octane gasoline, you could specify Gas in the Fgt Class field and Premium in the Fgt Class 2 field.
| Fuel Dispatch looks only at the class code and description. Entries recorded in other fields are informational only. |
Adding a commodity class
Use this procedure to add a commodity class option to Commodity Class 1 or 2.
| Generally, you should add classes only for the commodity class your company has elected to use. For details, see How to use commodity classes in Fuel Dispatch. |
-
Go to Maintenance > Commodity Maintenance.
-
Click
 New, or open an existing commodity profile.
The Classes button is enabled. -
Click Classes.

The Commodity Classes window opens.
Commodity Class 1 options are shown on the left side of the window, while Commodity Class 2 options are shown on the right side.
Show me Column definitions
Required field: *
Field Definition Code *
Unique ID assigned to the commodity class
Note: Changes made to an existing code cannot be saved.
Description*
The user-assigned name for the commodity class
UOM
Unit of measure for the commodity, such as gallons for gasoline or tons asphalt
Note: The unit of measure entered here will be used as the default when you enter a new order based on the commodity class.
ccl_displayorder
You can have the commodities on a saved order display in a different sequence from how they are listed here. Enter the sequence numbers in this column.
To enable this feature, you must also have
[FuelDispatch]SortFreightCommodityClassDisplayOrder=Yin your TTS50.If you have
[FuelDispatch]UseCustomCardPlannerToolTip=Y, the identified sequence also displays in the Card Planner and Planning Worksheet ToolTips for an order.If
[FuelDispatch]SortFreightFromGridLayout=Yin your TTS50, and you have saved the grid layout in a specific sort order, it will determine the order in which the commodities are listed in the Freight grid rather than the sequence in this column.Is Retired
When selected, indicates that the commodity class can no longer be used. Retired classes remain on file, but they will not show in drop-down lists, which prevents users from selecting them when they set up commodities. If needed later on, you can clear the checkbox to bring the commodity class out of retirement.
-
Under the appropriate Commodity Class, click Add.
A new row is added to the bottom of the list. -
Enter the Code and Description.
-
Select the unit of measure in the UOM field.
-
Click Save.
If you decide not to add the commodity class after all, click Cancel instead.
Modifying a commodity class
Follow this procedure to change information for a commodity class.
-
Go to Maintenance > Commodity Maintenance.
-
Click
New, or open an existing commodity profile. -
Click Classes.
-
Make the changes.
-
Click Save.
If you decide not to make the change after all, click Cancel instead.
Retiring a commodity class
There may be times when you no longer haul any of the products in a particular commodity class. Therefore, to prevent users from selecting the class or the commodities in it from drop-down lists, you can retire it.
-
Go to Maintenance > Commodity Maintenance.
-
Click
New, or open an existing commodity profile. -
Click Classes.
-
Do one of the following for the commodity class you want to retire:
-
Select the Is Retired checkbox.
-
Click Delete.
A confirmation message is shown: "Are you sure you want to delete this row?"On the confirmation window, do one of the following:
-
Click Yes to confirm the deletion.
-
Click No to cancel the deletion.
Note: Clicking the Delete button does not remove the commodity class from the system. It causes the Is Retired checkbox to be selected.
-
-
-
Click Save.
Bringing a commodity class out of retirement
As long as a commodity class is retired, it does not appear in drop-down lists. The commodities assigned to a retired class do not appear in drop-down lists.
If you resume hauling commodities for a retired commodity class, you must take the class out of retirement. This allows users to select the class, or the commodities in it, from drop-down lists.
-
Go to Maintenance > Commodity Maintenance.
-
Click
New, or open an existing commodity profile. -
Click Classes.
-
On the same row as the commodity class you want to bring out of retirement, clear the Is Retired checkbox.
-
Click Save.
If you decide not to make the change after all, click Cancel instead.