Entering company data
A company profile must exist for each entity with which your company does business, such as shippers, consignees, and companies responsible for payment of invoices. In addition, you must set up a company profile for any location where you may wish to show resources, such as a driver’s at home location or a terminal.
Fuel Dispatch requires profiles for these types of companies:
-
Bill To
Entity that pays for the shipping -
Shipper
Physical location where the product is picked up, that is, the rack -
Consignee
Physical location where the product is dropped -
Supplier
Company that sells branded and unbranded fuel to service stations -
Account Of
Entity that purchases fuel from a supplier and resells it to service stations -
At Home Location
Place where the driver starts and ends the workday, that is, his/her shift
To set up a profile, you must do the following:
-
Create the company profile in either of these windows:
-
The Company File Maintenance window in the File Maintenance application.
Show me
For details on this window, see the Company File Maintenance chapter in the File Maintenance guide.
-
The Company Profile window in Fuel Dispatch.
Show me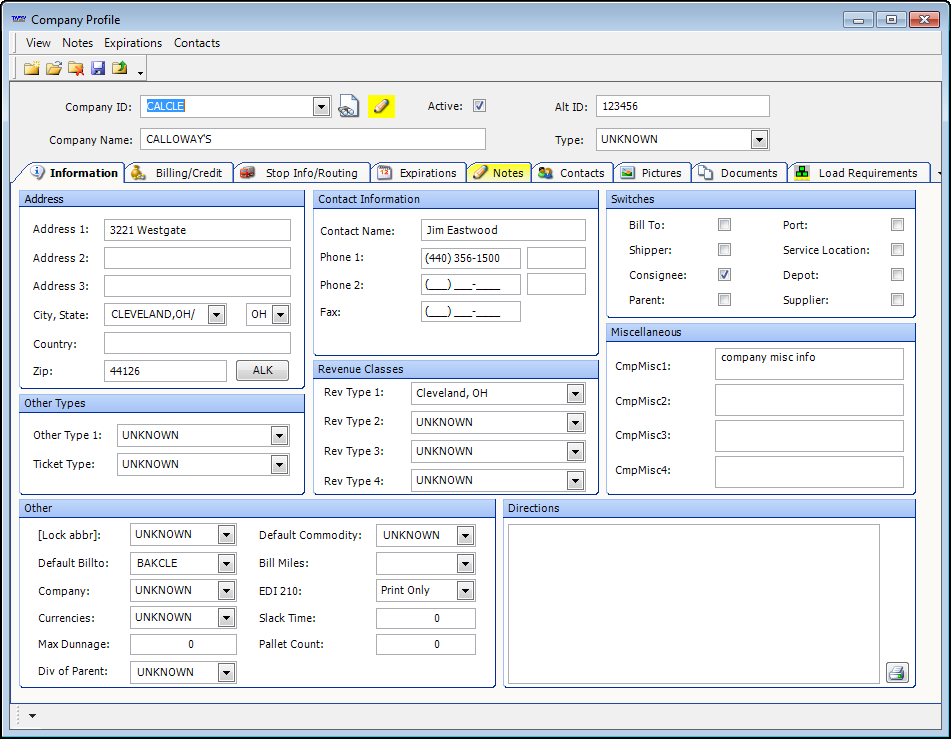
Although its layout is different from that of the Company File Maintenance window, it displays the same fields. For field definitions, see Company profile overview and field definitions. By default, the system does not allow you to edit data on this window. However, you can set up the system to allow this by using the
[FuelDispatch]ProfileEditDisabledsetting in your TTS50.
-
-
Record Fuel Dispatch specific information in the Company Relations Profile window, which exists only in the Fuel Dispatch application. To access it, go to Maintenance > Company Relations Profile.
Show me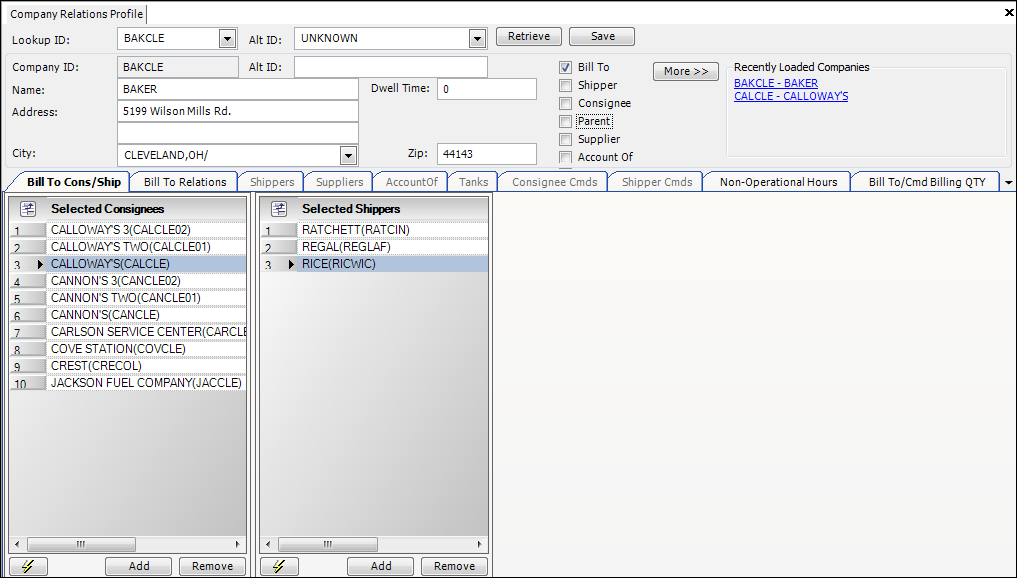
The Company Relations Profile window is divided into two sections:
-
Company profile data, most of which also exists in File Maintenance.
-
Sub tabs that allow you to set up company-to-company relationships, commodity-to-shipper and commodity-to-consignee relationships, and hours of operation.
For details on this window, see Entering general profile information.
-
Entering required company information
For Fuel Dispatch to function, entry of specific company data is required. Most entry occurs in the Company File Maintenance window in File Maintenance, or on the Company Profile window accessed via Scroll Companies, if your system is set up to edit profiles there. However, for some profiles, there are entries you are able to make only in the Company Relations Profile window in Fuel Dispatch. The following table lists the data that Fuel Dispatch requires, as well as the window(s) where you can make the entries.
| Company Type | Entries required for Fuel Dispatch |
|---|---|
Bill To |
When you create the profile in the Company File Maintenance window or Company Profile window, do the following:
|
Shipper |
When you create the profile in the Company File Maintenance window or Company Profile window, do the following:
In the Company Relations Profile window, identify the commodities that the shipper can provide for delivery. For details, see Associating commodities with shippers. |
Consignee |
When you create the profile in the Company File Maintenance window or Company Profile window, do the following:
In the Company Relations Profile window, identify the commodities for which the consignee will accept delivery. For details, see Associating commodities with consignees. |
Supplier |
When you create the profile in the Company File Maintenance window or Company Profile window, do the following:
|
Account Of |
When you create the profile in the Company File Maintenance window or Company Profile window, enter the company ID, name, and city/state or province. In the Company Relations Profile window, select the Account Of checkbox. |
At Home Location |
In the Company Relations Profile window:
Note: When you first access the Company Relations Profile window in Fuel Dispatch, this checkbox is hidden. To see it, in the header area, click More. |
| The checkboxes used to identify a company type are called switches. All company-related switches, e.g., Bill To, shipper, consignee, etc., exist in the Company Relations Profile window in Fuel Dispatch. After a company profile is created, you can use the window to select or clear checkbox(es) when needed. |
Looking up a company
Use these methods to open the profile of an active company in Fuel Dispatch.
Viewing basic profile information
Use one of these procedures to open the Company Profile window for a specific company.
Through the Company Scroll window
-
Go to Tools > Company Scroll.
-
Retrieve a list of companies.
-
When the list of company records is displayed, do one of the following:
-
Double-click on a company line.
The profile window opens as a tab within Fuel Dispatch. You can easily switch from one tab to another. -
Select the company line, and then click Profile.
The profile window opens as a separate window from Fuel Dispatch. While this window is open, you cannot access the Fuel Dispatch window. -
Right-click the ID. From the menu, select View Profile.
The profile window opens as a separate window from Fuel Dispatch. While this window is open, you cannot access the Fuel Dispatch window.
-
From a Company ID field on a window
-
Right-click on a company ID field in a Fuel Dispatch window, such as Call On Demand Order Entry.
-
From the shortcut menu, select View Profile.
This example shows the shortcut menu that appears when you click on the Bill To field in the Call On Demand Order Entry window.
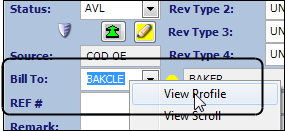
The profile window opens as a separate window from Fuel Dispatch. While this window is open, you cannot access the Fuel Dispatch window.
Note: This access method might not be supported on all windows.
Viewing Fuel Dispatch-specific profile information
To open the Company Relations Profile window for a specific company, follow these steps.
-
Go to Maintenance > Company Relations Profile.
-
In the lookup ID field, start entering the first few characters of the company’s ID.
The list drops into view, showing those items that match your entry.Note: Only active companies, that is, those having the Active checkbox selected in their profiles, are shown in the list.
-
Select the ID.
-
Do one of the following:
-
Press ENTER.
-
Click Retrieve.
-
Click
 Open.
Open.
The company’s profile is shown in the window.
-
If you have already looked up a company in the Company Relations Profile window, you can use either of these alternative methods to look up a different company:
-
The Recently Loaded Companies area of the window lists the last five companies you looked up during your current session with the window. The companies are listed from most recent lookup to oldest lookup. If you look up a sixth company, the oldest lookup drops off the list. The list remains in place until you close the Company Relations Profile window.
For each company in the list, the system shows a hyperlink that consists of the company ID, followed by the company name. To retrieve the profile of one of the companies in the list, click on the hyperlink.
Show me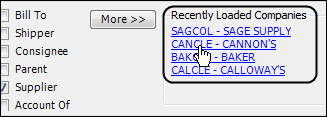
-
On some tabs in the Company Relations Profile window, the system lists company names. To look up the profile of one of those companies, double-click on it.
Show me
Entering general profile information
The top section of the Company Relations Profile window contains many fields that also exist in the Company File Maintenance window in File Maintenance. Regardless of which application you use to make entries in those fields, the data is written to the same database tables and columns. Therefore, an entry made in one application will be evident in the other application.
Because initial company profile setup occurs in File Maintenance, when you look up a company in the Company Relations Profile window, you will see data in many fields.
Use this procedure to make changes or add more data.
-
Go to Maintenance > Company Relations Profile.
-
In the Lookup ID field, start entering the first few characters of the company’s ID. The list drops into view, showing those items that match your entry.
Note: Only active companies, that is, those having the Active checkbox selected in their profiles, are shown in the list.
-
Select the ID.
-
Do one of the following:
-
Press ENTER.
-
Click Retrieve.
-
Click
Open.
-
-
-
Make entries in these fields as needed:
Show meBy default, the Company Relations Profile window does not display all company profile fields.

To see additional fields, click More. When you do so, the header area of the window expands.
Show me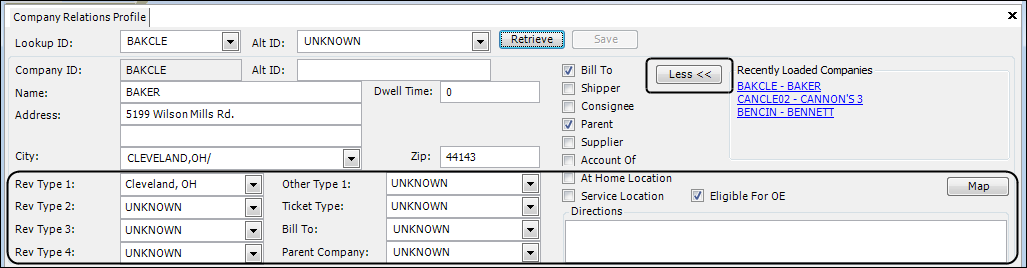 Field definitions
Field Definition Alt ID
An alternate, user-defined code assigned to the company. A maximum of 25 alphanumeric characters is allowed.
Name
Company name.
Address
Two fields used to record the street address for the company.
City
City and state/province where the company or stop is located
Zip
Five-digit or nine-digit ZIP Code for the city.
Dwell Time
Applicable only for shipper and consignee profiles.
-
For a shipper: Number of minutes required to load a product at its location.
Note: You can also record dwell times for the commodities associated with a shipper. For more information, see Associating commodities with shippers.
-
For a consignee: Number of minutes required to unload a product at its location.
Note: You can also record dwell times for the commodities associated with a consignee. For more information, see Associating commodities with consignees.
RevTypes1 - 4
Revenue classifications to which a record is associated.
OtherTypes1 - 2
The name and options for these fields are user-defined. Setup occurs in the Other Type 1 - 2 labels in the System Administration application.
Bill To
Applicable for companies for which invoices are to be sent to a different company. Enter the ID of the company to be billed for orders placed by this company.
Notes:
-
The Bill To company must be set up in the system before the code can be entered in this field.
-
When the Bill To checkbox in the Switches section is selected, the Bill To field must be set to UNKNOWN to prevent billing problems.
-
If you want, when you enter orders in the Call On Demand Order Entry window, you can have the system automatically default the Bill To based on the consignee. To set this up, do the following:
-
When you set up the consignee, use the Bill To field to identify the Bill To with which it is associated.
-
You must have
[FuelDispatch]SetBillToFromConsignee=Yin your TTS50.
-
Parent Company
Applicable only for Bill To’s. In some cases, a customer may be a parent company with multiple subcompanies or divisions. The setup of a parent and its divisions is useful when billing rates for subcompanies are based on the parent. If a Bill To is a subdivision of another company, enter the parent company’s ID here.
Map (button)
Allows you to view or add a site map.
Directions
Driving directions to the company.
checkboxes for:
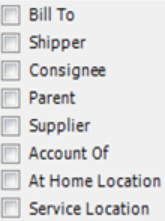
The Company Relations Profile window displays a series of checkboxes, called switches, which are used to indicate the type of company. For details on these company types, see Entering company data.
Notes:
-
Currently, Service Location is not applicable for Fuel Dispatch.
-
Eligible for OE is custom.
-
-
Click Save.
Adding a site map
Often it is helpful to have the physical layout of a company’s facility for reference. For example, in the case of a consignee, such a map shows the location of the tanks.
Use this procedure to attach a site map to a company profile.
-
Go to Maintenance > Company Relations Profile.
-
In the Lookup ID field, start entering the first few characters of the company’s ID. The list drops into view, showing those items that match your entry.
Note: Only active companies, that is, those having the Active checkbox selected in their profiles, are shown in the list.
-
Select the ID.
-
Do one of the following:
-
Press ENTER.
-
Click Retrieve.
-
Click
Open.
-
-
-
Click Map.
The Company Map Location window is displayed.Show me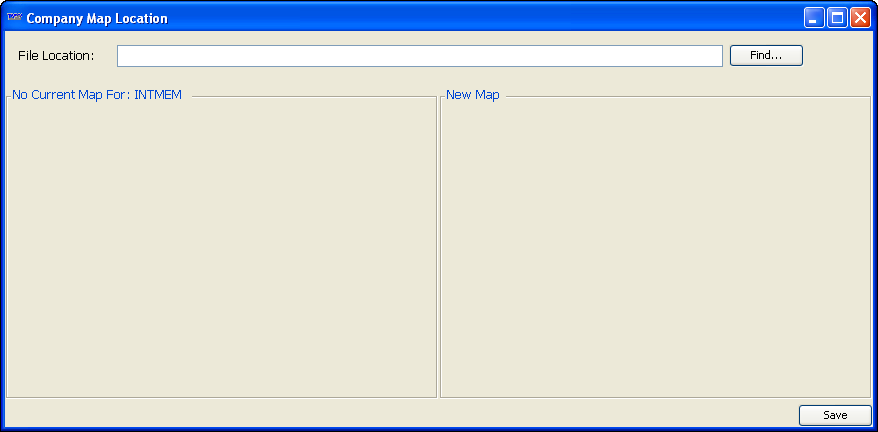
Note: If you do not see the Map button, click More. The company profile area of the window expands, and the Map button then becomes visible.
-
Click Find.
The Open dialog box is shown. -
Locate the map you want to add.
-
When you click Open in the Find dialog box, the map is added in the New Map pane.
Show me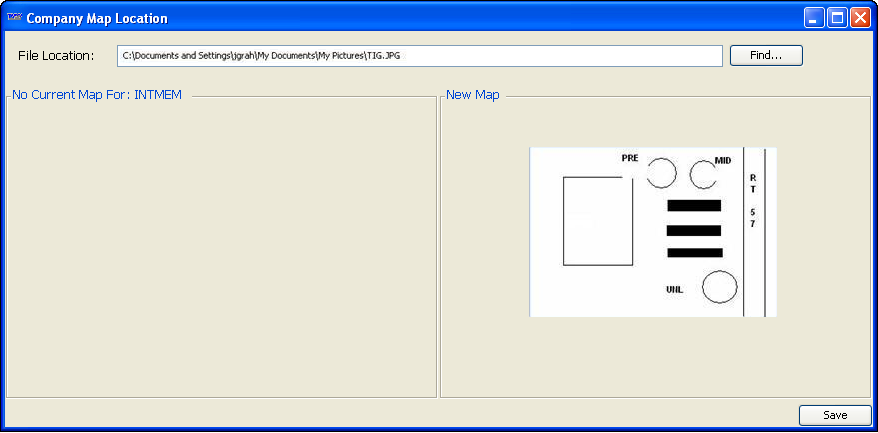
Note: If you add another site map for this company later on, the existing map shows in the window’s left pane and the new map shows in the right pane.
-
Click Save.
Entering the hours a company is closed
|
If you are using the Forecaster to create orders, you can use the Forecaster Restriction checkbox to:
|
-
Go to Maintenance > Company Relations Profile.
-
In the Lookup ID field, start entering the first few characters of the company’s ID. The list drops into view, showing those items that match your entry.
Note: Only active companies, that is, those having the Active checkbox selected in their profiles, are shown in the list.
-
Select the ID.
-
Do one of the following:
-
Press ENTER.
-
Click Retrieve.
-
Click
Open.
-
-
-
Click on the Non-Operational Hours tab.
The Company Closing Hours pane is displayed.Show me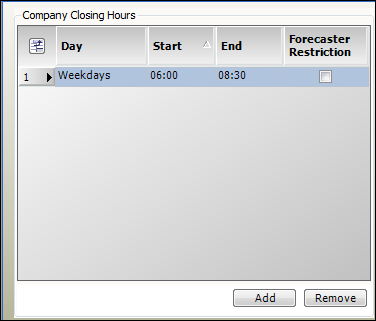
-
Click Add.
The system adds a row for Monday. -
Record the hours the company is closed, that is, when you cannot pick up or deliver product.
Field definitionsField Definition Day
The day(s) the company is closed. The options are:
-
Individual days of the week, e.g., Monday, Tuesday, etc.
-
Weekdays
-
Weekends
-
Week
Start
Beginning of the period when the company is closed.
Defaults to 08:00 because the Day field is set to a specific day of the week. If you selected a specific day, Weekdays, or Weekends in the Day field, enter the time in the HH:MM format.
If you selected Week, click in the field to access the calendar and select the appropriate start date.
End
End of the period when the company is closed.
Make an appropriate entry based on your entries in the Day and Start fields.
Forecaster Restriction
-
Selected
Prevent orders from being scheduled during the closed hours. -
Cleared
Receive a warning on the Planning Worksheet and Card Planner if you plan an order during this time.
-
-
Click Save.
Associating commodities with shippers
When you create orders, you need to provide a PIN code for each of the commodities recorded on the order. PIN codes are based on the consignee/commodity combination. If no PIN code exists for the consignee/commodity, the system will look for a state PIN code. State PIN codes are based on the shipper/commodity combination. If you plan to set up state PIN codes, you must record the commodities a shipper supplies in the shipper’s profile.
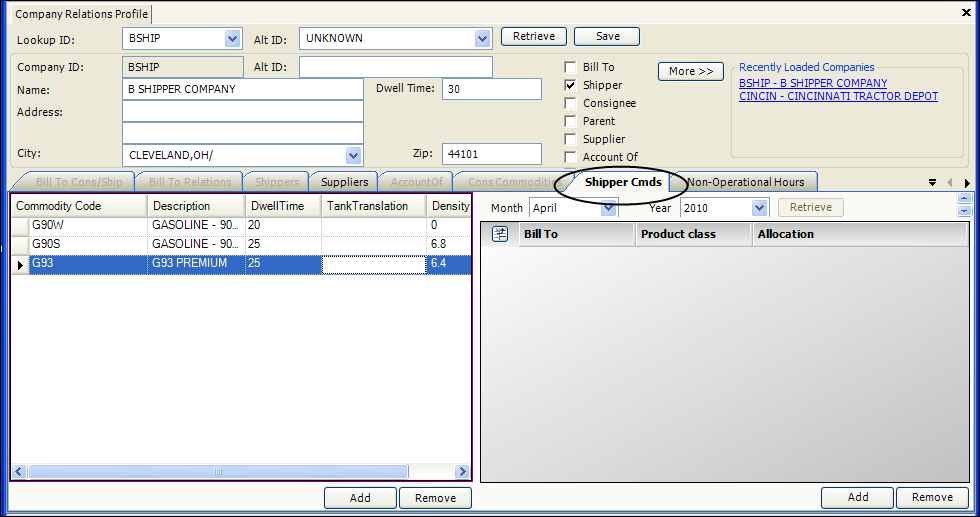
The left side of the Shipper Cmds tab in the Company Relations Profile window allows you to identify the commodities available at a shipper’s location.
Use this procedure to link commodities with a shipper.
-
Go to Maintenance > Company Relations Profile.
-
Retrieve the company.
-
In the Lookup ID field, start entering the first few characters of the shipper company’s ID. The list drops into view, showing those items that match your entry.
Note: Only active companies, that is, those having the Active checkbox selected in their profiles, are shown in the list.
-
Select the ID.
-
Do one of the following:
-
Press ENTER.
-
Click Retrieve.
-
Click
Open.
-
-
-
Select the Shipper Cmds tab.
-
Click Add.
-
Make entries in these columns:
Column definitionsColumn Definition Commodity Code
ID of the product the shipper can provide.
Description
The descriptive name recorded for the commodity in the Commodity File Maintenance window’s Name field.
Note: In File Maintenance, you can use two commodity classes to categorize a commodity. Fuel Dispatch allows you to link each shipper with one or more commodities within one of those commodity classes.
You can use the
[FuelDispatch]CommoditySubclassINI setting to specify which commodity class Fuel Dispatch is to use.Dwell Time
The amount of time required to load this commodity at the shipper’s location.
Tank Translation
Custom field.
Density / S.G.
The weight per gallon of the specified fuel.
-
Click Save.
Associating commodities with consignees
Before you can record a commodity for an order, you first must specify the commodity classes and commodities that can be delivered to specific consignees. This prevents a situation where the wrong type of fuel is delivered to a drop location.
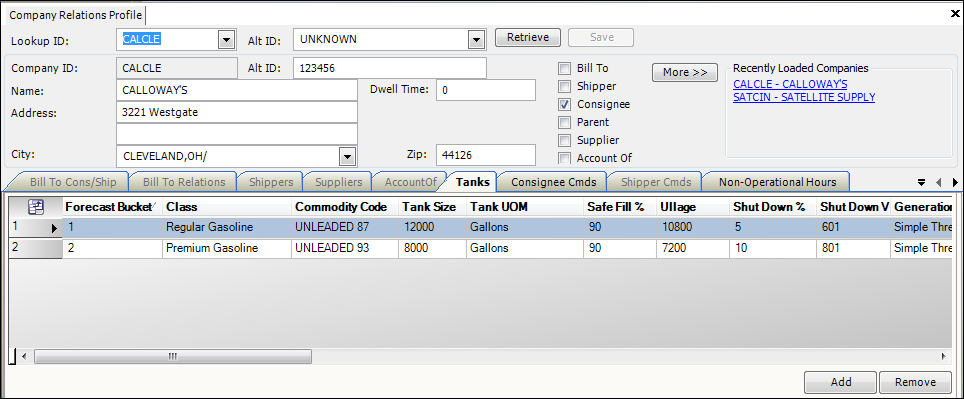
The Tanks tab in the Company Relations Profile window allows you to set up commodity-to-consignee relationships.
Use this procedure to link a consignee with commodity classes/commodities.
-
Go to Maintenance > Company Relations Profile.
-
Retrieve the company.
-
In the Lookup ID field, start entering the first few characters of the consignee company’s ID. The list drops into view, showing those items that match your entry.
Note: Only active companies, that is, those having the Active checkbox selected in their profiles, are shown in the list.
-
Select the ID.
-
Do one of the following:
-
Press ENTER.
-
Click Retrieve.
-
Click
Open.
-
-
-
Select the Tanks tab.
-
Click Add.
-
Make entries in these columns:
Column definitionsColumn Definition Tank ID
Tank in which the product will be dropped.
Class
Commodity classification to which the product has been assigned.
Note: In File Maintenance, you can use two commodity classes to categorize a commodity. Fuel Dispatch requires that you link each consignee with one or more commodities within one of those commodity classes. When a consignee is recorded for an order, you will be able to select only a commodity class/commodity that has been associated with that consignee.
You can use the
[FuelDispatch]CommoditySubclassINI setting to specify which commodity class Fuel Dispatch is to use.Commodity
ID of the product to be delivered.
Tank Size
Capacity of the tank, in gallons.
Tank UOM
The unit of measure used to determine how much the tank holds.
Safe Fill %
Maximum volume to which the tank should be filled, e.g., 95%.
Ullage
Empty volume of the tank. Ullage is calculated as:
Capacity x Full (%) - Volume.Shut Down %
Minimum volume the tank should ever contain, e.g., 10%.
Shut Down Volume
Minimum number of gallons the tank should ever contain. Calculated as the tank’s total volume times the Shut Down %.
Daily Avg Weeks Back
Number of weeks Inventory Management looks back when calculating same day sales averages. The default value is 2.
PM Delivery %
Factor used to estimate night sales versus day sales. For example, you deliver to a store easily accessed by drivers using a freeway on-ramp for morning their morning commute. The store’s volume is heavy in the morning. Consequently, their evening sales might be only 35% of the day’s total. The default value is 0.65.
Forecast Id
Identifies a managed commodity tank. The number is the tank’s placeholder on the Inventory Management window. Tanks on Call On Demand Order Entry orders have a value of 0 (zero).
Diameter
The measurement of the tank, from one side to the other.
Dwell Time
The amount of time required to unload this commodity at the consignee’s location.
Tank Translation
Custom field.
-
Click Save.
Specifying a company’s default carrier
First available in Fuel Dispatch V.2016.10
You can assign a carrier to an order for a certain shipper or consignee. If the same carrier regularly performs that company’s orders, you can assign it as the company’s default carrier. When you add this company to an order, the system assigns that carrier automatically.
You can assign default carriers to companies in Fuel Dispatch and Inventory Services.
-
Fuel Dispatch
On the Company Relations Profile window’s Carriers tab -
Inventory Services
On the Company Tank Setup window’s Carriers tabFor details, see Setting up a store when you don’t bill for transportation in the Inventory Services online help.
Automatic carrier assignment works differently in Call On Demand Order Entry and Oil Field Order Entry.
Call On Demand Order Entry orders
By default, the Call On Demand Order Entry window does not assign the default carrier automatically. To do so, you must have [FuelDispatch]AutoAssignDefaultCarrier=Y in your TTS50. With this setting enabled, the system assigns the default carrier when you save your order.
Oil Field Order Entry orders
For Oil Field Order Entry orders, the system assigns the company’s default carrier when you save the order. The [FuelDispatch]AutoAssignDefaultCarrier setting is not applicable.
This table shows how the system assigns carriers to orders.
| Default carrier assigned to | Carrier assigned to order |
|---|---|
Shipper |
Shipper |
Consignee |
Consignee |
Both |
Shipper |
To assign a company’s default carrier, follow these steps:
-
Go to Maintenance > Company Relations Profile.
The Company Relations Profile window opens. -
Look up a company for which you are assigning a default carrier.
-
Select the Carriers tab.
-
Click Add.
A blank row appears in the Company Preferred Carriers section. -
In the Carrier field, enter a carrier ID.
Note: You can add multiple carriers to a company. -
For the carrier you want to have assigned to the company’s orders automatically, select the Default checkbox.
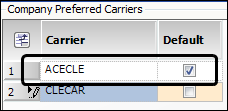
Note: To remove a carrier from the list, select that row and click Remove.
-
Click Save.