Working with expirations
You can add, edit, and delete expirations for resources in the Edit Expirations window, or on the Expirations tab in the resource’s profile.
Working in the Expiration Edit window
You can add expirations for a resource in the Expiration Edit window.

A |
In the lookup area, you select the resource type, and enter the specific ID of the resource for which you want to record, edit, or complete an expiration. |
B |
Two rows of read-only fields appear below the lookup area.
|
C |
The grid at the bottom of the window displays all of the resource’s expirations, both opened and closed. By default, they are listed from oldest to newest. However, you can click on the Start Date or End Date columns to display them with the newest at the top of the list. |
Looking up a resource in the Expiration Edit window
Use this procedure to open a resource’s expiration records.
-
Select Maintenance > Expiration Edit.
The Expiration Edit window opens. -
The lookup area defaults to Driver as the resource type. If needed, select a different resource type.
Show me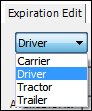
-
Enter the ID of the resource for which you are adding the expiration.
Show me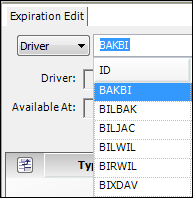
-
Click
 Open.
Open.
Any existing expirations recorded for the resource are shown in the grid at the bottom of the window.
Adding an expiration
To add an expiration for a resource, use this procedure.
-
Click
 Add.
Add.
A blank row is added below the last existing expiration. -
Make entries in these fields.
Field definitionsType
Select the appropriate expiration type from the drop-down list.
Note: The options are set up in the label file, accessed in System Administration.
Description
Clicking in the field will display the expiration type. If you want, you can enter a free-form message up to 95 characters.
Start Date
Enter the date the expiration goes into effect.
Done
Do not select this checkbox when adding a new expiration. It is used to mark the expiration as complete.
End Date
Enter the date the expiration is expected to be completed.
Route to Company
Enter the ID of the company where the resource will be located when the expiration is complete.
Note: Dispatch type expirations have codes of 200 or greater. If you are entering a dispatch type expiration, you must make an entry in this field. The expiration cannot be saved when the field value is left as UNKNOWN.
City
Automatically shows the city location of the company specified in the Route to Company field.
Note: If you are entering a non-dispatch type expiration, you can enter a city name if you want.
Priority
To rank the importance of the expiration, select the appropriate priority code. The default options are:
-
Required
The resource cannot be used on a trip while the expiration is in effect.
-
Key Date
The resource can be used on a trip while the expiration is in effect.
Note: Priority codes are defined in the ExpPriority label in System Administration.
LabelCode
The numeric ID assigned to the label option that defines the expiration.
-
-
Click
 Save.
Save.
Deleting an expiration
If an unneeded expiration has been added for a resource, it can be deleted.
-
In the grid at the bottom of the window, select the expiration you want to delete.
-
Click
 Delete Item.
The expiration is removed from the list. -
Click
Save.
Manually completing an expiration
When an expiration has been satisfied, you must mark it as done. Until you select the expiration’s Done checkbox, it is still in effect.
| When a Priority 1 expiration has reached its effective date, the system will not allow the resource to be dispatched. |
Use this procedure to complete an expiration manually.
-
Look up the resource in the Expiration Edit window.
Note: To complete a non-dispatch type expiration, you must access the Expiration Edit window through the Fuel Dispatch menu. You cannot complete non-dispatch expirations if you access the window by clicking a P1 or P2 indicator in the Planning Worksheet, Card Planner, or Edit Driver Schedule window.
-
In the grid at the bottom of the window, locate the expiration you need to complete.
-
If needed, change the date in the End Date field.
-
Select the Done checkbox.
-
Click
Save.
Working on the Expirations tab in the resource’s profile
You can use the Expirations tab in a resource’s profile to add, delete, and edit a record.
If your login allows you to edit resource profiles, you can add, edit, and delete expirations on the Expirations tab in the resource’s profile.
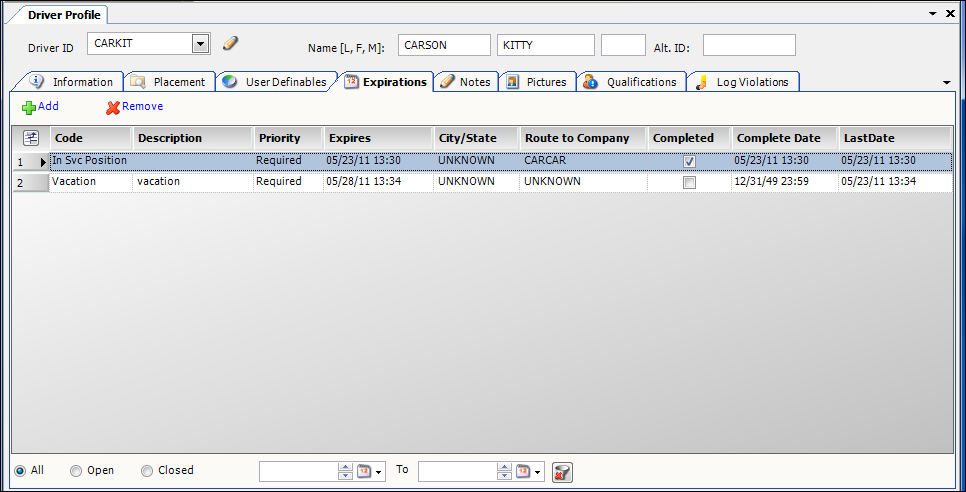
You can enter or modify an expiration for a resource on this tab.
| Column | Definition |
|---|---|
Code |
Expiration recorded for the resource. |
Description |
Free-form message of up to 95 characters. |
Priority |
Expiration’s rank. |
Expires |
Date the expiration goes into effect. |
City, State |
Location where the resource will be located when the expiration is complete. |
Route to Company |
ID of the company where the resource will be located when the expiration is complete. |
Completed |
This checkbox is used to mark the expiration as complete. |
Complete Date |
Date the expiration was officially completed, that is, the date the Completed checkbox was selected. |
Last Date |
Date the expiration is supposed to end. |
By default, the profile windows display in read-only mode. To have the ability to add or edit profile information, you must have access to the TMWSuite File Maintenance application and set [FuelDispatch]ProfileEditDisabled=N in your TTS50.
|
Adding an expiration
Use this procedure to add an expiration in the resource’s profile.
-
Retrieve the appropriate resource’s profile.
The profile opens as a tab within Fuel Dispatch.Show me
-
Select the Expirations tab.
-
Click Add.
A blank row is added to the grid. -
Make entries in the fields.
Field definitionsField Definition Code
Select the appropriate expiration type from the drop-down list.
Note: The options are set up in the label file, accessed in System Administration.
Description
If you want, you can enter a free-form message of up to 95 characters.
Priority
To rank the importance of the expiration, select the appropriate priority code. The default options are:
-
Required
The resource cannot be used on a trip while the expiration is in effect. -
Key Date
The resource can be used on a trip while the expiration is in effect.
Note: Priority codes are defined in the ExpPriority label in System Administration.
Expires
Enter the date the expiration goes into effect.
City, State
Enter the city/state where the resource will be located when the expiration is complete.
Note: Dispatch type expirations have codes of 200 or greater. If you are entering a dispatch type expiration, you may make an entry in this field, or you may make an entry in the Route to Company field. The expiration cannot be saved when both fields have values of UNKNOWN.
Route to Company
Enter the ID of the company where the resource will be located when the expiration is complete.
Note: Dispatch type expirations have codes of 200 or greater. If you are entering a dispatch type expiration, you may make an entry in this field, or you may make an entry in the City, State field. The expiration cannot be saved when both fields have values of UNKNOWN.
Completed
Do not select this checkbox when adding a new expiration. It is used to mark the expiration as complete.
Complete Date
This field is not applicable when adding an expiration.
Last Date
Enter the date the expiration is expected to end.
-
-
Click
Save.
Deleting an expiration
If an unneeded expiration has been added for a resource, it can be deleted.
-
Retrieve the appropriate resource’s profile.
The profile opens as a tab within Fuel Dispatch. -
Select the Expirations tab.
-
Select the expiration you want to delete.
-
Click Remove.
A confirmation messages appears.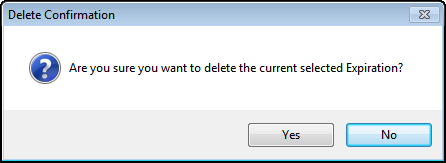
-
Click Yes to complete the deletion.
-
Click
Save.
Manually completing an expiration
When an expiration has been satisfied, you must mark it as done. Until you select the expiration’s Done checkbox, it is still in effect.
| When a Priority 1 expiration has reached its effective date, the system will not allow the resource to be dispatched. |
Use this procedure to complete an expiration manually.
-
Select the Expirations tab.
-
Locate the expiration you need to complete.
-
Select the Completed checkbox.
The Complete Date field is automatically updated to the current date/time. -
Click
Save.
Viewing a resource’s completed expirations
By default, when expirations are completed the system removes them from view. If you want, you can view completed expirations. In the lower left of the Expirations tab, three radio buttons are used to identify the status of the expirations you want to see:
This section allows you to select the kind of expirations the system will display.
![]()
-
All
Displays open expirations and those that were marked as Completed within the date range specified using the date fields. -
Open (default)
Displays expirations that are not marked as Completed. -
Closed
Displays expirations that were marked as Completed within the date range specified using the date fields.
To view completed expirations, follow these steps:
-
Select either the All or Closed radio button.
The date fields become active. -
In the date fields to enter a range of completion dates for the expirations to be listed.
Notes:
-
When you retrieve only closed expirations, the system will list those that have end dates in the date range you specify.
-
If you selected All, the date range affects only the listing of closed expirations; all open expirations will be shown, regardless of their end dates.
-
-
Click
 Open. All expirations that match the restrictions you set are shown.Show me
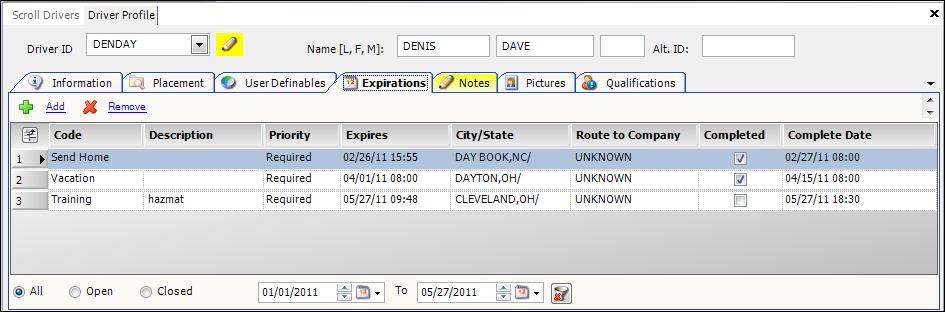
Automatically completing expirations
You can set up Fuel Dispatch to complete expirations automatically.
Automatic completion is a convenient feature for any routine type of expiration that does not require user intervention. For example, because you usually know the duration of a driver vacation in advance, you typically enter a specific end date when setting up a vacation expiration. If you set up the system to complete vacation expirations automatically, the driver will become available for dispatch as soon as the vacation’s end time passes.
Setting up expiration types to complete automatically
You can set up any expiration, for any resource type, to be completed automatically.
When the end date passes for an expiration type that has its checkbox selected, the auto_complete_expirations_sp stored procedure must execute in your Fuel Dispatch database before the expiration will be marked complete.

You can schedule this stored procedure to execute on a regular basis in SQL Server Enterprise Manager. For more information, see Setting up the recurring job to complete expirations.
Follow these steps to mark an expiration type to complete automatically.
-
In System Administration, select Edit > Label File.
The Edit User Definable Fields window is displayed. -
Click in the Field Name field, and from the drop-down list select the desired label (CarExp, DrvExp, TrcExp, or TrlExp).
-
Identify the first label entry for an expiration type that you want to be completed automatically, and select its Auto Complete checkbox.
Show me
-
Save your changes.
-
Repeat these steps for each expiration type you want to be completed automatically.
Setting up the recurring job to complete expirations
To have expirations completed automatically, you must set up a recurring job for the auto_complete_expirations_sp stored procedure. This stored procedure must execute after the expiration’s end date passes for that expiration to be completed automatically.
Use Microsoft SQL Server Management Studio or SQL Server Enterprise Manager to set up a job to run the stored procedure routinely. When creating the job:
-
Record a name for the step. The step name cannot be left blank.
-
Select Transact-SQL Script (T-SQL) as the Type.
-
Enter
exec auto_complete_expirations_spin the Command field.Show me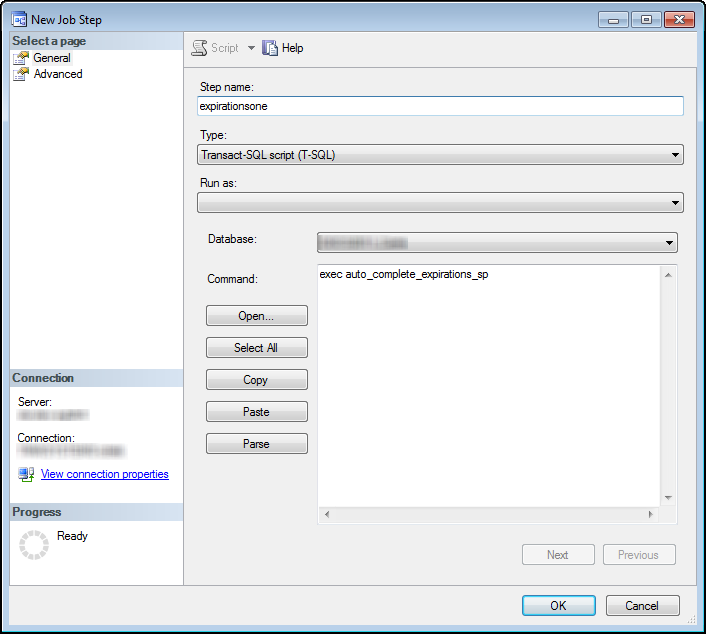
-
Set up the job schedule using auto_complete_expirations as the New Job Schedule Name, and have the job run every day.
| Refer to your SQL Server Management Studio or SQL Server Enterprise Manager Help system for instructions on creating a recurring job. If you need assistance, contact your Fuel Dispatch Support representative. |