Understanding dispatch board layouts
When you are dispatching, that is, planning and assigning trips, you can use the Card Planner or the Planning Worksheet.
The Card Planner allows you to see multiple drivers and their assigned trips at a glance. It displays a timeline that illustrates estimated and actual trip time. It is appropriate for shift-based dispatching as it lists trips in a block calendar-style grid and allows you to plan up to 30 trips per driver per shift.
The Planning Worksheet acts much like the Card Planner, since it is used for planning and dispatching trips. When used with a long haul or carrier board it can show, and allow you to plan, trips that span across multiple days. Unlike the Card Planner, the Planning Worksheet does not have a 30-trip limit for a driver per shift. It is appropriate for long-haul assignments.
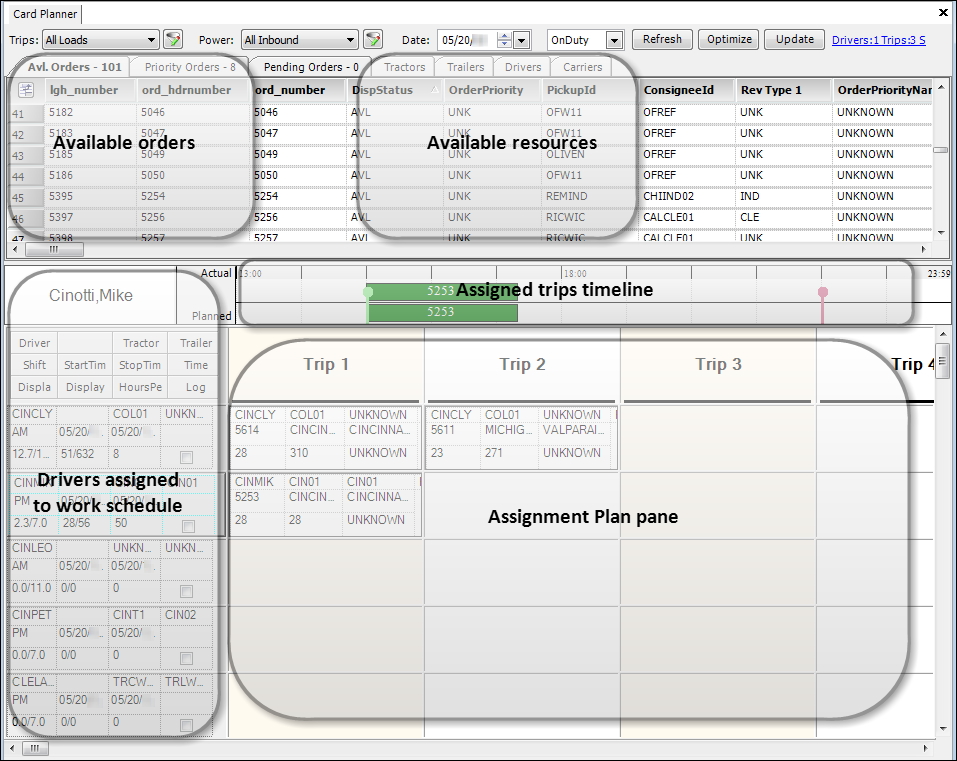
Card Planner layout
Available drivers are listed in the lower left of the window. The tractor and trailer assigned to the driver can also be listed. Trip blocks are shown to the right of each driver’s name. You assign a load by dragging-and-dropping an order from the Available Orders tab or the Priority Orders tab to a trip time block for a driver. You can plan up to 30 trips per driver per shift.
![]() See it in action - Card Planner overview
See it in action - Card Planner overview
![]() See it in action - Using the Card Planner timeline
See it in action - Using the Card Planner timeline
The system administrator can arrange the sections in a vertical fashion by using the [FuelDispatch]CardPlannerVertSplit setting. The sections of the Card Planner window are described below.
Restriction fields
The Restriction fields allow you to limit the trips and resources retrieved in the Card Planner.
You can filter the trips/resources based on:
-
User-defined restriction sets
-
Date
-
Drivers on duty, off duty, or all
Trips/Resources pane
The Trips/Resources pane has six tabs. Each tab contains spreadsheet-style grids that allow you to look up available trips and resources.
Available Orders tab |
The Available Orders tab lists outbound trip segments that are ready for dispatch. This tab can be considered a to-do list. It displays the trips that match the restrictions you set when retrieving trips and resources. A line of data is displayed for each trip segment listed. |
Priority Orders tab |
The Priority Orders tab lists orders that were tagged as Highest Priority when they were saved in the Call On Demand Order Entry window. Using priorities allows you to identify loads that require quick action. Note: Orders are automatically set to Highest Priority when the RevType1 value matches one of your terminals. |
Available Resources tabs |
The Available Resources tabs, also known as the Available Power tabs, are used to determine which resources are (or will be) available for dispatch in particular locations. There is a tab for each resource type:
The data shown reflects information that is stored in each resource’s profile. |
Timeline
The Card Planner Timeline, also called the Gantt bar, is found below the Trips/Resources pane.
When no trips are assigned to a driver, the Timeline shows only the start/end times for the driver’s shift.

When trips are assigned, the Timeline shows each trip’s duration and status.
-
Planned trips show in green.
![]()
-
Started trips show in blue.
![]()
-
Completed trips show in gray.
![]()
The system administrator can turn off the display of the Timeline using the DisplayGanttBar[[FuelDispatch]DisplayGanttBar] setting.
Shift pane
The Shift pane shows the drivers that are on duty for the selected date. It also lists the tractor and trailer associated with the driver when the schedule was generated.
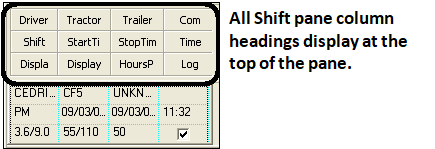
The system administrator can use the Cell Designer to change the information that is shown in the Shift pane, but the default information shown for each driver includes:
Top row
Driver |
Identifies the driver’s first and last name |
Tractor |
Identifies the tractor associated with the driver |
Trailer |
Identifies the trailer associated with the driver |
Com |
If you use mobile communications, this cell will display a satellite icon when the driver is logged on for the day. |
Middle row
Shift |
Identifies whether the driver works an AM or PM shift |
StartTime |
Displays the current day and the driver’s shift start time |
StopTime |
Displays the current day and the driver’s shift end time |
Time |
If the driver is logged in, identifies the time of the login |
Bottom row
Display/Hours |
Number of hours planned for the day, and the number of total hours in the driver’s shift |
Display/Mileage |
Number of loaded miles for the driver’s planned trips, and the number of total miles (loaded + empty) |
HoursPercent |
Percentage of the total miles on the driver’s planned trips that are loaded miles |
Log |
Identifies whether the driver has logged in to start his/her shift |
Assignment Plan pane
The Assignment Plan pane allows you to plan the trips a driver will complete during a shift. You can move trips around and line up several for a driver so that one trip ends near where the next begins. This allows you to arrange trips in an efficient sequence to minimize your deadhead miles.
You can view the trip details in the Card Planner. Each trip is shown in its own cell in the Assignment Plan pane.
The system administrator can use the Cell Designer to change the information that is shown in the Trip pane, but the default information shown for each trip includes:
Top row
Driver |
ID of the driver planned on the trip. |
Tractor |
ID of the tractor associated with the driver planned on the trip |
Trailer |
ID of the trailer associated with the driver planned on the trip |
Middle row
Order |
Unique identifier assigned to the order |
StartCity |
The city and state in which the trip starts |
EndCity |
The city and state in which the trip ends |
Bottom row
LoadedMileage |
Number of loaded miles for the planned trip |
EmptyMileage |
Number of empty miles for the planned trip |
Carrier |
ID of a third party company that hauls loads |
When you pause on a trip, its information summary window is displayed.
Trip assignments are not saved immediately, which lets you rearrange trips as much as you want. Assignments are saved when you click the Update button at the top of the window.
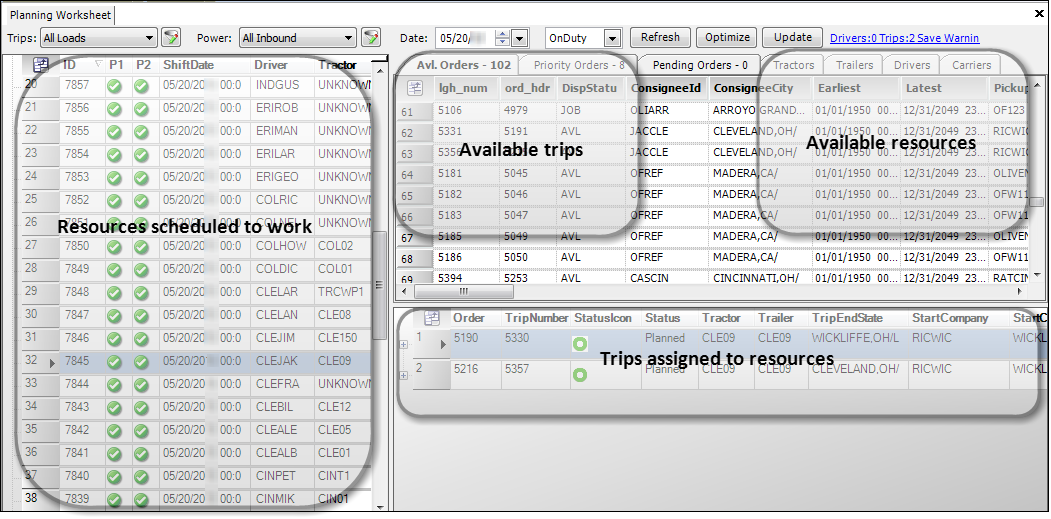
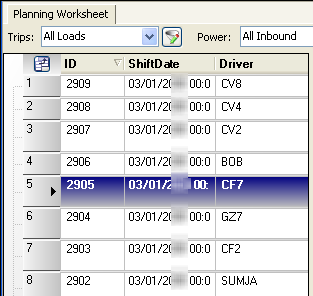
Planning Worksheet layout
Like the Card Planner, the left side of the Planning Worksheet shows drivers that are On Duty. You assign a load by highlighting a driver record and then dragging-and-dropping an order from the Available Orders tab or the Priority Orders tab to the assignment grid in the lower right of the window. Each row represents a tentative assignment.
The Planning Worksheet consists of these sections:
Restriction fields
The Restriction fields allow you to limit the trips and resources retrieved in the Planning Worksheet.
You can filter the trips or resources based on:
-
Trips: user-defined restriction sets
-
Date
-
Resources on duty, off duty, or all
Trips/Resources pane
The Trips/Resources pane has six tabs. Each tab contains spreadsheet-style grids that allow you to look up available trips and resources.
Available Orders tab |
The Available Orders tab lists outbound trip segments that are ready for dispatch. This tab can be considered a to-do list. It displays the trips that match the restrictions you set when retrieving trips and resources. A line of data is displayed for each trip segment listed. |
Priority Orders tab |
The Priority Orders tab lists orders that were tagged as Highest Priority when they were saved in the Call On Demand Order Entry window. Using priorities allows you to identify loads that require quick action. Note: Orders are automatically set to Highest Priority when the RevType1 value matches one of your terminals. |
Available Resources tabs |
The Available Resources tabs, also known as the Available Power tabs, are used to determine which resources are (or will be) available for dispatch in particular locations. There is a tab for each resource type:
The data shown reflects information that is stored in each resource’s profile. |
Resource pane
The Resource pane shows the drivers or carriers that match the selected shift type and date.
Information shown for each driver can include:
ID |
Identifies the ID number associated with the driver |
Shift |
Shift information is displayed in these columns:
Identifies whether the driver works an AM or PM shift
This date is the same as the date set in the Date restriction field.
Identifies whether or not the driver is scheduled to work that shift
Indicates the driver’s start and end time for the day’s shift |
Tractor |
Identifies the tractor associated with the driver |
Driver |
Identifies the driver’s short name |
DriverName |
Identifies the driver’s first and last name |
Hours |
Hours scheduled for the day |
DriverLoggedIn |
Identifies whether the driver has logged in to start his/her shift |
LoadedMileage |
Number of loaded miles for the driver’s planned trips |
HoursPercent |
Percentage of the total miles on the driver’s planned trips that are loaded miles The cell color changes, based on the percentage of loaded miles. By default, the color coding is:
|
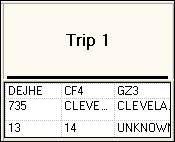
Assignment Plan pane
The Assignment Plan pane allows you to plan the trips for a resource and to see the trips already assigned to a particular resource. When a resource is selected in the Shift pane, the assigned trips are listed in the Assignment Plan pane.
You can view the trip details in the Planning Worksheet. Each trip is shown in its own row in the Assignment Plan pane.

Basic information shown for each trip can include:
Order |
Unique identifier assigned to the order |
Trip Number |
System-assigned numeric ID (also known as the Trip Segment number) that identifies the move to be performed by a single set of resources |
Status Icon |
Indicates the dispatch status of the trip
|
TripStart Date |
Shows the date and time the trip is to start
|
TripEndDate |
Shows the date and time the trip is to end
|
TripValidityImage |
Identifies any conflicts, such as load requirements or expirations Details are shown in the Save Warnings window when you try to save. |
By default, each row in the assignment grid has an ![]() Expand button. Clicking it displays all billable and non-billable stops for the trip.
Expand button. Clicking it displays all billable and non-billable stops for the trip.
Notice that when you click the button, it is replaced by the ![]() Collapse button.
Collapse button.
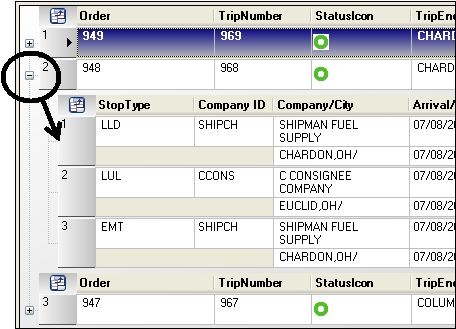
When you are done reviewing a trip’s stops, clicking it will hide them.
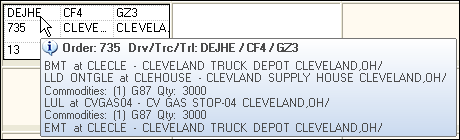
When you pause on a trip, its information summary window is displayed.
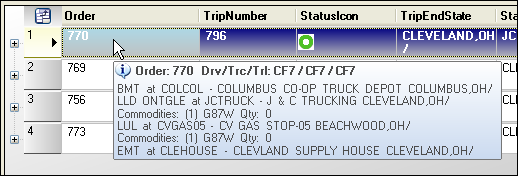
The summary information lists:
-
The event type and location (company ID and name, as well as the city/state) of each stop
-
To enforce trip continuity, the system automatically adds empty events as needed:
-
For the first trip assigned to a driver, the application adds a Begin Empty (BMT) event at the start. The BMT begins at the driver’s At Home location. The application also automatically ends the driver’s last trip with an End Empty (EMT) event to return the driver to the At Home location.
-
For interim trips, the system adds an End Empty event to a trip if the start of the next trip does not occur at the same location as the earlier trip’s last billable stop.
-
-
The commodities and quantities recorded on each stop
Trip assignments are not saved immediately, which lets you rearrange trips as much as you want. Assignments are saved when you click the Update button at the top of the window.
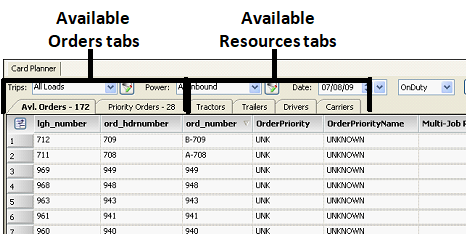
Common layout features
Because both the Card Planner and the Planning Worksheet are used to perform the same tasks, they use the same spreadsheet-style grids that allow you to look up available trips and available resources. These grids, shown as tabs across the upper part of the windows, display data based on user-defined restrictions sets, called views.
Available Orders tab
The Available Orders tab lists outbound trip segments that are ready for dispatch. This window can be considered a to-do list. Usually, it displays the trips that have not yet begun. A line of data is displayed for each trip segment listed. The Available Orders grid is shown here with sample data.

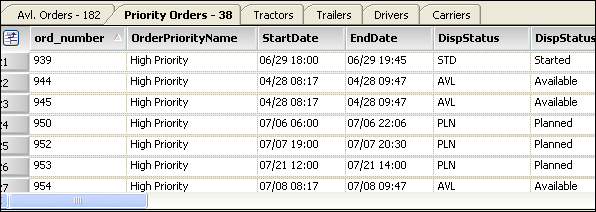
Priority Orders tab
The Priority Orders tab lists orders that were tagged as Highest Priority when they were saved in the Call On Demand Order Entry window. Use of priorities allows you to identify loads that require quick action.
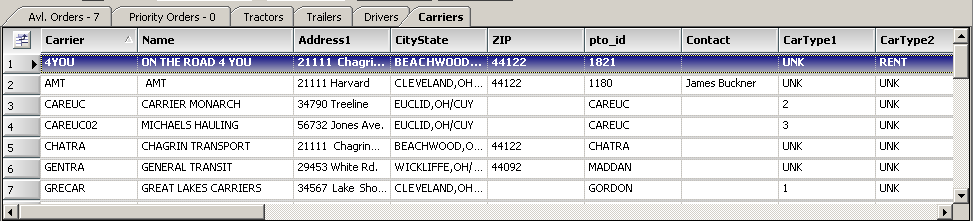
Available Resources tabs
The Available Resources tabs, also known as the Available Power tabs, are used to determine which resources are (or will be) available for dispatch in particular locations. There is a tab for each resource type. The data shown reflects information that is stored in the resources' profiles.
-
Tractors tab

-
Trailers tab

-
Drivers tab

-
Carriers tab
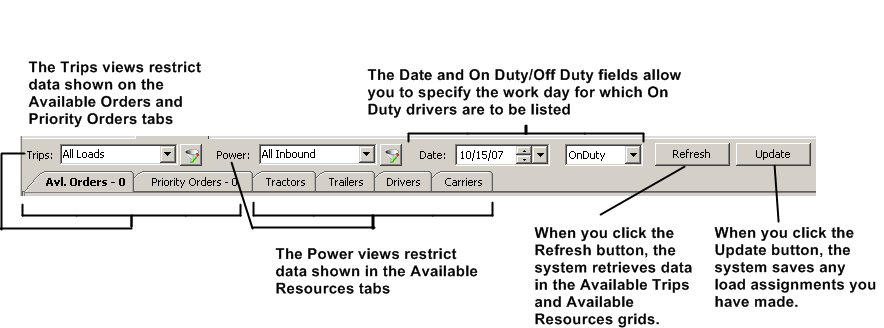
Retrieving and saving data
The fields and buttons shown at the top of the Card Planner and the Planning Worksheet allow you to:
-
Choose views to limit the display of data on the Available Orders tab and Available Resources tabs.
-
Specify the work date for which On Duty drivers are to be listed in the driver or resource planning area of the window.
-
Refresh data.
-
Save load assignments.
Accessing an order
When you double-click on a trip in the Card Planner or Planning Worksheet, Fuel Dispatch automatically opens the Call On Demand Order Entry window and displays order details. If needed, you can change data, as well as start or complete the trip. To return to the Card Planner or Planning Worksheet, you click the x in the upper right corner of the Call On Demand Order Entry window.