Viewing PeopleNet eDriver Logs entries
First available in Fuel Dispatch: 17.20
If you use PeopleNet Fleet Manager’s eDriver™ Log module, you can set up a single sign-on link from Fuel Dispatch to the Fleet Manager website. This allows you to view eDriver Log entries for your drivers, without the need to log into FleetManager.
Setting up the system to display eDriver Logs entries
To set up the system to use single sign-on access to view eDriver Logs entries, you must:
-
Identify valid duration values for driver logs shown in the PFM Browser cell.
-
Specify the number of days of data you want displayed.
-
Provide the information required to access PeopleNet eDriver Logs data.
-
Create the Company Planner board to display the information.
Setting driver log duration values
You use two INI settings to identify how many days of eDriver Logs data will be retrieved from PeopleNet Fleet Manager.
| INI setting | Use this setting to |
|---|---|
Identify the number of days for which driver logs are shown |
|
Identify the number of days of driver log data to retrieve in eDriver Logs |
Recording PeopleNet URL access information
Before creating the Company Planner board to display driver log data, you must provide the URL and password used to access the information.
-
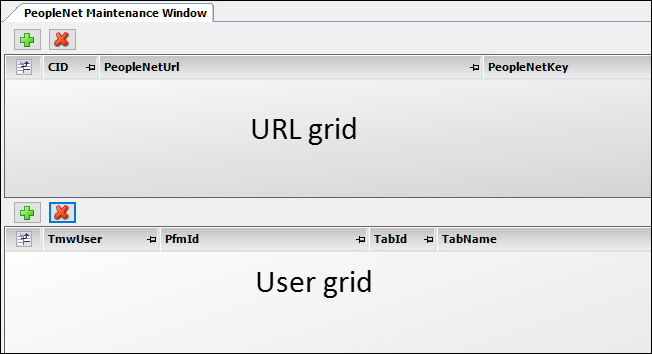
Go to Maintenance > PeopleNet Maintenance.
The PeopleNet Maintenance window is divided into two sections.
-
In the top section, you enter the web address and user login for the PeopleNet site you want to access.
-
In the bottom section, you associate a Trimble user with the PeopleNet login.
-
-
In the URL grid, click
 Add.
Add.
A blank row is added to the URL grid. -
Make entries in these fields:
CID
Enter the ID associated with the PeopleNet URL you use to access Fleet Manager.
PeopleNetUrl
Enter the PeopleNet Fleet Manager Single Sign-On URL you use to access PeopleNet.
Your PeopleNet representative provides this URL.
PeopleNetKKey
Enter the PeopleNet Fleet Manager access key required to access data from the Single Sign-On URL.
Your PeopleNet representative provides this key.
Note: When you tab out of the field, the key is encrypted.
-
Click
 Save.
Save. -
In the User grid, click
Add.
A blank row is added to the User grid. -
Make entries in these fields:
TMWUser
Select the ID of the user who can access PeopleNet Fleet Manager using these credentials.
PfmId
Enter the e-mail address of the user selected in the TMWUser field.
TabId
Enter the PeopleNet Fleet Manager tab ID.
Your PeopleNet representative provides this ID.
TabName
Enter the name of the PeopleNet Fleet Manager tab you want to access.
-
Click
Save.
Creating a Company Planner board to display eDriver Logs data
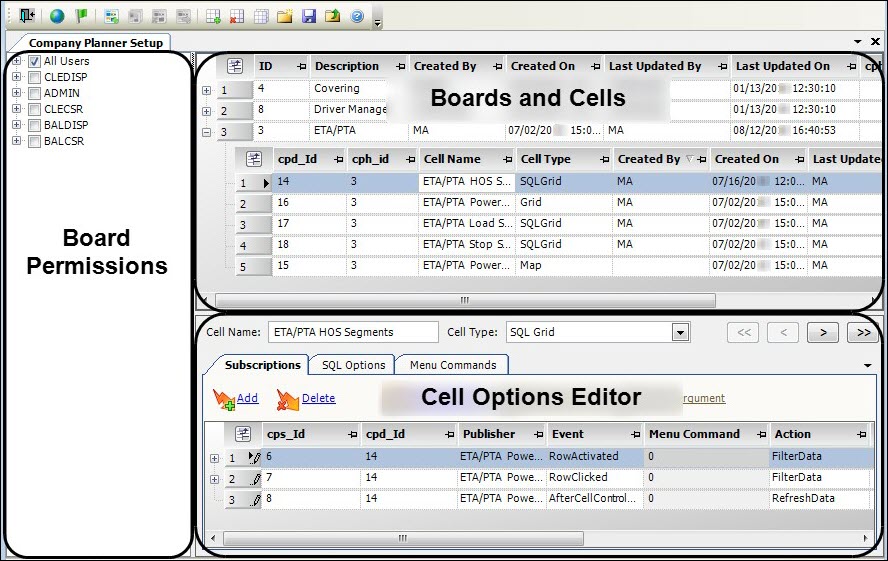
To make the eDriver Logs entries easily accessible, create a Company Planner board that will display log data for drivers. You create boards in the Company Planner Setup window.
|
To create the board for viewing eDriver Logs entries, follow these steps.
-
Go to Operations Maintenance > Company Planner Setup.
The Company Planner Setup window opens. -
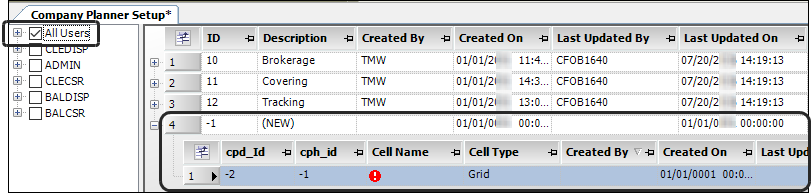
Go to Company Planner Admin > Add Board.
A new row appears in the Boards and Cells pane. By default:-
The Description field shows (NEW).
-
A single cell row is added, with the Cell Type set to Grid.
-
The new board will be available to all users.
Note: If you want, you can clear the All Users checkbox and select only your own user ID while you create and test the board. When the board is complete, you can give other users access to it. For details, see Specifying who can use the board.
-
-
In the Description field, enter a name for the board, for example eDriverLog.
-
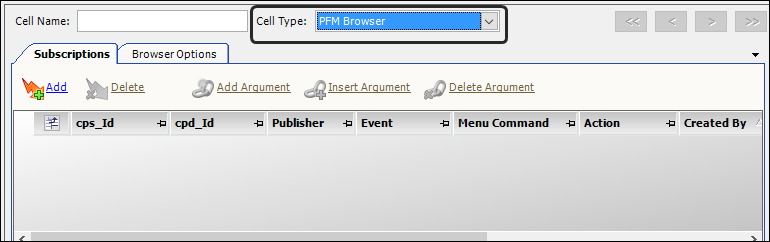
In the Cell Options Editor pane’s Cell Type field, select PFM Browser.
-
Select the Browser Options tab.
-
In the Header Details field, select the PeopleNet URL you created in the PeopleNet Maintenance window.
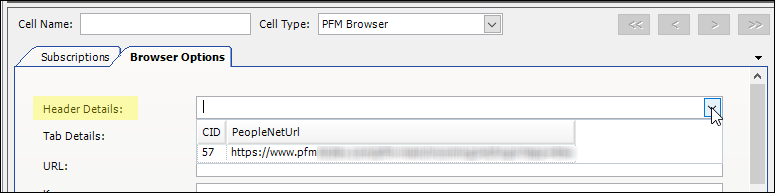
Your selection provides the entries in the URL, Key, and CID fields automatically. The values come from the information you entered for the URL in the PeopleNet Maintenance window.
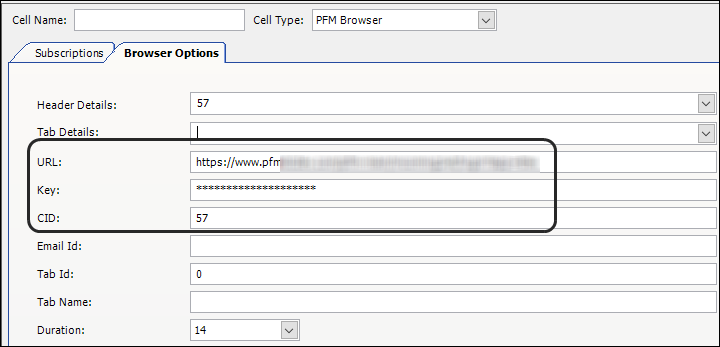
The Duration field shows the value recorded for the
[Misc]DriverLogDurationForPFMINI setting.Note: The Duration field drop-down list shows the values you recorded in the
[Misc]ValidDriverLogDurationValuesForPFMINI setting as options. -
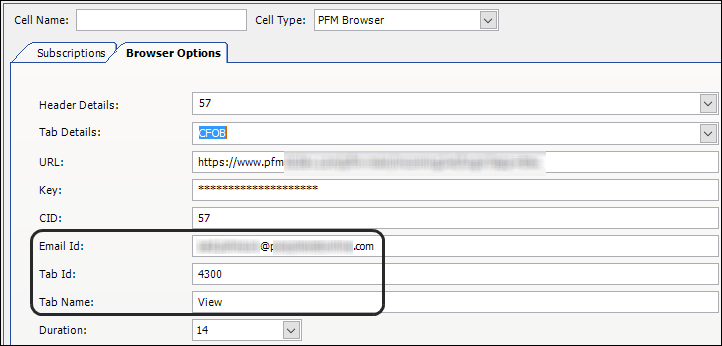
In the Tab Details field, select the user ID you associated with this PeopleNet URL in the PeopleNet Maintenance window.
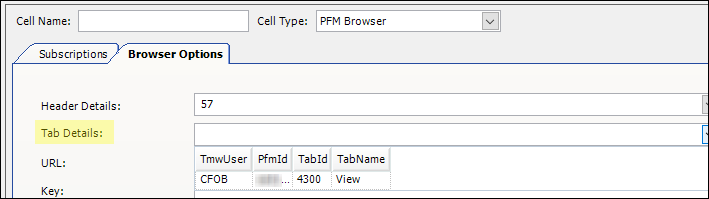
Your selection provides the entries in the Email Id, Tab Id, and Tab Name fields automatically. The values come from the information you entered for the user in the PeopleNet Maintenance window.
-
Click
 Save.
Save. -
Click
 Add Cell.
A new row appears in the Boards and Cells pane. The cell type defaults to Grid.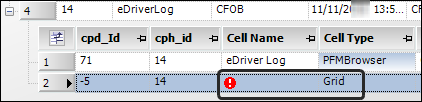
-
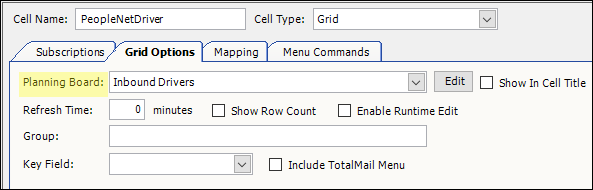
In the Cell Name, enter a name to identify the cell contents, such as PeopleNetDriver.
-
In the Cell Options Editor pane, select the Grid Options tab.
-
In the Planning Board field, select the Inbound Drivers option.
-
In the Boards and Cells pane, select the PFMBrowser cell.
-
In the Cell Options Editor pane, select the Subscriptions tab.
-
Click
 Add.
Add.
A blank row is added.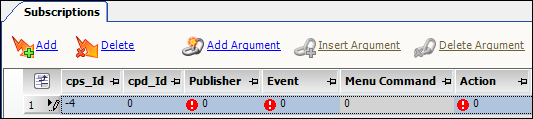
-
Make entries in the following fields:
Publisher
Select the cell you created in Step 10. In this example, it is the PeopleNetDriver cell.
Note: The field shows the cells in your board in a drop-down list.
Event
Select Row Activated as the event.
Action
Select RefreshData as the action.
-
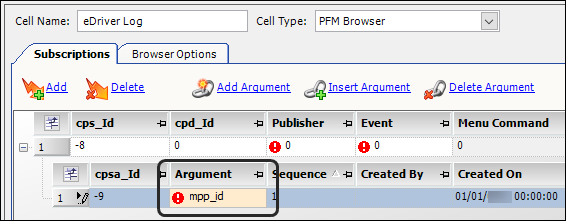
Click
 Add Argument.
A child row is added to the subscription. The system sets the sequence for the arguments to the order in which you add them. -
In the Argument field, enter mpp_id. This tells the system that the driver ID must be provided before the action can take place.
-
Click
Save.Note: If you cleared the All Users checkbox in the Board Permissions section of the window while creating the board, be sure to give other users access to it. For details, see Specifying who can use the board.
-
Click
 to exit the Company Planner Setup window.
Retrieving eDriver Logs data
To view your drivers' eDriver Logs entries, follow these steps.
-
Go to Application > Company Planner.
The list of available boards appears. -
Select the board created for viewing driver log data.
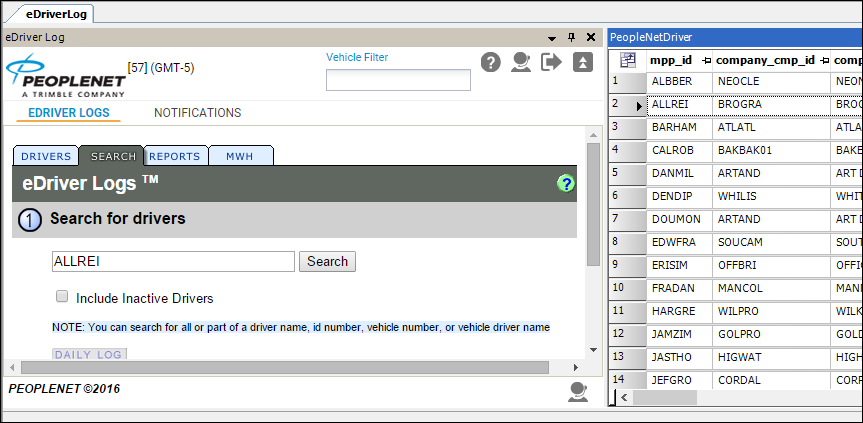
The board shows:-
The PeopleNet eDriver Logs web page on the left
The web page is fully functional. You can switch from one tab to another. For instructions on using the page, click
 Help on the web page, not in Fuel Dispatch.
 -
A list of your drivers on the right
-
-
Select a driver in the list on the right to view his/her log data.