Using reports in Fuel Dispatch
Fuel Dispatch ships with several default reports that can be printed and/or saved.
To run the default reports, you must have TMW Crystal Reports Redistributable installed. Your system administrator will install it when installing Fuel Dispatch. Once the reports are installed, settings in your TTS50 file tell the system where to find them.
|
Running default reports from a planning board
You can run any default report from the Card Planner Assignment Plan pane or the Planning Worksheet Assignment Plan pane.
| You can run reports from the Assignment Plan pane or the Card Planner Shift pane and the Planning Worksheet Resource pane. Other than where your cursor is placed when you right-click to access the shortcut menu, the process is the same. The steps below cover running reports from the Assignment Plan pane. |
-
From the Assignment Plan pane, right-click on a planned trip.
Note: The driver assignment must be saved before running the report. If it is not, the report does not show the order’s information.
-
From the shortcut menu, select Reports, and then select the report you want to run.
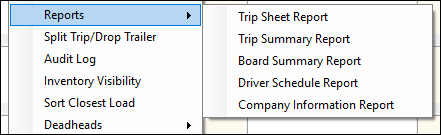
Note: If you select Company Information Report, the Company Information window opens. Enter the company ID and click Print in this window. The window remains opened.
The report viewer opens.
-
In the report viewer, use the tools to export, print, toggle group tree, go to, search, and zoom the report.

-
Click
 Close to exit viewer.
Note: If you selected the Company Information Report, click
Close or Cancel to exit the Company Information window.
Running default reports from the Reports window
To run a default report from the Reports window, follow these steps.
-
Go to Maintenance > Reports.
The Reports window opens. -
Make appropriate entries in the report settings fields.
Required field: *
Field Definition Inbound View *
The value must be a custom view for all reports except the Company Information Report. To define views, see Creating and managing views.
Outbound View *
The value must be a custom view for all reports except the Company Information Report. To define views, see Creating and managing views.
Start Date
The value defaults to the system current date and time. You can set the start date for the past or future.
-
Select the tab for the report you want to run. You can accept the default report settings values or enter your own.
-
Trip Summary
Enter the driver ID. -
Board Summary
No additional entries are needed. -
Driver Schedule
Enter an end date later than the Start Date value. These dates define the weeks the report will retrieve. -
Company Information
Enter the company ID.
-
-
Click View Report (or Print for the Company Information Report).
The report viewer opens. -
In the report viewer, use the tools to export, print, toggle group tree, go to, search, and zoom the report.
-
Click
Close to exit viewer.