Entering reference numbers
When you enter an order, you may need to record ID number(s) assigned to the order either by your customer or by your company. Such numbers are called reference numbers in TMWSuite and Fuel Dispatch. Common reference numbers are bill of lading numbers and purchase order numbers.
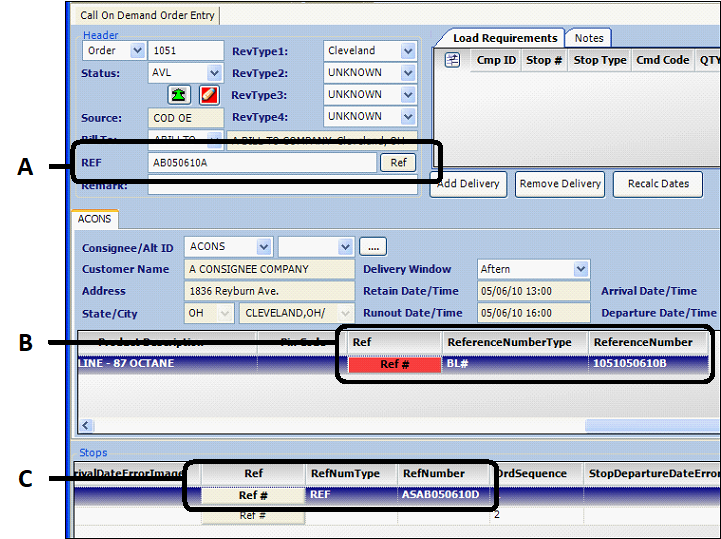
The illustration below shows order #1051 in the Call on Demand Order Entry window. The callouts show the three places on the screen where you can enter reference numbers. In this example, the Freight Detail and Stop Detail grids have been set up so that the reference number columns are visible. If you do not see the columns, use the grids' scroll bars to locate them.
You can add, edit, or delete one or more reference numbers for:
A |
The order header (applicable for reference number(s) that apply to the order as a whole, such as a purchase order number) |
B |
A specific commodity, that is, freight detail |
C |
A specific stop |
In the illustration above, note that the Ref# button for the freight detail is red. This means that multiple reference numbers have been recorded.
| Your company defines the types of numbers in the ReferenceNumber label, accessed in the System Administration application. |
Setting up how the system handles reference numbers
You can change the way the system handles order header, freight, or stop reference numbers for Fuel Dispatch by following the procedures in this section.
Allowing the sequencing of multiple reference numbers with keystrokes
The system allows you to record multiple reference numbers to the order header, freight detail, and stop detail. A sequence number is assigned to each reference number in the list. The reference number with a Seq # of 1 displays on the order header, the freight detail, and the stop detail without any additional user action, that is, selecting the Ref button to open the reference numbers grid. This can significantly reduce data entry and lookup time.
By default, a user can change the sequence order of multiple reference numbers by using the mouse to drag and drop the rows to the desired location in the list. The [Misc]AllowReferenceNumberSequenceChangeByKeyStroke setting in your TTS50 allows the user to change the sequence by using the keyboard to edit the sequence number.
Requiring reference numbers for specific Bill To’s
In File Maintenance, the Company Order Requirements window can be used to require that order header reference numbers for Bill To’s be entered before an order can be saved with specified statuses. By default, the system checks for those requirements and, when met, allows the user to save the order.
The Reference Numbers tab of the Company Order Requirements window is used to enter requirements for the type of reference number(s) recorded on the order.

The [FuelDispatch]ReferenceNumberValidityChecks setting disables that functionality and allows an order to be saved without the required order header reference numbers for specific Bill To’s.
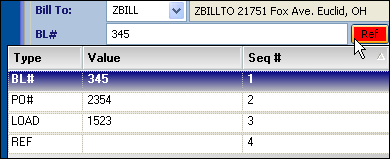
Recording order header reference numbers
To enter one or more reference numbers on the order header, follow these steps.
-
Go to Application > Call On Demand Order Entry.
By default, the Call On Demand Order Entry window is shown as read-only. -
Do one of the following:
-
Add a new order by clicking
 New.
New. -
Open an existing order by entering an order number, and then clicking
 Open.
Open.
-
-
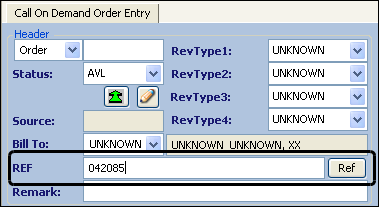
Enter the order header reference number.
Show meThis sample shows the reference number type is REF. Your system might be configured to show another type, such as PO#.
-
If necessary, change the reference number type, shown as the field name.
-
Click the Ref button.
The multiple reference number grid is shown.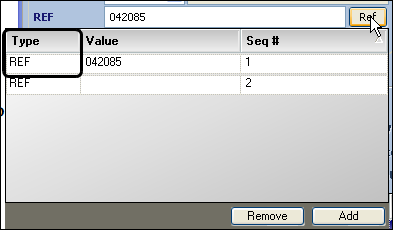
-
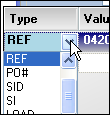
Select the correct reference number type from the drop-down list.
-
To close the multiple reference number grid, do one of the following:
-
If your system is set up to use the mouse for entering reference numbers, click anywhere on the Call On Demand Order Entry window.
-
If your system is set up to use the keyboard for entering reference numbers, press ESC.
-
-
-
If appropriate, enter multiple reference numbers.
-
Click the Ref button.
The multiple reference number grid is shown with the first reference number at Seq # 1.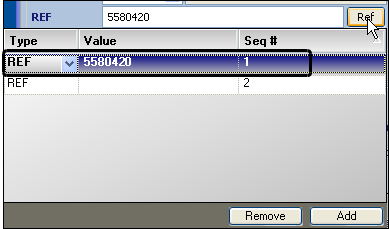
-
If an empty row is not shown, click Add.
-
Select the reference number type from the drop-down list.
-
Enter the order header reference number.
-
Repeat Steps b though d to continue adding reference numbers.
-
If necessary, identify which number should automatically display on the order header.
-
To close the multiple reference number grid, do one of the following:
-
If your system is configured to use the mouse for entering reference numbers, click anywhere on the Call On Demand Order Entry window
-
If your system is configured to use the keyboard for entering reference numbers, press ESC.
-
Note: The Ref button turns red when multiple reference numbers are recorded.
-
-
Continue with entering or editing the order.
| When a reference number has been recorded on the order header, you can use the reference number to look up the order. For details, see Using a reference number to look up an order. |
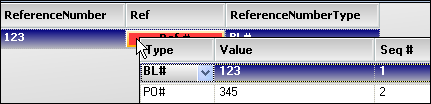
Recording freight reference numbers
By default, you enter freight reference numbers associated with an order’s commodity using the multiple reference number grid. You can enter a single reference number or multiples.
You can also set up your system to allow you to record freight reference numbers directly in the Freight Detail grid.
Using the multiple reference number window
To record one or more freight reference numbers associated with an order’s freight detail, follow these steps.
-
Go to Application > Call On Demand Order Entry.
By default, the Call On Demand Order Entry window is shown as read-only. -
Do one of the following:
-
Add a new order by clicking
New. -
Open an existing order by entering an order number, and then clicking
Open.
-
-
Click the Ref button in the commodity’s freight detail.
The multiple reference number grid opens.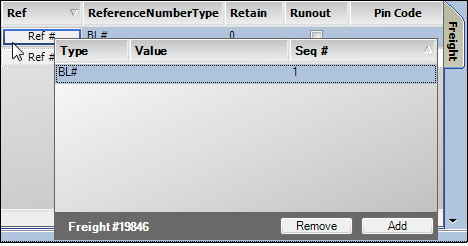
-
If the Type is not what you want, click in the field and select the correct option from the drop-down list.
-
In the Value field, enter the reference number.
-
If you are done, do one of the following:
-
If your system is set up to use the mouse for entering reference numbers, click anywhere on the Call On Demand Order Entry window. The multiple reference number grid closes.
-
If your system is set up to use the keyboard for entering reference numbers, press ESC.
-
-
If you need to enter multiple reference numbers, click Add.
-
Make appropriate entries in the Type and Value fields.
-
If necessary, identify which number should display on the grid.
-
Close the multiple reference number grid.
Note: The Ref button turns red when multiple reference numbers are recorded.
-
-
Continue with entering or editing the order.
-
Save the order.
Note: Reference numbers do not display in the freight detail grid until the order is saved.
This example shows that multiple numbers were entered (red button), but the columns will not be populated until the order is saved.

Using the editable FreightReferenceNumber fields
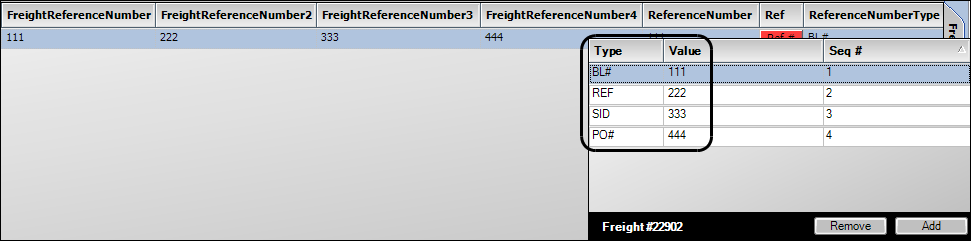
You can set up your system to add four reference numbers directly in the Freight Detail grid.
![]()
Setting up the system to record freight reference numbers in the Freight grid
List up to four reference number types in the [FuelDispatch]FreightGridReferenceNumTypes setting in your TTS50.
Recording freight reference numbers in the Freight grid
By default, FreightReferenceNumber, FreightReferenceNumber2, FreightReferenceNumber3 and FreightReferenceNumber4 do not appear in the Freight Detail grid. You must add them using the Freight grid’s Field Chooser.
The fields are editable so you can add or change reference information directly in the grid.
| Changes you make to grids are temporary. If you want to view the FreightReferenceNumber fields each time you access Call On Demand Order Entry, save your grid layout. |
Follow these steps to add freight reference numbers.
-
Go to Application > Call On Demand Order Entry.
By default, the Call On Demand Order Entry window is shown as read-only. -
Do one of the following:
-
Add a new order by clicking
New. -
Open an existing order by entering an order number, and then clicking
Open.
-
-
Make appropriate reference number entries in the FreightReferenceNumber fields.
The multiple reference number grid displays how reference number types are mapped to FreightReferenceNumber fields on the grid. For example, when
FreightGridReferenceNumTypes=BL#,REF,SID,PO#:-
Reference number type BL# maps to the FreightReferenceNumber field.
-
Reference number type REF maps to the FreightReferenceNumber2 field.
-
Reference number type SID maps to the FreightReferenceNumber3 field.
-
Reference number type PO# maps to the FreightReferenceNumber4 field.
-
-
Continue with entering or editing the order.
-
Save the order.
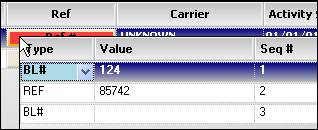
Recording stop reference numbers
To record one or more reference numbers associated to an order’s stop detail, follow these steps.
-
Go to Application > Call On Demand Order Entry.
By default, the Call On Demand Order Entry window is shown as read-only. -
Do one of the following:
-
Add a new order by clicking
New. -
Open an existing order by entering an order number, and then clicking
Open.
-
-
Select the appropriate Ref button in the Stop Detail grid.
The multiple reference number grid is shown.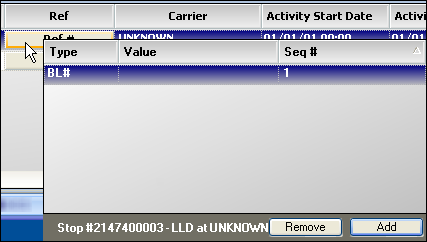
-
If the Type is not what you want, click in the field and select the correct option from the drop-down list.
-
In the Value field, enter the reference number.
-
If you are done, do one of the following:
-
If your system is set up to use the mouse for entering reference numbers, click anywhere on the Call On Demand Order Entry window. The multiple reference number grid closes.
-
If your system is set up to use the keyboard for entering reference numbers, press ESC.
-
-
If you need to enter multiple reference numbers, click Add.
-
Make appropriate entries in the Type and Value fields.
-
If necessary, identify which number should display on the grid.
-
Close the multiple reference number grid.
Note: The Ref button turns red when multiple reference numbers are recorded.
-
-
Continue with entering or editing the order.
-
Save the order.
Note: This example shows multiple numbers were entered (red button), but the columns will not be populated until the order is saved.
Identifying the main reference number when multiple numbers are recorded
When multiple reference numbers are recorded, you can use this procedure to change the sequence of the numbers. The reference number with a Seq # of 1 can be considered the main number and displays on the order header, Freight Details or Stop Details grid without any additional user action, that is, selecting the Ref button to open the reference numbers grid.
-
Go to Application > Call On Demand Order Entry.
By default, the Call On Demand Order Entry window is shown as read-only. -
Do one of the following:
-
Add a new order by clicking
 New.
New. -
Open an existing order by entering an order number, and then clicking
Open.
-
-
Select the appropriate Ref button in the order header, freight detail or stop detail grid.
The multiple reference number grid is shown.Note: The Ref button turns red when multiple reference numbers are recorded.
Order header:
Freight detail grid:
Stop detail grid:
-
Do one of the following:
If your system is configured to use the mouse for working with reference numbers:
-
Click and drag the main reference number row to the top of the list.
The Seq # changes to 1. -
Click anywhere on the Call On Demand Order Entry window to close the multiple reference number grid.
If your system is configured to use the keyboard for working with reference numbers:
-
In the Seq # field of the main number, change the number to 1.
-
Press ENTER.
The selected reference number moves to the top of the list. -
Press ESC to close the multiple reference number grid.
-
-
Continue with entering or editing the order.
-
Save the order.