Using the Learned Autoloading method
The Fuel Dispatch Trailer Autoloading feature helps dispatchers load trailers to maximum capacities. This can increase trailer revenue while helping avoid fines related to overweight loads and axle overloading.
Trailer Autoloading is used in the Fuel Dispatch application. The required setup is performed in TMWSuite’s System Administration and File Maintenance applications. For information on setting up your system, see the Learned Autoloading Setup guide.
|
Learned Autoloading maintains trailer-loading profile history (commodities, tank loading sequences, and volumes on a given trailer). When you create an order, the system looks for a profile that matches your load entries. If it finds a match, the system automatically loads the trailer compartments in the Trailer Autoload window after you assign assets to an order and save the planned order. This simplifies finding a suitable trailer for a trip. It also:
-
Prevents saving an assignment when a gross vehicle weight exceeds a set limit, and commodity weight or volume exceeds a compartment’s capacity.
-
Compares a trailer’s percentage of loading to a user-specified minimum value, based on compartment volume and notifies you that you are not meeting the trailer’s capacity.
Learned Autoloading - accessing the Trailer Autoload window
The Trailer Autoload window opens when you save the asset assignment for an order. It opens only when the order has a Planned status.
To open the Trailer Autoload window, do one of the following
In Call On Demand Order Entry
-
Open an available order.
-
In the Stops grid, locate the Driver, Tractor, and Trailer columns. Assign the desired assets.
-
Click
 Save.
Save.
Note: When a trip is in Planned status, you can open the window in Call On Demand Order Entry by clicking ![]() Trailer Autoload below the Load Requirements tab.
Trailer Autoload below the Load Requirements tab.
Reviewing the Learned Autoloading data
The [FuelDispatch}AutoloadMethod setting determines how the system fills the trailer compartments with commodities. When using the Learned Autoloading method, the default option applies.
[FuelDispatch]AutoloadMethod=1
Commodities are not loaded automatically. The commodity and volume for each compartment must be entered manually.
|
If a trailer-loading profile exists for the commodity load specifications on your order, the system automatically loads the trailer compartments in the Trailer Autoload window, after you assign assets to the order and save the planned order. |
Review the data in each section of the window to determine that the loading is efficient.
-
In the Trailer Information pane, look for an autoload ID number in the Trailer Autoload ID field.
-
When the Trailer Autoload ID field is populated
If the trailer(s) has been used on a previous order transporting the same commodity and quantity, this field shows the ID of that assignment.
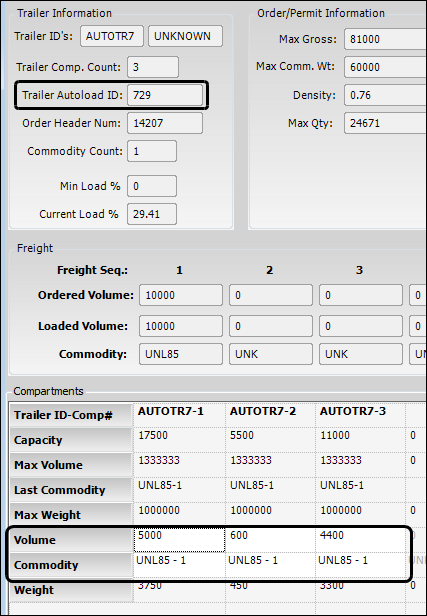
The Volume and Commodity fields in the Compartment pane are populated with the loading sequence from the matching trip.
If no Weight fields are shaded in orange, you can:
-
Accept this trailer loading profile as-is.
-
Edit a Volume field to autoload a greater or lesser volume than is currently displayed in the field. Your system setup must allow this.
-
Rearrange the order of commodities in the compartments.
-
Notes:
-
You can view details on the loading information associated with this ID. Go to Maintenance > Trailer Autoload Maintenance. The Trailer Autoload Maintenance window shows the volumes loaded in each of the trailer compartments on the previous trips.
-
You can find the orders associated with this ID. Go to Maintenance > Trailer Compartment History. The Trailer Compartment History window shows the order header numbers of the previous trips.
-
-
When the Trailer Autoload ID field is blank, you must enter the volumes and commodity in the Compartment pane manually.
-
In the Compartments pane, review the entries in the Volume and Commodity fields for each trailer compartment. Edit the fields as needed.
Field definitionsVolume
Enter the volume to be loaded into each compartment
The Totals column displays the total volume loaded for all compartments.
Commodity
Select the commodity ID of the commodity loaded into each compartment
As you make entries in the Volume and Commodity fields, the system calculates the value shown in the Weight field as:
Commodity Volume * Density
If planned compartment loading exceeds the weight limit of an axle group initially, or after you modify compartment volumes, the corresponding Weight field turns orange.
Show me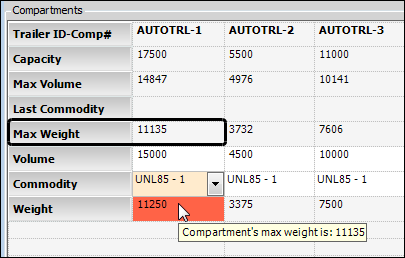
To view the weight capacity of the compartment, move the cursor over the Weight field.
Notes:
-
You cannot enter a volume greater than the Max Volume amount.
-
If the weight is too heavy for a compartment, the associated Weight field turns red, and the system will not allow you to save the compartment load.
The rest of the fields in this pane are read-only.
Field definitionsTrailer ID-Comp#
The trailer ID and trailer compartment number
Capacity
The volume capacity of the trailer compartment
Max Volume
Maximum volume that can be loaded into each compartment
The Totals column displays the total maximum volume for all commodities.
Last Commodity
If the trailer has been used on a previous order that was started or completed, this field shows the commodity IDs for that order loaded into each compartment.
This is for informational purposes only.
Max Weight
Maximum weight that can be carried in that compartment
Weight
The weight of the commodity in that compartment
The commodity weight equals the compartment volume multiplied by the density of the commodity
The value is determined by your entries in the Volume and Commodities fields.
-
-
Review the information in the rest of the fields in the Trailer Information pane.
Field definitionsTrailer ID’s
Trailer ID of the lead trailer and pup trailer (if applicable)
Trailer Comp. Count
Total number of compartments in the lead trailer and pup trailer
Order Header Num
Order number
Commodity Count
Number of commodities on the order
Min Load %
Minimum load capacity required
If 0, no minimum has been set.
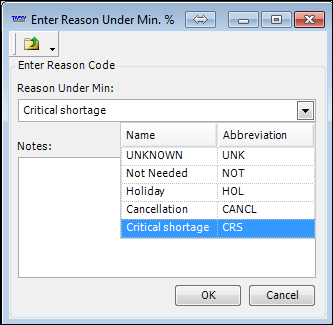
When a trailer is loaded with less than the minimum percentage, the Reason Under Min % window opens when you attempt to save. After you enter the reason code, you can save the order.
Note: You use the
[FuelDispatch]MinimumLoadedPercentsetting in your TTS50 to specify the minimum percentage.For details, see Tracking loads below a minimum loading percentage in the Learned Autoloading Setup guide.
Current Load %
Percentage of compartment capacity that is loaded
It is calculated as:
Sum of Ordered Weight Sum of Trailer Max Weight
-
Review the fields in the Order/Permit Information pane.
Fields updated by volume and commodity entriesThe values in these fields are based on the entries in the Volume and Commodity fields in the Compartment section.
Density
The commodity’s density value
If a trip includes more than one commodity with different densities, this is a weighted average.
Max Qty
Total volume of commodity that will fit in the trailer
If the load volume equals the trailer’s maximum volume capacity, the field displays the maximum volume capacity.
If not, the system performs these volume calculations and displays the lesser value:
Max Comm Wt ÷ Density
or
(Max Gross - Driver/Cushion - Tractor Tare - Trailer Tare) ÷ (Lbs/Gal)
Commodity
Total commodity weight, calculated as:
Commodity volumes on the order × Average density value
Total Gross
Total loaded weight, calculated as:
Driver/Cushion + Tractor Tare + Trailer Tare + Commodity
Over/Under
Amount by which the total loaded weight exceeds or falls below the maximum permitted weight
The over/under amount is calculated as:
Total Gross - Max Gross
-
If the weight falls below the maximum permitted weight, it displays as a negative number.

-
If the weight exceeds the maximum permitted weight, the field background is orange.

Note: You use the
GVWMarginofErrorGeneral Info Table setting to specify the maximum amount by which a load’s total weight can exceed the maximum gross weight.Fields unchanged by volume and commodity entriesThe values in these fields are unchanged by your entries in the Compartments pane:
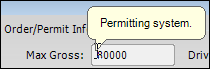
Max Gross
The maximum permissible gross weight of the tractor, trailer(s) and load
-
When the Permitting license is applied to your database, Max Gross is fixed at 80,000.
-
When the Permitting license is not applied to your database, Max Gross is determined by the following logic, and may exceed 80,000.
-
If both the tractor Gross and trailer Gross are greater than 80,000, Max Gross equals the lesser of the values.
-
If either the tractor Gross or trailer Gross is less than 80,000, then the Max Gross equals 80000.
When you position the cursor over the Max Gross field, a ToolTip indicates how the system determined the amount shown.
Note: You record tractor and trailer gross weights in the tractor and trailer profiles in File Maintenance.
Max Comm. Wt
Maximum allowable commodity weight for all trailer compartments
Driver + Cushion
Weight of the driver plus a small reserve
Note: For the Learned Autoloading method, this value is permanently set to 250 pounds.
Tractor Tare
Tractor’s tare weight, from the Total Tare field in the tractor profile
Trailer Tare
Total tare weight for all trailers on the trip, from the Tare field in each trailer’s profile
-
-
Click OK.
-
If your company tracks underloaded trailers, and the Trailer Autoload window’s Current Load % field is less than the Min Load % field, the Enter Reason Under Min % window opens.
Show me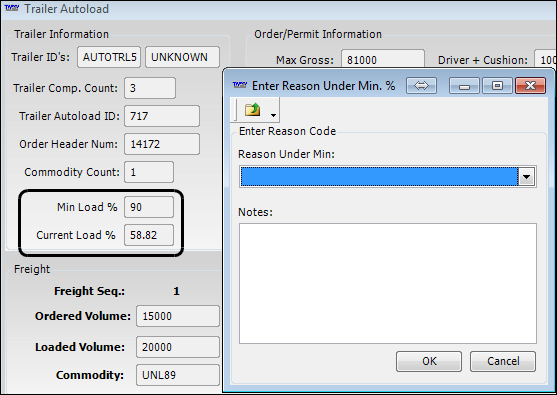
Do one of the following:
-
To return to the Trailer Autoload window and modify the compartment loading, click Cancel.
-
To finish planning the order as-is:
-
Click the Reason Under Min drop-down list and select a reason.
-
If you want, enter a note in the Notes area.
-
-
-
Click OK.
Note: If you click OK without entering a reason, an error message opens indicating that you must select a reason code. Click OK to close the error message, then complete and close the Enter Reason Under Min % window.
-
Click
 Save.
Save. -
To ensure that drivers receive the autoloading information for their assignments, you can use:
-
A customized trip sheet report
The trip sheet identifies the compartment-loading configuration for the trailer assigned to a trip. For assistance in creating a custom report format, contact TMW Support to submit a service request.
-
A customized TotalMail load assignment
The load assignment form identifies the compartment-loading configuration for the trailer assigned to a trip. For assistance in creating a custom form, contact TotalMail Support to submit a service request.
-
Viewing a trailer’s compartment history
You can view a trailer’s history of order numbers, Autoload ID numbers, and commodities that were transported in the trailer’s compartments. This information is read-only.
-
In Fuel Dispatch, go to Maintenance > Trailer Compartment History.
The Trailer Compartment History window opens.Show me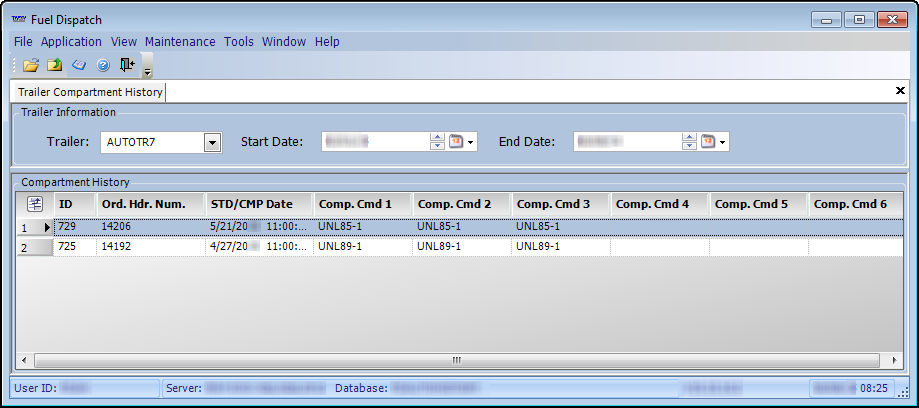
-
Select a trailer from the Trailer drop-down list.
-
In the Start Date and End Date fields, specify a date range.
-
Click
 Open.
Open.
The grid displays trips matching your restrictions. The ID field displays the Autoload profile ID number.
Maintaining Autoload configuration profiles
In the Fuel Dispatch Trailer Autoload Maintenance window, you can view a specific trailer’s Autoload profiles. If needed, you can delete profiles. You cannot edit individual profiles in this window.
-
Go to Maintenance > Autoload Maintenance.
The Trailer Autoload Maintenance window opens.Show me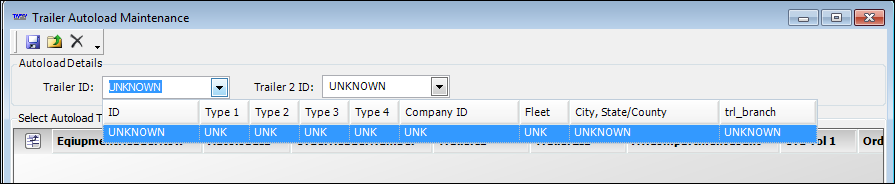
-
In the Trailer ID field, use the drop-down list to enter the ID of the primary trailer.
Note: If needed, do the same in the Trailer 2 ID field.
-
Press the TAB key.
The grid displays the trailer’s Autoload profiles.Show me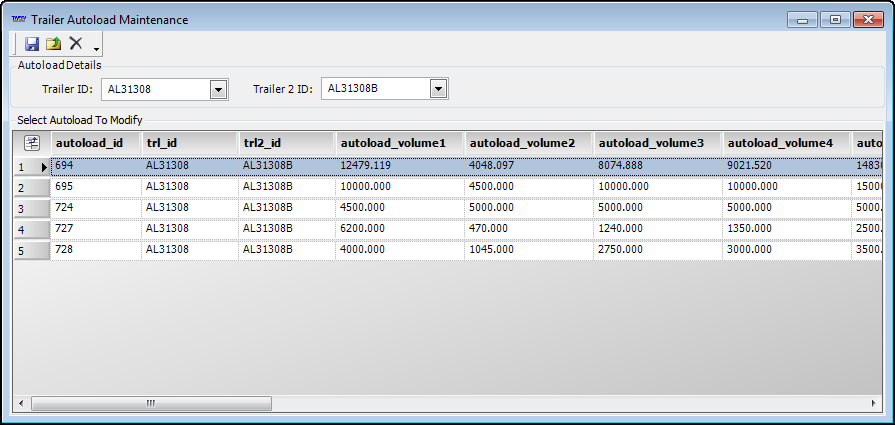
-
Click the autoloading profile you want to delete.
Note: You must select profiles individually. You cannot select multiple rows for mass deletion. -
Click
 Delete.
 -
Click
 Save.
Save.