Setting up board security
In Fuel Dispatch, dispatchers assign trips to resources using the Card Planner or Planning Worksheet. These windows serve as planning boards. By default, all dispatchers can see and plan all trips on these boards.
However, it is common for companies to divide work by terminal, with each terminal handling its own order entry and planning duties. In some companies, workload is further divided by fleet. Therefore, you may need to place restrictions on what dispatchers can see and do regarding loads that belong to other terminals/fleets. In Fuel Dispatch, restrictions are composed of permission types and one or two levels of board security.
Permissions can be set up for individual users and/or user groups. There are three permission types:
-
Read/Write
Dispatchers can see and plan all loads for all terminals/fleets on the planning boards. They can edit any order for any terminal/fleet on the Call on Demand Order Entry window. -
Read Only
Dispatchers can see all loads on the planning boards, but orders for restricted terminals/fleets are grayed out and cannot be planned.In the Call on Demand Order Entry window, dispatchers cannot edit an order created by a restricted terminal/fleet, as indicated by the grayed-out fields.
-
No Access
On the planning boards, dispatchers cannot see loads belonging to restricted terminals/fleets. On the Call on Demand Order Entry window, they cannot edit an order created by a restricted terminal/fleet.
Fuel Dispatch provides you with your choice of one or two levels of board security:
-
Level 1: Basing board security on terminal
Permissions are based on the terminal. This means the system checks the terminal on an order and then applies the permission level assigned to the user for that terminal.
Show me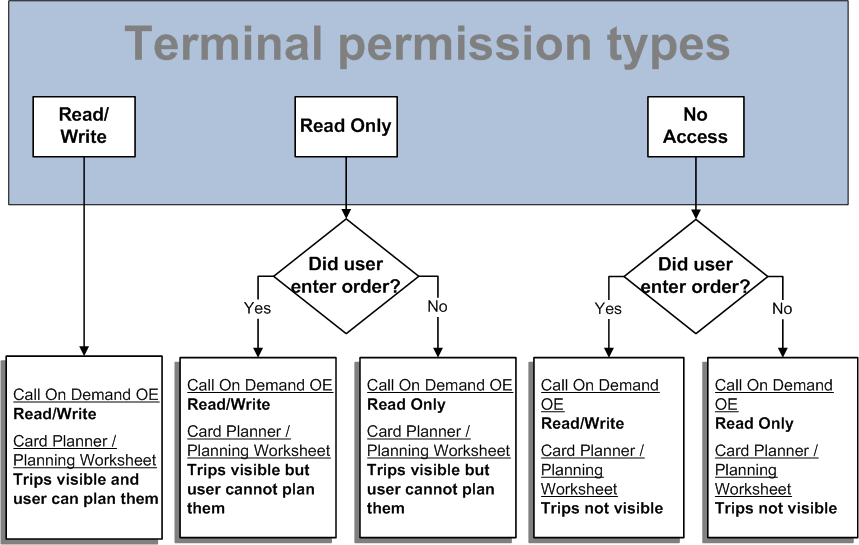
-
Level 2: Basing board security on terminal and fleet
Permissions are based on terminal and fleet. This means that the system checks both the terminal and the fleet recorded on the order. After comparing the user’s permission levels for both terminal and fleet, it applies the permission level that is the more restrictive of the two.
Show me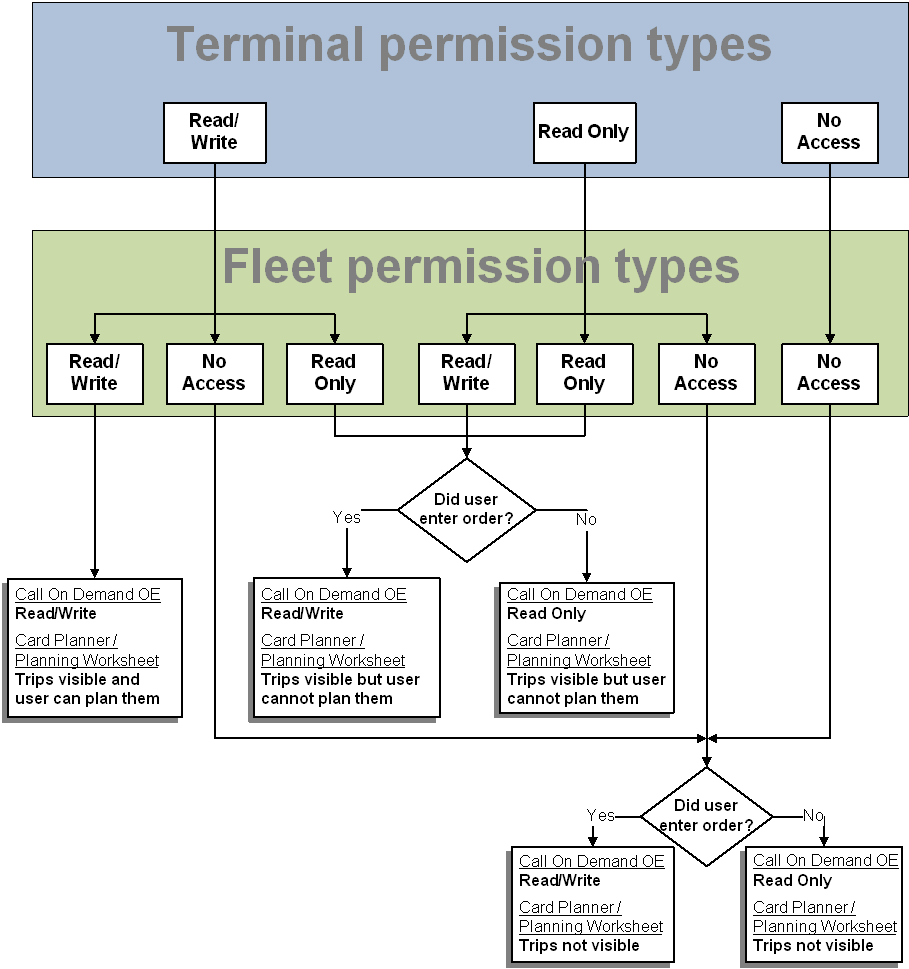
Setup for the board security feature involves these steps, which must be done in the sequence shown here:
-
Set up labels for board security.
Terminals are set up in one of the four user-defined RevType labels in the label file. Fleets also are set up in one of the RevType labels.
Note: When a user creates an order in the Call on Demand Order Entry window, their RevType entries determine the security to be applied for that order.
-
Assign permissions to users.
When you activate board security, all permissions for all users are set to No access by default. Therefore, you must complete the assignment of board-level security before you enable it.
-
Use the
[FuelDispatch]BoardSecurityINI setting to activate the feature.
Setting up labels for board security
To enable you to retain the categorizations and terms your company uses, TMWSuite allows you to define many fields yourself. Such user-defined fields are called labels. You use these fields to categorize data in ways that make sense for your business environment. User-defined field names and options are set up in the label file, which is accessed in System Administration.
In Fuel Dispatch, relationships between a user or group and a terminal or fleet, as identified in the TMWSuite label file, provide a board-level security. This security allows terminal managers, dispatchers, or schedulers to view specific boards with read/write, read only, or no security access to orders for planning or editing in the Card Planner, Planning Worksheet, and Call on Demand Order Entry windows.
In Fuel Dispatch, the following labels have a special function.
-
RevType1-4
-
Terminal
-
Fleet
Setting up RevType/Terminal relationships
In Fuel Dispatch, two labels are used to identify your company’s terminals:
-
RevType1- 4
When you create an order, you assign a RevType value to it to indicate the terminal with which the order is associated. By default, the system uses RevType1. However, you can use the
[FuelDispatch]TerminalRevTypeINI setting to identify one of the other RevTypes as terminal -
Terminal
The Terminal field exists on driver, tractor, and trailer profiles. You use it to identify the terminal to which a resource belongs.
Because both labels identify your terminals, each RevType value must be identical to a Terminal value.
Use this procedure to set up the labels.
-
Access the label file in System Administration.
For details on accessing and making entries in the label file, see:Guide: System Administration | Chapter: Using the label file to customize fields
-
In the appropriate RevType label, make entries for your terminals.
-
Before you exit the RevType label, make a note of what you entered for each terminal in these fields:
-
Description
-
Abbr
-
Code
-
-
In the Terminal label, make entries exactly as you did for the RevType.
-
Click Save.
Setting up RevType/Fleet relationships
Fleets are subdivisions within your terminals. In Fuel Dispatch, two labels are used to identify fleets:
-
RevType1- 4
When you create an order, you assign a RevType value to it to indicate the fleet with which the order is associated. By default, the system uses RevType2. However, you can use the
[FuelDispatch]FleetRevTypeINI setting to identify one of the other RevTypes as fleet. -
Fleet
The Fleet field exists on driver, tractor, and trailer profiles. You use it to identify the subdivision to which a resource belongs.
Because both labels identify your terminals, each RevType value must be identical to a Fleet value.
To set up the labels, follow these steps.
-
Access the label file in System Administration.
For details on accessing and making entries in the label file, see:Guide: System Administration | Chapter: Using the label file to customize fields
-
In the appropriate RevType label, make entries for your terminals.
-
Before you exit the RevType label, make a note of what you entered for each terminal in these fields:
-
Description
-
Abbr
-
Code
-
-
In the Fleet label, make entries exactly as you did for the RevType.
-
Click Save.
Assigning or changing a permission level for a user or user group
Use this procedure to assign or change a permission level to dispatchers as a user or user group. Permission levels can be established for terminal and fleet relationships.
|
If all terminals or fleets are listed in the No Access pane, no security has been applied for the selected user or group. In this case, the selected user or group:
|
-
Go to Maintenance > User/Terminal Relations.
The User/Group Maintenance window is displayed. -
Under Permissions Type, select one of the following:
-
User Terminal or Group Terminal
Show me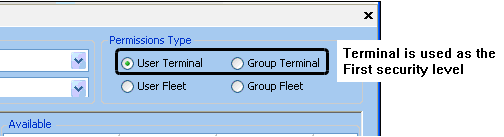
-
User Fleet or Group Fleet
Show me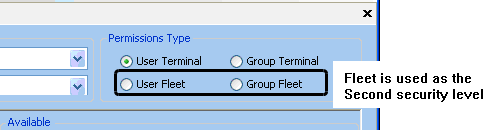
-
-
Under Permissions, in the User field, select the user or group to assign.
The drop-down list includes only the users or groups granted access to the TMWSuite database. -
Click
 Open or press ENTER.
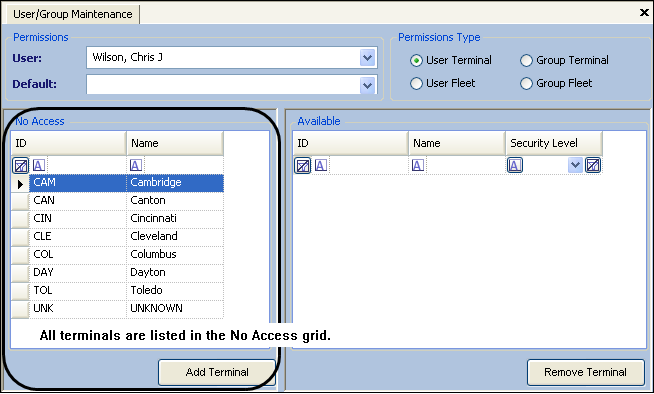
The No Access and Available panes are populated according to the Permissions Type and user or group selected.No assignments madeThis illustration shows the settings for:
-
Permissions Type = User Terminal
-
User = Chris J Wilson
No board security has been assigned.
 Assignments made
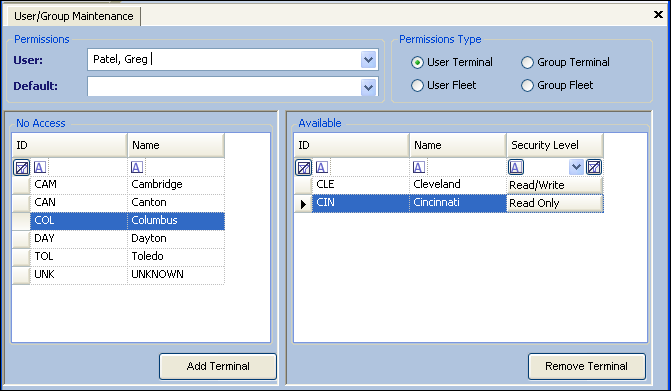
This illustration shows the settings for:
-
Permissions Type = User Terminal
-
User = Greg Patel
The user was assigned Read/Write access to the Cleveland terminal, and Read Only access to the Cincinnati terminal.
-
-
Add a terminal or fleet.
-
In the No Access pane, select the terminals or fleets to which the user or group should have access.
Notes:
-
You can use the CTRL and SHIFT keys to highlight more than one at a time.
-
If the list is too long, you can filter the data on the ID or Name column.
-
-
Click Add Terminal or Add Fleet.
The terminal or fleet is moved from the No Access pane to the Available pane with the Security Level of Read/Write.
-
-
For each terminal or fleet, select the appropriate security option.
The selections take effect immediately.-
Under No Access, select the terminals or fleets to which the user or group should have access.
-
Click in the Security Level cell to cycle through to the appropriate security option.
The selections change from Read/Write to None to Read Only to Read/Write, etc.
Notes:
-
Changing the security level to None is the same as removing the terminal or fleet from the Available pane to the No Access pane.
-
To help you make the correct selection, refer to Setting up board security.
-