Setting up views for scroll windows
The scroll views determine which fields in which data tables are used as restrictions for a scroll window, as well as which ones will be listed as columns in the window’s data retrieval grid. Although the system is installed with one view for each scroll window, a Trimble system administrator can use SQL to enhance those views or create new views to meet each user’s needs.
Any scroll window can be customized using the Quick Designer and Field Chooser to change and save the window and grid layouts.
When you design a window layout, you can:
-
Apply security to fields or parts of windows by making them read-only or hidden.
-
Make data entry efficient by moving fields or changing the tabbing order.
-
Add, reposition, or remove detail tabs.
-
Assign the layout to individual users and/or user groups.
When you design a data grid layout, you can:
-
Use Field Chooser to show only the columns that apply to your business.
-
Reposition columns to allow users to see data in a logical order.
-
Apply default sorts and filters so that data is ready for review immediately upon users' access.
-
Assign the layout to individual users and/or user groups.
However, if you want greater flexibility and control of the data retrieved by the default scroll views, the view definition feature provides you with this functionality. You can create your own SQL scroll view to retrieve additional table columns and to run nested queries that return aggregate or calculated data.
For the restriction area of a scroll window, the view definition feature allows you to:
-
Use SQL and Quick Designer to add field restrictions that were not included in the system default version of the window.
-
Set default values for particular restriction fields.
For the data retrieval grid, the view definition feature allows you to:
-
Use SQL to add columns that were not included in the system default version of the window.
-
Include additional record data that displays when the data row is expanded. This data is sometimes referred to as "nested" data. A nested view is a view within a view. The primary view provides you with the "top layer" of data for a record. A nested view then takes that record and provides detail from related tables that are joined by a primary key.
-
Assign custom column headings.
You can create one customized view and assign it as the company-wide default. Or you can create multiple versions of a scroll window by setting up multiple views for it. You can then assign specific views to the users or user groups for whom you customized them.
The high-level process for working with SQL views and the scroll windows is outlined below.
During installation
In your TTS50, set [Misc]UseNewScrolls=Y.
In Microsoft SQL Server Management Studio
-
Warning: Do not change the SQL of the default scroll views. Your changes will be overridden when you upgrade your system.
Note: For a custom SQL view, follow a naming convention such as [CustomName]xxxView.
-
Allow access to the view.
In Fuel Dispatch
-
Open the scroll window.
-
Set up the default scroll view or a copy of the view.
-
Assign users or user groups to the view.
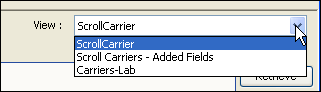
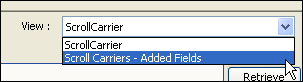
When users access the scroll window, they will see a View field. The field lists all of the user’s assigned views. The user can select the view that is best suited to the task.
Listing of SQL view names for all scroll windows
The system is installed with one view for each scroll window. The names for the system default views, and the database tables in each view, are listed below. You will reference these names when you use Microsoft SQL Server Management Studio to create a new view by copying a system default view.
| Scroll View | Database tables in view |
|---|---|
TMWScrollBranchView |
branch |
TMWScrollCarrierView |
carrier, city |
TMWScrollCommoditiesView |
commodity |
TMWScrollCompanyView |
company, city |
TMWScrollDriverView |
manpowerprofile, city |
TMWScrollEmptyMoveView |
legheader |
TMWScrollExpirationsView |
expiration, tractorprofile, trailerprofile, manpowerprofile, carrier, company, thirdpartyprofile, expedite_audit, labelfile |
TMWScrollInvoiceView |
invoiceheader, city |
TMWScrollMultipleAssetView |
manpowerprofile, city, tractorprofile, trailerprofile |
TMWScrollOrderView |
orderheader, legheader, company, city |
TMWScrollPassengerView |
passenger, city |
TMWScrollPayToView |
payto, city |
TMWScrollReferenceNumberView |
ReferenceNumber |
TMWScrollStopView |
stops, city, company |
TMWScrollThirdPartyView |
thirdpartyprofile |
TMWScrollTractorView |
tractorprofile, city |
TMWScrollTrailerView |
trailerprofile, city |
TMWScrollTruckStopView |
TruckStops, city |
You may not see all scroll windows because some are available only if you have purchased the add-on features to which they belong. These windows are tied to the installation of add-ons:
-
Scroll Branches: Requires a license for Fuel Dispatch or TMW Operations.
-
Scroll Passengers: Requires a license for the ACE (Automated Commercial Environment) feature.
-
Scroll Third Parties: Requires a license for the Third Party Pay feature.
-
Scroll Truck Stops: Requires Advances and Fuel Purchase (a third-party application).
Creating custom SQL views
Although it is possible to create a new SQL view from "scratch," you can also copy an existing view and then modify it. Use this procedure to copy an existing view.
| When customizing a view, consider how running the SQL might affect performance. |
-
Open Microsoft SQL Server Management Studio.
-
Connect to the database.
-
Create the view’s query from an existing view.
-
Locate the view to copy.
-
Right-click on the view and select Script View as > CREATE To > New Query Editor Window.
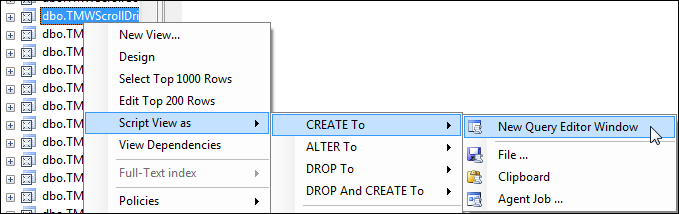
The query is presented for editing.
-
-
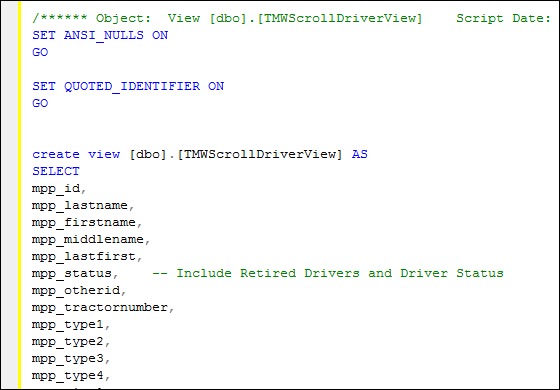
At the top of the query, replace the name of the view with the new name.
Note: It is recommended that you append the existing view name with your own custom identification. When this is done, view names will be alphabetically listed together.
This sample shows the new name as TMWScrollDriverView_Custom.

-
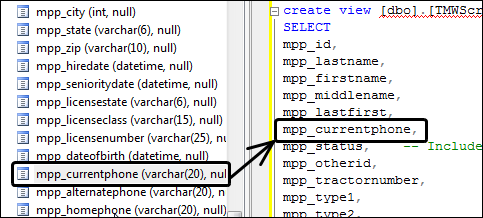
Edit the fields for the new view.
-
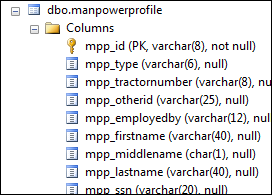
To see a list of fields from which to choose, open the Columns folder in the appropriate table.
This sample shows columns from the manpowerprofile table.
-
To add columns (fields) to the view, enter their names in the query.
-
Remove unwanted columns.
Warning: Boards must include certain columns to run. In Microsoft SQL Server Management Studio, view the required columns that cannot be removed from a view. Run this command against the PlanningBoardRequired table to view the required columns for a particular Board Type.
This command displays the required columns for Inbound (DRVSCR) views.

-
If you want, include nested queries to run aggregate or calculated data.
Note: The nested view must contain the primary key of the primary view table.
-
To prevent the retrieved records from being marked as locked, it is recommended you use
WITH (NOLOCK)after the table definition in theFROMstatement.
-
Execute the Select / From command to verify the correct data is retrieved.
-
-
Click Execute.
The new view is created. -
Allow others to use the view.
-
Enter
grant select on [View_Name] to public. -
Execute the
grant selectcommand.
-
|
Accessing the Board Setup window for the view type
The Board Setup window, accessed by a system administrator from any scroll window, is the starting point from which scroll views are set up and assigned to users or user groups.
The Edit Views icon displays only on the scroll windows that are accessed with a system administrator user ID. This sample shows the icon on the Carrier Scroll window.

Once the window is opened, you can set up any or all view types. For example, if you accessed the Board Setup window from the Driver Scroll window, you can still set up Company Scroll Views, Tractor Scroll Views, etc., as well as Driver Scroll Views.
Follow this procedure to open the Board Setup window.
-
Sign on to Fuel Dispatch with a system administrator user ID.
-
Open a scroll window.
Note: You can access the Board Setup window from any scroll window.
-
Click
 Edit Views.
The Board Setup window opens.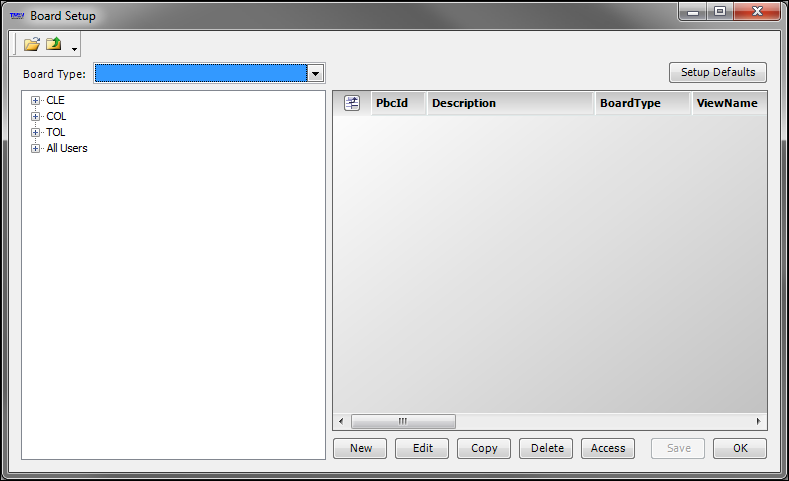
-
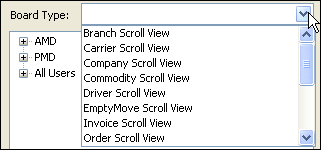
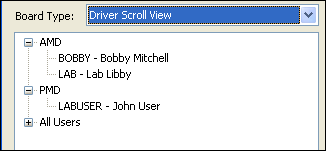
From the Board Type drop-down list, select the type of view with which you want to work.
The left panel of the window displays a list of user groups that you can expand to display all users included in that group.
Setting up the view from within Fuel Dispatch
Follow this procedure to create or edit a view definition that allows users to access the SQL view from within the scroll window.
| If you open Fuel Dispatch before creating the new view, you must close and reopen Fuel Dispatch to see the new view in the Create/Edit Board Definitions window. |
-
From the user groups grid, select the group or user you want to have access to this view.
Note: Selecting All Users will display a list of all scroll views as well as other board definitions that are appropriate to Fuel Dispatch. Only those views with a scroll BoardType ending with SCR can be set up through this window.
-
Open the Create/Edit Board Definition window by doing one of the following:
-
Create a new view
Click New. -
Copy an existing view
-
Select the definition to copy.
-
Click Copy.
The Create/Edit Board Definitions window opens.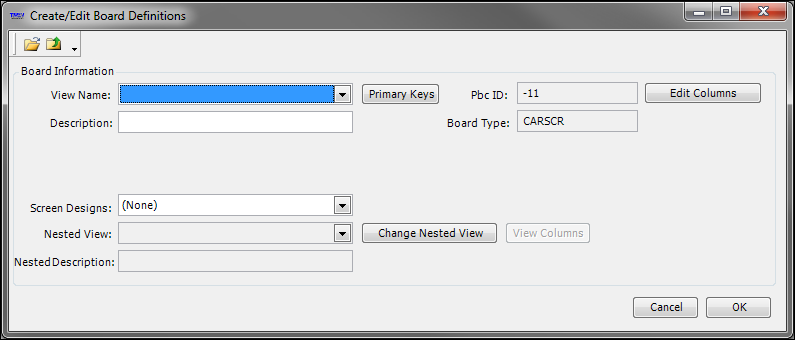
-
View Name
The name of the SQL view you are setting up.
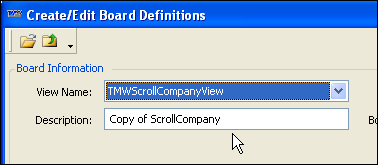
Description
This description appears in the View drop-down list on the Scroll window.
If you copied an existing view, the Description is preceded with Copy of.
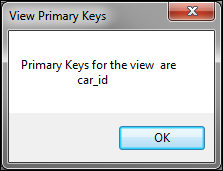
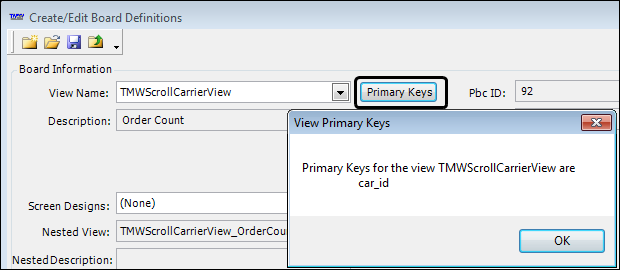
Primary Keys
Click this button to display the primary keys associated with the selected view. The primary keys are needed when Adding a nested view to a scroll view.
Pbc ID
This ID number is automatically assigned.
Note: The ID is initially a negative number. When you Save from the Board Setup window, a unique ID is assigned.
Board Type
The type of scroll/view you are setting up. This is a read-only field.
Edit Columns
Access the View Editor window to hide columns, modify the names of the columns, or reorder the columns that are in the SQL view.
Screen Designs
If you used Quick Designer to modify and save the scroll window layout to use with this view, select the layout name for the view.
Nested View
If you used SQL to create a view that is joined by the primary key in the current view, select the view name to add the related information as an expanded row in the retrieved data.
Nested Description
A brief description of the nested view.
-
-
Select the View Name.
-
Enter a brief Description of the view.
-
If you want to make changes to the data grid columns, click Edit Columns.
You can edit any of the following:-
Hide a column from displaying
Clear the Visible checkbox.
Note: Hiding columns with this checkbox applies only to columns that you added to an SQL view. To hide default columns, you must use Field Chooser or Column security.
-
Change the name of a column heading
In the View Display Name column, enter a new name or change the existing name that will display as the column heading on the data grid.
-
Reorder the columns
Click the row number and drag it to the new location. The read-only sequence number changes accordingly.
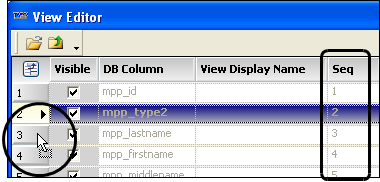
When finished, close the View Editor window.
-
-
If you used Quick Designer to add a restriction field to a scroll window, select the layout name for the view.
-
If you used SQL to create a view that is joined by a key field in the current view, select the view name to add the related information as an expanded row in the retrieved data.
For more information, see Adding a nested view to a scroll view. -
Click OK.
A new data row is added to the Board Setup window.
-
Click Save.
A PbcId is assigned.
-
Close the Board Setup window.
To see the new view, close and then re-open the Scroll window.
Adding a nested view to a scroll view
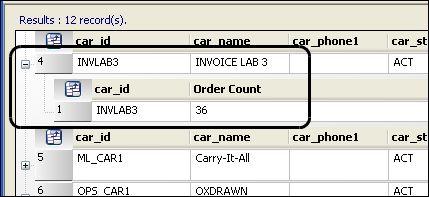
A nested view is a view within a view. The primary view provides you with the "top layer" of data for a record. A nested view takes that record and provides more detail. By default, only data for the primary view is shown, but you can expand each line of data for a record to see the information retrieved for the nested view. In this sample, the order count for each carrier was added as a nested view.
In Microsoft SQL Server Management Studio
-
Connect to the database.
-
Create the query for the view.
Note: The nested view must contain the primary key of the primary view table.
Where to find the primary key:
On the Board Definition window of the primary view, click Primary Keys. A window opens to display the key column names.
This sample joins the carrier (primary) table with the orderheader (nested) table to display the order count for each carrier.

-
Allow others to use the view.

In Fuel Dispatch
| If you open Fuel Dispatch before creating the new view, you must close and reopen it to see the new view in the Create/Edit Board Definitions window. |
-
From the user groups grid, select the group or user that has access to this view.
-
Create a new view.
-
Click New.
-
The Board Definition window opens.
-
Select the SQL View Name.
-
Enter a Description for the view.
-
When finished, save the changes.
-
On the Create/Edit Board Definitions window, click OK.
-
On the Board Definition window, click OK.
-
On the Board Setup window, click Save.
-
-
-
Add the nested view you just created in SQL.
-
On the Board Setup window, select the primary view you just created.
-
Click Edit.
-
Click Change View.
The Create/Edit Board Definitions window opens. -
Click Change Nested View.
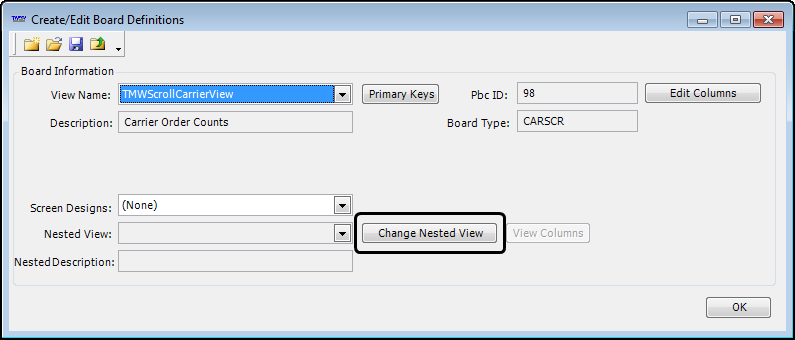
The Nested View field becomes editable, and the button label changes.

-
Select the SQL view to nest.
-
Click Commit Nested View.
-
When finished, save the changes.
-
On the Create/Edit Board Definitions window, click OK.
-
On the Board Definition window, click OK.
-
On the Board Setup window, click Save, and then OK.
-
-
Adding a restriction field to a scroll window
If the default view for a scroll window does not provide a restriction field that you need, you can add it. This procedure illustrates how you could add a restriction field to the Order Scroll window that allows the user to retrieve orders according to the entry in the TrlType1 field on the order header.
Adding the field to a scroll view with SQL
Create a custom SQL view that includes the additional field in the data retrieval grid. In this example, add the following to the select statement:
orderheader.trl_type1 as 'Trl_Type1',
Since the trl_type1 column already exists in the orderheader table, it is a simple addition.
Adding the field to the scroll window with Quick Designer
When you add fields to a SQL view, those fields become available for you to add to the window layout. This is done through the Quick Designer.
-
In the Order Scroll window, load the window layout to include the new restriction field.
-
Follow the steps in Adding fields to a window to add the restriction field to, for example, the Assets tab.
-
Select Add New Item > Standard tab.
Note: The Add New Item window contains objects appropriate for the window you are modifying. The fields you added to the view are included in the list in the lower-right portion of the window.

The following mappings were used for our example and selected in this order:
-
Control Type: LabelFileDropdown
-
TMW Required Properties: In the LabelDefinition field, TrlType1 was selected.
-
Field Group: Orders
-
Field / Type: The TrlType1 field is identified as a String type.
-
-
Select the Auto-label checkbox.
-
Click OK.
-
Toggle out of Quick Designer.
The new restriction field is added to the layout.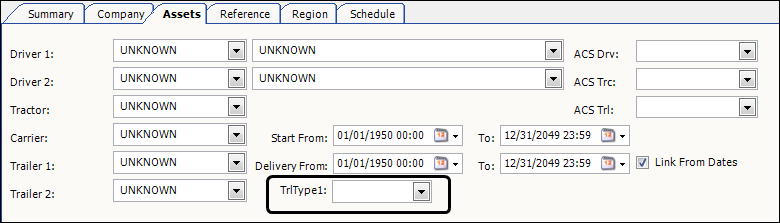
-
After you add the data field and label to the window, you must save the layout.
Attaching the saved layout to the view
Now that the layout is saved, you must attach the saved layout to the scroll view definition.
-
From the user groups grid, select the group or user that has access to this view.
-
From the list, select the view to modify.
-
Click Edit.
The Board Definition window opens. -
Click Change View.
The Create/Edit Board Definitions window opens.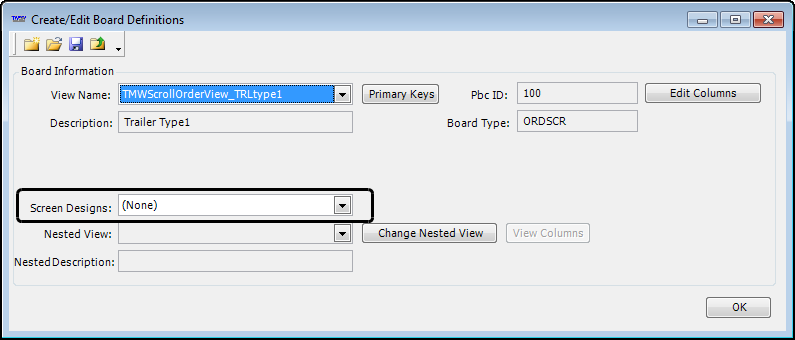
-
In the Screen Designs field, select the layout.
-
When finished, save the changes.
-
On the Create/Edit Board Definition window, click OK.
-
On the Board Definition window, click OK.
-
On the Board Setup window, click Save, and then OK.
-
-
Assign the view to users or user groups.
Modifying a view
Follow this procedure to change the settings for an existing view. You can change the description, the column headings that will display on the data retrieval grid, and hide columns from view. You can also remove access to the view by a particular user or user group.
Changing the settings for an existing view
-
From the user groups grid, select the group or user that has access to this view.
-
From the list, select the view to modify.
-
Click Edit.
The Board Definition window opens.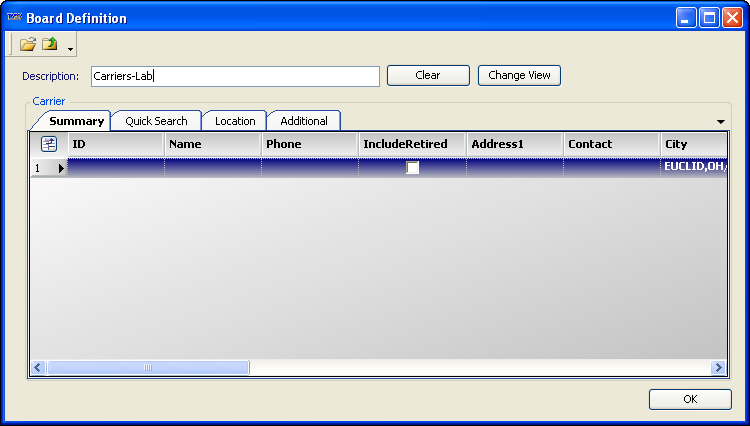
-
If you want, change the text in the Description field.
-
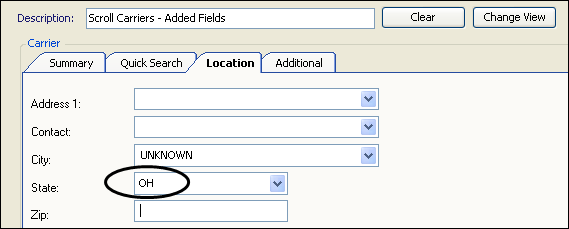
If you want to set a default value for a retrieval field in the scroll window, on the appropriate sub tab, enter or select the default value.
When the user opens the scroll window view or clicks New Search, the default value will automatically populate the restriction field. This sample shows OH selected as a default retrieval value.
-
Click Change View.
The Create/Edit Board Definitions window opens.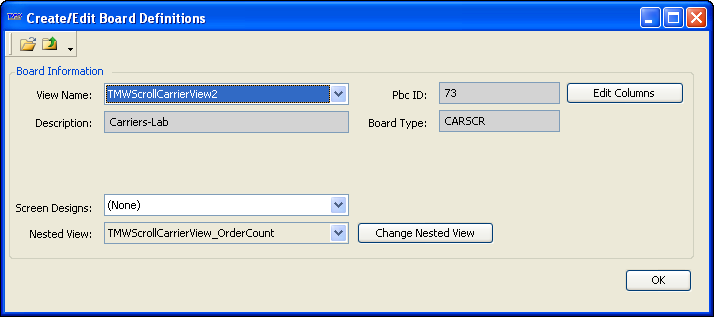
Make the appropriate changes. For details, see Setting up the view from within Fuel Dispatch.
-
When finished, save the changes.
-
Close the View Editor window.
-
On the Create/Edit Board Definitions window, click OK.
-
On the Board Definition window, click OK.
-
On the Board Setup window, click Save, and then OK.
-
Removing access to a view
Follow this procedure to remove rights for a user or group to access the view in Fuel Dispatch.
-
From the user groups grid, select the group or user for whom you want to remove access to the view.
-
From the list, select the view.
-
Click Delete.
A confirmation message is shown.
-
Click Yes.
If you do not want to remove access to the view after all, click No instead.
Changing an existing SQL view
If you need to modify a SQL view you created, you can make the necessary changes in Microsoft SQL Server Management Studio, and then use the SQL Alter command.
| Do not change the SQL of the default scroll views. Your changes will be overridden when you upgrade your system. |
Example:
Alter view TMWScrollDriverView_New AS
SELECT...