Switching the driver on a started trip
There may be times when the primary driver who started a trip is unable to complete it and you must replace that driver. The Driver Switch-Out feature allows you to create a split trip in which only the primary driver assignment changes.
You split the trip into starting and final segments.
-
The starting segment covers the assignment from the trip origin to the specified switch-out location. The original primary driver assigned to the trip is assigned to the first trip segment.
-
The final segment covers the assignment from the switch-out location to the destination. You assign a new driver to this second trip segment.
Optionally, system settings allow you to:
-
Specify whether a tractor is dropped with the trailer at the time the trip is split.
-
Create an empty move from the truck yard to the switch-out location and assign the new primary driver to it.
-
Create an empty move from the switch-out location to the truck yard and assign the original primary driver to the move.
-
Specify the stop event type for the beginning and end of each empty move.
-
Specify the LghType1 value used to categorize the empty moves.
You access the feature from the Assignment Plan pane in the Card Planner or Planning Worksheet. Right-click a started trip and then select Driver Switch-Out from the shortcut menu. The Driver Switch-out window opens.
|
Understanding the Driver Switch-Out window
When the feature is enabled, you access the Driver Switch-Out window in the Planning Worksheet or the Card Planner. To open it:
-
Right-click a started trip in the Assignment Plan pane of either window.
-
Select Driver Switch-Out from the shortcut menu.
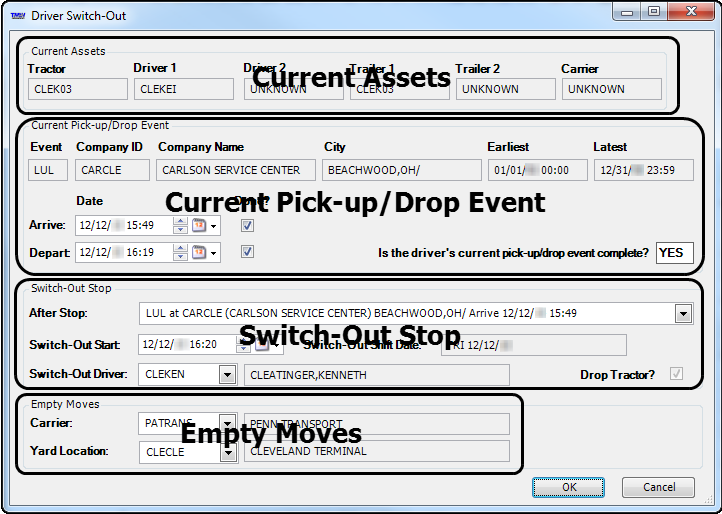
The Driver Switch-Out window contains four sections.
Current Assets |
Displays read-only information about the assets originally assigned to the trip |
Current Pick-up/ Drop Event |
Displays information and status for one of the following:
|
Switch-Out Stop |
In this section, enter the new driver and other details of the driver switch-out. |
Empty Moves |
In this section, specify the carrier and yard location for the empty moves that serve as the origin for the replacement driver and the destination for the original driver. Note: This section appears only when the |
Setting up the Driver Switch-Out feature
The Driver Switch-Out feature is not available by default. You enable it, and control how it works, using system settings in your TTS50.
-
Enable the feature.
-
Specify what happens to the tractor at the time of the switch-out.
-
If you want, enable the arrival and departure times to be modified.
-
If you want, specify the type of empty move the system creates when you switch the driver.
Enabling the Driver Switch-Out feature
Use the [FuelDispatch]EnableDriverSwitchOutFunction INI setting in your TTS50 to show the Driver Switch-Out menu command.
Specifying if the original tractor is replaced when the driver is switched
By default, when a driver switch-out takes place, the original tractor assigned to the order is dropped, so that it remains with the trailer. In the Driver Switch-Out window, the Drop Tractor checkbox is selected.
![]()
Two settings in the [FuelDispatch] section of your TTS50 control the functionality of the Drop Tractor checkbox.
-
The
DriverSwitchOutDropTractorEnablesetting controls whether the checkbox is editable. -
The
DriverSwitchOutDropTractorDefaultsetting determines whether the checkbox is selected or cleared by default.
Preventing users from changing arrival and departure times when switching a driver
By default, users can edit the arrival and departure dates in the Driver Switch-Out window. If you want, you can prevent users from changing this information by using the [FuelDispatch]EnableDriverSwitchOutStopEdit setting in your TTS50.
Adding empty moves and categorizing them
By default, the Driver Switch-Out feature does not add empty moves to handle transporting the drivers involved in the split trip. If you want, you can have the system create empty moves to take drivers to/from the switch-out location. To do this, you specify the Trip Type 1 value that you want assigned to them. Make your entry in the [FuelDispatch]DriverSwitchOutEmptyMoveCode setting in your TTS50.
|
Identifying the empty move for a driver switch out
If you made an entry for the [FuelDispatch]DriverSwitchOutEmptyMoveCode setting in your TTS50, you can specify the event type for the empty moves created by the Driver Switch-Out feature. You identify the begin empty event and the end empty event using the [FuelDispatch]DriverSwitchOutEmptyMoveBeginEvent and [FuelDispatch]DriverSwitchOutEmptyMoveEndEvent settings.
Switching a driver
You can switch the driver on a started trip from the Planning Worksheet or Card Planner. Follow these steps:
| If the trip was assigned to a carrier, you cannot switch drivers on the trip. |
-
Modify restrictions in the Planning Worksheet or Card Planner header to access started trips, and click Refresh.
-
In the Assignment Plan pane, right-click the trip that needs a different driver assigned. The shortcut menu opens.
-
Select Driver Switch-Out.
The Driver Switch-Out window is displayed.Show me
Note: If the order has not been started, the system displays the message: "Leg must be started and in progress for driver switch-out."
-
Complete or modify fields as needed. Note that some fields are always read-only. Availability and read-only status of other fields depend on how you set up the feature.
Field definitionsRequired field: *
Tractor
Current tractor on the trip
This field is read-only.
Driver 1
Current primary driver on the trip
This field is read-only.
Driver 2
Current secondary driver on the trip
This field is read-only.
Trailer 1
Current primary trailer on the trip
This field is read-only.
Trailer 2
Current secondary trailer on the trip
This field is read-only.
Carrier
If the resources on the trip belong to a board carrier, this field will display the carrier ID.
This field is read-only.
Event
Code for the current event
This field is read-only.
The event represents one of the following:
-
Last-arrived stop, if it has freight
-
Next stop with freight after the last-arrived stop
Company ID
ID of the company where the current event took place
This field is read-only.
Company Name
Name of the company where the current event took place
This field is read-only.
City
City where the current event took place
This field is read-only.
Earliest
Date/time recorded in the Earliest Date/Time field for the event in the DeadHead/Trip Editor window
This field is read-only.
Latest
Date/time recorded in the Latest Date/Time field for the event on the DeadHead/Trip Editor window
This field is read-only.
Arrive Date
Depart Date
Done?
Two sets of fields show the date/time of the current stop’s arrival and departure.
-
When the Done checkbox is cleared, the Arrive Date or Depart Date field displays the scheduled date/time of the corresponding event.
-
When the Done checkbox is selected, the arrival or departure is completed, and the date/time of completion appears in the corresponding field.
Note: By default, the Arrive Date and Depart Date fields are editable. You can make them read-only by setting
[FuelDispatch]EnableDriverSwitchOutStopEdit=Nin your TTS50.Is the driver’s current pick-up/drop event complete?
The value in this field is determined by the Done checkboxes associated with the Arrive Date and Depart Date fields.
If you select both Done checkboxes, the value in this field is set to YES. Otherwise, the field is set to NO.
This field is read-only.
After Stop
Stop after which the trip is split
The drop-down list contains all stops on the order, starting with the stop shown in the Current Pick-Up/Drop Event section.
Switch-Out Start*
This value represents both of the following:
-
Drop and hook date and time
-
Switch-Out Stop date and time for both drivers' empty moves
Note: These dates and times may change when the trip segments are placed into the shifts.
Switch-Out Shift Date
This read-only value is the same as the date for the current shift. If the Switch-Out Start date/time is later than the Switch-Out Driver’s shift end time, the field displays the next day’s date, and the trip segment will appear in the Assignment Plan pane for the next day’s shift.
Switch-Out Driver*
The ID of the new driver
The driver’s name appears in the second field.
Drop Tractor
This checkbox determines what happens to the original tractor assigned on the trip:
-
When this checkbox is selected, the original tractor is dropped and remains with the trailer at the time the trip is split.
-
When this checkbox is cleared, the original tractor must be replaced. The value in the Tractor field for the new trip segment is UNKNOWN. Specify the new tractor ID in the DeadHead/Trip Editor window.
Notes:
-
To edit this checkbox, you must have
[FuelDispatch]DriverSwitchOutDropTractorEnable=Yin your TTS50. -
To set a default value, use the
[FuelDispatch]DriverSwitchOutDropTractorDefaultINI setting in your TTS50.For example, you can ensure that tractors always remain with the trailer during a driver switch-out by making the checkbox read-only and setting its default value to Y. To do this, you must have the following setting values in your TTS50:
-
`[FuelDispatch] DriverSwitchOutDropTractorEnable=N
-
`[FuelDispatch] DriverSwitchOutDropTractorDefault=Y
-
Carrier
The ID of the carrier that will transport the drivers to/from the switch out location and the yard
When selected, the carrier’s name appears in the second field.
Note: This field appears only if the
[FuelDispatch]DriverSwitchOutEmptyMoveCodeINI setting in your TTS50 is not blank. When it appears, it is a required field.Yard Location
The ID of the yard location used for empty moves
-
The new driver will depart from the yard.
-
The original driver will return to it.
When selected, the yard location’s name appears in the second field.
Notes:
-
. This field appears only if the
[FuelDispatch]DriverSwitchOutEmptyMoveCodeINI setting in your TTS50 is not blank. When it appears, it is a required field. -
. The yard location must have a company profile.
-
-
Click OK.
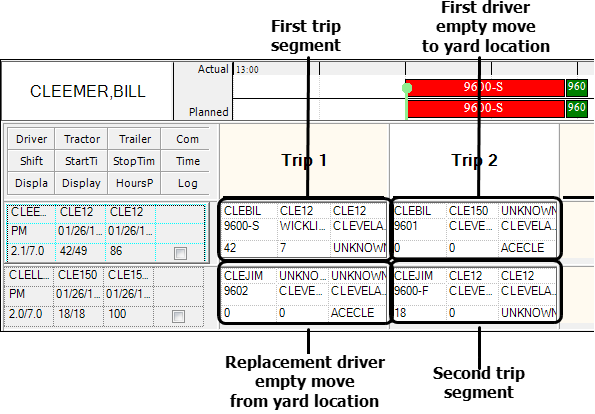
In the Assignment Plan pane, the new trip segment is added below the original trip segment. This illustration shows the segments in the Planning Worksheet.

-
In the Planning Worksheet or Card Planner, click Update.
The trip has been split. In the Avl. Orders tab:
-
The first trip segment is identified using the original order number with -S added to it.
-
The second trip segment is identified using the original order number with -F added to it.
-
The replacement driver’s ID appears in the Driver1 field for the second trip segment.
Note: If a Driver2 was assigned to the original trip, that driver remains assigned to the second trip segment.
If you made an entry in the [FuelDispatch]DriverSwitchOutEmptyMoveCode setting in your TTS50:
-
The system creates two empty moves to transport the original and new drivers between the truck yard and the switch-out location. It assigns new order numbers to these moves.
-
The system assigns the TripType1 value specified in the
[FuelDispatch]DriverSwitchOutEmptyMoveCodesetting in your TTS50 to the empty moves.
In this Card Planner illustration, the trip for order 9600 has been split and the driver switched. The second driver completes an empty move (order 9602) from the yard location to the location of the split, and the first driver completes an empty move (order 9601) from the location of the split to the yard location.