Order entry basics
An order is a record of the pickups and deliveries a customer wants made at particular locations on specific dates and times.
Starting a new order
An order is a record of the pickups and deliveries a customer wants made at particular locations on specific dates and times. To enter an order, you must:
-
Make entries in the order header.
-
Record pickup, drop, and freight detail (commodity) information.
|
To save an order, a number of entries are required by default. Be sure that you have all required information ready before you starting an order.
|
Recording the basic order information
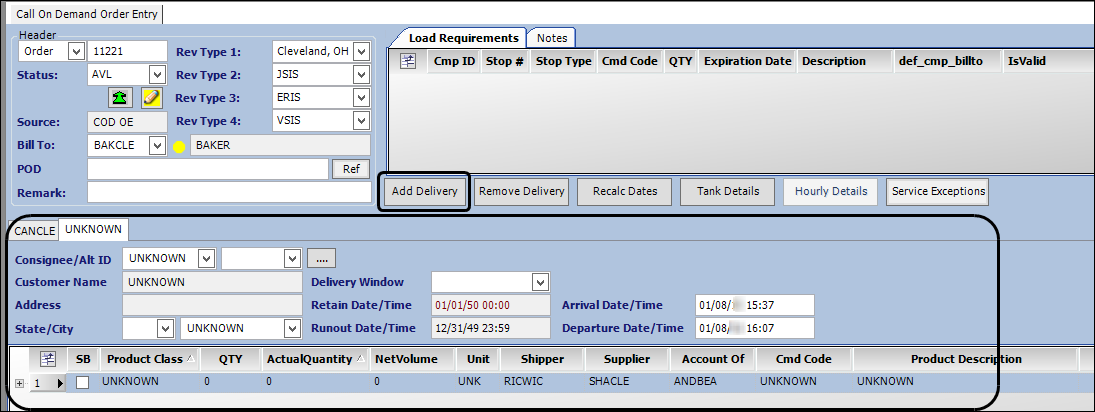
You enter all basic information about an order in the order header section of the Call On Demand Order Entry window.
To add or change an order, follow these steps:
-
Go to Application > Call On Demand Order Entry.
By default, the Call On Demand Order Entry window is shown as read-only. -
Click
 New in the toolbar.
Fields in the Call On Demand Order Entry window are now editable.Show me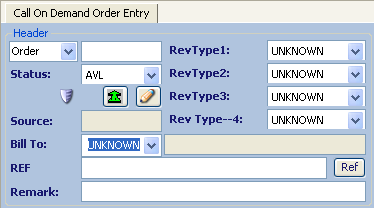
-
If you want, manually enter a user-defined ID number in the order ID field.
-
By default, the system assigns a numeric order ID the first time you save an order.
-
Manually assigned IDs are used most often for master orders. Master orders serve as order templates for standard runs.
-
You may use up to 12 alphanumeric characters for a manually entered ID.
-
-
Enter billing-related information, order type and, if needed, reference numbers and remarks.
Field definitionsRequired field: *
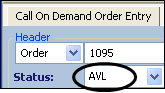
Status*
Select the option that identifies the type of order you are creating.
-
AVL - Available
The order is ready for dispatch. The system assigns this status to an order automatically when it is first saved.
-
QTE - Quote
The customer has made a tentative request for service, but you do not know for certain that the order will be processed. You must select this status manually.
-
MST - Master
This order is to be used as a template; it will be copied to create other orders. Master orders can never be dispatched. You must select this status manually.
Note: These statuses are relevant for a new order, but other statuses may apply to an order during the course of its life cycle.
Source
This read-only field identifies the system used to create the order.
-
Orders entered in the Oil Field Order Entry window show OFOE.
-
Orders entered in the Call On Demand Order Entry window show COD OE.
An order created by, or imported from, another software application is identified as such. For example, orders created automatically by the FuelTMS Forecaster module show FRCST.
Bill To*
There are two fields for Bill To information:
-
Use the drop-down list in the first field to select the TMWSuite identification code assigned to the company that is to be billed for shipment of the fuel.
-
The second field displays the Bill To’s name.
When you make an entry in the ID field and press TAB, the name field is populated.
Note: If you have
[FuelDispatch]SetBillToFromConsignee=Yin your TTS50, when you enter an ID in the Consignee field, the system records the Bill To automatically. It uses the default Bill To from the consignee’s profile. If your system is set up to do this, do not enter or change the ID in this field.Later, if you change the ID in the Consignee field, the system updates the Bill To field automatically to the Bill To in the new consignee’s profile. If no Bill To is recorded in the consignee’s profile, the Bill To field is set to UNKNOWN. The Bill To field is updated after you enter the new consignee and press TAB.
RevTypes1 - 4
Enter the revenue classification(s) that are appropriate for the order.
Notes:
-
. Classifying orders allows you to track the revenue collected for different types of loads.
-
. The names and options for these fields are user-defined. They are set up in the RevType1 - 4 labels in the System Administration application.
-
. As part of the required setup for Fuel Dispatch, your company identified one of the four RevTypes to be used as terminal. Your entry in that RevType field indicates the terminal with which the order is associated. For details on setup, see Setting up RevType/Terminal relationships.
-
. You can set up the system so that the RevType automatically reflects the terminal associated with the consignee or the user.
-
. When you change the RevType1 or RevType2 value on a saved order, the system automatically updates its priority to Highest Priority. Orders flagged as Highest are listed on the Priority Orders tab in the Card Planner and Planning Worksheet. Orders with any other priority are listed on the Available Orders tab. For additional information about order priority, see Changing an order’s priority.
-
. By default, RevType1 - 4 values can be edited only when an order’s status is Available. This is controlled by the
[FuelDispatch]AllowRevTypeChangesUntilOrderStartedsetting in your TTS50:-
When set to
N(default), you can edit the RevType1-4 fields only while the trip’s status is Available. -
When set to Y, you can edit the RevType1-4 fields until the order’s status is Started.
-
RefType
Enter order header reference number(s). For details, see Entering reference numbers.
Remarks
Free-form text that applies to an order
-
Recording store information
You enter information about the store receiving the delivery and key dates in the Freight Detail header section of the window.

Required field: *
Consignee* |
TMWSuite identification code for the company where the delivery takes place When you make an entry in the Consignee field and press TAB, the system fills in the customer name and address fields. Note: If you have |
Alt ID |
This is the unnamed field to the right of the Consignee field. You can use it to enter an alternate, user-defined code assigned to the company. A maximum of 25 alphanumeric characters is allowed. An alternate ID is sometimes needed to identify the company in a separate computer system (such as an accounting package) to which TMWSuite interfaces. Note: If you have |
Customer Name |
Consignee’s name Note: When you make an entry in the Consignee/Alt ID field and press TAB, the system fills in the customer name and address fields. |
Address |
Consignee’s address |
State/City |
City and state/province where the delivery takes place Note: When you make an entry in the Consignee/Alt ID field and press TAB, the system fills in the State/City field. |
Delivery Window |
User-defined name associated with a standard time frame for pickup and delivery of fuel The window represents the earliest dates/times and latest dates/times acceptable for the load and unload, respectively. Note: Delivery windows are set up in the Delivery Window Maintenance window. Identify a delivery window in one of these ways:
|
Retain Date/Time |
Earliest date/time that the tank at the delivery site can accept a load Note: If you made a selection in the Delivery Window field, this field defaults to the Earliest Date recorded for that window. For details, see Defining standard retain/runout windows. |
Runout Date/Time |
Date/time at which the consignee is estimated to run out of fuel Notes:
|
Arrival Date/Time |
Date/time when the driver is scheduled to arrive at the consignee’s location Notes:
|
Delivery Date/Time |
Date/time when the driver is scheduled to depart from the consignee’s location Notes:
|
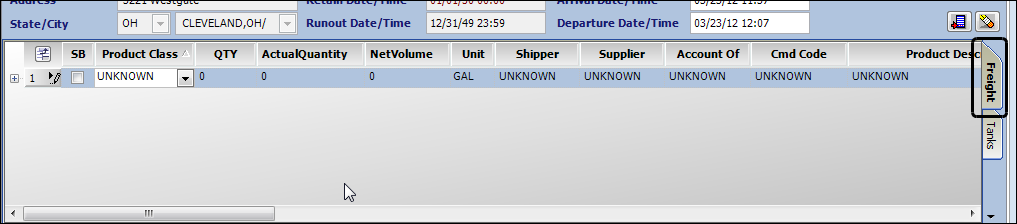
Recording commodity information on the Freight tab
If your system allows you to enter commodity information as freight details on the Call On Demand Order Entry window Freight tab, follow these steps.
-
Click the Freight tab.
-
Enter or modify the shipper and commodity-related information.
Notes:
-
Depending on your system, commodity, default shipper, default supplier, default account of, tank, unit, and other data may automatically populate the Freight Details grid.
-
First available in Fuel Dispatch: 2018.4
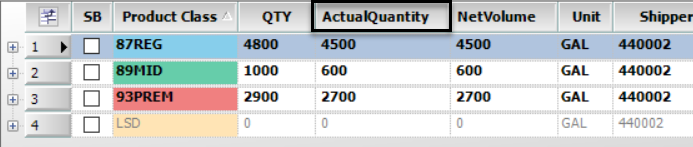
For non-forecasted sites, it is possible to overload a trailer when entering values in the QTY, ActualQuantity and NetVolume fields. To set a maximum full-trailer amount, see[FuelDispatch]MaxFullTrailerAmount.
Field definitionsRequired field: *
Cmd Code*
TMWSuite ID assigned to the product to be delivered
Notes:
-
The drop-down for the field displays only the commodities that are associated with the consignee. For details on how consignees are linked with commodity classes/commodities, see Setting up commodity classes and commodities.
-
By default, when the consignee is entered all products associated with tanks are added to the data grid. For products not part of the order, set the quantity fields to zero (0).
Product Class*
Commodity classification to which the product has been assigned
Notes:
-
In File Maintenance, you can use two commodity classes to categorize a commodity. Fuel Dispatch requires that you link each consignee with one or more commodities within one of those commodity classes. When creating an order for the consignee, you can select only a commodity class/commodity associated with that consignee.
-
You can use the
[FuelDispatch]CommoditySubclasssetting in your TTS50 to specify which commodity class Fuel Dispatch is to use. -
For details on how consignees are linked with commodity classes/commodities, see Setting up commodity classes and commodities.
-
By default, when the consignee is entered all products associated with tanks are added to the data grid. For products not part of the order, set the quantity fields to zero (0).
Shipper*
TMWSuite ID of the company where the fuel is picked up, that is, the rack
Notes:
-
By default, when you change a shipper, you must indicate the reason in the Enter Reason for Supplier/Shipper Change window. For details, see Changing a shipper or supplier.
-
If there are shippers for which change reasons are not required, see Bypassing the reason change form.
-
If you use the Bill To company relationship enforcement level, you can use the
[FuelDispatch]DisableCODOEShipperChangeValidation=Ysetting in your TTS50 to disable relationship enforcement. Then, when you change the shipper, the order retains the original commodity code and class. For details, see Retaining the commodity code when you change the shipper or supplier. -
If the store has active forecast data in the Inventory Services module, the Shipper field defaults to the store’s Default Shipper value set on the Forecaster tab of the Commodity Forecast Setup window.
Supplier*
TMWSuite ID of the company that provides the fuel for the rack
Notes:
-
By default, entry of a supplier is required before you can save an order. However, you can use the
[FuelDispatch]SupplierRequiredINI setting to disable the requirement. -
When creating a master order for copying, it is recommended that you add Supplier as CALL DISP so you can save the order, and then set the supplier with the copied orders. Also, setting the quantity to 0 provides a visual clue to enter commodity data on copied orders.
-
By default, when you change a supplier, you must indicate the reason in the Enter Reason for Supplier/Shipper Change window. For details, see Changing a shipper or supplier.
-
If there are suppliers for which change reasons are not required, see Bypassing the reason change form.
-
If you use the Bill To company relationship enforcement level,you can use the
[FuelDispatch]DisableCODOEShipperChangeValidationsetting in your TTS50 to disable relationship enforcement. Then, when you change the supplier, the order retains the original commodity code and class. For details, see Retaining the commodity code when you change the shipper or supplier. -
If the store has active forecast data in the Inventory Services module, the Supplier field defaults to the store’s Supplier value set on the Forecaster tab of the Commodity Forecast Setup window.
Account Of
TMWSuite identification code for the company that pays for the fuel that is delivered
Note: If the store has active forecast data in the Inventory Services module, the Account Of field defaults to the store’s Account Of value set on the Forecaster tab of the Commodity Forecast Setup window.
ActualQuantity
Quantity of the commodity that is actually picked up by the driver
Note: The value initially shown in this field is copied from the quantity orders, as entered in the QTY field. If the quantity the driver picks up at the rack is different than the ordered quantity (value in the QTY field, you can update this field. Do not change the value in the QTY field.
NetVolume
Volume of the commodity delivered to the store
Note: The value initially shown in this field is copied from the quantity orders, as entered in the QTY field. If the actual quantity delivered to the store is different than the ordered quantity (value in the QTY field), you can update this field. Do not change the value in the QTY field.
Pin code
Personal identification number that serves as an authorization code for fuel transactions
A driver is required to enter a PIN code at a rack in order to pick up fuel.
QTY
Quantity of the commodity ordered
Note: The value you initially enter in this field is copied to the ActualQuantity and NetVolume fields.
Ref
Enter freight detail reference numbers. For details, see Entering reference numbers.
SB
Select the SB (Splash Blend) checkbox if the pickup involves having the tank filled with a mix of different grades of fuel.
Unit
Unit of measure used for the commodity quantity
Note: The unit automatically populates based on the unit of measure configured for the commodity. If no unit of measure is associated with the commodity, then the value for the
[Order]DefaultWgtVolCountsetting in your TTS50 is used.Product Description
Commodity name
Note: By default, when the consignee is entered all products associated with tanks are added to the data grid. For products not part of the order, set the quantity fields to zero (0).
-
Recording commodity information on the Tanks tab
If your company is using the FuelTMS Inventory Services module, it has created tank profiles for each of the stores to which you deliver product. These profiles identify the commodities carried at each store. Entering orders based on a store’s tanks eliminates the possibility of selecting the wrong commodity.
The ability to enter orders on the Tanks tab is controlled by the [FuelDispatch]OrderEntryTankMode setting in your TTS50.
|
If your system allows you to enter commodity information on the Call On Demand Order Entry window Tanks tab, follow these steps:
-
Click the Tanks tab.

-
For each of the store’s tanks affected by the order, enter the required tank-related information.
Note: First available in Fuel Dispatch: 2018.1
Depending on your system, commodity, default shipper, default supplier, default account of, tank, unit, and other data may automatically populate the Freight Details grid.
Field definitionsRequired field: *
Account Of *
TMWSuite identification code for the company that pays for the fuel that is delivered
Note: If the store has active forecast data in the Inventory Services module, the Account Of field defaults to the store’s Account Of value set on the Forecaster tab of the Commodity Forecast Setup window.
CmdCode*
TMWSuite ID of the product to be delivered
Warning: Although this field provides a drop-down list of the commodities associated with the consignee, do not change the value. The values are pulled from the store’s company tank setup, as recorded in Inventory Services._
Note: By default, when the consignee is entered all products associated with tanks are added to the data grid. For products not part of the order, set the quantity fields to zero (0).
Pin code
Authorization code that allows a driver to load fuel from a rack
Notes:
-
If a consignee/commodity PIN code is found, the system automatically applies it to this field.
-
If no consignee/commodity PIN code is found, the system looks for a state (shipper/commodity) PIN code. If one is found, the system automatically applies it to this field.
-
If no state PIN code is found, the field is left blank, allowing you to enter the code manually.
Product Class
This read-only field identifies the commodity classification to which the product has been assigned.
Notes:
-
In File Maintenance, you can use two commodity classes to categorize a commodity. Fuel Dispatch requires that you link each consignee with one or more commodities within one of those commodity classes. When a consignee is used on an order, you can select only a commodity class/commodity that has been associated with that consignee.
-
You can use the
[FuelDispatch]CommoditySubclassINI setting to specify which commodity class Fuel Dispatch is to use. -
For details on how consignees are linked with commodity classes/commodities, see Setting up commodity classes and commodities.
-
By default, when the consignee is entered all products associated with tanks are added to the data grid. For products not part of the order, set the quantity fields to zero (0).
Product Description
Read-only field displaying the full name for the commodity ID entered in the CmdCode field
Note: By default, when the consignee is entered all products associated with tanks are added to the data grid. For products not part of the order, set the quantity fields to zero (0).
Quantity of the commodity retained by the driver if the tank could not accept the originally ordered volume
Note: This field can be automatically updated when the driver submits a TotalMail macro. For more information on TotalMail, contact your TMW Sales representative.
Runout
Indicates the tank had reached the runout level
Note: This field can be updated automatically when the driver submits a TotalMail macro. For more information on TotalMail, contact your TMW Sales representative.
Shipper*
TMWSuite ID of the company where the fuel is picked up (the rack)
Notes:
-
By default, when you change a shipper, you must indicate the reason in the Enter Reason for Supplier/Shipper Change window. For details, see Changing a shipper or supplier.
-
If there are shippers for which change reasons are not required, see Bypassing the reason change form.
-
If the store has active forecast data in the Inventory Services module, the Shipper field defaults to the store’s Default Shipper value set on the Forecaster tab of the Commodity Forecast Setup window.
Supplier*
TMWSuite ID of the company that provides the fuel for the rack
Notes:
-
By default, entry of a supplier is required before you can save an order. However, you can use the
[FuelDispatch]SupplierRequiredINI setting to disable the requirement. -
When creating a master order for copying, it is recommended that you add Supplier as CALL DISP so you can save the order, and then set the supplier with the copied orders. Also, setting the quantity to 0 provides a visual clue to enter commodity data on copied orders.
-
By default, when you change a supplier, you must indicate the reason in the Enter Reason for Supplier/Shipper Change window. For details, see Changing a shipper or supplier.
-
If there are suppliers for which change reasons are not required, see Bypassing the reason change form.
-
. If the store has active forecast data in the Inventory Services module, the Supplier field defaults to the store’s Supplier value set on the Forecaster tab of the Commodity Forecast Setup window.
TankDescr
Read-only field displaying the tank’s commodity content and tank number
TankVolume
Actual gross volume delivered of the commodity ordered
Notes:
-
Use the Field Chooser to show this field in the grid.
-
Pause the pointer over any column cell to display the Actual Gross Volume Tooltip.
TankNetVolume
Actual net volume delivered of the commodity delivered to the store
Notes:
-
A driver can report the delivered volume using a TotalMail form. For more information on TotalMail, contact your TMW Sales representative.
-
The value you initially enter in this field is copied to the NetVolume field.
-
Pause the pointer over any column cell to display the Actual Net Volume Delivered Tooltip.
-
See the definition of the Retain field above.
Tank Quantity*
Ordered volume of the commodity
Notes:
-
The value you initially enter in this field is copied to the TankNetVolume, Quantity, Actual Quantity, and Net Volume fields.
-
Pause the pointer over any column cell to display the Ordered Volume Tooltip.
Unit*
Unit of measure used for the commodity quantity
Note: The unit automatically populates based on the unit of measure configured for the commodity. If no unit of measure is associated with the commodity, then the value for the
[Order]DefaultWgtVolCountsetting in your TTS50 is used. -
Adding and removing commodity information
How and where you add and remove commodities (freight records) for an order depends on the [FuelDispatch]OrderEntryTankMode setting in your TTS50. The setting allows you to determine whether to display the Tanks tab.
-
The default option is set to OFF; only the Freight tab displays.
You use the Freight tab to add and remove commodities.
-
When you set the option to either N or Y, the Tanks tab displays.
You can use the Tanks tab to add and remove an ordered quantity.
|
First available in Fuel Dispatch: 2018.3 Use the PAGE UP and PAGE DOWN keys to enter commodity information in the same column. For example, enter the quantity (QTY) in the first row and then use PAGE DOWN to go to the next row. |
Adding and removing commodities on the Freight tab
When another commodity is to be dropped at the same delivery location, click ![]() Add Freight Record. A new freight record line is added.
Add Freight Record. A new freight record line is added.
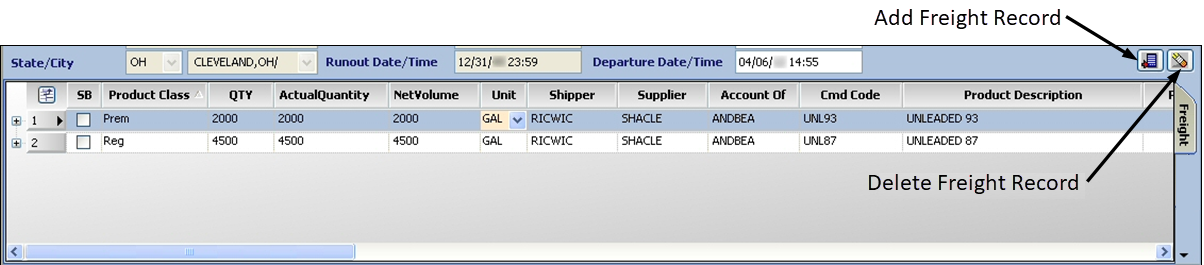
Each order must have at least one freight record. If you added an extra freight record line in error and want to remove it, select the freight record and then click ![]() Delete Freight Record.
Delete Freight Record.
Adding and removing an ordered quantity on the Tanks tab
The Tanks tab shows the commodities carried at each store. Entering orders based on a store’s tanks eliminates the possibility of selecting the wrong commodity.
When the Tanks tab displays, the system deactivates the Add Freight Record command on the Freight tab; however, the ![]() Delete Freight Record command remains available.
Delete Freight Record command remains available.
To add a new ordered quantity on the Tanks tab, follow these steps.
-
Save the order if not already done so.
-
Select the tank.
-
Click
 Add Freight Record.
 -
Enter the ordered volume for the tank in the TankQuantity field.
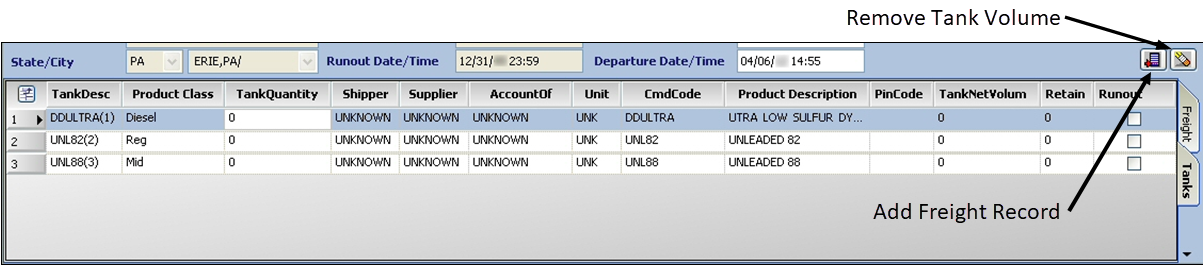
To remove an ordered quantity on the Tanks tab, follow these steps.
-
Save the order if not already done so.
-
Select the appropriate tank.
-
Click
 Remove Tank Volume.
The freight record is removed from the Tanks and Freight tabs.
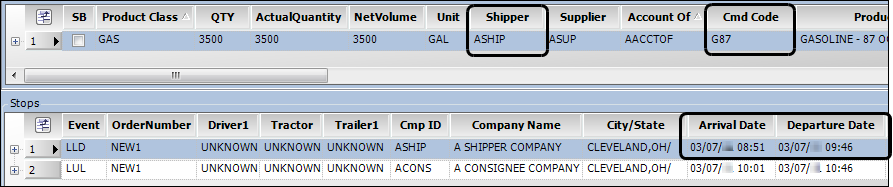
How your entries affect the Stop Detail grid
The entries you made in the order header, freight detail header, and on the Freight or Tank tabs cause many fields in the Stop Detail grid to be filled in automatically.
-
The consignee is automatically recorded as the location of the drop.
-
The shipper is automatically recorded as the location of the pickup.
When you start a new order, the Stop Detail grid’s Arrival Date and Departure Date fields for the pickup default to the current date/time. The Arrival Date for the drop defaults to 15 minutes later. The Departure Date for the drop is 30 minutes later than the drop’s arrival date.

Dates/times can be updated based on your entries of the consignee, shipper, and commodity.
-
By default, the system adds 30 minutes to the arrival time to calculate the departure time. This 30 minutes is the default generic dwell time, but it can be modified.
-
If there is dwell time recorded for the consignee and/or shipper, the system adds the dwell time minutes recorded in the company’s profile to the appropriate stop, instead of using the generic dwell time.
-
If there is dwell time recorded for the company/commodity, the system adds the dwell time minutes recorded for the commodity in the company’s Company Relationship profile instead of using the generic dwell time or that recorded for the company.
Show meIn this example, the dwell time applied to the pickup comes from the shipper/commodity combination.
The shipper has a dwell time of 45 minutes recorded for it. However, it also has a dwell time of 55 minutes specific to the commodity on the order. The system applies the commodity dwell time instead of the shipper’s dwell time.

-
If you plan a trip with a trailer associated with a dwell time, the system adds the dwell time to any existing pickup and delivery dwell times. The dwell time hierarchy described above does not affect application of a trailer-specific dwell time.
For example, in its profile, trailer MyTrl1 is set up to add 20 minutes of dwell time to stops. You assign MyTrl1 to an order where the pickup dwell time is 35 minutes and the delivery dwell time is 55 minutes. These dwell times become 55 minutes and 75 minutes.
| For more information, see Setting up how the system handles dwell times. |
Adding another drop to the order
If another delivery is needed, click Add Delivery.
A separate tab for the delivery is shown in the Freight Detail Header.
| If you added a drop in error, click Remove Delivery to delete it. |
An order that uses the same resources to deliver a product to multiple stores is known as a split delivery. For these orders, the Inventory Services Forecaster stops updating the retain and runout times, and sets the adjustment status to Locked. You can change this behavior for available, planned, and/or dispatched split deliveries by setting [InventoryService]ForecastSplitWindows to a value.
Saving the order
When you have entered all required information, click ![]() Save or
Save or ![]() Save and Close.
Save and Close.
|
First available in Fuel Dispatch: 2018.3 See Changing menus and toolbars to add the Save and Close icon to the toolbar. |
One of the following happens.
-
If the save is successful, the system will assign a numeric order number to your record. (If you manually assigned an ID, that ID will be saved as well.) The order will be set to an Available status, unless you manually changed the status to Quote or Master when you saved. If you used Save and Close, the Call On Demand Order Entry window closes.
-
If you have failed to make required entries, you will receive an error message when you attempt to save. Go back and enter whatever is needed.
-
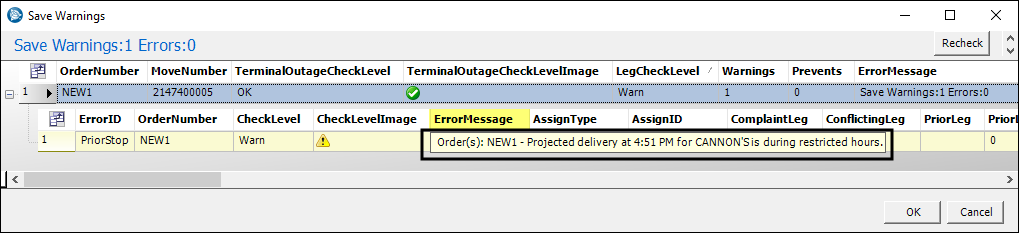
If the order has a scheduled delivery during a store’s closed hours and the following conditions apply, the Save Warnings pop-up window opens and indicates that the delivery is during restricted hours. The conditions include:
-
Entering the hours a company is closed and clearing the Forecaster Restriction checkbox
-
Having
[FuelDispatch]ShowWarnings=Y.
When the setting’s option is N, you can create an order without getting the pop-up window. The order shows a Save Warnings link in the Planning Worksheet and Card Planner when you plan an order during closed hours. You can click the link to open the Save Warnings window.
-
To view the warning:
-
Expand the Save Warnings grid row.
-
View the message in the Error Message field.
-
Click Recheck or click OK to close the window and continue creating the order.
-
-
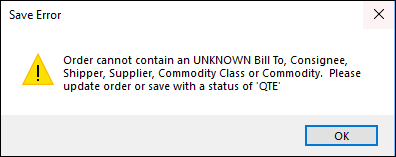
FuelTMS Only
If you are licensed for TMW’s FuelTMS suite of applications, additional functionality is available in Fuel Dispatch. One such functionality is the Credit Status Check feature. If your system is set up to perform credit status checking, the system prevents saving an order when either the Bill To or consignee on the order has been assigned a credit status at the Prevent level. A Save Error message is displayed.

If either the Bill To or consignee have a credit check status at the Warn level, the Credit Check Override window opens. You must enter an override, and the reason for the override, before you can save the order.
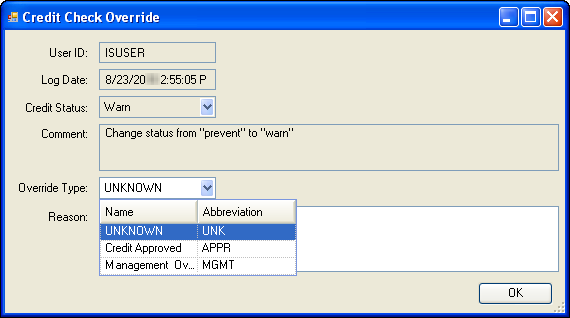
If you are authorized to handle a credit status warning, follow these steps:
-
In the Override Type field, select the appropriate option.
-
In the Reason field, enter the reason you are overriding the warning.
-
Click OK.
Note: If you decide that you do not want to enter an override, click
 to close the window. In the Cannot Save message, click OK.Show me
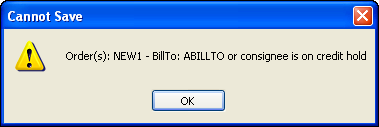
If you are not authorized to override a credit status warning, contact the appropriate person or department.
For more information on the Credit Hold Status feature, see Credit Hold Status feature.
-
If some kind of conflict exists, the Save Warnings window is shown:
-
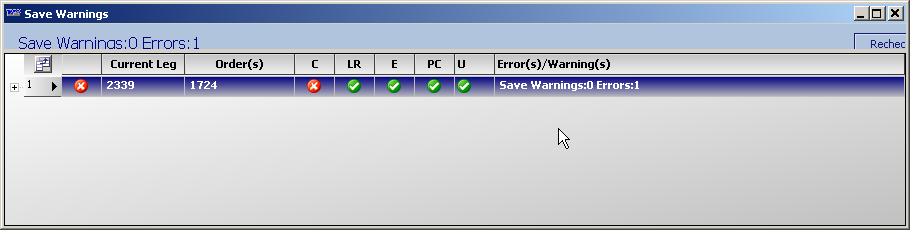
Click ![]() Expand to the left of the error. The row expands to display details about what is wrong.
Expand to the left of the error. The row expands to display details about what is wrong.

For more information about the Save Warnings window, see Resolving asset assignment conflicts.
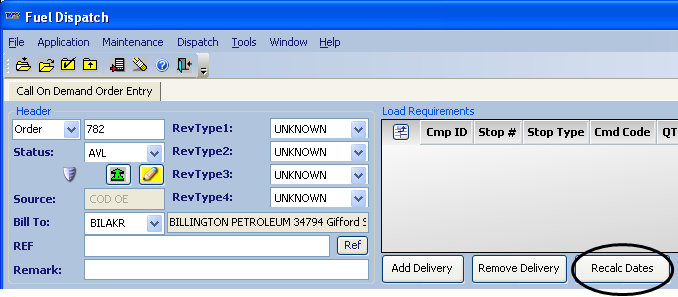
For new orders, the most common error is the improper sequencing of dates. To fix a date problem, click the Recalc Dates button and save. For more information, see How the system recalculates stop dates.
Creating a master order
A master order is an order template from which future orders can be copied. You create a master order the same way you create a regular order, except:
-
You manually enter the ID, so that it is recognizable as a master order
Note: To copy a master order in the Quick Copy Master Order window, the ID must contain at least one alpha character.
-
You assign the order the status of Master.
When you save a master order, the Save Master Order? message appears. It states, "You are changing a MASTER order. Would you like to continue?" Click Yes to save the order.
Master orders are not available for dispatch.
Looking up an existing order
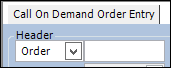
In Call On Demand Order Entry, you can retrieve existing orders by entering a system ID code, invoice number, or reference number. You enter this information in the order header’s lookup fields.
-
In the first field, use the drop-down list to select the type of record you want to use for the lookup.
-
In the second field, enter the ID for a specific record.
| In Call On Demand Order Entry, you can retrieve an order that was created in Oil Field Order Entry. |
Using a system ID number to look up an order
Each time you create an order in Fuel Dispatch, the system automatically assigns these unique system ID numbers to the order:
-
Order number
-
Movement number that identifies all activities performed by the resources assigned to the trip
-
Trip segment that identifies each time a different driver and/or tractor is assigned to the movement
To use a system ID number to look up an order, follow these steps:
-
Go to Application > Call On Demand Order Entry.
-
In the first lookup field, select one of the following:
-
Order
-
Movement
-
Trip Segment#
-
-
In the second lookup field, enter the system ID number.
-
Click
 Open in the toolbar.
The order appears in the window.
Using an invoice number to look up an order
After an invoice record has been generated and saved for an order, you can use the invoice number to look up the order.
-
Go to Application > Call On Demand Order Entry.
-
In first lookup field, select Invoice#.
-
In the second lookup field, enter the invoice number.
Be sure to include the suffix or prefix; for example, 11264A.
Show me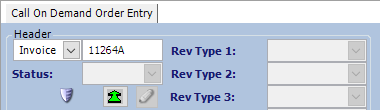
-
Click
Open in the toolbar.
A warning appears. It states that the order has an invoice and cannot be modified.Show me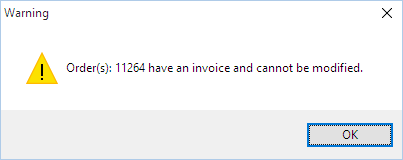
Click OK to close the warning and open the order.
Using a reference number to look up an order
First available in Fuel Dispatch: 16.10.28.0
If one or more reference numbers have been recorded on the order header, you can use a reference number to look up the order.
-
Go to Application > Call On Demand Order Entry.
-
In first lookup field, select Ref#.
-
In the second lookup field, enter the reference number.
-
Click
Open in the toolbar.
If the same reference number has been recorded on more than one order, the most recent order is displayed.
|
Using a barcode number to look up an order
First available in Fuel Dispatch: 16.10.28.0
If one or more barcodes have been recorded on the order header, you can use a barcode to look up the order.
-
Go to Application > Call On Demand Order Entry.
-
In the first lookup field, select Barcode#.
Show me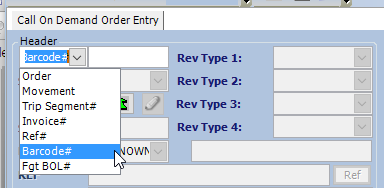
-
In the second lookup field, enter the barcode number.
-
Click
Open in the toolbar.
If the same barcode number was used on more than one order, the most recent order is displayed.
|
Making changes to an order
Once an order is saved, you may find that you need to change its priority, re-sequence stops, or recalculate dates/times.
Changing a shipper or supplier
After you enter the shipper or supplier for an order in Call On Demand Order Entry window’s Freight or Tanks tab, you may decide to enter a different company instead. By default, you are required to record the reason.
To make a change to a shipper or supplier:
-
Select a different company in the Shipper or Supplier field.
The Enter Reason for Supplier/Shipper Change window opens.Show me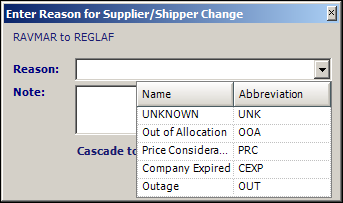
At the top of the dialog box, the system displays the ID of the previous company, as well as the ID of the new company.
-
In the Reason field, select the option that best describes why a change is needed.
Note: Reason options are set up in the CompanyChangeLog label, which is accessed in System Administration.
-
If you want, enter a free-form note in the Note field regarding the change.
-
If you need to apply the same change to all freight details on the order, select the Cascade to All Freight Rows checkbox.
-
Click OK.
| When you enter a change reason, it is logged in the Order Audit Log window’s Change Log section. For details, see Tracking changes to orders. |
Bypassing the reason change form
Two INI settings can control when the reason change form is displayed.
If you do not want to track reasons for changing shippers, suppliers, or both, you can use the [FuelDispatch]DoNotDisplayReasonChangeForm setting to disable the appearance of the Enter Reason for Supplier/Shipper Change window.
If there are specific companies for which change reasons are not required when the shipper or supplier is changed, use the [FuelDispatch]ExcludeFromShipperSupplierChange INI setting to identify them. When you change from one of the identified companies to another, the system will not display the reason change window.
Retaining the commodity code when you change the shipper or supplier
In Fuel Dispatch, relationships between companies affect the order entry process in Call On Demand Order Entry. By default, if you use the Bill To company relationship enforcement level and you change an order’s shipper or supplier, the system resets the commodity code and class based on the commodities available at the new shipper/supplier. This functionality applies to the Freight tab. It does not apply to the Tanks tab.
You can use the [FuelDispatch]DisableCODOEShipperChangeValidation setting in your TTS50 to disable this relationship enforcement. Then, when you change an order’s shipper/supplier in Call On Demand Order Entry, the system retains the original commodity code and class.
Re-sequencing stops
When an order has multiple stops, you may want to re-sequence them so that they are more efficiently organized.
In this example, the drop closest to the pickup is the last one on the order.
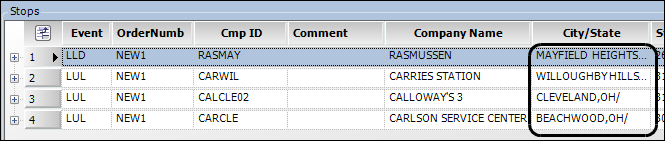
The stops can be re-sequenced so that the drop closest to the shipper is the first drop.
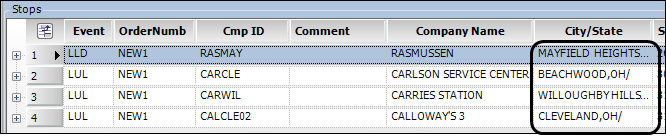
To move a stop, select the row you want to move and drag it to the position you want.
|
Recalculating stop dates
When you make a stop’s Arrival later, the stop’s Departure is adjusted by the same number of minutes. The reverse also happens. If you make a Departure time earlier, the Arrival time is adjusted by the same number of minutes.
When you make a pickup’s Departure time later, the drop’s Arrival and Departure are adjusted by the same number of minutes. However, the reverse does not occur. If you make a drop’s Arrival time earlier than the pickup Arrival and/or Departure, the pickup times remain as they were. The drop times are reset to what they were.
To trigger an automatic recalculation of an order’s stop dates and times on the Call On Demand Order Entry window, you can click Recalc Dates.
| If your manual entry of a stop’s Arrival and Departure does not match that stop’s dwell time, the system adjusts the times to account for dwell time. For more information on how the system uses dwell times to calculate arrivals and departures, see Setting up how the system handles dwell times. |
Changing an order’s priority
To flag an order’s importance, you can assign a priority to it. The priority determines the tab on which it will be listed in the Trip/Resource pane in the Card Planner and Planning Worksheet:
-
Orders flagged as Highest Priority will be listed on the Priority Orders tab.
-
Orders with a priority set to UNKNOWN, Medium, or Low will be listed on the Available Orders tab.
An order’s default priority is UNKNOWN. During the order entry process, it is common to enter a RevType1 and/or RevType2 value. When you change the RevType1 or RevType2 value on a saved order, the system automatically updates its priority to Highest Priority.
|
To view or change an order’s priority, follow these steps:
-
With the needed order opened in the Call On Demand Order Entry window, click
 Header Info in the Order Header.
The Additional Order Header Information window is displayed.Show me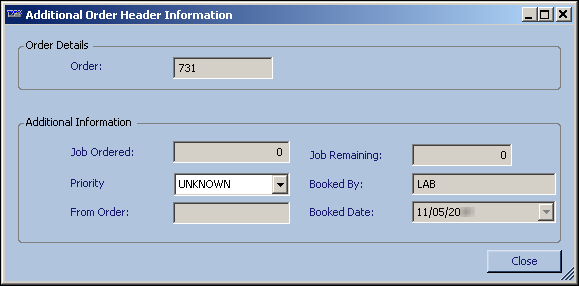
-
If you want, change the entry in the Priority field, located in the Additional Information section.
-
Click Close.
-
Save the order.
-
Redirecting loads and retains
First available in Fuel Dispatch: 2018.2
If a driver is unable to pick up or deliver the amount of product ordered due to a retain or a runout, use the Retain/Redirect feature to:
-
Change pickup/delivery locations
-
Modify commodity quantities
-
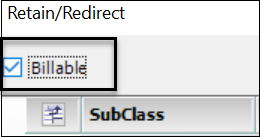
Specify if the retain/redirect is billable
-
Modify the Shipper, Supplier, or Account Of for the retain/redirect
Redirecting a load from the pick up (loading) location
-
Look up the order in the Call On Demand Order Entry window.
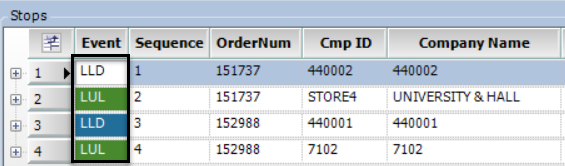
-
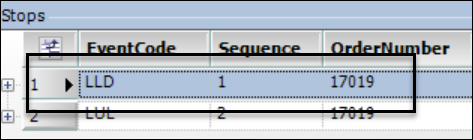
On the Stops details grid, select the LLD (Live Load) event.
-
Click Retain/Redirect in the Order header section.
The Retain/Redirect window opens. -
Enter the load redirect information. The values you give here will be shown on the Stops details grid.
Field definitions
Required field: *
SubClass (Product Class) * |
Commodity classification to which the product has been assigned. |
CmdCode* |
TMWSuite ID assigned to the product to be delivered. |
Quantity* |
Quantity of the commodity ordered. |
Redirect Quantity* |
Quantity of product to be redirected. |
Shipper* |
TMWSuite ID of the company where the fuel is picked up, that is, the rack. |
Supplier |
TMWSuite ID of the company that provides the fuel for the rack. |
Account Of |
TMWSuite identification code for the company that pays for the fuel that is delivered. |
-
Optionally, check Billable to make the load redirect a billable event.
-
Click OK.
The new pickup location is added to the Stops details grid as an LLD event. The original pickup location is marked as an RDR (Redirect) event or IRDR (Billable Redirect) event if the Billable option was used.

-
Click Save.
Redirecting a retain
-
Look up the order in the Call On Demand Order Entry window.
-
In the Stop details grid, select the LUL (Live Unload) event where the retain occurs.
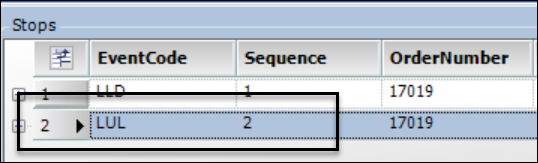
-
Click Retain/Redirect in the Order header section.
The Retain/Redirect window opens. -
Enter the retain information. The values you give here will be shown on the Freight tab and the Stops details grid.
Field definitions
Required field: *
SubClass (Product Class) * |
Commodity classification to which the product has been assigned. |
CmdCode* |
TMWSuite ID assigned to the product to be delivered. |
Quantity* |
Quantity of the commodity ordered. |
Retain Quantity* |
Retained quantity to redirected. |
RetainTo* |
The location where the product is redirected. For example, redirect to another store. Note: The retained commodity must be configured for the new location. For example, if the retain includes Unleaded 87, the retain-to location must include Unleaded 87 in its commodity list. |
Shipper |
TMWSuite ID of the company where the fuel is picked up, that is, the rack. |
Supplier |
TMWSuite ID of the company that provides the fuel for the rack. |
Account Of |
TMWSuite identification code for the company that pays for the fuel that is delivered. |
-
Optionally, check Billable to make the retain a billable event.
-
Click OK.
The new delivery location is added to the order, including a new LUL (unload) event on the Stops details grid.
-
Click Save.
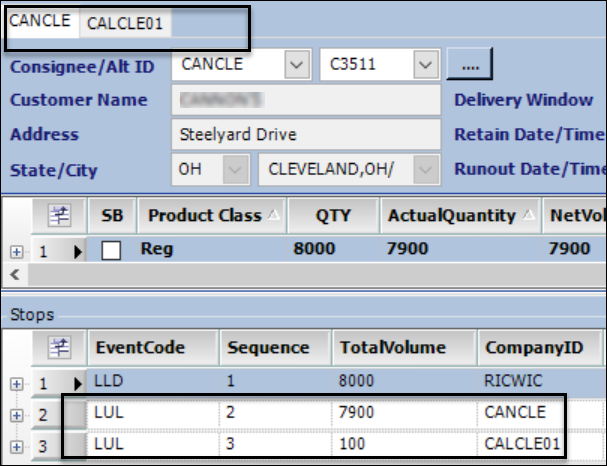
Retain/Redirect consolidation option
First available in Fuel Dispatch: 2020.3
Sometimes after a partial retain, a driver needs to fill the trailer again before the next delivery. You can consolidate orders to adjust the retain quantity using the Retain/Redirect consolidation option.
To consolidate an order using this feature:
-
Look up the order in Call On Demand Order Entry.
-
On the Stops Details grid, select the LUL (Live Unload) event.
-
Click Retain/Redirect in the Order header section.
The Retain/Redirect window opens. -
Enter a valid order number into the Retain and Consolidate to Order box.
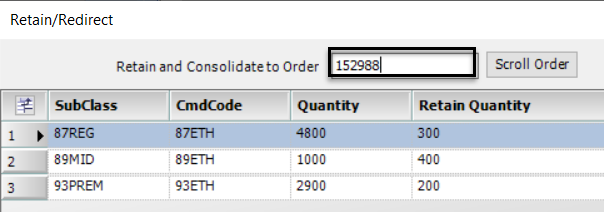
-
Enter the retain quantity in the Retain Quantity field.
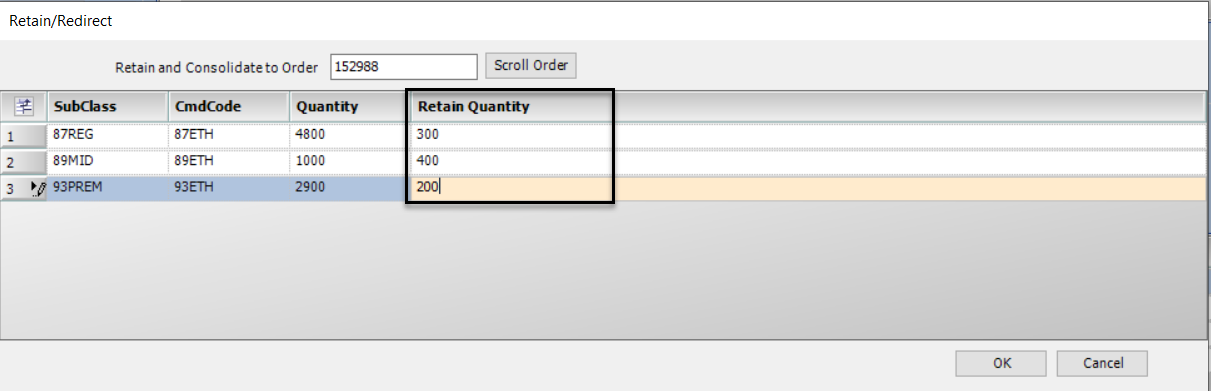
-
Click OK.
-
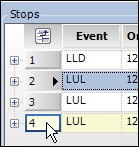
The quantities in the ActualQuantity field on the Freight grid are adjusted. The adjustment is based on the Retain Quantity you entered.
-
The order stops sequence in the Stops grid is updated as shown in this illustration.
Canceling an order
You may need to cancel an order placed by a customer who later decides that the trip should not be made. You can cancel an order that is Available or Planned, and have the option to bill the customer for the canceled order. You cannot cancel an order that has been Started or Completed.
When you cancel an order, the system logs data in the orderheader_cancel_log table.
-
Order header ID
-
Unique numeric ID assigned to the order by the system the first time you save it
-
Order ID
-
If a user-defined alphanumeric ID was assigned manually at the time the order was saved, it is saved to this column. If no manual entry was made, the numeric system-assigned ID is saved to this column.
-
Canceled by
-
Date canceled
-
Requested By
-
Remark
To cancel the order, follow these steps:
-
Look up the order in the Call On Demand Order Entry window.
-
Go to Dispatch > Cancel Order.
The Cancel Order window opens.Show me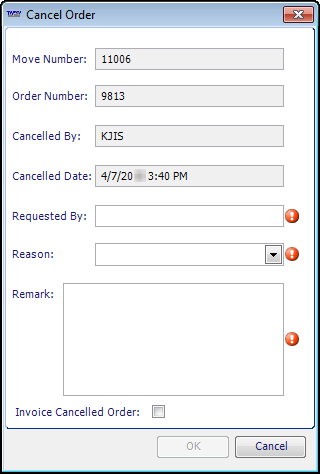
You must make entries in the Requested By and Remark fields. When the Cancel Order window first opens, the
 Required Entry indicator flashes next to the required fields. Once you make an entry, the indicator is removed.
 -
In the Requested By field, you must enter the person’s name who requested the cancellation.
-
If required, you must select the appropriate reason from the Reason drop-down list.
-
You establish the reasons for canceling an order using the CancelReasonCode label.
-
Use the
[Misc]CancelLogReasonRequiredINI setting in your TTS50 to indicate whether this is a required field.
-
-
In the Remark field, you must enter the reason the order is being canceled.
-
If you want to bill for the canceled order, select the Invoice Cancelled Order checkbox.
-
To continue canceling the order, click OK.
Note: If you do not want to continue, click Cancel instead of OK.
The Cancel Order window will close. -
A confirmation message asks, "Are you sure you wish to cancel this order?"
Do one of the following:
Change your Requested By, Reason, or Remark entries-
Click Cancel.
The Cancel Order window is redisplayed. -
Enter your changes.
-
Click OK.
You will again be asked to confirm the cancellation.
Confirm the cancellationClick Yes.
The Call On Demand Order Entry window is redisplayed as read-only, and a warning appears. It states, "This order has been cancelled and cannot be modified."Click OK. The message closes.
-
If you selected the Invoice Cancelled Order checkbox, the status is now ICO (cancelled billable).
-
If you did not select the Invoice Cancelled Order checkbox, the status is now CAN (cancelled).
Note: When you cancel a Planned order, the assigned resources are removed from the order.
Choose not to cancel the order after allClick No.
The Cancel Order window will close.When you attempt to open a canceled order, this warning appears: "This order has been cancelled and cannot be modified." The order information is read-only. -
Changing the status of a canceled order
By default, you cannot modify a canceled order. Follow these procedures to set up your system to allow resetting the status of an order from Cancelled (CAN) or Cancelled Billable (ICO) back to Available (AVL).
Setting up your system to allow a change in status
Use the [FuelDispatch]AllowCanceledToAvailable setting to enable the ability to reset a canceled order and then update it as is necessary.
Changing an order status from Cancelled to Available
To reset an order’s Cancelled status back to Available, follow these steps:
-
Look up the canceled order in the Call On Demand Order Entry window.
The system displays a warning message stating, "This order has been cancelled and cannot be modified." -
Click OK.
-
Go to Dispatch > Undo Cancel.
The status is reset to AVL.
-
Save the order.
Note: The Dispatch > Undo Cancel command is shown only when you look up a canceled order.
Reviewing an order that has a Pending invoice status
If you choose to auto-complete a driver’s unfinished trips when you manually log him/her out on the Card Planner, the system may prompt you to indicate whether their invoice status should be set to Available. This prompt appears only if your company has set up the system to make it visible.
Your response to the prompt determines whether billing for the orders can proceed.
-
If you click Yes, the orders can be invoiced.
-
If you select No, the order will be ineligible for billing until someone reviews it in the Call On Demand Order Entry window.
| By default, the system displays the prompt when you log out a driver who has unfinished orders. However, this feature can be turned off. Or, you can set up the system to suppress the prompt and automatically make the orders ineligible for billing until they are reviewed. For details on the setting that controls this, see Preventing/allowing an order to be billed when it is completed via logout. |
If you indicate that you do not wish to change the orders' invoice status to Available, the system:
-
Leaves the orders' invoice status set to Pending. This means it cannot be billed.
-
Sets a data review flag for each order. This means that the invoice status cannot be changed from Pending to Available until someone reviews the order in the Call On Demand Order Entry window.
This allows you to make sure that key data, such as volume, has been recorded correctly. You may need to wait until the driver submits paperwork that provides trip details.
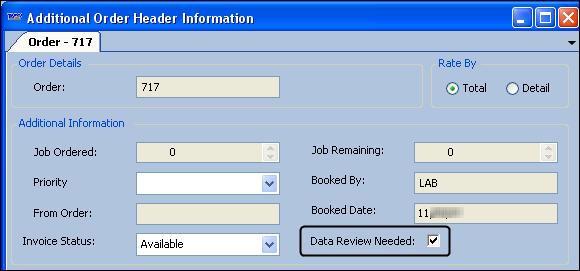
To see the data review flag for an order:
-
Open the order in the Call On Demand Order Entry window.
-
Click
 Header Info in the header.
The Additional Order Header Information window opens. -
Look for the Data Review Needed checkbox.
When you use the Call On Demand Order Entry window to edit an order that requires a data review, the system displays the Reset Data Review Flag? message when you save your changes:

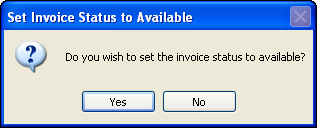
If you have completed your review of the order, click Yes.
The system displays the Invoice Status Change message.
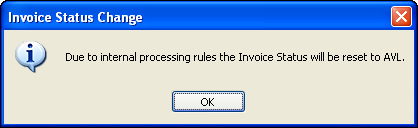
The message indicates that the order’s invoice status has been changed from Pending to Available. It is now ready to be billed. Click OK.
Reviewing an order’s notes
In the Call On Demand Order Entry window, there are two ways to view notes.
-
You can use the
 Notes icon to access the Notes window.
For details, see Entering Notes. -
You can use the Notes tab.
To view notes associated with the order on the Notes tab:
-
Open an order.
-
Click on the Notes tab.
-
Click the
 icon for a note category to read the notes.
For details on the available columns within a note, see Column Definitions.