Splitting a trip into segments
In Fuel Dispatch, a movement that consists of multiple trip segments is called a split trip. Splitting a trip means the trailer, or trailer with tractor, will be parked by the driver at the end of his or her shift. Typically, a new driver will continue the trip later.
Splitting a trip may be necessary in situations such as an equipment breakdown, driver illness, and delays during a shift that prevent all deliveries from being completed. You can only split the last trip planned on a driver’s shift.
When you split a trip, you break it up into two segments. All segments have unique, system-assigned IDs, called trip segment numbers. Another name for such an ID is legheader number. When a driver’s settlement for a trip is prepared, he will be paid for the activities that he performed during his segment of the trip.
| A split trip is different from a split delivery. On a split delivery, the same resources deliver a product to multiple consignees. On a split trip, an order is not completed by a single set of resources. The number of deliveries has no bearing. The change in resources is what constitutes the split. |
You use the Split Trip/Drop Trailer window to split a trip. The first row of fields in the window displays the assets currently assigned to the trip. In the Drop Trailer/Tractor area of the window, you record:
-
The reason for the split
-
The stop after which the split will occur
-
The location where the trailer will be parked
-
Whether the tractor will be parked as well
-
Dates/times of the park and hook
Show me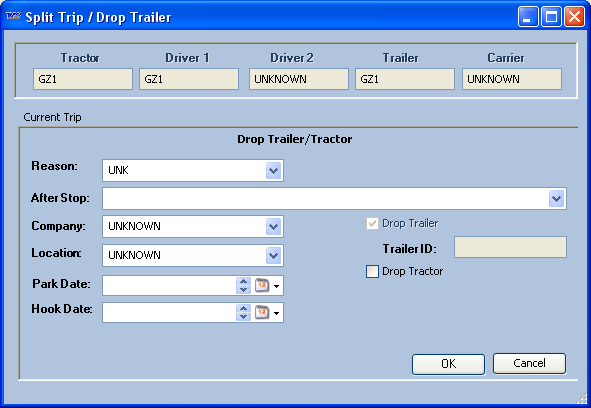
Setting up the split trip feature
When you split a trip, you must supply a reason for creating the split. Optionally, you can also select the Drop Tractor checkbox, indicating the tractor should be parked with the trailer.
This functionality requires you to:
-
Record reasons for splitting a trip.
-
Make the Drop Tractor checkbox visible in the Split Trip/Drop Trailer window.
This checkbox lets you specify whether the tractor is to be dropped with the trailer. It is hidden by default.
Setting up reasons for splitting a trip
You record reasons for splitting a trip as options in the DropAssetReason label. Your entries are available in the Split Trip/Drop Trailer window’s Reason drop-down list. These options are set up by your company, according to your business practices. You access the label file in the TMWSuite System Administration application.
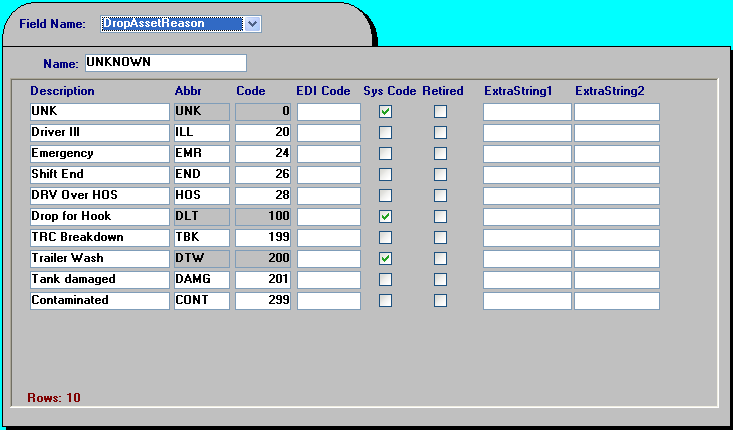
The value you enter in the Code field for a label option determines when it can be used as the reason for splitting a trip:
-
0-99
These reasons can be selected when the trailer is either loaded or empty.
-
100-199
These reasons can be selected only when a trailer contains a full or partial load.
-
199-200
These reasons can be selected only when a trailer is empty.
| For details, see Using the label file to customize fields. |
Making the Drop Tractor checkbox visible
By default, the Drop Tractor checkbox in the Split Trip/Drop Trailer window is hidden. You make it visible using the [FuelDispatch]HideDropTractorCheckbox setting in your TTS50. When this checkbox is visible, it is cleared by default. The tractor will not be parked with the trailer. To park the tractor, you must select the checkbox.
Allowing split trips without trailers
Split trips typically consist of tractors and trailers. In some cases, however, split trips involve trucks without trailers, for example, straight trucks. To allow the system to create a split trip for a truck without a trailer, set [Split]TrailerRequiredToSplit=NO in your TTS50.
| Tractors are identified as straight trucks in their profiles. On the Information tab, verify that your straight trucks are set to No Trl (drv reqd) in the TrcRequiresDrvTrl field. |
Splitting a trip
You split trips in the Card Planner or Planning Worksheet. The trip you want to split must be the last planned trip of the driver’s shift. You can split a trip immediately after you plan it, or you can split a trip that was planned at an earlier time.
The split trip feature allows you to park a trailer at an interim location so that one of the following can occur:
-
The driver can hook the trailer to a different tractor
-
A new driver can change places with the original driver
-
The trailer can be hooked to a different tractor driven by a different driver
| In Fuel Dispatch, the split trip feature is designed to split a trip once only. Splitting a trip produces a starting trip segment and a final trip segment. Do not attempt to split either of these segments any further. |
To split the trip, follow these steps:
-
In the Card Planner or Planning Worksheet, locate the trip you want to split.
-
Right-click the trip, and select Split Trip/Drop Trailer from the shortcut menu.
The Split Trip/Drop Trailer window opens. The top of the window displays the assets currently assigned to the trip. You use the bottom of the window to enter the details of the split.
Show me -
Make the appropriate entries in these fields.
Field definitionsReason
Select a reason that identifies why the split trip is necessary.
-
For reasons having codes 0-99, the trailer can be loaded or empty.
-
For reasons having codes 100-199, the trailer must be loaded.
-
For reasons having codes 199-200, the trailer must be empty.
Note: Reasons are set up in the DropAssetReason label in the System Administration application.
After Stop
Select the stop after which the park and hook is to be inserted from the drop-down list.
By default, the system lists the initial pickup. For example, if only two stops exist for an order, the logical place to split the trip is between these two stops.
Company
This field defaults to the company recorded for the stop you selected in the After Stop field. Enter the ID of company where the trailer will be parked.
Location
This field defaults to the city and state/province of the company specified in the Company field. Leave it as is.
Park Date
This field defaults to the estimated date/time that it will take for the driver to arrive at the park location. Change it, if needed.
Hook Date
This field defaults to one minute after the date/time shown in the Park Date field. Change it to the date/time when you expect the next driver/tractor will be able to start the next segment of the trip.
Drop Tractor
By default, only the trailer will be parked when a trip is split. However, if the Drop Tractor checkbox is visible, you have the option to drop the tractor with the trailer. Select it if this is needed.
Note: The selections in the After Stop and Reason fields must be compatible. For example, if the trailer is to be dropped after a Live Load (LLD) event, the trailer is assumed to be loaded. The reason must be applicable for a loaded trailer. For details, refer to Setting up reasons for splitting a trip.
-
-
Click OK.
The system checks to see whether the Reason entry is compatible with the trailer’s load status at the drop location.
-
If the reason is invalid, an error message is displayed. Edit the Reason or After Stop field as needed.
Show me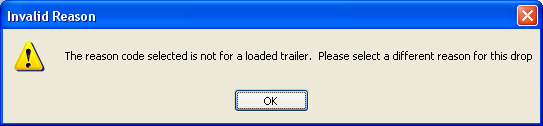
-
For reasons having codes 0-99, the trailer can be loaded or empty.
-
For reasons having codes 100-199, the trailer must be loaded.
-
For reasons having codes 199-200, the trailer must be empty.
-
If the reason is valid, the system displays the "Are you sure you wish to split this trip?" confirmation message. Click Yes, and allow a few seconds for the system to process the split.
-
-
In the Card Planner or Planning Worksheet, click Update to save the split.
Note: If you have Trailer Autoloading enabled, you might need to perform additional steps to complete the save. See Trailer Autoloading overview for details.
When the save is completed, two trip segments having the same order number will be present in the Priority Orders tab.
-
The starting segment
The order number ends with the suffix "-S." The assets that were assigned originally to the order remain assigned to this segment.
-
The final segment
The order number ends with the suffix "-F." This segment is unplanned.
Show me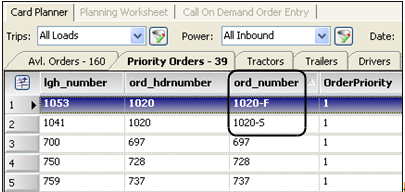
-
-
Click Refresh.
-
If you want, assign assets to the newly-created final trip segment.
How a split trip looks in the Call On Demand Order Entry window
A split trip is sometimes called a park and hook. The first segment ends with the parking of the trailer. The second segment begins with the hook, which signifies the switch in resources, that is, the take-over of the trip by the next driver/ tractor pairing. When you split a trip, the system creates the park and hook by automatically adding two events in the place you specified as the split location.
These events are:
-
DLT
The event code DLT stands for Drop Loaded Trailer. It represents the park.
-
HLT
The event code HLT stands for Hook Loaded Trailer.
This illustration shows the way stops for a trip look before it is split.

If you split a trip and park only the trailer, the trip looks like this.
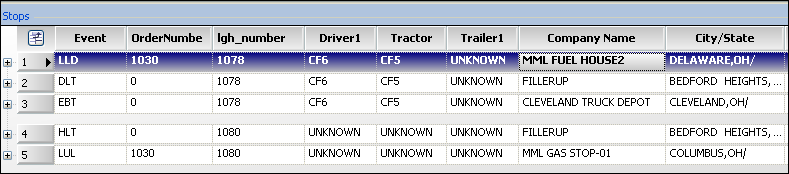
On this trip, the DLT event follows the pickup in the first segment and the HLT event is the first one in the second segment. Note that the system inserts an EBT (End Bobtail) event at the end of the first segment. Since the segment is the last one the driver will do on his shift, the system automatically bobtails him to his home terminal.
If you split a trip and park both the tractor and the trailer, the trip looks like this.

The first segment ends with a DLT event, and the second begins with an HLT event. An empty event is not added to the first segment because there is no way for the system to determine how the driver will leave the park location.
Assigning assets to the final trip segment created by the split
After you split a trip, the starting ("-S") segment of the trip retains the assets originally assigned to the trip.
The final ("-F") trip segment requires the assignment of a driver, or a driver and tractor, depending on whether the tractor was dropped with the trailer.
You can assign assets to the trip’s final segment immediately after you split the trip, or you can do so later, after you save the split.
| When you plan a final trip segment where only the trailer was dropped, make sure a tractor is one of the assigned assets. If it is not, the tractor assignment on the final segment will remain UNKNOWN, and you will have to assign a tractor manually. |
Follow these steps:
-
In the Card Planner or Planning Worksheet, locate the two trip segments created by the split. Normally, the split process places these orders on the Priority Order tab.
-
Do one of the following:
-
In the Card Planner, drag the trip final segment to the desired asset’s card in the Assignment Plan pane.
-
In the Planning Worksheet, click and drag the segment to the desired asset in the Resource pane.
Note: For details on planning trips in the Card Planner and Planning Worksheet, refer to Assigning resources to trips.
-
-
Click Update.
Canceling a split trip
A split trip can be canceled in Call On Demand Order Entry. Canceling a split trip does not cancel the order; it recombines the segments.
| To cancel a split trip, the first event in the second segment of the trip must be an HLT, which will be the case for an unplanned second segment. If the second segment has already been planned, the first event of the second segment can also be a BMT or BBT. In this case, you must remove the assets assigned to the second segment before canceling the split. |
-
Open the order in Call On Demand Order Entry.
In the Stops grid, you should see the starting and final segments of the split trip, separated by a blank horizontal space. The first event in the second segment should be Begin Bobtail (BBT), Begin Empty (BMT), or Hook Loaded Trailer (HLT).
Show me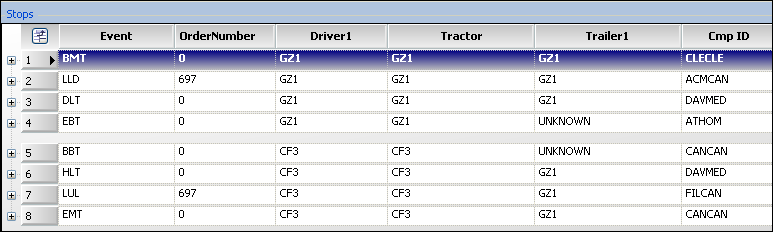
-
If the first event of the second segment is not HLT, remove the assets from the segment. Do this by setting the Driver1, Driver2, Tractor, Trailer1, and Trailer2 fields in the first event of the second segment to UNKNOWN. The system will complete the unplanning operation automatically.
-
Do one of the following:
-
Go to Dispatch > Cancel Split Trip.
-
Right-click the order in the Stops grid, and select Cancel Split Trip from the shortcut menu.
The split will be removed, and the stop events will change to BMT / LLD / LUL.
-
-
To complete the split cancellation, click
 Save.
Save. -
In the Stops grid, an End Empty (EMT) event should now be restored as the last stop event.
Show me