Creating a multi-order job
The multi-order job feature simplifies the process of creating and dispatching orders for repetitive loads. A job serves as a planning record.
You use the Call on Demand Order Entry window to create a job. You use the Card Planner or Planning Worksheet to create order copies from the job and dispatch them.
-
It is created and saved in the same way.
-
You can have the system assign an order number, or you can enter a user-defined ID.
-
It cannot be dispatched.
-
Order copies are made from it.
-
A job’s lifespan can be limited to the number of order copies or volume you specify when you create it. By default, a job drops off the Available Order grid when its remaining orders or volume reach 0 (zero).
-
Although it cannot be dispatched, it shows in the Card Planner or Planning Worksheet as a planning record. Its priority determines which tab it appears on:
-
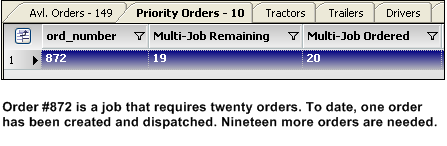
If the job has a High priority, it shows in the Priority Orders grid.
-
If it has a priority other than High, it shows in the Avl Orders grid.
-
-
Dragging a job from the Avl. Orders grid or the Priority Orders grid to the assignment pane in the Card Planner or Planning Worksheet creates an order copy and dispatches it automatically. The number of available orders or volume remaining in the job decreases.
-
If you create an order from a job and then decide it was planned in error, you do not need to cancel it. You can drag it from the trip assignment pane in the Card Planner or Planning Worksheet back to the Avl. Orders grid or the Priority Orders grid. The job’s remaining orders quantity is reset to what it was before you created the order.
The system provides the following methods for creating a multi-order job. You create the job based on the appropriate job type:
-
Order Count
Create the job order based on the number of orders needed to fulfill the job.
This method is available by default.
-
Volume
Create the job order based on a specific commodity volume to fulfill the job.
This method requires additional setup. For more information, contact you Trimble Support Team.
Select a procedure to create a multi-order job.
Create a job by order count
-
Select Applications > Call on Demand Order Entry.
The Call on Demand Order Entry window opens. -
Create a new order as you would normally (refer to Order entry basics if needed).
-
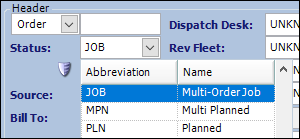
Click the Status field and select JOB.
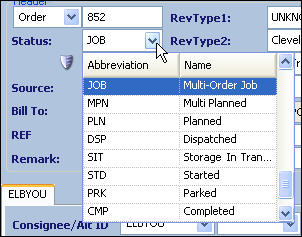
Note: If JOB does not appear among the options, open the TMWSuite System Administration application and look up the DispatchStatus label. Check that the system code Multi-Order Job option has its Retired checkbox cleared.
-
Before saving the order, click
 Header Info, located beneath the Status field.
The Additional Order Header Information window opens.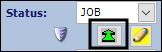
-
In the Job Ordered field, enter the number of order copies that you want to create for this job and press TAB.
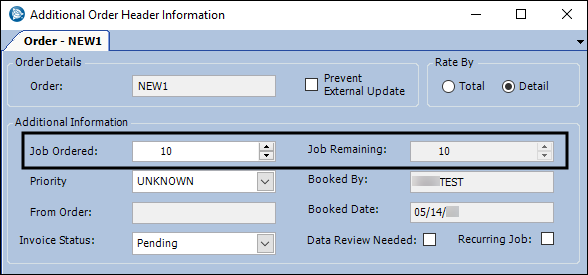
The quantity in the Job Remaining field updates to show the same number. This field is read only. As you make order copies, the number in this field decreases by one for each order.
By default, the system prevents you from editing the Job Ordered field value after saving the order. To allow editing, you must have
[FuelDispatch]AllowEditJOBOrdered=Yin your TTS50.If the value you enter in the Job Ordered field is less than the amount showing in the Job Remaining field, the system displays the
 Exclamation icon. When you position your pointer over the icon, a ToolTip displays. It states, "Job Ordered cannot be less than Job Remaining."
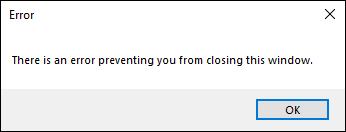
If you try to exit the window, the system opens an error message that states, "There is an error preventing you from closing this window." To close the Error window, click OK. To close the Additional Order Header Information window, correct the value in the Job Ordered field and then exit the window.
-
Select a priority level in the Priority field.
Note: A job record with a High Priority is listed in the Priority Orders grid in the Card Planner and Planning Worksheet. Jobs with any other priority are listed in the Avl. Orders grid.
-
To make the job a recurring job, select the Recurring Job checkbox. When there are no orders left on the job, the job remains available for adding new orders.
Note: The checkbox is not available by default. You must have
[FuelDispatch]RecurringJobOrdersin your TTS50. -
In the Additional Order Header Information window, click Close.
-
Save the order.
Create a job by volume
Note: This method requires additional setup. For more information, contact you Trimble Support Team.
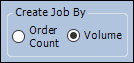
When creating job orders based on a specific volume, the Create Job By section shows in the Additional Order Header Information window. It includes the Order Count and Volume radio buttons that allow you to toggle between the types of job orders you want to create. The system selects the Volume radio button by default.
To create a job by volume:
-
Select Applications > Call on Demand Order Entry.
The Call on Demand Order Entry window opens. -
Create a new order as you would normally (refer to Order entry basics if needed).
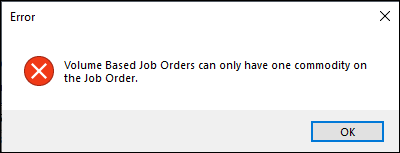
Note: A job order based on volume can include only one commodity. If you add one or more additional commodities to a job order or job order copy and save, the system opens an error message that states, "Volume Based Job Orders can only have one commodity on the Job Order." To close the Error window, click OK. Remove any additional commodities.
-
Click the Status field and select JOB.
Note: If JOB does not appear among the options, open the TMWSuite System Administration application and look up the DispatchStatus label. Check that the system code Multi-Order Job option has its Retired checkbox cleared.
-
Before saving the order, click
Header Info, located beneath the Status field.
The Additional Order Header Information window opens. -
In the Volume Ordered field, enter the volume required for this job and press TAB.

The quantity in the Volume Remaining field updates to show the same volume. This field is read only. As you make order copies, the volume in this field decreases by the volume you specify on the order copy.
By default, the system prevents you from editing the Job Ordered field value after saving the order. To allow editing, you must have
[FuelDispatch]AllowEditJOBOrdered=Yin your TTS50.If the value you enter in the Volume Ordered field is less than the amount showing in the Volume Remaining field, the system displays the
Exclamation icon. When you position your pointer over the icon, a ToolTip displays. It states, "Volume Ordered cannot be less than Volume Remaining."
If you try to exit the window, the system opens an error message that states, "There is an error preventing you from closing this window." To close the Error window, click OK. To close the Additional Order Header Information window, correct the value in the Volume Ordered field and then exit the window.
The system validates entries in the Volume Remaining and Volume Ordered fields and issues error messages for the following types of conflicts.
-
Volume Ordered value is less than the Volume Remaining value
-
Job order by volume includes more than one commodity
-
Copy order’s freight volume exceeds the Volume Remaining value
-
-
Select a priority level in the Priority field.
Note: A job record with a High Priority is listed in the Priority Orders grid in the Card Planner and Planning Worksheet. Jobs with any other priority are listed in the Avl. Orders grid.
-
To make the job a recurring job, select the Recurring Job checkbox. When there are no orders left on the job, the job remains available for adding new orders.
Note: The checkbox is not available by default. You must have
[FuelDispatch]RecurringJobOrdersin your TTS50. -
In the Additional Order Header Information window, click Close.
-
Save the order.