Creating oil field orders
Oil field orders involve the transportation of crude oil, by-products, and related materials. You create these types of orders in the Oil Field Order Entry window.
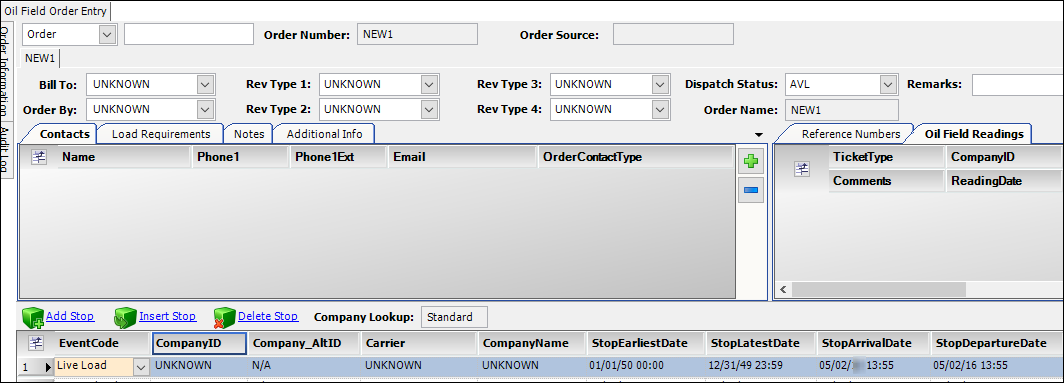
Oil Field Order Entry window overview
You enter and update oil field orders in the Oil Field Order Entry window. To make the window available, you must have [FuelDispatch]ShowOilFieldOrderEntry=Y in your TTS50. To access the window, go to Application > Oil Field Order Entry.
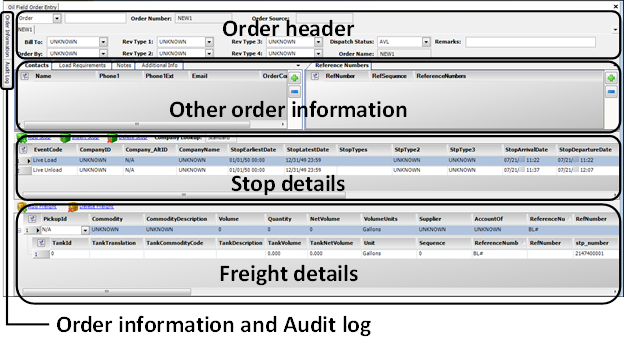
The sections of the Oil Field Order Entry window are described below.
Section |
Function |
Order header |
Used to record the Bill To and Order By company IDs, revenue classifications, dispatch status, and free-form remarks |
Other order information (grid) |
The default Other order information grid contains five tabs:
|
Stop details |
Lists all of the billable and non-billable stops recorded for the trip You also can use the Stop detail to start and complete the trip. |
Freight details |
Used to enter commodities for the order Each record consists of a primary freight row, and a secondary tank row.
|
Order information |
Displays the leg, movement, order, and order header numbers for an order or consolidation These fields are read-only. |
Audit log |
Displays a record of changes to the order that includes:
These fields are read-only. |
Entries in many fields in the Oil Field Order Entry window are optional; the fields you need to complete depend on the order. You must, however, enter pickup and drop locations for a new order, or you will receive an error message when you attempt to save the order.
The following topics describe the usual sequence for creating an order in the Oil Field Order Entry window. The sequence is a guideline that you can modify as needed.
Recording the basic order information
The order header section supplies basic information about the companies that place the order and pay for the shipment. You edit fields in the order header when you create a new order. You can also modify the header for an existing order.
-
To begin a new order, click
 New or select File > New.
-
In the Order header, complete fields as needed.
-

Required field: *
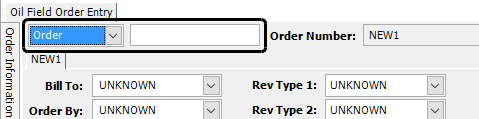
Order (drop-down list) ID (unlabeled) |
The Order drop-down list contains different ID types that can be associated with an order. The unlabeled field to its right displays or accepts the entry of the ID.
|
Order Number |
Displays the order ID of the retrieved order, regardless of the ID type selected in the Order drop-down list. This field is read-only. |
Order Source |
This read-only field identifies the system used to create the order. Orders entered in the Oil Field Order Entry window show OFOE. Orders entered in the Call On Demand Order Entry window show COD OE. An order created by, or imported from, another software application is identified as such. For example, orders created automatically by the FuelTMS Forecaster module show FRCST. |
Bill To * |
Displays the unique ID assigned to the company that is to be billed for the shipment When you create an order, enter the Bill To ID in the field. Note: The |
Order By |
Displays the unique ID of the company placing the order When you create an order, enter the Order By ID in the field. Note: A company can be an Order By company if the Account of checkbox is selected in its Company Relations Profile. |
Rev Type 1-4 |
From the Rev Type drop-down lists, select the revenue classification(s) appropriate for the order. Notes:
|
Dispatch Status |
Identifies the status of the order Note: A status of AVL (Available) is assigned automatically to an order when it is first saved. You must assign other statuses manually. |
Order Name |
Displays the order name/number This field is read-only. |
Remarks |
Enter free-form text that applies to the order. |
Recording stop information
The Stops grid lists all of the billable and non-billable stops recorded for the trip.
| Although resources are assigned to an order in the Card Planner or Planning Worksheet, you can use the Stops grid to start and complete the trip. |

Required field: *
The most commonly used fields are listed here in alphabetical order.
Select this checkbox to indicate the truck has arrived at the stop. Note: Although you assign resources to orders in the Card Planner or Planning Worksheet, you can actualize the order’s stops in the Oil Field Order Entry window. |
|
Carrier |
Displays the carrier assigned to the order |
Company_AltID |
The alternate company identification code if one is recorded in the stop location’s company profile |
CompanyID * |
The system-assigned ID of the company at which the stop is located |
CompanyName |
The name recorded in the stop location’s company profile This field is read-only. |
Select this checkbox to indicate the truck has left the stop. Note: Although you assign resources to orders in the Card Planner or Planning Worksheet, you can actualize an order’s stops in the Oil Field Order Entry window. |
|
Driver1 |
The identification code recorded in the profile of the tractor assigned to the trip This field is read-only. Note: You assign drivers to orders in the Card Planner or Planning Worksheet. |
Driver2 |
The identification code recorded in the secondary driver’s profile This field is read-only. Note: You assign drivers to orders in the Card Planner or Planning Worksheet. |
EventCode |
The activity performed at the stop |
ReferenceNumbers |
Identifies the reference number type associated with the stop Notes: You use the drop-down list to select the reference number type you want to record. Your company defines its reference number types using the ReferenceNumbers label. |
RefNumber |
Displays the reference number associated with the stop Note: You use this field to enter a reference number of the specified type for the stop. |
MoveSequence |
The order of the stops, as they occur on the trip You can re-order stops by editing this field. |
OrderNumber |
The unique, system-assigned ID associated with the order This field is read-only. |
ShowAsCompany Name |
Displays the ID of the stop location company recorded in its company profile This field is read-only. |
StopArrivalDate |
The date/time the truck arrived at the stop |
StopDepartureDate |
The date/time the truck left the stop |
StopEarliestDate |
The earliest date/time the stop can occur |
StopLatestDate |
The latest date/time the stop can occur |
Tractor |
The identification code recorded in the profile of the tractor assigned to the trip This field is read-only. Note: You assign tractors to orders in the Card Planner or Planning Worksheet. |
Trailer |
The identification code recorded in the profile of the primary trailer assigned to the trip |
Trailer2 |
The identification code recorded in the profile of the secondary trailer assigned to the trip, if applicable |
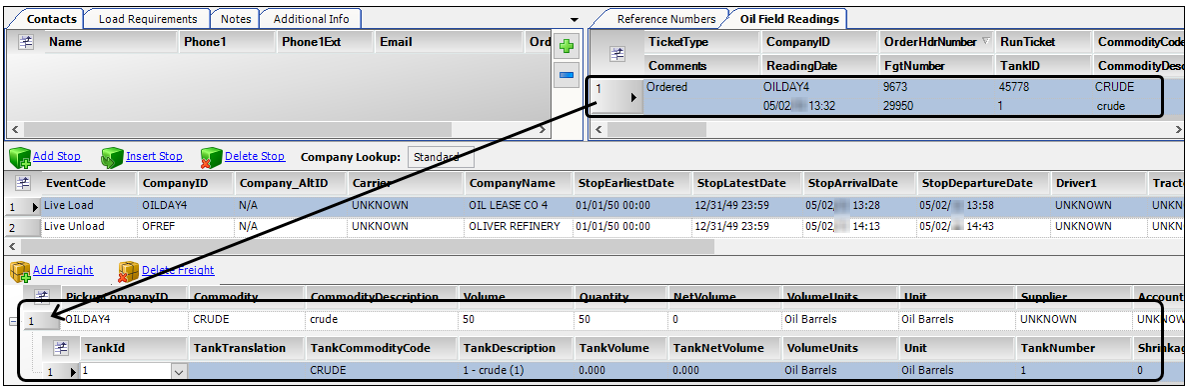
Recording freight details
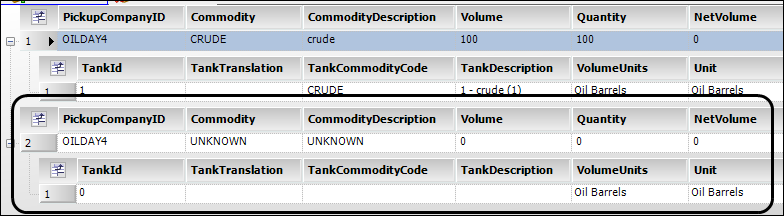
When you create an order, the system adds a blank freight record to the Freight Information grid. The freight record consists of:
-
A primary row containing fields for the entry of commodity information
-
A secondary row for the entry of tank information
Complete both records as needed.
Recording commodity information
Required field: *
PickupId |
Alternate company identification code, if one is recorded in the shipper company’s profile |
Commodity * |
Identification code assigned to the product to be picked up Note: The drop-down list for the field displays only the commodities that are associated with the shipper. For details, see Setting up commodity classes and commodities. |
Commodity |
Commodity name as recorded in the commodity profile |
Volume |
If the commodity is measured by volume, enter the number of units on the order. Note: If you enter a value in this field before you enter a Quantity and Actual Quantity, the system copies your entry to the other two fields. You can edit any of these fields independently. |
Quantity* |
Ordered quantity of the commodity Note: If you enter a value in this field before you enter a Volume and Actual Quantity, the system copies your entry to the other two fields. You can edit any of these fields independently. |
Actual Quantity |
Loaded quantity of the commodity Note: If you enter a value in this field before you enter a Volume and Quantity, the system copies your entry to the other two fields. You can edit any of these fields independently. |
NetVolume |
Volume of the commodity being delivered |
VolumeUnits |
Default unit of measure used for commodities measured by volume You can select another unit of measure from the drop-down list. |
RefNumbers |
Displays a drop-down list of reference number types Your company defines its reference number types using the ReferenceNumber label. |
RefNumber |
Enter the reference number of the specified type associated with the freight. |
fgt_sequence |
Sequence in which the commodity was added to the order This field is read-only. |
DeliveryCompanyID |
Identification code of the consignee company |
stp_number |
Stop number associated with the commodity This field is read-only. |
fgt_number |
System ID assigned to the freight record This field is read-only. |
PickupCompanyID |
Company identification code recorded in the shipper company’s profile This field is read-only. |
Unit |
Unit of measure used for the commodity quantity |
Weight |
If the commodity is measured by weight, enter the number of units on the order. |
WeightUnits |
Default unit of measure used for commodities measured by weight You can select a different unit of measure from the drop-down list. |
Count |
If the commodity is measured by count, enter the number of units on the order. |
CountUnits |
Default unit of measure used for commodities measured by count You can select another unit of measure from the drop-down list. |
TankId |
Select the tank’s ID number from the drop-down list. |
TankDescription |
Displays the tank’s commodity content This field is read-only. |
TankTranslation |
ID painted on the side of the tank and provided to the driver to ensure product is lifted from the correct source |
TankSize |
Tank volume |
TankLastReading |
Tank’s last volume reading, expressed as a dip reading |
TankLastReadingDate |
Date the last tank reading was performed |
TankLastReading |
Equivalent of the tank’s last volume reading expressed in barrels |
TankVolume |
Custom field |
TankNetVolume |
Custom field |
TankCommodityCode |
Custom field |
Recording tank information
Record tank information as needed.
PickupCompanyID |
Identification code recorded in the shipper company’s profile This field is read-only. |
Commodity |
Identification code of the commodity in the tank, as recorded in the commodity profile |
Commodity |
Name of the commodity in the tank, as recorded in the commodity profile |
Volume |
Tank size |
Quantity |
Amount of product on the order |
fgt_sequence |
Sequence in which the commodity was added to the order This field is read-only. |
DeliveryCompanyID |
Identification code recorded in the consignee company’s profile This field is read-only. |
stp_number |
Stop number associated with the commodity |
fgt_number |
System ID assigned to the freight record This field is read-only. |
TankId |
Select the tank’s ID number from the drop-down list. Note: Your company may set up the system to hide tanks that are not producing. |
TankDescription |
Tank’s commodity content This field is read-only. |
TankSize |
Tank volume |
TankLastReadingIn |
Tank’s last volume reading, expressed as a dip reading |
TankLastReadingDate |
Date the last tank reading was performed |
TankLastReading |
Equivalent of the tank’s last reading, expressed in barrels |
Notes:
-
An order’s run ticket information is displayed on the Oil Field Readings tab. Availability of this tab requires the
[StopOrderEntry]ShowOilFieldReadings=Yin your TTS50. -
By default, you enter the run ticket manually. If you have
[StopOrderEntry]OFOETankMode=Crudein your TTS50, the system uses your entries in the Tanks grid to create the run ticket automatically.
Add or remove freight as needed.
-
Click Add Freight.
New commodity and tank rows are added to the Freight information grid.
-
Enter commodity and tank information as needed.
-
Repeat steps 1 and 2 as needed for additional freight.
Note: By default, the system allows you to add freight details from ten different tanks. However, if you have
[StopOrderEntry]OFOETankMode=Crudein your TTS50 you can enter more than ten tanks.
-
Select the freight detail row you want to remove.
-
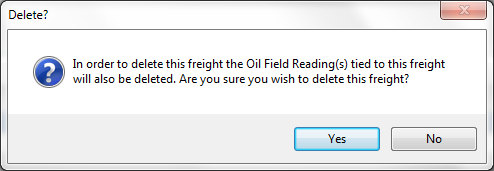
Click Delete Freight.
The system displays a message stating, "In order to delete this freight the Oil Field Reading(s) tied to this freight will also be deleted. Are you sure you wish to delete this freight?" -
Do one of the following:
-
Click Yes to remove the freight detail.
-
Click No to close this window without removing the freight detail row.
-
-
Save the order.
Adding and removing commodities
You can add or delete commodities in the Freight information grid using the Add Freight and Delete Freight links located above the grid.
![]()
-
To add a commodity, click Add Freight.
A new commodity item is added to the Freight information grid. Complete commodity and tank information fields as described under Recording freight details.
-
To delete a commodity, select the commodity and click Delete Freight.
The system displays a confirmation request:
Note: Oil Field Readings are entered in the Oil Field Readings tab. Availability of this tab requires the
[StopOrderEntry]ShowOilFieldReadings=Yin your TTS50. See Reviewing run ticket data on the Oil Field Readings tab for more information.

Adding run ticket rows
Run tickets provide information such as:
-
Company ID and Tank ID
-
Reading date
-
Order number and run ticket number
-
Commodity and commodity class
-
Amount of product removed from a tank
Example run ticket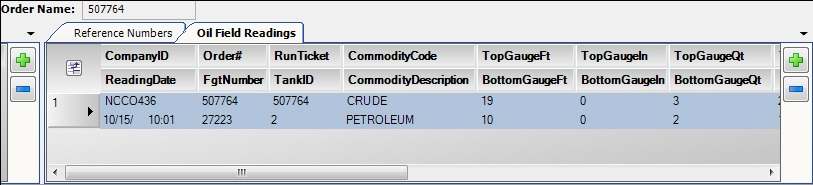
Use the [StopOrderEntry]ShowOilFieldReadings setting in your TTS50 to display this tab.
There are two ways to enter a run ticket for an order.
-
Manually
You must add a row of data on the Oil Field Readings tab for each freight detail on the order.
-
Automatically
You can set up the system to have it add a row of data for each freight detail automatically.
When the driver provides the run ticket information, you can enter it on the tab.
Adding run ticket rows manually
To add a run ticket row manually, follow these steps:
-
Go to Application > Oil Field Order Entry.
The Oil Field Order Entry window opens.
-
Look up the order.
-
Click the Oil Field Readings tab.
The system displays the Oil Field Readings grid. -
Click
 Add.
Add.
The system adds a new row to the Oil Field Readings grid.

To remove a row from this grid, highlight that row and click ![]() Remove.
Remove.
-
Enter as much information as possible.
-
Repeat Steps 4 and 5 as needed for each of the order’s freight details row.
Each row in the Oil Field Readings grid corresponds with the freight detail row.
-
Save your changes.
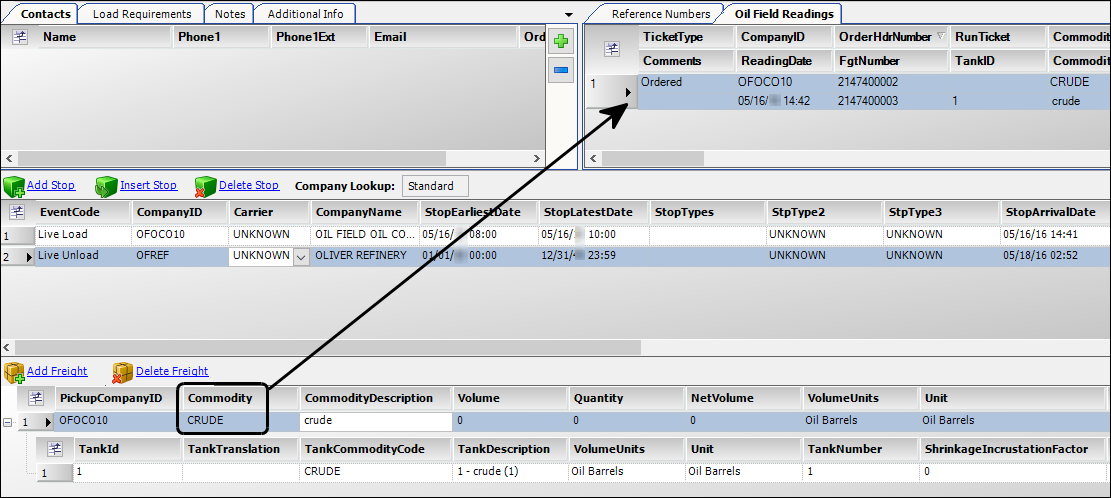
Having the system enter run ticket rows automatically
First available in Fuel Dispatch V.16.20
In Fuel Dispatch, there are two ways to have the system add run ticket rows automatically. The first way is to use PeopleNet Crude Oil Workflow. If you are not using this feature, you can set up the system to add run ticket rows.
To set up the system so it adds run ticket rows automatically, you must have [StopOrderEntry]OFOETankMode=Crude in your TTS50. The system adds a run ticket row when you enter a commodity in the Freight Details section.
Notes:
-
The lease company must have a tank that contains the selected commodity. If it does not, the system will not create a run ticket row.
-
If you change the tank ID in the TankId field of the freight details row, the system will change the run ticket accordingly.
Recording other order information
The Order Information section consists of the Contacts, Load Requirements, Notes, and Additional Info tabs.
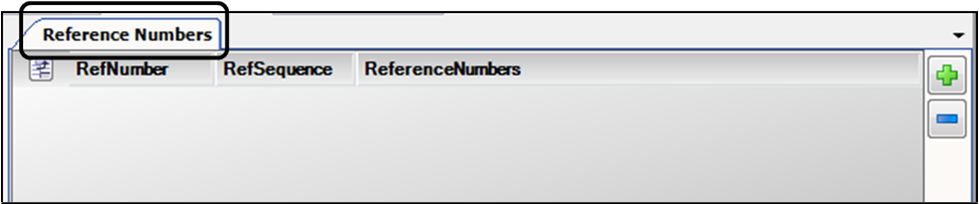
Entering order header reference numbers
The Reference Numbers tab can be used to add one or more reference numbers to the order header.
-
Click the Reference Numbers tab.
-
At the right side of the tab, click
 Add. The system adds a reference number row to the tab.
-
Complete fields as needed.
Field definitionsRequired field: *
RefNumber*
Enter the reference number value.
RefSequence
When you add a reference number, the system assigns the lowest available value to this field. To change the sequence of reference numbers, enter whole numbers in the field(s).
ReferenceNumbers*
Select a reference number type from the drop-down list.
-
Click
 Save.
Save.
Re-sequencing the Reference Numbers grid
To re-sequence the Reference Numbers grid:
-
To sort the reference number grid, click a column header. The grid sorts in ascending or descending order according to values in the column.
-
To re-sequence reference numbers, edit the RefSequence fields as needed (whole numbers, only) and click the RefSequence header.
-
To keep the current reference number sequence, save the order.
The [Misc]AllowReferenceNumberSequenceChangeByKeyStroke setting in your TTS50 does not apply to Oil Field Order Entry.
|
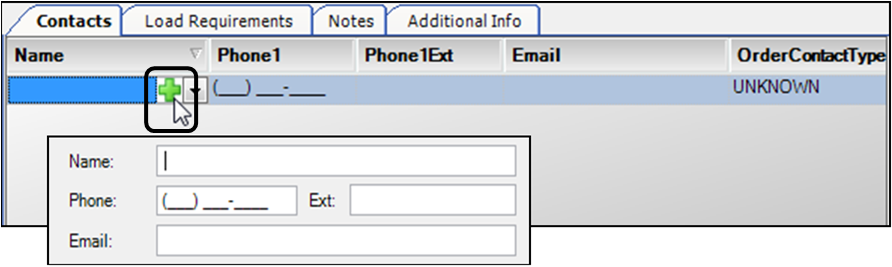
Adding a contact
The Contacts tab is used to attach an order-type contact to the order. If you add a new contact in this tab, the contact will also be added to the Contacts tab in the Bill To company profile.
To attach an order-type contact to the order, follow these steps.
-
Click the Contacts tab.

-
At the right side of the tab, click
 Add. The system adds a blank contact record to the tab.

-
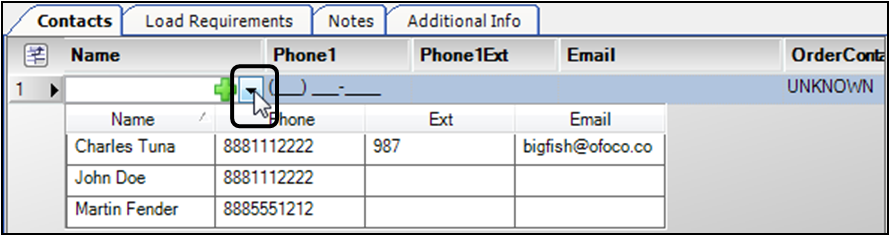
Do one of the following:
-
In the Name field, click
Add.A contact form opens beneath the field.
-
Complete the fields in the form.
Note: At minimum, enter the contact name. You can complete other fields in the form at the same time, or do so later in the Contacts tab.
-
To close the form, click within the new contact Name field, to the left of
Add.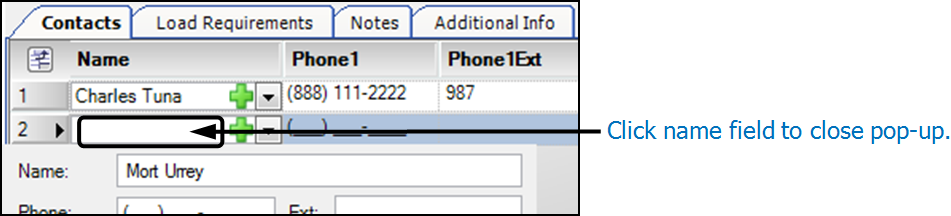
Notes:
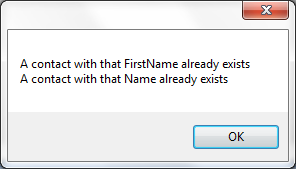
-
If you enter a contact that already exists, a message appears stating, "A contact with the FirstName already exists. A contact with that Name already exists.". To attach this contact, use the steps in Attach an existing order-type contact.
-
If the contact does not exist in the Bill To company’s profile, it is added to the profile immediately as an order-type contact, even if you do not save the order.
-
If you do not want to use the contact just added to the order, select the contact and click
 Collapse to remove it. You must remove the contact manually from the Bill To company profile.
-
In the Name field, select the needed contact. Available contacts are displayed beneath the Name field.
-
Select a contact.
The system adds the contact to the Contacts tab.
-
In the Contact tab, edit fields as needed.
Note: If you change a field for a contact that was already saved to (or loaded from) the Bill To company profile, that information will be updated in the company profile when you save the order.
Field definitionsRequired field: *
Name*
Free-form field for entering the name of the contact
Phone1
Free-form field for entering the contact’s phone number
Phone1Ext
Free-form field for entering the contact’s phone extension
Email
Free-form field for entering the contact’s e-mail address
OrderContactType
Drop-down list of options that identify the type of contact
Note: Options in the OrderContactType drop-down list are defined in the OrderContactType label in the System Administration application. Your company defines the options according to its business needs.
-
To add another contact, repeat steps 2-4.
-
Click
Save.
Deleting a contact
To delete a contact from the Contacts tab:
-
In the Contacts tab, scroll to and select the contact you want to delete.
-
Click
Collapse at the right side of the Contacts tab.
The contact will be removed from the order but will remain in the Bill To company’s profile.
-
Click
Save.
| To remove the contact from the Bill To company profile, open the profile and manually remove the contact. |
Adding a load requirement
Load requirements specify special criteria that must or should be met when assigning resources (driver, tractor, trailer, or carrier) to an order. You can:
-
Record default load requirements for a company or commodity
-
Record load requirements specific to an order
For more information about load requirements, see What are load requirements/preferences?
To add a load requirement:
-
Click the Load Requirements tab.

-
At the right side of the tab, click
Add. The system adds a load requirement row to the tab.

-
Complete fields as needed for the load requirement.
Field definitionsRequired field: *
Activity
Specify the type of stop to which the condition applies. The options are:
* Both (pickup and drop)
-
Pickup
-
Drop
Bill To
Applicable only to default load requirements recorded for a company
The checkbox is not selectable in Oil Field Order Entry.
Commodity
If the condition applies to a specific commodity, select the commodity.
Defaulted
Indicates whether the load requirement is a default requirement recorded for the company or the commodity
Equip*
Specify the resource type to which the condition applies. The options are:
-
Driver
-
Tractor
-
Trailer
-
Carrier
Note: The resource type selected in this field determines the options that will be displayed in the Requirement field.
Expiration Date
Specify the date the requirement expires and will no longer be applied on an order.
Note: Applicable only to default load requirements.
Mandatory *
Specify whether the requirement is a must or a should condition.
Not *
Specify whether the requirement is met by the presence of the criteria or the absence of it. The options are:
-
Have/be
-
Not have/not be
Order Header#
If a company ID is selected in the load requirement Stop field, the system automatically inserts the order header number in the OrderHeader# field. The field is read-only.
Overridable
Applicable only to default load requirements
If the checkbox was selected in the default requirement, you have the option to override it for the order.
Qty
Applicable only for trailers for which an inventory quantity was recorded on the Inventory tab in its profile
If needed, specify the accessory quantity required for the trip. When a trailer is assigned to the trip, the system will check the quantity recorded in the trailer’s profile. If the quantity is less than the amount recorded for the load requirement, the system will display a warning. For a must requirement, it also will prevent dispatch of the trailer.
Requirement*
Select the applicable accessory/qualification from the drop-down list.
Notes:
-
Accessories are defined using the CarQual, DrvAcc, TrcAcc, and TrlAcc labels in the System Administration application. The options displayed reflect your selection in the Equipment field.
-
For tractors and trailers, the list does not distinguish between inventory and non-inventory items.
Stop
If the condition is applicable at a particular stop, select the company ID for that stop.
-
-
To add another load requirement, repeat Steps 2 and 3.
-
Click
Save.
Adding a note
A note allows you to convey information about an order to other users who access the order. In Oil Field Order Entry, you can:
-
Attach, view, edit, and delete order-type notes for an order.
-
View, edit, and delete notes that were attached to the profiles of companies and resources listed on the order.
Notes:
-
The Oil Field Order Entry Notes tab does not display notes attached to a commodity profile.
-
If you edit a note attached to a profile, you affect the note wherever it appears.
-
For more information about notes, see Entering and working with notes.
To add a note to the order:
-
Click the Notes tab.

-
. At the right side of the tab, click
Add. The system adds a note row to the tab.

-
. Complete fields as needed for the note.
Field definitionsRequired field: *
Expires
Date the note no longer applies
Id
The note’s system-assigned ID
This field is read-only.
Note: If you add a note to the grid and then delete it, the system discards the Id number. The next note you add uses the next available number.
LastUpdated
Displays the date/time the note was last modified
This field is read-only.
LastUpdatedBy
Displays the ID of the last person who modified the note
This field is read-only.
SentBy
Free-form field where you can enter the name of the person who sent the note
SentOn
Select the date when the note was sent.
Sequence
The system will automatically assign a number in this field. You can change this to any number from 0 to 9999.
Notes:
-
By default, the system assigns the number 1 to the first note, 2 to the second, and increments all subsequent numbers by one.
-
To sort the notes by Sequence number, click the column header.
-
You may assign the same Sequence number to more than one note. If more than one note has the same number, the note that was added most recently is displayed at the top of the window.
Table
Displays the name of the database table where the note is recorded
For example, company, driver, orderheader. This field is read-only.
TableCopiedFrom
This display-only field will be blank
TableKey
Identifies the record to which the note is attached
-
For notes attached to a trip or stop, this field displays the trip or stop number.
-
For notes attached to a master profile, this field displays the profile ID.
Text
Free-form note text
Type
The note’s primary subject matter
Note: Options are created in the NoteRe label in TMWSuite System Administration.
Urgent
Select the appropriate option:
-
Note
The note is informational only (default).
-
Urgent
The note is of critical importance.
ViewLevel
Who can see the note
-
Unknown
-
Internal Only
-
OK for external use
-
Agent Only
-
-
To add another note, repeat Steps 2 and 3.
-
Click
Save.
Deleting a note
To delete a note, follow these steps:
-
In the Notes tab, scroll to and select the note you want to delete.
-
Click
Collapse at the right side of the Notes tab. -
The system asks you to confirm the deletion. Confirmation messages and the results of deleting the note vary with note type.
-
If you delete an orderheader-type note, i.e., one that was added to the order in Oil Field Order Entry, you delete it from the current order, only. The confirmation message states, "Are you sure you want to delete the current selected note?"
-
If you delete a note that was attached to the profile of a company, resource, etc., you remove the note from the profile, and from any other order where it might appear. The confirmation message identifies the record to which the note is attached. For example, "By deleting a note attached to a Company, it will no longer appear on any order with this Company. Are you sure you want to delete the current selected note?"
-
Click Yes to delete the note.
-
Click
Save.
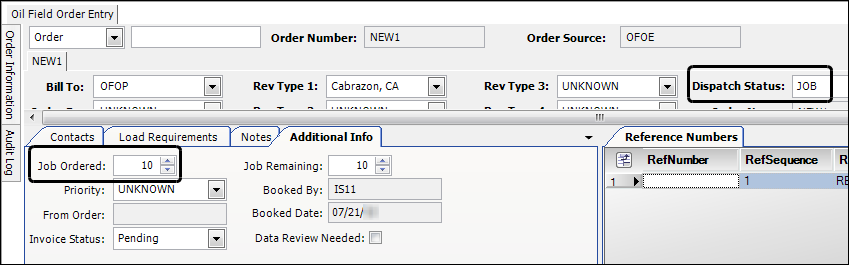
Creating a multi-order job for oil field orders
Like Call On Demand Order Entry, Oil Field Order Entry allows you to create multi-order jobs. The process is much the same in both windows:
-
You create the order and set its Dispatch status to Job.
-
Before saving the order, you enter the number of jobs ordered.
The difference between creating multi-order jobs in the two windows is in accessing the Additional Info window. In Oil Field Order Entry, you enter the number of required orders on the Additional Info tab, using the Job Ordered field.
For more information, see Creating a multi-order job in Call On Demand Order Entry.
Viewing other order information
The Order Information section contains tabs that display read-only information about the order.
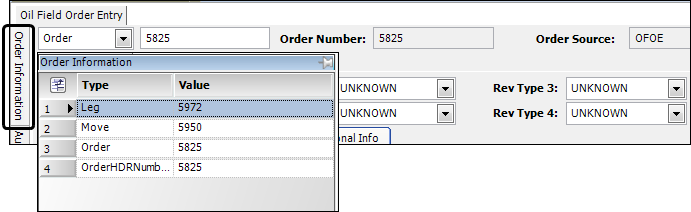
Order Information flyout
The Order Information tab displays the leg, movement, order, and order header IDs associated with an order. To view the contents, click the tab.
If the order is a consolidation:
-
The Order Information tab turns red and displays a C.
-
The Order Number field displays the IDs of individual orders making up the consolidation.
-
The Order header section displays a tab where you can view details of each order.
-
Clicking the Order Information tab displays information for all the consolidated orders.
Show me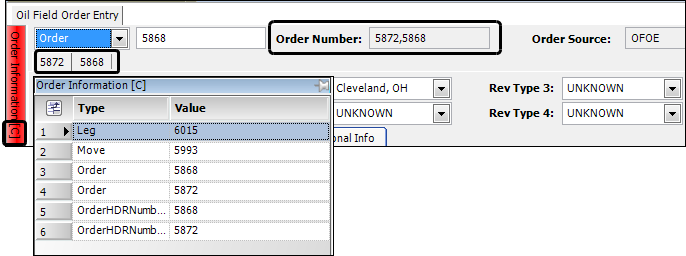
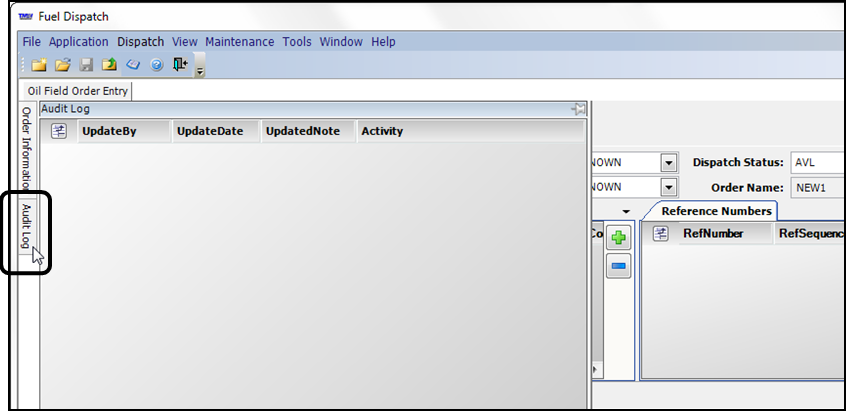
Audit Log flyout
The Audit Log tab displays a record of changes to the order, when the changes were made, and the login ID of the person making the changes. This information is available only when you are set up to track changes to orders.
Saving the order
When you have entered all required information, click ![]() Save.
Save.
One of the following occurs:
-
If the save is successful, the system will assign a numeric order number to your record. The order will be set to an Available (AVL) status, unless you manually changed the status before you saved.
Note: If you manually assigned an ID, the system saves the order using that ID.
-
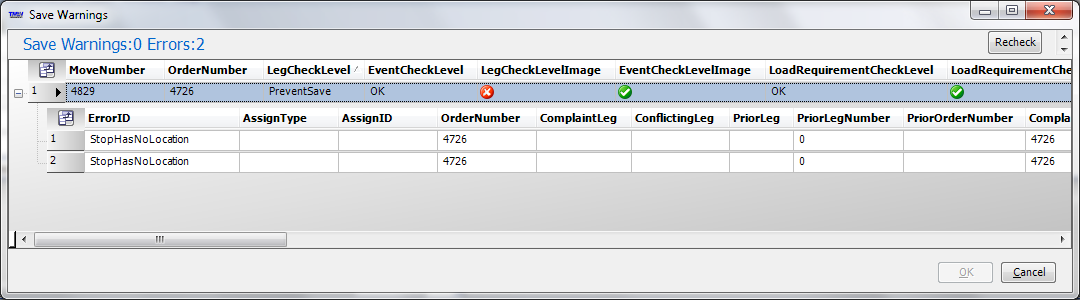
If you have failed to make required entries, you will receive a Save Warnings/Errors message when you attempt to save. Close the window, go back to the order, and enter the required data.
Looking up an existing order in Oil Field Order Entry
You can retrieve existing orders by entering a system ID code, asset ID code, or reference number. You enter this information in the order header’s lookup fields.
-
In the first field, use the drop-down list to select the type of record you want to use for the lookup.
-
In the second field, enter the ID for a specific record.
You can use these system ID codes to look up an order:
-
Order number
-
Order header number
-
Move number
-
Trip segment number
-
Leg number
You can use these asset ID codes to look up an order:
-
Driver
-
Tractor
-
Trailer
You can also use a reference number or barcode number to look up an order when one or more has been recorded on the order header.
|
Using a system ID to look up an order
Each time you record an order in Fuel Dispatch, the system automatically assigns these unique system ID numbers to the order:
-
Order number and order header number (usually the same number)
-
Movement number that identifies all activities performed by the resources assigned to the trip
-
Trip segment (or leg) that identifies each time a different driver and/or tractor is assigned to the movement
-
Go to Application > Oil Field Order Entry.
-
In the first lookup field, select one of the following:
-
Order
-
OrderHDRNumber
-
Move
-
TRIPSEG
-
Leg
-
-
In the second lookup field, enter the system ID number.
-
Click
 Open.
Open.
The order opens in the window.
-
Using an asset ID code to look up an order
After assets have been assigned to an order, you can look up the order using an asset ID code.
-
Go to Application > Oil Field Order Entry.
-
In first lookup field, select one of the following:
-
Driver
-
Tractor
-
Trailer
-
-
In the second lookup field, enter an ID code for the selected asset type.
-
Click
Open.
The asset’s most recent order or most recently completed order is displayed.-
If searching by tractor ID, the tractor’s most recent order is displayed.
-
If searching by trailer ID, the trailer’s most recently completed order is displayed.
-
If searching by driver, either the most recent order or most recently completed order is displayed, depending on the tractor and trailer assigned to the order.
-
Using a reference number to look up an order
First available in Fuel Dispatch: 16.10.28.0
If one or more reference numbers have been recorded on the order header, you can use a reference number to look up the order.
-
Go to Application > Oil Field Order Entry.
-
In first lookup field, select Reference.
-
In the second lookup field, enter the reference number.
-
Click
Open.
If the same reference number was used on more than one order, the most recent order is displayed.
|
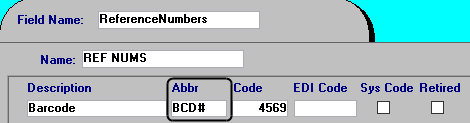
Using a barcode number to look up an order
First available in Fuel Dispatch: 16.10.28.0
If one or more barcodes have been recorded on the order header, you can use a barcode to look up the order.
-
Go to Application > Oil Field Order Entry.
-
In the first lookup field, select Barcode.
-
In the second lookup field, enter the barcode number.
-
Click
Open.
If the same barcode number was used on more than one order, the most recent order is displayed.
|