Assigning a different tractor or trailer to a driver
Ordinarily, the tractor and trailer are associated with the driver at the time you create the driver’s schedule. Occasionally, you may need to add or change the tractor/trailer association with a driver.
Assigning a different tractor or trailer using the Trips/Resources pane
Use these procedures to add, replace, or un-assign a tractor or trailer to a driver using the Trips/Resources pane. You can access this feature from either the Card Planner or the Planning Worksheet.
Adding a tractor/trailer
To add a tractor/trailer, follow these steps.
-
Do one of the following:
-
Go to Application > Card Planner.
-
Go to Application > Planning Worksheet.
-
-
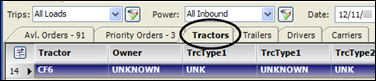
With trips and resources retrieved, select the Tractors tab.
-
Find the tractor you want, and then drag it to the correct driver in the Shift or Resource pane.
The tractor now shows in the driver’s row.Note: Only active tractors display on the Tractors tab, that is, those that are currently in service. The same is true for the Trailers tab.
-
If needed, repeat Steps 2 and 3, selecting the Trailers tab and dragging a trailer to the driver’s row in the Shift or Resource pane.
Note: If assigning resources in the Card Planner, the following applies. Assigning a trailer may cause a secondary trailer to be assigned automatically. For more information, see the section, Assigning primary and secondary trailers automatically.
-
Click Update.
Replacing a tractor/trailer
To assign a different tractor or trailer to a driver, follow these steps.
-
Do one of the following:
-
Go to Application > Card Planner.
-
Go to Application > Planning Worksheet.
-
-
With trips and resources retrieved, find the driver who needs a different tractor in the Shift or Resource pane.
-
Select the Tractors tab.
-
Find the tractor or trailer you want to assign to the driver, and then drag it down to the driver’s row in the Shift or Resource pane.
The new tractor replaces the original one.Note: If assigning resources in the Card Planner, the following applies. Assigning a trailer may cause a secondary trailer to be assigned automatically. For more information, see the section, Assigning primary and secondary trailers automatically.
-
If needed, repeat Steps 2 and 3, selecting the Trailers tab and dragging a trailer to the driver’s row in the Shift or Resource pane.
Note: Dragging a different tractor or trailer to the driver’s shift does not change already assigned trips. However, it does affect subsequently assigned trips.
Un-assigning a tractor/trailer
To remove a tractor or trailer association with a driver, without making a replacement, follow these steps.
-
Do one of the following:
-
Go to Application > Card Planner.
-
Go to Application > Planning Worksheet.
-
-
With trips and resources retrieved, find the driver from which you want to remove the association in the Shift or Resource pane.
-
Select the Tractors tab.
-
Find the UNKNOWN tractor, and then drag it down to the driver’s row in the Shift or Resource pane.
The UNKNOWN tractor replaces the original one. -
If needed, repeat Steps 3 and 4, selecting the Trailers tab and dragging a trailer to the driver’s row in the Shift or Resource pane.
Changing the tractor or trailer in the Card Planner’s Edit Shift Information window
Use this procedure to add, replace, or un-assign a tractor or trailer to a driver using the Edit Shift Information window. This window is accessed directly from the Card Planner. It is not available from the Planning Worksheet.
The ability to assign a tractor or trailer from the Card Planner is especially useful when drivers do not always use the same equipment. You can plan a driver’s trips for the day, assign the equipment, and then print a trip sheet report.
-
Go to Application > Card Planner.
-
Right-click on the driver listed in the Shift pane.
-
From the shortcut menu, select Shift Login/Logout.
Show me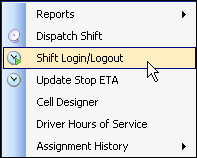
-
In the Edit Shift Information window, select the appropriate tractor or trailer from the drop-down lists.
Show me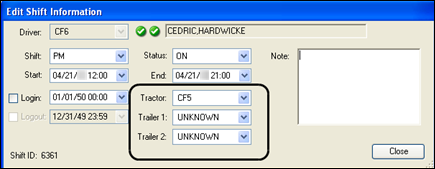
Notes
-
Only active tractors and trailers are available for selection.
-
Assigning a different tractor or trailer to the driver does not change already assigned trips. However, it does affect subsequently assigned trips.
-
-
If you want, enter text in the Note text box.
Note: If note text exists in the corresponding Driver Shift Schedule, it is shown here. If you add or change text in this window, the note on the Driver Shift Schedule is also changed.
-
Click Close.
-
Click Update to save the changes.