Entering orders
You record a customer’s request for pickup and delivery of fuel in the Call On Demand Order Entry window. To access it, go to Fuel Dispatch > Call On Demand Order Entry.
The window consists of six parts:
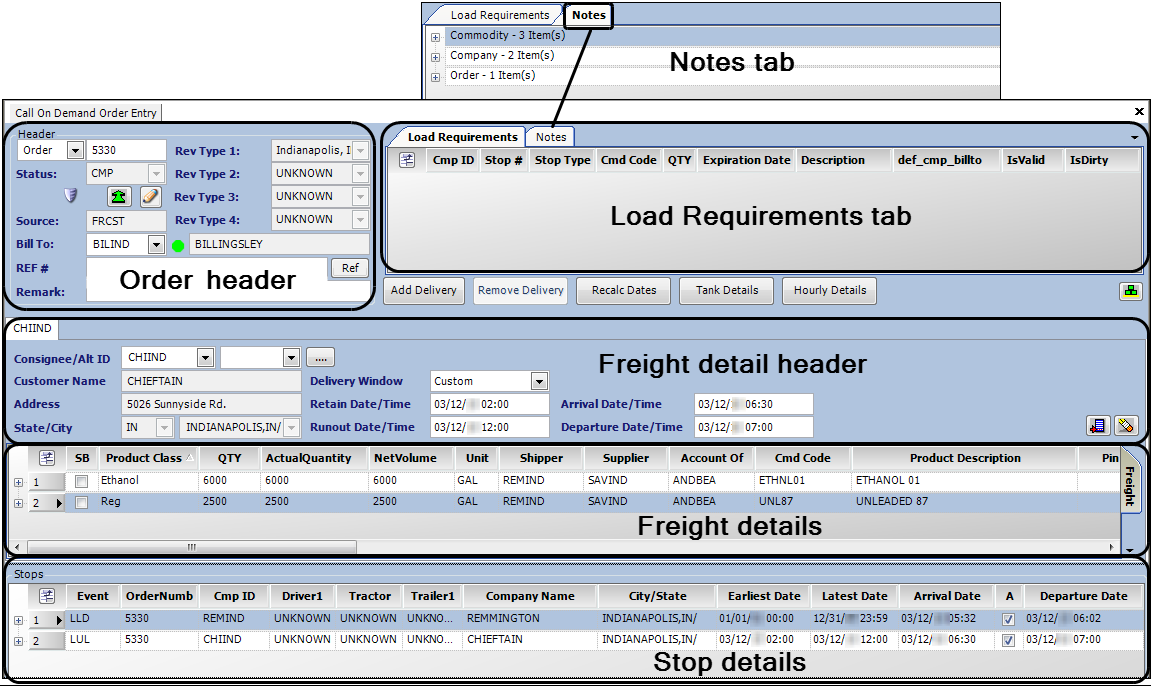
You use the header to record the Bill To, revenue classifications, order header reference numbers, and free-form remarks. It also displays the status of the order.
In the freight detail section, you record the commodity class, commodity, and quantity to be moved, as well as the consignee and the supplier. You also can enter pickup and delivery dates here. If you record multiple deliveries, information for each delivery shows on its own freight detail tab.
The stop detail area lists all of the billable and non-billable stops recorded for the trip. You also can use it to start, and complete the trip.
The Load Requirements tab lists special criteria that resources must or should meet to be assigned to the order. If default load requirements have been recorded for a commodity or a company on the order, they are shown here. You can also record load requirements that are specific to the order. If a resource assigned to perform the order does not meet a must requirement, the system will prevent dispatch.
The Notes tab provides a read-only view of the notes related to the order. You can view notes for the order, the movement, companies associated to the order, commodities listed on the order, or resources assigned to the order. Additionally, notes created in profiles for companies, commodities, and resources appear in this section.
To save an order, the following entries are required by default:
-
Bill To
-
Shipper
-
Consignee
-
Supplier
Note: This requirement can be disabled with a configuration setting.
-
Commodity class/commodity.
For details on entering orders, see Order entry basics.
Where loads are assigned
Fuel Dispatch has two windows that you can use to plan trips.
You can use either window to plan both shift-based trips and long haul trips. In general, the Card Planner is used for planning shift-based trips, and the Planning Worksheet is used for planning long haul trips.
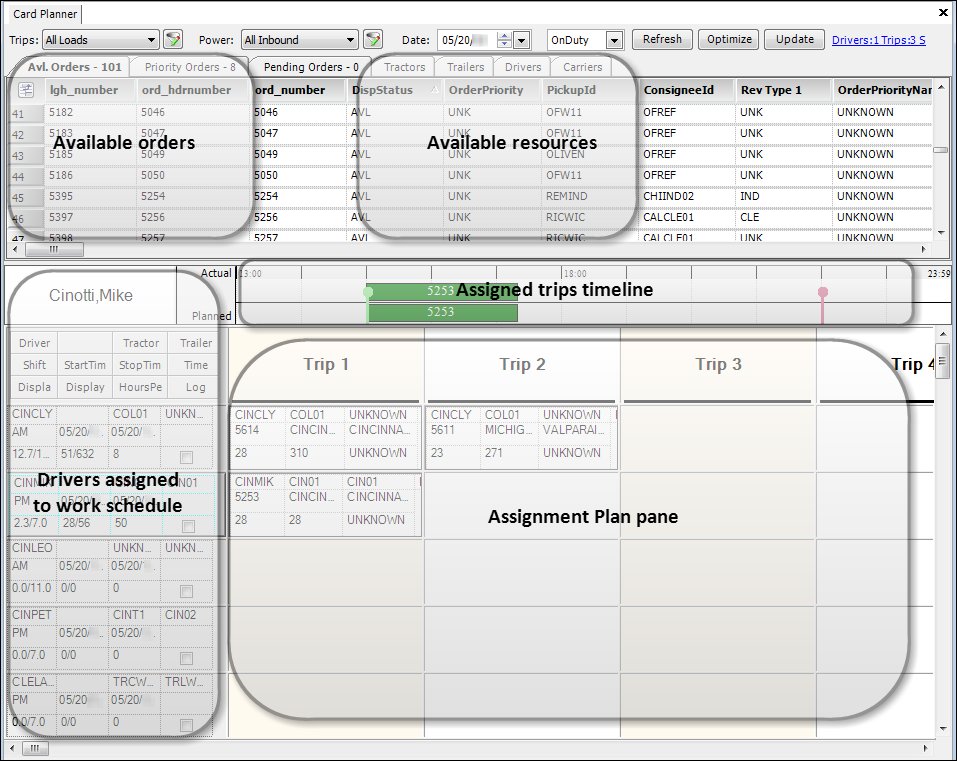
Card Planner
The Card Planner is a planning tool that allows you to match trips with drivers who are on duty during a specific day. When you select a driver, it displays a timeline in the middle of the window that illustrates the start and end of a driver’s shift. A block-style grid is shown to the right of each driver. Each block represents a time period for which a trip can be planned. You can select an Available trip from the grid at the top of the window and drag it down to a time block for the driver who is to move the load.
As trips are assigned to the driver, their start and end times are shown in the driver’s timeline. Trip details are provided in the time blocks where the trips have been scheduled.
To access the window, go to Fuel Dispatch > Card Planner. For details on using the Card Planner, see Assigning trips in the Card Planner.
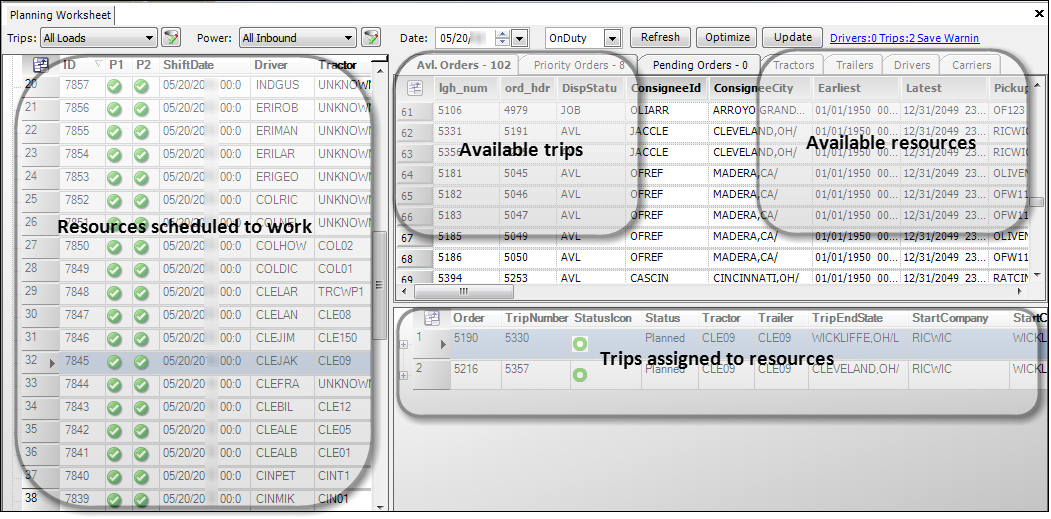
Planning Worksheet
The Planning Worksheet lists trips and resources in spreadsheet-style grids. To plan a trip, you can drag an Available trip from the grid in the top right of the window onto a resource listed in the grid on the left. When you highlight a resource, a list of its assigned trips is shown in the grid at the bottom right.
Although you can use the window to assign trips to drivers, it is especially useful when assigning loads to non-board carriers. This is because:
-
It can be configured to show a listing of available orders that are scheduled to start over a user-defined span of days, without regard to shift.
-
You can assign an unlimited number of trips to a resource. Although this is impractical for a single driver during a single workday, it is useful for carriers because you are not monitoring their drivers and equipment.
To access the window, select Fuel Dispatch > Planning Worksheet. For details on using the Planning Worksheet, see Assigning trips in the Planning Worksheet.
Common window features
Because both the Card Planner and the Planning Worksheet are used to perform the same tasks, they use the same spreadsheet-style grids that allow you to look up available trips and available resources. These grids are shown as tabs across the upper part of the windows. They display data based on user-defined restrictions sets, called views or boards. For details on using these features, see Common layout features.
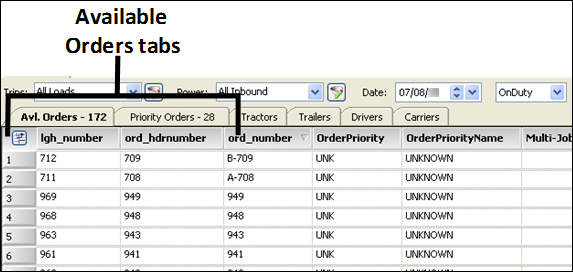
Available and Priority Orders tabs
The Available Orders tab lists outbound trip segments that are ready for dispatch. This window can be considered a to-do list. Usually, it displays the trips that have not yet begun. A line of data is displayed for each trip segment listed.
The Priority Orders tab lists orders that were tagged as Highest Priority when they were saved in the Call On Demand Order Entry window. Use of priorities allows you to identify loads that require quick action.
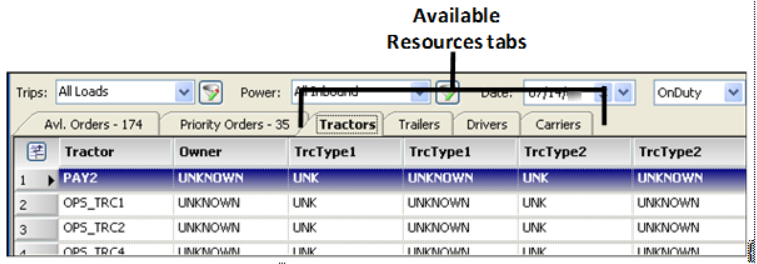
Available Resources tabs
The Available Resources tabs, also known as the Available Power tabs, are used to determine which resources are (or will be) available for dispatch in particular locations. There is a tab for each resource type: driver, tractor, trailer, and carrier. The data shown reflects information that is stored in the resources' profiles.
Retrieving and saving data
By default, the fields and buttons shown at the top of the Card Planner and Planning Worksheet look like this:
![]()
They allow you to:
-
Choose views to limit the display of data on the Available Orders tab and Available Resources tabs. A view is a user-defined set of restrictions. It also can dictate which columns are visible on the tabs.
-
Specify the work date for which resources are to be listed in the window for assignment.
-
Refresh data.
-
Save (Update) load assignments.
Accessing an order
When you double-click on a trip in the Card Planner or Planning Worksheet, Fuel Dispatch automatically opens the Call On Demand Order Entry window and displays order details. If needed, you can change data, as well as start or complete the trip. To return to the Card Planner or Planning Worksheet, close the Call On Demand Order Entry window.