Overtime Calculator
The Overtime Calculator is designed to read in DRIVERPAY payroll timesheet records and generate the appropriate overtime entries based on the information available.
This application starts up by calculating and displaying the overtime for the week prior to the current week.
To access the Overtime Calculator:
| From this location | Go to |
|---|---|
TruckMate Menu and TruckMate Task List |
|
Windows Start Menu |
TruckMate 20xx > Overtime Calculator |
Windows Explorer |
C:\Program Files (x86) > TruckMate 20xx > OTCalc.exe |
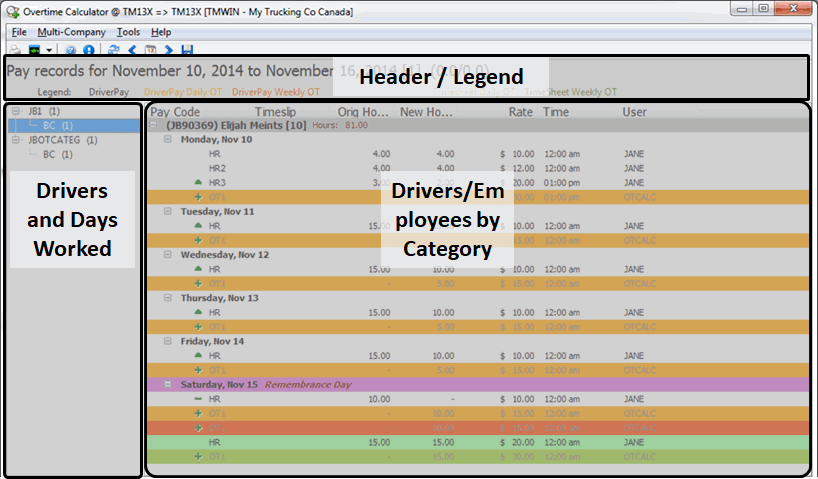
Layout of the Overtime Calculator window
The Header includes a legend describing the color coding appearing in the grid.
The left side panel groups the drivers, the days they’ve worked, the individual DRIVERPAY/PR_TIME_SHEET records the Overtime Calculator program has found to consider, as well as showing the overtime records it is proposing should be generated.
The right side panel categories drivers/employees first by the Other Category defined for the driver on the Driver Profiles program > Pay/Remuneration tab, then by department. The definition of department varies depending upon the OTCALC.EXE > Join Employee Table application configuration option; if False, it uses the Terminal # field on the Driver Profiles > Address tab as the department. If True, it uses the Department field on the Employee Profiles > Address tab which defaults to NA if not populated.
Setting up Overtime Calculator
The basic steps for setting up the Overtime Calculator are:
-
Configure the Application Configurator settings for OTCALC.exe
-
Indicate what the number of regular hours worked in a day and week are using the Driver and Employee profile programs
-
Specify pay codes that should not generate overtime and should be excluded.
-
Map each pay code that should generate overtime to an overtime code.
Application Configurator for Overtime Calculator
The following Application Configurator options are listed under Configuration Options > OTCALC.EXE.
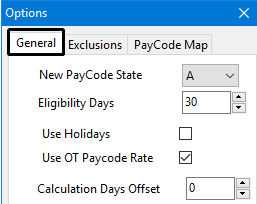
* Indicates this application configuration option can also be edited within the Overtime Calculator program using the Tools menu > Options > General tab.
| Option | Definition |
|---|---|
Days Offset * |
The Overtime Calculator program works on a weekly basis, but this configuration allows you to specify which day of the week it starts on. 0 = Sunday, 1 = Monday, etc… Default: 0 |
Eligibility Days * |
The number of days from the hire date to qualify for Overtime eligibility. If a statutory holiday falls after this configuration value, the driver will get the statutory holiday. Default: 30 Note: Only applies if 'Stat Worked OT Factor' configuration option is set to 0. |
Enable Logging |
Determines if the system will write to a log file when you save.
|
Generation Mode |
Determines the tables where the Overtime Calculator program will generate entries.
|
Join Employee Table |
Determines which TruckMate application will be used to obtain the daily/weekly hours considered as normal hours before overtime is applied.
|
New Payment State * |
Indicates which status is considered a valid payment state. This is the status that generated DRIVERPAY records should be in to ensure the General Ledger is correctly updated. Values include:
|
OT Rate Formula |
Determines the formula by which the Overtime is calculated.
|
Stat Worked OT Factor |
Determines the overtime factor to be applied for time entered during a statutory holiday. For example, regular overtime may be paid out using a factor of 1.5 but time worked during a statutory holiday might be calculated using an OT factor of 2.5. Default: 0 |
Use Holidays * |
This option is for future development and is not enabled yet. The system will currently always use Holidays as defined in the Codes Maintenance program.
|
Use OT Paycode Rate * |
This option is for future development and is not enabled yet. The system will currently always use the Overtime Paycode rate of 1.5.
|
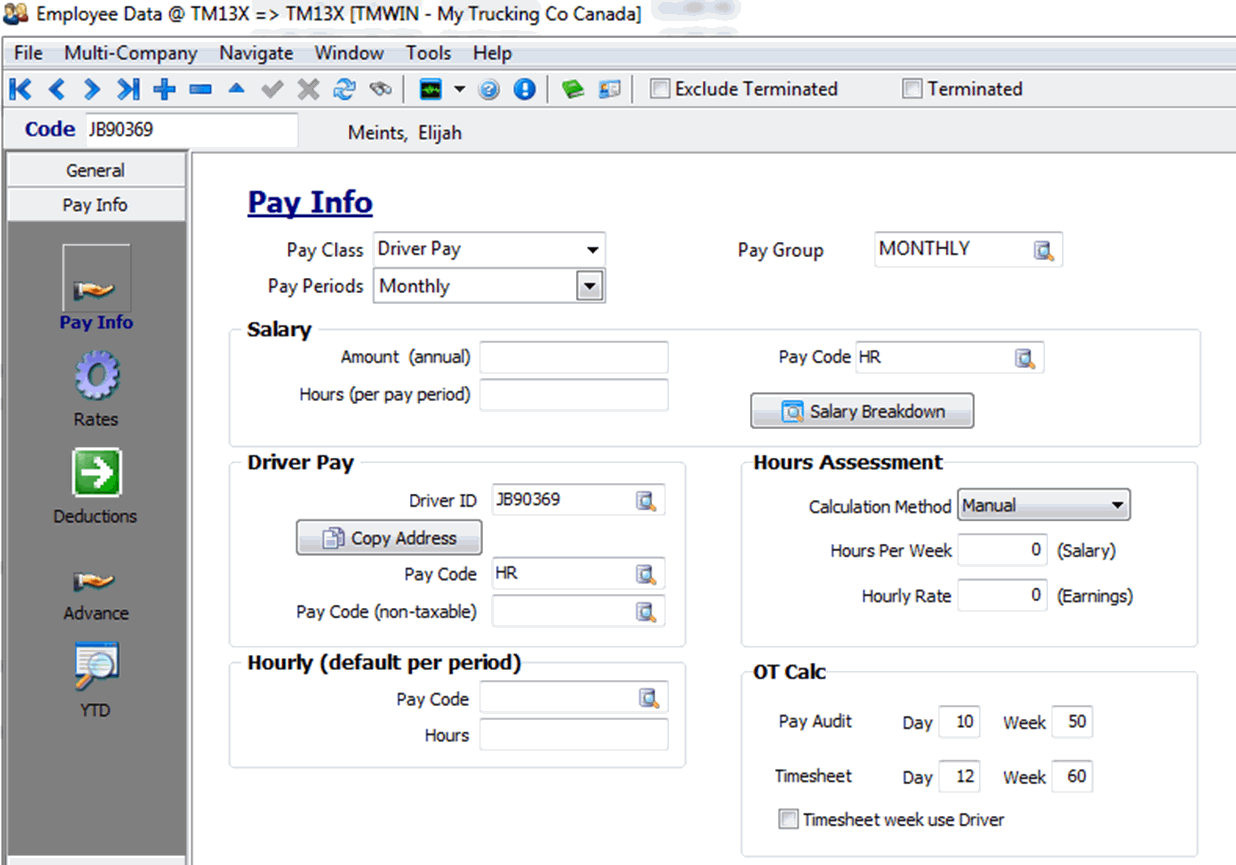
Driver/Employee Setup (DRIVERS.EXE/EMPLOYEE.EXE)
If the OTCALC.EXE > application configuration setting for Join Employee Table is False, then you need to configure every driver to indicate what the number of regular hours worked in a day and week are in a week in the Driver Profiles program.
For example, Day would be set to 8 hours, Week would be set to 40.
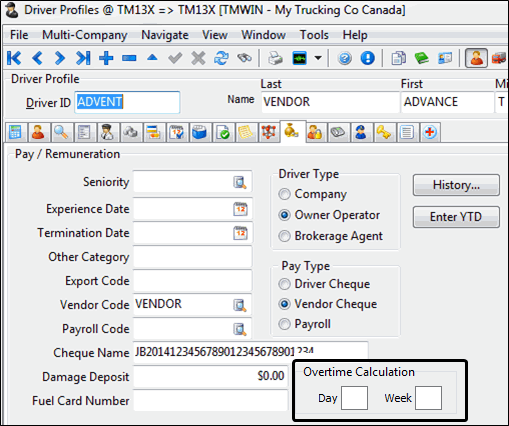
If the OTCALC.EXE > application configuration setting for Join Employee Table is True, or the Generation Mode configuration option is set to 'DPTS', then you need to configure each employee/driver in EMPLOYEE.EXE.
The Pay Audit line determines the regular daily/weekly hours before Overtime should be assessed for DRIVERPAY records. The Timesheet line determines the regular daily/weekly hours before Overtime should be assessed for PR_TIME_SHEET records.
The Timesheet week use Driver checkbox is a True/False field; False (clear) by default. If True, then all the DRIVERPAY hours will also be considered as part of the weekly hours for an employee/driver when generating timesheet weekly overtime.
For example, If employee drove 20 driverpay hours, and 30 time sheet hours, with the Timesheet weekly regular hours being 40, then the employee should have 10 hours of Timesheet weekly overtime.
Pay Code Configuration (OTCALC.EXE)
This application assumes that your DRIVERPAY pay codes (as defined by PAYCON.EXE) matches your payroll pay codes (as defined in PRCONFIG.EXE).
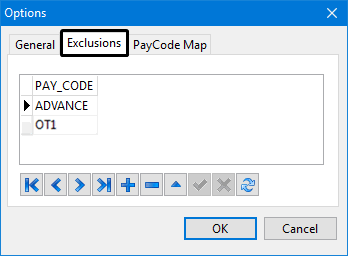
Exclusions
To specify pay codes that should not generate overtime, go to the Tools menu > Options > Exclusions tab and add them.
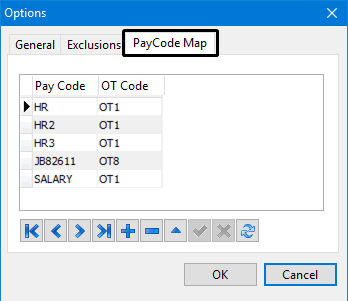
PayCode Map
For every pay code that should generate overtime, you need to map it to the appropriate overtime code.
Go to the Overtime Calculator > Tools menu > Options > Paycode Map tab, add the pay codes which should generate overtime and associate them with the OT Code which is using the correct OT rate.
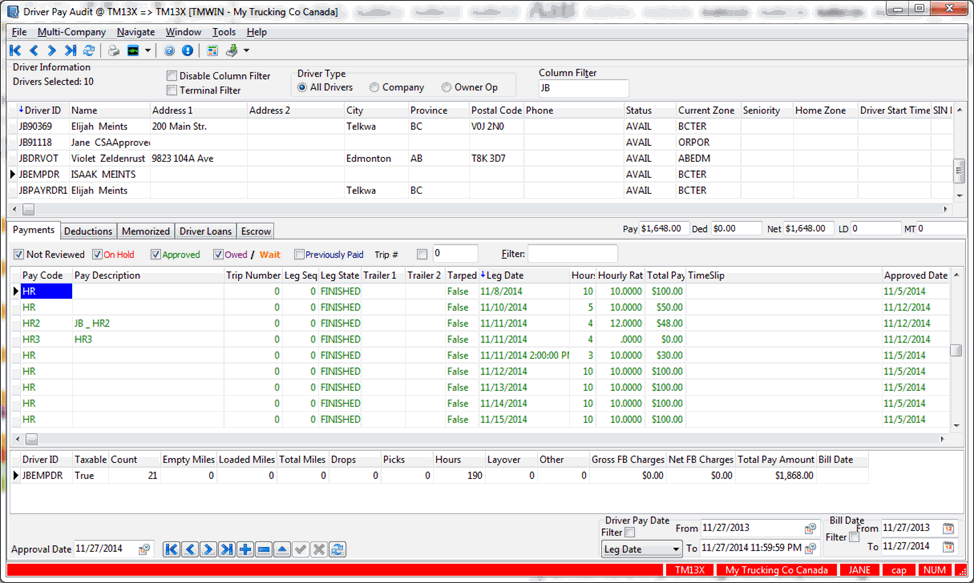
Driver Pay Audit (PAYAUDIT.EXE)
Driver Pay records can be entered into the TruckMate system in multiple manners. They can be added directly to a freight bill in the Customer Service program, or generated by assigning a driver to a trip through the dispatching programs, or by imported from some other application in the Driver Pay Audit program.
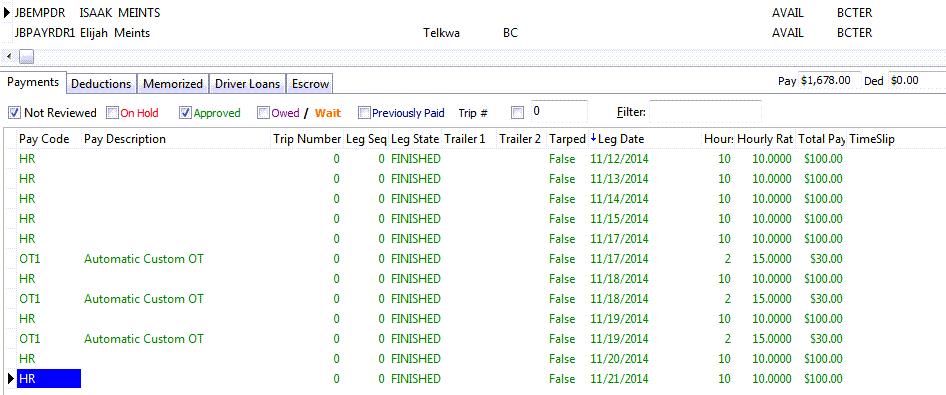
But the DRIVERPAY records must reach the Approved state before they are considered for overtime generation. Double-clicking the records in the Payments tab in PAYAUDIT.EXE will change them from the Not Reviewed state to the Approved state.
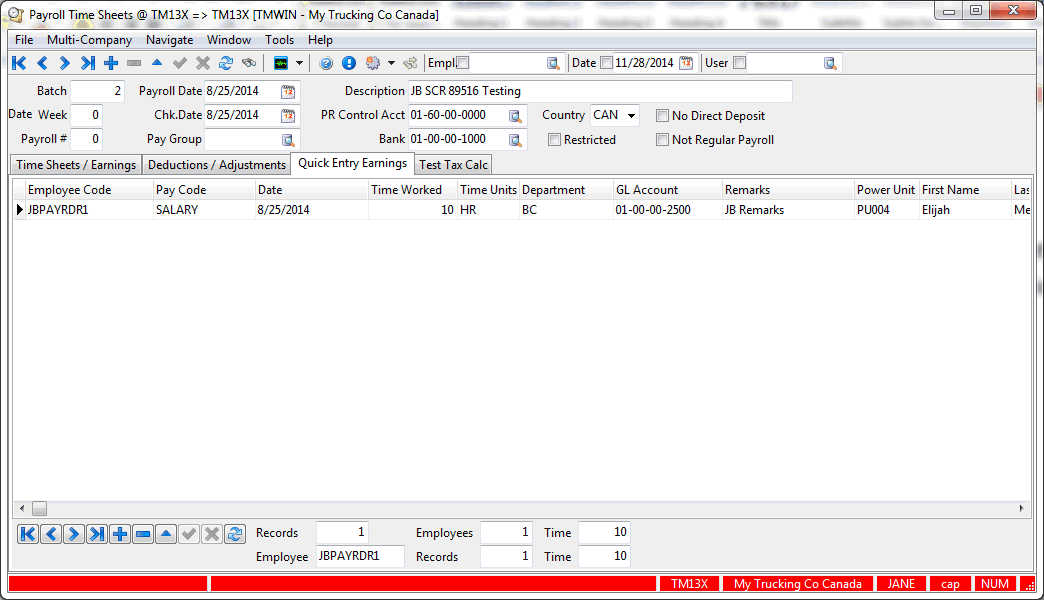
Payroll Time Sheets (TIMESHEETS.EXE)
If your application configuration Generation Mode is set to DPTS, so it generates overtime for both DRIVERPAY and PR_TIME_SHEETS, you will also need to have the time entered into the Payroll > Payroll Time Sheets program prior to running OTCALC.EXE.
Overtime Calculation (OTCalc.exe)
This application starts up by calculating the overtime for the week prior to the current week.
On the right pane it categorizes drivers/employees first by the Other Category found on the Driver Profiles > Pay/Remuneration' tab, then by department. The definition of department varies upon the OTCALC.EXE > Join Employee Table application configuration setting. If False, it uses the Terminal # field on the Driver Profiles > Address tab as the department. If True, it uses the Department field on the Employee Profiles > Address tab which defaults to 'NA' if not populated.
On the left pane, it groups the drivers, then the days they have worked, then the individual DRIVERPAY/PR_TIME_SHEET records it has found to consider, as well as showing the overtime records it is proposing should be generated.
At the top in the header area, there is a legend describing the color coding used by the rows in the grid.
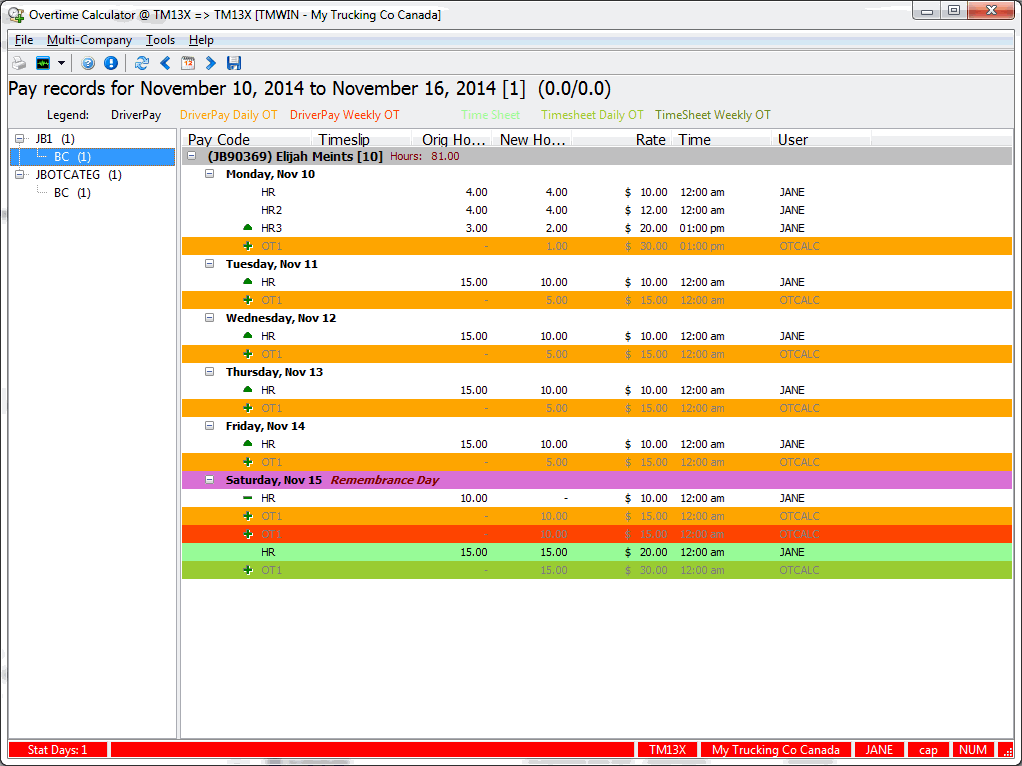
You can use the calendar icon at the top to select a date, or the '<' or '>' arrows to scroll backwards/forwards by week.
The title of the screen gives you some information: "Pay records for <Start Date> to <End Date> [# of Statutory Holidays in week] (<Time to retrieve information for that week> / < Time to process the information for that week>).
Right-click the Department from the panel on the right to display the related information in the left side panel.
In the right side panel, hover the cursor over the driver to get additional information to appear.
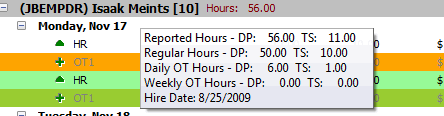
The information displayed depends on the OTCALC.EXE > Generation Mode application configuration setting; if it is DP (driver pay only), it would not include the TS (i.e., time sheet) subtotals.
The Reported hours lists the total hours the program read in and considered for overtime. The Regular Hours is what the reported hours were converted to (i.e., It reduces those hours, as it converts the time to overtime). It also shows the hours it will insert as daily overtime and weekly overtime.
You can get a similar breakdown if you hover over a particular date.
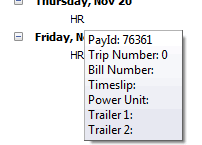
If you hover over a DRIVERPAY records (white color), you also get more information on that record.
If you hover over a Timesheet record (Pale Green color), you get additional information on that record.
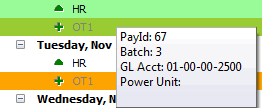
The Orig Hours column identifies the number of hours that was on the DRIVERPAY/PR_TIME_SHEET record. The New Hours column identifies what it reduced that record’s hours to when generating the appropriate overtime.
Once you have reviewed the generated overtime, you need to save it. You can do that at multiple levels; if you right-mouse-click on a driver record you have a few options, including Save Driver.
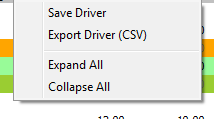
But you can also right-click the Department & Category levels in the left pane to get similar options to save at those levels; including Save All.
It will first prompt you for a filename to save a .csv version of the data and use this to update the DRIVERPAY/PR_TIME_SHEET records appropriately; i.e., reducing the hours on those records, and potentially even deleting them (if all hours on that record were converted to overtime).
This application is meant to be a one-time processing event! I.e., once you have applied a week’s changes and go back to that week for that driver, there is no guarantee the system will re-generate the same overtime.
For example, suppose this was your driver record, and you saved it.
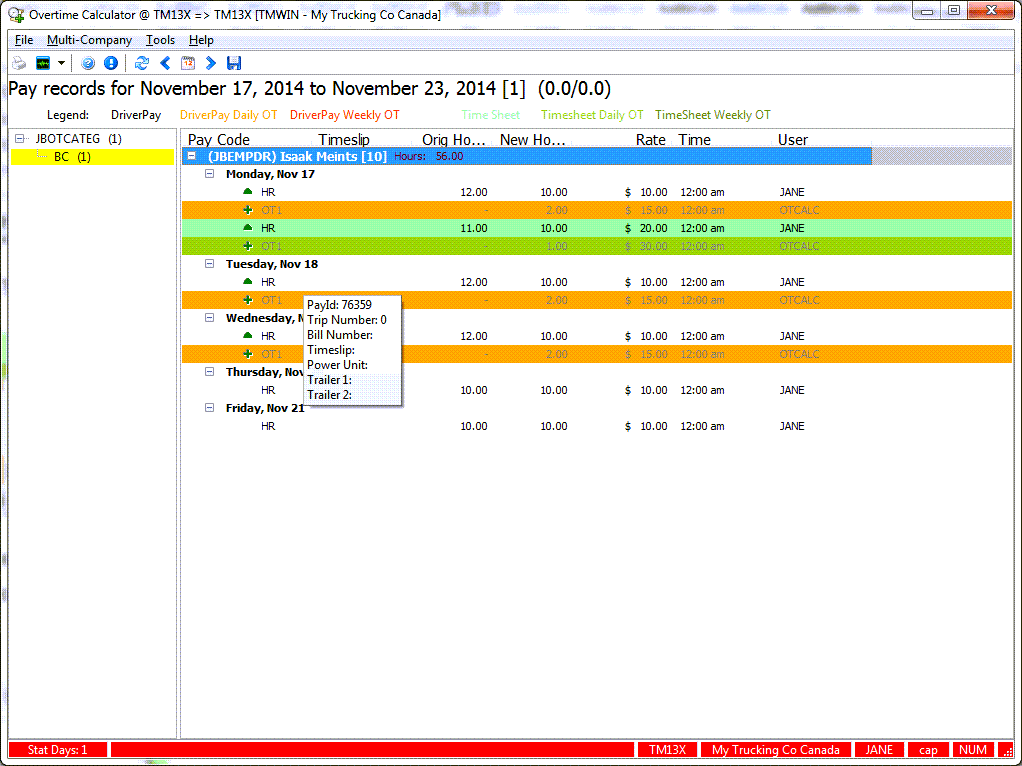
You would see the entries in DRIVERPAY adjusted; e.g., The 'HR' entry on 11/17/2014 used to be 12 hours; it is now 10 hours and an 'OT1' record has been inserted for that date, @ 1.5 times the 'HR' rate.