Routes Management
|

The Routes Management application allows you to import and manage trip routing data from Paragon, as well as create trips for the routes, and sequence Freight Bills according to the routing data. Routing information is imported from the Paragon software in a .CSV file, and will overwrite any data already in the table where the data will be stored. Once imported, the Routes are displayed, allowing the user to easily view the records by route, ordered by sequence. The user can then perform the following actions:
-
Re-order the sequence: the system will automatically renumber the sequence numbers accordingly.
-
Delete a stop: the system will automatically renumber the sequence numbers accordingly.
-
Insert a new stop: the system will automatically renumber the sequence numbers accordingly.
-
Edit the data of an existing stop.
To access Routes Management in TruckMate 2022.x and earlier, go to:
C:\Program Files (x86) > TruckMate 20xx > RoutesManagement.exe
Menu and toolbar options
This topic describes menu and toolbar options and functionality that are specific to the Routes Management window.
For information about common menu and toolbar options (i.e. File menu, Refresh, Multi-Company, etc.), see General menu and toolbar options in TruckMate basics.
Settings Menu
Import Configuration
![]() Selecting this option will open the Import Configuration window, which allows you to specify various import configurations.
Selecting this option will open the Import Configuration window, which allows you to specify various import configurations.
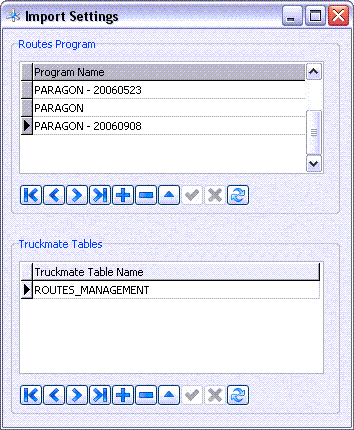
Routes Program
Use the '+' button and add the name of the program you will be importing from. Currently we only support PARAGON routing software, but as you can see in the image above, you can setup multiple instances of the same program so that you can import different files for different periods.
TruckMate Tables
Use the '+' button and double-click the provided field to select a TruckMate Table to store the imported data. The ROUTES_MANAGEMENT TruckMate Table has been created for this purpose, so you should use it.
The manner in which the route information is inserted into this Table’s fields is controlled by the Import Configuration Tab.
Note: The data that exists in this Table is always overwritten automatically when a new import is performed. In order to not lose old data, make sure you use the Tools Menu > Purge All Data option (and select 'Yes' to store the purged data in the ROUTES_PURGED Table) before you do a new import.
Route Settings
![]() Selecting this option will open the Routes Settings window, which allows you to control how the route information will be imported into TruckMate.
Selecting this option will open the Routes Settings window, which allows you to control how the route information will be imported into TruckMate.
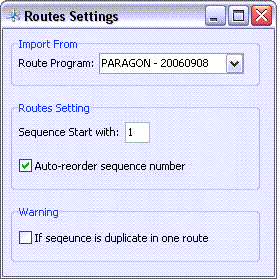
Import From
Use the drop-down menu to select the Route program you will be importing data from. These values are configued on the Import Configuration window (another option on the Settings Menu).
Sequence Start with
Set this value to the first number of a route sequence (normally '1' or '0').
Auto-reorder sequence number
Selecting this flag will ensure that even out-of-order import files will be automatically ordered by sequence when imported.
Warning
If you would like the Routes Management program to produce a warning message if a single route has a duplicate sequence value, ensure that this flag is checked.
Tools Menu
Summary
![]() Selecting this option will open the Routes Management Summary window, which allows you to view summary information via a number of filter criteria.
Selecting this option will open the Routes Management Summary window, which allows you to view summary information via a number of filter criteria.
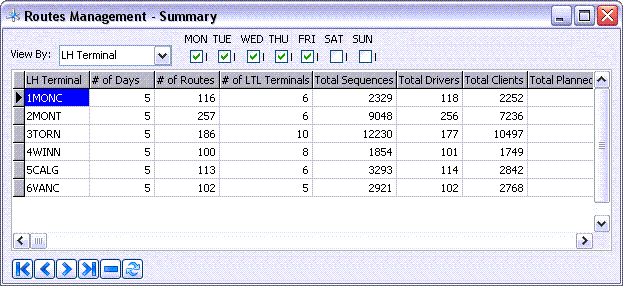
This window displays a variety of summary information regarding routes based on the particular filters applied.
View By
The option chosen in this drop-down menu will configure the Summary grid accordingly. Your available choices are:
-
Day of Week: will display various totals for the day(s) of the week selected using the day filters to the right.
-
Line Haul (LH) Terminal: will display various totals organized by their respective LH Terminal.
-
LTL Terminal: will display various totals organized by their respective LTL Terminal.
-
Route ID: will display various totals organized by their respective Route ID.
Mon - Sun
The days of the week filters are used to limit the results displayed in the Summary Grid for a specific day or day range.
Note: If you do not see this option, your Administrator may have to change some options on the Security Setup program > Security > Allow Changes Tab for Routes Management.
Validate & Create Trip
![]() Selecting this option will open the Create Trip window, which allows you to validate the imported routes and create trips automatically.
Selecting this option will open the Create Trip window, which allows you to validate the imported routes and create trips automatically.
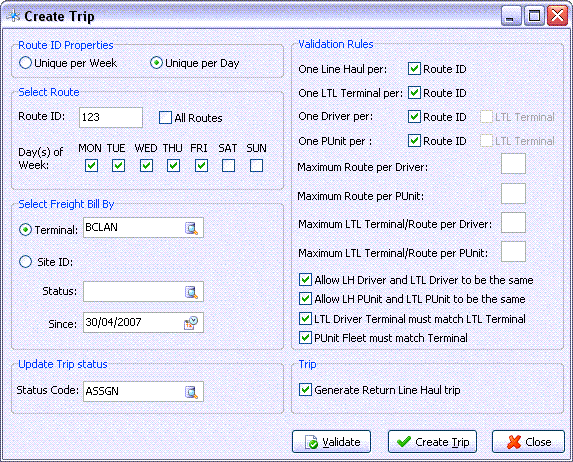
Route ID Properties
The Route ID Properties controls how the Routes can be assigned to Trips.
Unique Per Week
Selecting this flag will allow a Route to be assigned to multiple days per week in the 'Select Route' section below.
Unique Per Day
Selecting this flag will allow a Route to be assigned only to one day at a time in the 'Select Route' section below.
Select Route
Route ID / All Routes
Enter the Route ID that the Trip will use, or select the 'All Routes' flag to use all of the available routes for the Trip.
Day(s) of Week
Select the day(s) of the week that you would like the Trip to occur.
Select Freight Bill By
These options allow you to filter Freight Bills to be added to the created Trips. Freight Bills are matched to Trips using their 'Client ID' and 'Start/End Zone'.
Terminal
Select this option and use the database search button to select one of your Terminals. Only Freight Bills in this Terminal will be used for Trips.
Site ID
Select this to filter the Freight Bills by their specific Site ID, and the two following options:
Status
You can filter on a specific Freight Bill status as well. Use the database search button to choose a Freight Bill status from your system. Only Freight Bills with this Status (in this Site) will be applied to the Trips.
Since
This field has been added to prevent the use of out-dated Freight Bills in the created Trips. Any Freight Bills that have been created before the date in this filed will not be applicable to be matched to Trips.
Update Trip Status
Status Code
Use the database search button to select a Status. The Freight Bill’s included on the Trip will be given this status when assigned to the Trip.
Validation Rules
The Validation Rules section contains a number of different flags that are used to validate the data populated in the Routes Tab. Depending on the rules selected and the data involved, you may see 'Warning' or 'Error' messages when you select the 'Validate' button below.
Warnings are for non-crucial items (those that violate one or more Validation Rules but that the trip is still "allowable" in TruckMate), while Errors will occur if the violated Validation Rules will cause an error in TruckMate itself (as in assigning 5 Drivers to a single Trip, and so on).
Trip
Generate Return Line Haul Trip
If this flag is selected, the Routes Manager program will automatically create a Return Line Hall (RLH) Trip when a Line Haul (LH) Trip is completed (using the same Validation Rules as configured above). The RLH Trip will include all of the Freight Bills that are picked on the LTL/LH Trip.
Validate
Select this button to Validate the current Trip.
Create Trip
Select this button to create the Trip.
Close
Select this button to exit the Create Trip window.
Note: If you do not see this option, your Administrator may have to change some options on the Security Setup program > Security > Allow Changes Tab for Routes Management.
Purge All Data
![]() Selecting this option will delete all imported data from the Table you have selected to use as the TruckMate routes Table (normally ROUTES_MANAGEMENT). You will be prompted to confirm, and then prompted if you would like to backup the data to the ROUTES_PURGED TruckMate Table.
Selecting this option will delete all imported data from the Table you have selected to use as the TruckMate routes Table (normally ROUTES_MANAGEMENT). You will be prompted to confirm, and then prompted if you would like to backup the data to the ROUTES_PURGED TruckMate Table.
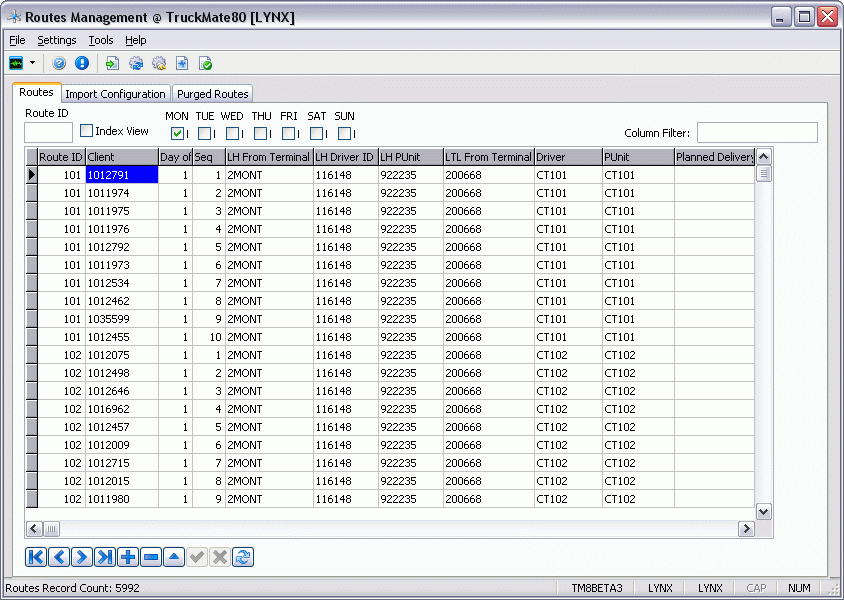
Routes Tab
The Routes Tab is used to setup individual routes or to import entire lists of routes into TruckMate.
Routes Filters
You can use one or a combination of these Filtering options to quickly located a specific route.
Route ID
Enter a Route ID number in this field to filter the records in the Routes Grid.
Index View
If you do not have a Route ID filter engaged, you can select this flag to order the routes by their primary sequence value only. This greatly shortens the list of routes displayed in the Routes Grid, aiding in browsing for route details. Removing this flag with display all the sequences for every route (making more data appear in the Routes Grid.)
Mon - Sun
Use the date checkboxes to filter the available routes available on the respective day of the week.
Column Filter
Depending on what column you are filtering on, you can enter a text or numerical value here to filter for a specific record. If you have double-clicked the 'Client' column, for example, you can enter a specific Client’s name to filter on all the routes for that Client.
Import Configuration Tab
The Import Configuration Tab allows you to setup what data will be imported from your import file.
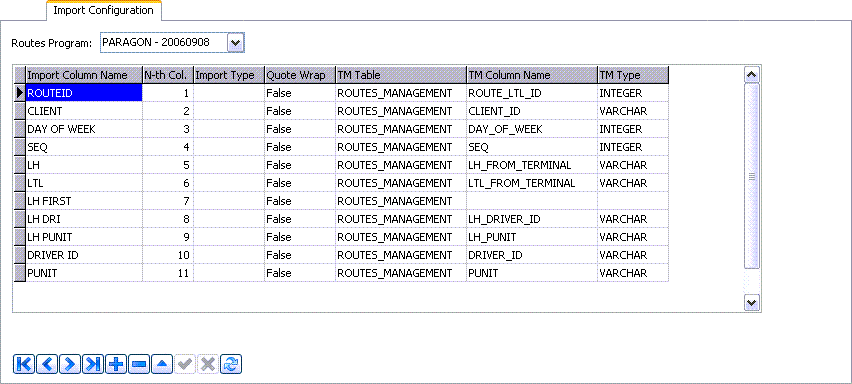
Routes Program
Use the drop-down menu to select one of the Routes Programs that you have configured on the Import Configuration Window.
Import Grid
Before importing the routes file into the Route Management program, you must configure the various fields in the ROUTES_MANAGEMENT TruckMate Table that will contain the information from the import file. You must provide the details for all of the fields that will receive data from the import file, or you will receive errors upon import.
This setup will depend on the kind of data you are importing, but the screenshot above should provide a good example on how a usual import can be setup.
Security options for imports are available in the Security Setup program > Security Tab > Allow Changes Tab.
Purged Routes Tab
The Purged Routes Tab keeps a list of the routes that have been previously deleted/purged from the Routes Management program.
Purged Routes Filters
You can use one or a combination of these Filtering options to quickly located a specific purged route.
Route ID
Enter a Route ID number in this field to filter the records in the Purged Routes Grid.
Index View
If you do not have a Route ID filter engaged, you can select this flag to order the routes by their primary sequence value only. This greatly shortens the list of routes displayed in the Routes Grid, aiding in browsing for route details. Removing this flag with display all the sequences for every route (making more data appear in the Routes Grid.)
Mon - Sun
Use the date checkboxes to filter the purged routes on the respective day of the week.
Purged From / To
Select the calendar buttons on these two fields to setup a Date Range. All records that have been purged during this range will be displayed in the Purged Routes Grid below.
Column Filter
Depending on what column you are filtering on, you can enter a text or numerical value here to filter for a specific record. If you have double-clicked the 'Client' column, for example, you can enter a specific Client’s name to filter on all the purged routes for that Client.
Purged Routes Grid
The Purged Route Grid displays all the route information (as determined by the filters selected) that has been purged from the ROUTES_MANAGEMENT TruckMate Table. All information here is populated in the ROUTES_PURGED TruckMate Table. If you do not have any data but have purged data in the past, make sure you select 'Yes' when asked if you would like all data to be sent to this Table when purging.