AR Adjustments

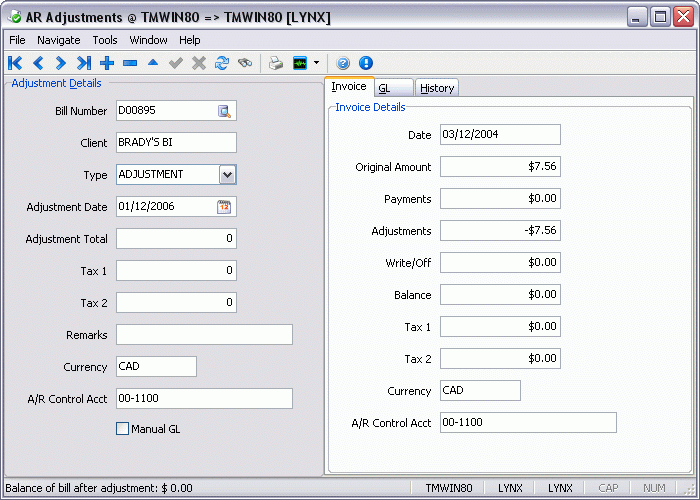
The AR Adjustments program is used to make credit or debit adjustments against freight bills. The left side of the screen is the working area, where adjustments are entered. The right side of the screen displays information about the selected freight bill, with additional options available to view specific particulars from either the Invoice, GL, or History of this particular bill. Adjustments to invoices can also be made using the Void and Rebill function in the AR Inquiry program. This function can cause the original freight bill to be voided by a rebill, and can (optionally) generate a new freight bill that can be modified to reflect the adjustment. The AR Adjustment program, on the other hand, simply adjusts the original invoice.
To update adjustments created in the AR Adjustments program, use the AR Adjustment Register program.
The AR Adjustments program window is divided into the following areas: the Adjustment Details and Invoice, General Ledger, and History Information.
To access AR Adjustments:
| From this location | Go to |
|---|---|
TruckMate Menu and TruckMate Task List |
Accounting & Finance > Accounts Receivable > AR Adjustments |
Windows Start Menu |
TruckMate 20xx > AR Adjustments |
Windows Explorer |
C:\Program Files (x86) > TruckMate 20xx > Arrae.exe |
How Do I?
How do I make an adjustment to an A/R Invoice?
The AR Adjustments program is used to make credit or debit adjustments against Freight Bills. The left side of the screen is the working area, where adjustments are entered. The right side of the screen displays information about the selected Freight Bill. Adjustments to invoices can also be made using the Void and Rebill function in the AR Inquiry program. This function can cause the original Freight Bill to be voided by a rebill, and can (optionally) generate a new Freight Bill that can be modified to reflect the adjustment. The AR Adjustment program, on the other hand, simply adjusts the original invoice. To update adjustments created in the AR Adjustments program, use the AR Adjustment Register program.
-
Open the AR Adjustments program (ARRAE.EXE).
-
Use the search function to locate the Freight Bill if you’re unsure of the Freight Bill number. Once you locate the correct Freight Bill number, the original Invoice Details will pre-populate on the right-hand side of the screen.
-
Enter your adjustment on the left-hand side of the screen. On the right-hand side of the screen, you’ll see particulars from your selected Freight Bill.
-
After entering your adjustments to the invoice, save the information.
-
Next, you’ll have to open the A/R Adjustment Register program to update the AR adjustments you’ve just created. Running the AR Adjustment Register program creates general ledger postings that can be viewed in the GL Journal Entries program. The AR Adjustment Register program also updates the Freight Bill record in the AR Inquiry program.
| Using the A/R Adjustment Register program will allow your entries to display in either the posted or pending areas of the GL Journal Entries Register program. To move GL Journal Entries from the pending transactions area to the posted transactions area, simply run the GL Journal Entries Register program. |
Menu Bar / Toolbar
File Menu
Print Reports
 Selecting the Print Reports button will bring up the report selection window, common to many TruckMate applications. Here, you will select a report file from those available in your system and a Crystal Report will be generated.
For more information on Report functionality in TruckMate, see the Crystal Reports Reference.
Exit
 Selecting this option will close the A/P Check Register program.
Multi-Company Menu
For more information on the Multi-Company options available from the Menu Bar, see the Multi-Company documentation.
Navigate Menu
The Navigate Menu contains the standard TruckMate Navigation Bar, as well as the following options:
Find
![]() Click this button to search for a specific AR Adjustment record using a variety of criteria.
Click this button to search for a specific AR Adjustment record using a variety of criteria.
Tools Menu
TruckMate Monitor
![]() Click the down arrow next to this button to access the various functions of the new TruckMate Monitor.
Click the down arrow next to this button to access the various functions of the new TruckMate Monitor.
Remember Position / Size
Selecting this option will maintain the program window position and size upon close. When the program is re-opened, it will appear the same.
Window Menu
Customer Service
![]() Selecting this option will open an instance of the Customer Service program.
Selecting this option will open an instance of the Customer Service program.
AR Adjustments Register
![]() Selecting this option will open an instance of the AR Adjustments Register program.
Selecting this option will open an instance of the AR Adjustments Register program.
Help Menu
TruckMate Help
![]() Selecting this button will open the AR Adjustment topic in the TruckMate Online Help file (the page you are currently viewing).
Selecting this button will open the AR Adjustment topic in the TruckMate Online Help file (the page you are currently viewing).
Service Portal
![]() Selecting this button will open an instance of your default Internet browsing software, with the https://www.tmwcare.com login page displayed.
Selecting this button will open an instance of your default Internet browsing software, with the https://www.tmwcare.com login page displayed.
About
![]() Selecting this button will open the standard TruckMate About window, which contains important information about the application you are currently using, including its version number (important for support calls).
Selecting this button will open the standard TruckMate About window, which contains important information about the application you are currently using, including its version number (important for support calls).
Adjustment Details
Bill Number
You can either key in a bill number or double-click on the field to open the Select Bill Number for Adjustment window, where you can select a Freight Bill for adjustment.
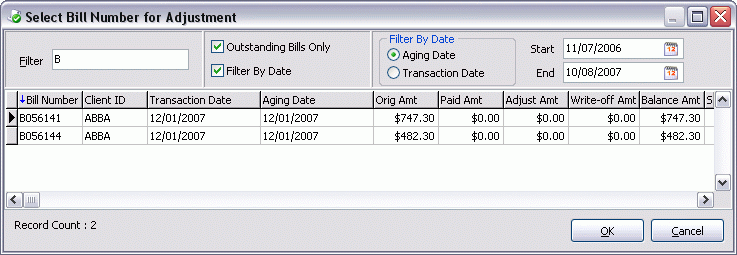
When the form opens you will probably have too many freight bills to display them all in the grid. Use the filter field in the selection form to narrow down the display. Select the <Tab> key to update the display of the freight bill on the right side of the screen.
The filter works in conjunction with the column sorting. Double-click on a column header to sort the list by that column. The column which is used for the sorting provides the values that the filter will be applied to.
| If you put a cash receipt into edit mode (select it for adjustment), even if it was balanced and you haven’t made any changes (yet), then the cash receipt will not be able to be selected (by another user) in the register. This is because you could either a) cancel your changes, b) make changes that put the cash receipt out of balance, or c) make the cash receipt still balance but have either different dollar figures, GL accounts, or FB’s. Because of b and c, you would not want someone else posting the cash receipt with the old data. Once you click cancel or post (and the cash receipt balances), it will become available again for someone to select in the register. |
Client
Will default to the 'Bill To' Customer on the freight bill.
| A new Application Configurator option is now available allowing you to edit the Client Name, Currency Type, and Control Account Information. |
Type
Select the type of adjustment from the drop down list box. Adjustment types are configured in the A/R Transaction Types program. Only transaction types with the code behaviors of 'Adjustment', 'Memo', and 'Write Off' will be available for selection.
Adjustment Date
Defaults to today’s date. Double-click for a calendar selection form.
Adjustment Total
Enter the amount of the adjustment (not the total for the freight bill after adjustment). Enter a positive number if you wish to increase the charge on the original invoice, and a negative number to reduce the charge on the original invoice.
Tax 1 / Tax 2
Will calculate automatically based on the customer’s profile (configured in the Customer & Vendor Profiles program) and the setup of the Tax Calculation Configuration program.
Remarks
Enter Remarks as appropriate. These are displayed in the Transaction History window of the AR Inquiry program.
Currency
Will default according to the original invoice, and can only be changed via the Application Configurator program.
A/R Control Acct
This value is set according to the original invoice, and can only be changed via the Application Configurator program.
Manual GL
Setting this flag allows a user to control the GL Accounts affected by an adjustment. Instead of deriving the GL offset account from the TYPE field, this new enhancement allows you to adjust the offset to a more 'precise' GL entry. This flag must be set in order if you wish to change the account distribution in the GL Tab.
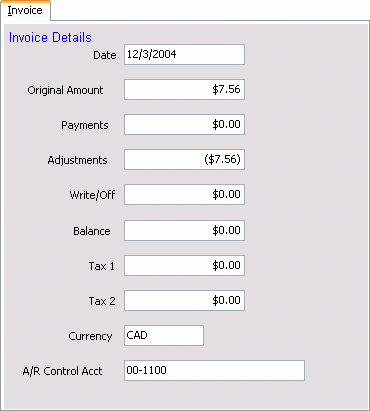
Invoice Tab
The invoice details from the original bill are presented on the Invoice Tab. This data is for informational purposes only.
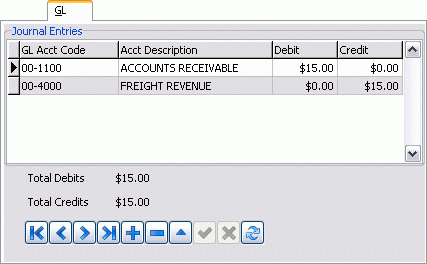
GL Tab
General ledger journal entries relevant to this bill will appear on the GL Tab. If you have set the 'Manual GL' flag to 'checked' in the 'Adjustment Details' section, you may add new entry lines (or edit the entries already displayed) on this Tab Grid.
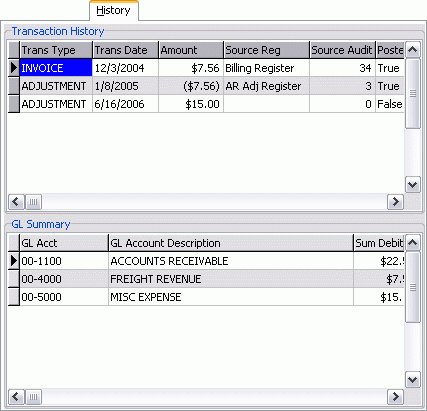
History Tab
All entries relevant to this freight bill will appear in the transaction history grids on the History Tab. The top grid shows the transaction type for this adjustment, the transaction date, amount, source register, source audit, whether the item has been posted, and any reference notes, tax and account number information, the functional amount, and the currency used. The bottom grid summarizes the accounting debit and credit information relevant for this adjustment. The data shown here is for informational purposes only.