Message tabs 105 through 214

There are several Tabs available within the EDI Communication Manager program, each of which details a certain kind of EDI Message.
| In order to maintain a succinct overview of the functionality of each of these Tabs, only those details that are unique to each Tab will be outlined. For an overview of the common details, see the 204 In Tab descriptions. |
105 Out Tab
This transaction set can be used for Business Entity Filling data exchange. Information related to Trade Chain Partner/Owner, Operator, Terminal and Warehouse Updates. Additional information can include annual reports, change of officers, change of senior management and required fees.
Active
This checkbox indicates whether the displayed 105 configuration is active or non-active. Select this checkbox to activate the configuration.
Trading Partner Information
This section includes all the information necessary to identify the trading partner to exchange this transaction set with. A 'Search' button is available to help select the trading partner from the database. The information available in this section include the 'Trading Partner Code', 'Name', 'Address' and other contact information including 'Contact Person'.
In addition to the address and contact information, there is a sub-section for Cross Reference information. This section is to record information that can be used during the exchange of the data set to verify the identity of the Trading Partner.
SCAC Code
The SCAC (Standard Carrier Alpha Code) can be used for verification. This code is a unique code to identify transportation companies. Enter the SCAC code of your Trading Partner.
DUNS Number
A Data Universal Numbering System (DUNS) Number is a unique nine-digit sequence recognized as the universal standard for identifying and keeping track of over 140 million businesses worldwide. Enter your Trading Partner’s DUNS number.
Mutually Defined
For additional security, you can define a mutual code with your Trading Partner to be used in the EDI transactions between the two partners. If such code exists, enter it in this field.
Message Transfer Mode
Create and Transmit (FTP)
When this option is selected, enter the FTP information in the 'FTP Configuration' area below. Then, you can send files via FTP.
Create File Only
No FTP available with this option. For use when you have another system that’s responsible for sending the files normally handled via FTP. Examples would be 'Gentran' or 'Mercadur'. There are a few options available where you can process and map these files to be anything you want. This would occur locally and the file would be dumped into the transfer directory (see below). Enter a specific file name, if applicable, into the FTP Configuration area. Once the file is processed (using the Process File Only option), the data is renamed and placed in the Archive Directory.
Message Format
Allows the selection of an MSI Standard (.DLL file) for use in configuring the appearance of your Messages.
| 'Custom' is a distinctive format for specialized circumstances and should only be used under recommendation of TMW Systems. The Message Format drop down will list 'MSI Standard' and any DLL’s available for the transaction set. The DLL’s must be in the same directory where the EDI Communication Manger program is being called from, in order to be recognized and utilized. |
Transfer File Location
Transfer Directory
For usage, when you have another system that’s responsible for sending the files. Examples would be 'Gentran' or 'Mercadur'. There are a few options available where you can process and map these files to be anything you want. This would occur locally and the file would be dumped into the transfer directory. Also used for the FTP option as well. If files are sent or retrieved via FTP, this is the location the files are transferred from or to.
Archive Directory
Once a file is processed, a copy of it is placed in the archive directory renamed using the current date and time prefix as 'YYYYMMDDHHMMSS<filename>'.
FTP Configuration
IP Address
Enter the Trading Partner’s IP address, or other FTP EDI processor information.
Login User
Enter the FTP Login name.
Password
Enter the FTP Site password. Assign a Username and a password to your trading partner to access your (FTP) site.
Directory
If it is necessary to change to a different directory after logging into the FTP Site before transferring files, enter the directory name here.
File Name
Send the file name 'as-is' or enter any wild cards or file names here, or, if you prefer, just leave this field blank.
FTP Script Button
See the FTP Script window description above for more information.
Production / Test
This radio button group enables the user to run this process in a test environment by selecting the test radio button.
204 In Tab
The 204 EDI holds information about motor carrier shipment, or load tenders. This is an EDI equivalent of a shipper calling the hauler and offering a load. Instead of receiving a phone call, a Load Offer with all details will appear in the EDI Order Pre-Processor program. The dispatcher only needs to accept or reject it. The shipper is then informed of the status by way of a 990.
| You must use the '+' to add in a new Trading Partner. Then, select the search button to locate your Trading Partner’s information if it is located in your Customer Profile database. Double-click on the client you wish to add as a Trading Partner. All of the fields will populate with whatever information you have in your Client Profile database for this particular client, press the 'Check' button to save the client information. Then, select the 'Search' button again, and it will list all Trading Partners entered thus far. Even, if you have a Trading Partner that you wish to set up for the 204, 210, and 990 configurations, you still must go into each tab and set each Trading Partner up properly. This is because there are so many configuration issues required in the set up. |
Message Transfer Mode
Receive (FTP) and Process
When this option is selected, enter the FTP information in the 'FTP Configuration' area below. Then, you can transfer files via FTP before processing, or work with files found in transfer directory only.
Process File Only
No FTP available with this option. For use when you have another system that’s responsible for retrieving the files normally handled via FTP. Examples would be 'Gentran' or 'Mercadur'. There are a few options available where you can process and map these files to be anything you want. This would occur locally and the file would be dumped into the transfer directory (see below). Enter a specific file name, if applicable, into the FTP Configuration area. Once the file is processed (using the Process File Only option), the data is renamed and placed in the Archive Directory.
Message Format
Allows the selection of an MSI Standard (.dll file) for use in configuring the appearance of your Messages.
| 'Custom' is a distinctive format for specialized circumstances and should only be used under recommendation of TMW Systems. The Message Format drop down will list 'MSI Standard' and any dll’s available for the transaction set. The dll’s must be in the same directory where the EDI Communication Manger program is being called from, in order to be recognized and utilized. |
Transfer File Location
Transfer Directory
For usage, when you have another system that’s responsible for retrieving the files. Examples would be 'Gentran' or 'Mercadur'. There are a few options available where you can process and map these files to be anything you want. This would occur locally and the file would be dumped into the transfer directory. Also used for the ftp option as well. If files are sent or retrieved via FTP, this is the location the files are transferred from or to.
Archive Directory
Once a file is processed, a copy of it is placed in the archive directory renamed using the current date and time prefix as 'YYYYMMDDHHMMSS<filename>'.
Update Frequency
Days
Select the days you wish to use the program.
Starting
Enter your starting hour/minutes. You may only want to check for this Trading Partner at say, 8:00 am every morning, or perhaps every 10 minutes. Whatever time you wish to set up for this particular Trading Partner, should be entered here.
Ending
Enter the ending hour/minutes. You may only want to check for this Trading Partner at say, 8:00 am every morning, or perhaps every 10 minutes. Whatever time you wish to set up for this particular Trading Partner, should be entered here.
Frequency
Enter the regularity of when the system goes out to check for work. For those using this 24 hours, you would set it to 1 minute. For Trading Partners you could set it for every 10 minutes, or once per hour, or whatever frequency you wish.
Last Update Occurred
Shows the date and time that the last update occurred.
Next Update
Shows when the next scheduled update will be, as per your frequency specifications. The next update option can also be used to set or reset the next usage date. (Double-click to view the calender) When processing, this date field value is checked. When compared to the current time (if equal to, or already exceeded) the process will begin.
| This field is the only value evaluated for process firing purposes. All other update frequency fields are only used to establish the 'Next Update' date and time. |
FTP Configuration
IP Address
Enter the Client’s IP address, or other FTP EDI processor information.
Login User
Enter the FTP Login name.
Password
Enter the FTP Site password. The Client will assign you an FTP Username and password, and TMW Systems will supply this information.
Directory
If it is necessary to change to a different directory after logging into the FTP Site before transferring files, enter the directory name here.
File Name
Send the file name 'as-is' or enter any wild cards or file names here, or, if you prefer, just leave this field blank.
Post Bill Number before Update
Check this option if you would like to Post the Freight Bill Number before Updating the 204 EDI information.
Generate 997 (FA) Responses
Check this option if you would like to generate 997 'Functional Acknowledgement' (FA) EDI Responses.
Process from a User Perspective
Each 204 In has one of the following purposes: 'NEW', 'UPDATE', or 'CANCEL' (as shown in the Order Pre-Processor program > Pending Orders Tab).
-
NEW: a new Load Tender is offered.
-
UPDATE: a Load Tender was offered previously, but there are some changes to its information.
-
CANCEL: a Load Tender was offered previously, but is being cancelled by the Trading Partner.
| With a 'NEW' 204 In, the User can perform an 'Accept' or 'Reject'; with an 'UPDATE' or 'CANCEL', the User can only 'Accept'. |
204 Update Scenario:
If a trading partner wants to send Extra Stops or any changes after an original 204 (NEW) had been sent, the Trading Partner would send a 204 as an 'UPDATE'. If the UPDATE 204 is accepted, the system does not actually edit the original Freight Bill in the Customer Service program. The User has to create the Extra Stop records, Trace Numbers, etc. in Customer Service themselves.
If this is not acceptable, the Trading Partner can be asked to send a 'CANCEL' 204, which would cancel the original Freight Bill, and then a second 'NEW' 204 could be generated and sent, which would create a new Freight Bill with all the Extra Stops, etc. The process is up to the Trading Partner.
FTP Script
Clicking the FTP Script Button will open the FTP Script window where you can configure FTP Scripts for use when connecting to your Client’s FTP Site.
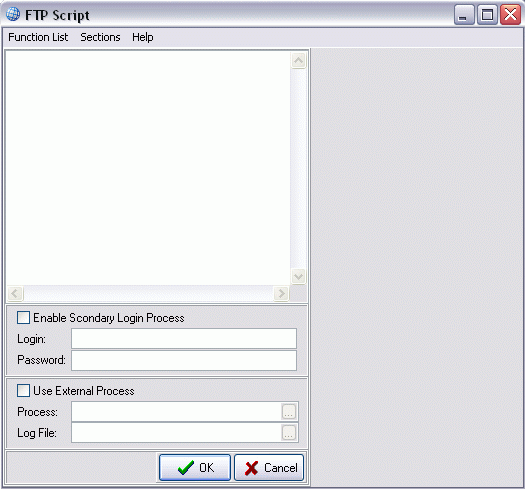
Function List
The options displayed when you click the 'Function List' menu option are used when the Script is run. Clicking an option will populate it’s value into the main FTP Script window with the generic extension of '<filename>'. Once the Function is displayed in the FTP Script window, you can manually erase the generic extension and enter the filename (and path) of the File you would like to access on the Client’s FTP Site.
Sections
The options within the 'Sections' menu allow you to set when the Functions setup in the FTP Script window will occur. Selecting a Section option will populate a Section into the FTP Script window (delineated by the '#' number sign). This tells the FTP Script when to apply the Functions that follow the '#' sign.
Help
Clicking the 'Help' menu option will open the FTP Script’s internal help file into the grey area to the right of the FTP Script window.
Enable Secondary Login Process
If you would like to use an FTP Script process you must check this option and supply a Login ID and the respective Password.
Use External Process
If you would like to use an FTP Script process that has been created outside this window, you must check this option and supply a Process File location and Log File location using the search buttons.
204 Out Tab
EDI 204 Out messages are for sending load offers out to vendors/interliners/trading partners. To trigger a 204 Out EDI, you will need to assign the Interliner to the Trip, and when the Trip’s status is changed to the one specified in on this Tab, EDI Comm Manager will send out the EDI on its next cycle.
Making the Status Code work in Dispatch
A well functioning EDI 204 Out setup is all in the behavior of the Status Code, and the timing in which the Status should be applied:
-
When defining the Status to be used (in the Codes Maintenance program > Status Codes Tab), it should have the 'Trip' flag selected in the 'Applies To' section, so that it will work in the Dispatch program.
-
The 'Assignment' Status Code 'Behavior Type' should be selected. An 'Assignment' behavior Status Code will be available for selection in Dispatch right up until the load is set to an 'Arrive at Shipper' or 'Picked' Status.
-
The Reasoning behind using an Assignment behavior type status to cause a 204 to be sent is in the case that the Carrier rejects the shipment, in which case the Dispatcher will need to de-assign the Interliner and assign a different one. 'Assignment' makes the most sense for this 'in-limbo' shipment status.
Process from a User Perspective
The TruckMate User wants to send a Load Offer to the Carrier, roughly at the same time the load is assigned in the Dispatch program.
-
In the Dispatch program, assign the Interliner to trip/shipment(s) using the Carrier Assign window as normal.
-
Change the status of the Trip to the status you have setup for EDI 204 Out messages. If setup correctly, the status will propagate to the ODRSTAT Table (a record will be shown on the Customer Service program > Status Tab).
-
If that Status that propagates into ODRSTAT is defined in the 'Status Set Generation' section of the EDI 204 Out Tab, a 204 Out (Load Offer) will be generated and send to the specified Vendor.
210 Out Tab
The 210 EDI holds information regarding motor carrier Freight details and Invoice. It’s probably the most popular in the trucking industry as it replaces the printing, and mailing of Invoices. Cost savings appear in the Billing Department from labour and material because the Freight is Invoiced instantly, and no paper Invoice is required.
|
The majority of the details available on this Tab are found on the '204 In Tab'. See the 204 In Tab documentation for more information. The user can process all invoices regardless of the Bill-To customer by setting up a single 210 Trading Partner profile named <ALL>. |
Invoice Selection Criteria
Select by Range of Invoices
Place a checkmark in the box provided if you wish to print Invoices for the Freight Bill Numbers specified in the fields below Enter the Starting and Ending Freight Bill Numbers.
Starting
Use the search button to select a starting Bill Number.
Ending
Use the pull-down arrow to select an ending Bill Number.
Select by Range of Billing Dates
Place a checkmark in the box provided if you wish to print Invoices for a range of Billing Dates. Enter the Starting and Ending billing dates using the pull-down arrows.
Starting
Enter the Starting billing Date Range by double clicking within the field and selecting a date form the calendar menu.
Ending
Enter the Ending billing Date Range by double clicking within the field and selecting a date form the calendar menu.
Select Invoices by Current Status
Replaces the process of printing Freight Bills even though it doesn’t look exactly like the Freight Bill processing program, it does function in a similar way. You can select bills by status, which are 'Approved', and after the processing you can set the bill status to 'Complete'. That way when you are printing your Freight Bills it will skip these ones that have been sent by EDI. If you just want to do a specific range of Invoices, and you would only do that if you’re doing a test, or re-sending a bill that may have got lost.
Status
Use the pull-down arrow to select the desired Status code.
Only Approved Invoices
Place a checkmark in the box provided if you wish to include only Approved Invoices in your status selection.
Printed Invoices
This drop-down list allows the user to specify what invoices to select in terms of whether they were printed or not. The selection list includes three values: 'Only Printed Invoices', 'Not Printed Invoices' and 'Unprinted And Printed Invoices'. Select the value that serves your business needs best.
Include Credit Invoices
Place a checkmark in the box provided if you wish to include Credit Invoices in your status selection. (If not checked, Credit Invoices will not be selected).
Include Processed Invoices
Place a checkmark in the box provided if you wish to include Processed Invoices in your status selection. (If not checked, Processed Invoices will not be selected).
Update Order Status
Use the pull-down arrow to select a status of your choice, and then place a checkmark in the box provided to update order status' to the selected status. This is similar to the Billing Register program.
Update Printed Status
Place a checkmark in the box provided if you wish to update the printed status as well as the order status.
Test Only (No Updates)
Select if you wish to do a test or are re-sending a bill.
| The Freight Bill status is NOT updated when 'Test Only' is checked. |
Registered Invoices
Choose the radio option of the value you would like to use when checking the Update Status of Invoices. Choose 'Only' to use only those Invoices that are Updated, 'Not' to use the Invoices that aren’t Updated, or 'Don’t Care' to check All Invoices.
Specific Register
Check this option to select Invoices based on a specific Register Audit number.
Audit #
Enter the Register Audit number in the space provided, once the 'Specific Register' checkbox is enabled.
Multi-Stop Operations Style
Make your selection based on your preference on last drops, either first or last order. This is a new configuration option to the 210 Profiles, 'Multi-Stop Operations Style', which allows use of the system where the parent order has the first pick up and last drop, or first pick up and first drop style in the Customer Service program.
Last Drop on First Order
Select this option if your last drop is on your first order.
Last Drop on Last Order
Select this option if your last drop is on your last order.
Cross Reference
Selecting the Cross Reference button will bring up the 210 Cross Reference settings for this particular client. You can select a system code type, a system code, and make resolves to the EDI Code. Entries made here will appear in the grid. When generating 210’s, if a matching entry is located for the Trading Partner in the cross reference table, the specified code is used instead of the code used in the order record.
Invoice Check
Clicking the search button will open a search window where you can select to view the associated Freight Bills.
214 In Tab
The EDI 214 In message set is normally reserved for when an Interliner/Carrier/Trading Partner sends you their bill/invoice for a carried load.
214 Out Tab
The 214 EDI is a transportation carrier shipment status message. It allows a Trading Partner to be informed immediately any time a status change occurs to their shipment. You can configured a 214 EDI for each Trading Partner’s needs, and only requested status changes are sent. For example, Load Pick-up, Delivered, Late, etc.,
X6 is an off-shoot of the 214 message. Its purpose is to inform the Trading Partner of the geographical location of their shipment at specific intervals. Certain companies want to have an update daily at say, 10:00 am, as to the exact locations (GPS) of all of their shipments and the X6 would provide that.
| The user can process all status updates regardless of the customer by setting up a single 214 Trading Partner profile named <ALL>. No client rules are required. |
Production / Test
These radio options modify the Production / Test indicator in the Outbound file. Select the radio option for that best classifies your 214 Out EDI Messages.
Rules - Send Update to Trading Partner When
If your Client has it’s own set of Customers that also require the 214 EDI Messages, this section gives you the ability to send a 214 Out Message to 10 different clients, for every status change on an order, if you needed to. Use the '+' button on the Navigation bar to add a new record, and double click the two fields to select values from a Search window. The Message Details will be setup using the various Tabs to the right of this section.
Status Codes Tab
Select the '' to add in a new status code to the grid. After selecting the '' sign, double-click in the status code column and a 'Select Status Code' dialog box will appear. Select one. When the order hits that status, it’s time to send out a status code update, or 214 EDI. The status code generates an EDI code, which is easily setup in the EDI Status Codes tab.
| The purpose of this grid is to generate and maintain a cross reference of your system dispatch and customer service status codes to the EDI equivalent status codes. Order status changes could potentially mean a different EDI status to different Trading Partners. This feature allows you to configure a status code cross reference catered to each individual Trading Partner. |
Status
Shows status for this entry. Double-clicking in this field will offer more Status Code options. This is the status code used in the Dispatch program and Customer Service program.
EDI Code
Shows the EDI code for this entry. Double-clicking in this field will offer more EDI Code options (if you’ve imported or created those). This is the cross-referenced EDI code, which will be sent to your Trading Partner, in reference to the meaning of your status code. Example: In your system you may use 'DELVD' to deliver a load. The resulting EDI code which 'DEVLD' would cross-reference to the EDI code 'D1'. When you deliver (DELVD) a load, 'D1' will be sent to your Trading Partner.
| Required EDI status codes and their meanings are often supplied by your Trading Partner. |
Appointment Code
Double-click in this field and you’ll see the available appointment codes. Newer EDI versions utilize appointment codes in place of normal EDI codes. Usage of this field is best determined at implementation and testing time. You would not use both the EDI Code field and the Appointment Code field.
Reason Code
Double-click in this field and you’ll see the available reason codes.
| Most codes are usually considered 'NS' or Normal Status. If in doubt, set up new codes as 'NS'. |
Description
Enter an applicable description. This is only intended as an aid and reminder to the EDI Administrator.
Use Date Value
Double-click in this field and a pull-down arrow will appear showing the available 'use date value' options. In almost all cases, the date and time specified when the status is entered against an order should represent the date and time of the status occurrence. Example: When entering the 'DELVD' status for an order (delivered), the date and time entered would normally be the date and time the status occurred. All possible date fields are available for flexibility and usage in special circumstance situations. It is recommended to use 'Status Change Date' as the 'Use Date Value'. This option can be fine tuned later during testing if needed.
Hold for Audit
Double-click in this field and a pull-down arrow will appear showing the available 'hold for audit' options (i.e., 'never', 'always', 'when').
| The next two columns 'Operator' and 'Date Field' are only relevant if you put 'When' in the 'Hold for Audit' field. For example, if you selected 'When' in the 'Hold for Audit' field, and put '>' in 'Operator', and put 'Deliver_By_End' in the 'Date Field' you would be putting this 214 status message on hold and the person looking after the EDI Audit program would see the message on hold and place the correct reason for this occurring in the status message. This might only be relevant in a few situations like, say, if you had a Trading Partner that was picky about delivery dates, so much so that if the next few deliveries are late you might even lose your contract with that Trading Partner, then this might be an option to consider. It gives you a 'heads up' whenever there’s a concern about a delivery. |
Operator
Double-click in this field and a pull-down arrow will appear showing the available 'operator' options, i.e., <, >, etc.
| Only applicable when 'Hold for Audit' = 'When'. |
Date Field
Double-click in this field and a pull-down arrow will appear showing the available 'date field' options.
| Only applicable when 'Hold for Audit' = 'When'. |
PU / Del / Oth
Use the pull-down arrow to view selections of either 'P' (pick up), 'D' (delivery), or 'O' (other). This option allows the user to specify in the EDI_STATUS_CODES if the code should use the order’s pick up or delivery specified city, state and postal location, or always the last known location. i.e., Specifies location to use for the status message: Shipper location, Consignee location, or Other (closest, last known geographical location of equipment).
Required
Double-click in this field and a pull-down arrow will appear showing the available 'required' options, i.e., true, false.
| Currently, this field has no operations purpose. It can be useful for report building such as in the case of service failures or reporting on orders which have missing 'Required' 214 status changes. |
EDI Status Codes Tab
Select the '+' and enter your EDI Code in the EDI Code column. Tab over to the Description column and enter an explanatory description for this code in this column. Using your context menu, you can import Status Codes from a text file or from another Customer Profile. Contact Trimble Transportation Support for more information if an EDI text file hasn’t been included in your TruckMate install.
| Although there is a standard set of EDI codes for the EDI version your customer is requesting, it is more common for a specified set of EDI status codes to be transmitted. By configuring only the codes requested by your customer, only their codes will show in drop-down selections in the status code grid and in the EDI Audit program. This aids in preventing data-entry errors. It does also occur, on occasion, that a Trading Partner may request special customized codes. This grid also accepts customized codes allowing you to meet your customer’s needs. |
EDI Reason Codes Tab
EDI Reason Codes
Select the '+' and enter your EDI Reason Code in the EDI Code column. Tab over to the Description column and enter an explanatory description for this code in this column. Alternatively, using your context menu, you can import Status Codes from a text file or from another Customer Profile. Contact Trimble Transportation Support for more information if an EDI text file hasn’t been included in your TruckMate install.
Description
Enter an applicable description. This is only intended as an aid and reminder to the EDI Administrator.
214-X6 Out Tab
A 214-X6 EDI is an off-shoot of the 214 message. Its purpose is to inform the Trading Partner of the geographical location of their shipment at specific intervals. Certain companies want to have an update daily at say, 10:00 am, as to the exact locations (GPS) of all of their shipments and the X6 EDI would provide that. These are often referred to as check calls, and are specifically used to locate equipment at certain times of the day
Update Frequency
Frequency Style
Intermittent
Selecting intermittent would follow the starting and ending preferences set up above in the 'Update Frequency' area.
Specific
Selecting specific means you will enter specific times in the fields provided. For example, if you have a Trading Partner that requires updates at 10:00 am, 2:00 pm, and 6:00 pm, you would simply enter those times in the fields provided, and place a checkmark beside them to activate those times.
Last Update Occurred
Shows the date and time that the last update occurred.
Next Update
Shows when the next scheduled update will be, as per your frequency specifications.
Applicable Status Behaviors
Check the options that you would like to set as Applicable Status Behaviors for your 214-X6 Out Messages. Select from the options given: Assignment, Dispatch, Delivery, Late, Pick-up, Terminal, Spotting, Unavailability, Availability, Completion, Cancel, Docked, and Other.
| You probably wouldn’t need to show them any loads already delivered, completed or cancelled, but you would want to show locations on all of the other options. |
Warning Feature
This warning feature is only associated with the EDI Communications Manager program > Standard tab > 214-X6 sub-tab.
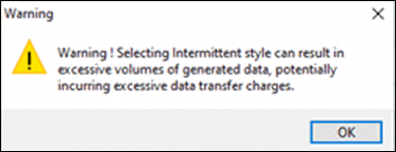
When the profile is active and the Update Frequency Style is set to Intermittent, setting the Hour, Minutes, or Seconds of the frequency displays a warning message to remind you this may cause a large amount of data transfer. This is not an issue if there is no cost to the transmission of data and if your receiver side is not limiting the amount of data received. However, if the transmission is via VAN, where transmission fees may occur per byte, having the frequency set too frequently may result in a large total cost.
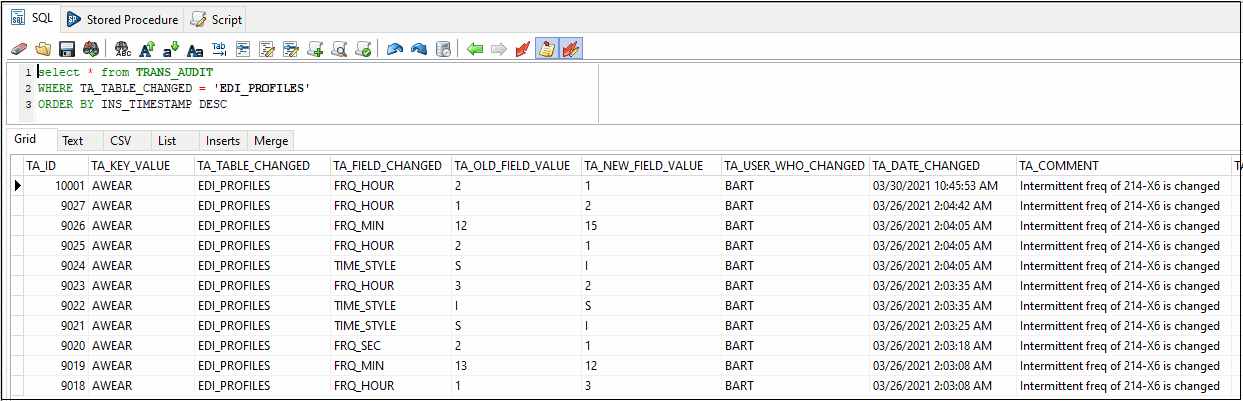
The frequency change is also logged in the TRANS_AUDIT table. When you change the Hour, Minute, Seconds or Frequency Style, regardless of whether the profile is active, the change is logged to the TRANS_AUDIT table.
SELECT * FROM TRANS_AUDIT
WHERE TA_TABLE_CHANGED = 'EDI_PROFILES'
ORDER BY INS_TIMESTAMP DESC