Detail tabs: Dispatch, Driver Pay

This topic discusses the following tabs:
-
Dispatch
-
Driver Pay
Dispatch
The Dispatch Tab offers mainly summary information from the Dispatch program about the Freight Bill. There are some fields that can be set that will affect driver pay and contract billing.
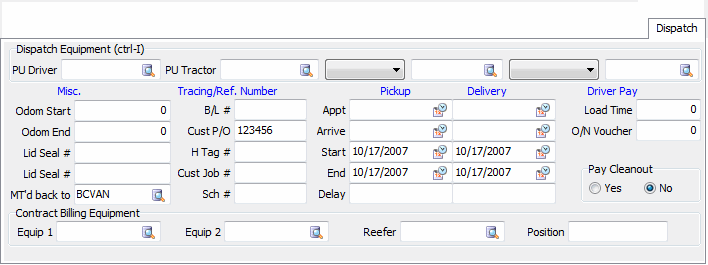
Dispatch Equipment Info
| Field | Definition |
|---|---|
P.U. Driver |
Enter the Driver Name here or use the search button to locate the Driver Name. |
P.U. Tractor |
Enter the Tractor Name here, or use the search button to locate the Tractor Name. |
P.U. Trailer1/P.U. Trailer2 |
The user can enter 2 trailers for the pickup. First select the trailer number (1 or 2) from the drop down list and then enter the Trailer Name, or use the search button to locate the pickup Trailer Name. |
Dlvry Trailer1/Dlvry Trailer2 |
The user can enter 2 trailers for the delivery. First select the trailer number (1 or 2) from the drop down list and then enter a trailer Name, or use the search button to locate the delivery Trailer Name. |
Miscellaneous Info
| Field | Definition |
|---|---|
Odom. Start / End |
Enter your starting and ending odometer readings. |
Lid Seal # |
Enter the Lid Seal number here, if applicable. |
Mt’d back to |
Motored back to End Destination'. Select the appropriate ending destination. Note: If you have a 'Terminal' zone entered in this field, the selected Freight Bill will show up in the Crossdock program. Likewise, If a 'Terminal' zone' isn’t entered, then the Freight Bill will not appear in Crossdock. |
Tracing / Ref. Number
| Field | Definition |
|---|---|
B/L# |
Enter the Bill of Lading number here. |
Cust. PO |
Enter the customer PO number here. |
Hand Tag |
Enter the Hand Tag number here. |
CW Load # |
Enter the CW Load number here. |
USP Seals |
Enter the USP Seal number here, if applicable. |
Pickup / Delivery Info
| Field | Definition |
|---|---|
Appt |
Enter the Appointment time. |
Arrive |
These two fields will display the data in the 'ACTUAL_PICKUP' and 'ACTUAL_DELIVERY' fields of the TLORDER TruckMate Table. These fields are automatically populated when the Freight Bill’s associated Trip goes through a certain Status code ('P' for Pickup and 'D' for Delivery). |
Start / End |
These date fields will display the same dates as entered in the Shipper and Consignee header sections of the Customer Service program. |
Delay |
Driver Pay
| Field | Definition |
|---|---|
Load Time |
Enter the time taken to load. |
O/N Voucher |
Enter any relevant voucher information here. |
Pay Cleanout |
Check either the 'Yes' or 'No' flag, depending on if the Driver requires Pay Cleanout or not. |
Contract Billing Equipment
This section is used to bill a customer when they are not billed per Freight Bill, but rather rent a truck/trailer/driver by the hour. In order to use the information in this area, these settings must be used in the following areas:
-
Application Configurator:
-
RATES.EXE - Aggregate Rating must be set to 'False'.
-
RATES.EXE - Equipment Rating must be set to 'TLDTL'.
-
CONBILL.EXE - Add Odometer to R&M can be either 'True' or 'False'.
-
-
In the Rates Maintenance program > Rate Sheet Tab, select the 'Contract' sheet-type. Freight bills are created for each haul, and must be dispatched as well as completed.
-
In Customer Service, Dispatch Tab, the Equipment Classes are entered, along with a billing 'position', which is a field that can be used to keep billing batches separate.
-
In the Contract Billing program, these bills will show up on the entry Tab when the appropriate information is entered and the 'Find Bills' is refreshed.
| Field | Definition |
|---|---|
Equipment 1 / Equipment 2 / Reefer |
Enter an Equipment Class or Reefer class, or click the search button to bring up a pop-up search form where you can search by code or description. |
Position |
Used in conjunction with the Contract Billing program. When a new 'summarized' bill is created, the position that is used to group/consolidate the bills will be entered here by the program. |
Driver Pay
When a driver who is paid by percentage of revenue on the Freight Bill (as configured in the Driver Pay Contracts program) is assigned to the Freight Bill (using the Quick Bill Entry program, the Local Dispatch program, or the Driver Pay Tab in the Customer Service program), automatically generated pay entries will be displayed on this Tab. Also if a driver is configured to be paid by mileage and is assigned to a Freight Bill (as described above) the pay entry will display here (but note that pay will only be calculated if a Mileage amount has been assigned to the Freight Bill in the Freight Bill header). Because percentage-based driver payments are correlated to the charges on a Freight Bill, only percentage pay items are shown here, not mileage pay items generated by the Dispatch program. You can also manually enter extra pay and deductions on this Tab.
Four additional sub-Tabs are available in the Driver Pay Tab. Their associated Keyboard Shortcuts are displayed on the Tabs next to their descriptions, when available.
| Depending on a setting on the Security Setup program > Security > Business Events > Allow Changes Tab, the user may or may not be able to amend Driver Pay data once a Freight Bill is posted to the Billing Register. |
Driver Deductions sub-tab
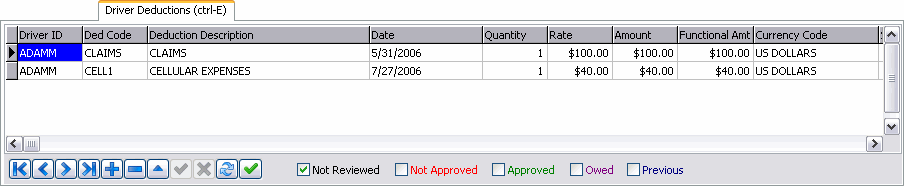
Driver Deductions can be manually entered on this Tab. Note that you can only enter deductions for drivers who have an entry on the Pay Tab. The driver who is currently highlighted on the Pay Tab will by the default recipient of the deduction. This cannot be changed. All outstanding deduction entries for the driver highlighted on the Pay Tab will display in the grid. You can view deductions of all status types by selecting the checkboxes at the bottom of the Tab.
Approving Driver Deduction Records
You can set the status of a Driver Deduction entry (manual or automatic) to 'Approved' in the Driver Deduction Tab of the Customer Service program (depending on your security clearance on the Security Setup program > Security > Business Events > Misc > Customer Service Tab). Approving a Deduction entry allows it to be updated by the Driver Deduction Register program and included on a statement. Double-click on a pay entry to approve it. The entry will turn from black text to green text. For further information about the status color codes, refer to the Driver Pay Audit program documentation.
| Users that do not have the appropriate security clearance to Approve records can still do other status changes on them, such as to the 'Owed' status. |
Creating Advance Checks
![]() Selecting this button will open the Advance Check window, whcih allows the user to create an advance check for any Drivers that have been assigned to the Freight Bill.
Selecting this button will open the Advance Check window, whcih allows the user to create an advance check for any Drivers that have been assigned to the Freight Bill.
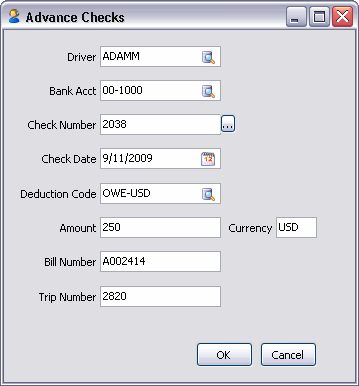
There are some restrictions when using this functionality:
-
The Freight Bill status must be at least 'Dispatched', and must not be 'Complete'.
-
The Driver ID has been assigned to the Freight Bill (i.e. the Driver will be visible on the Trip Resources Tab.
Once the check details have been populated by the user, the normal Crystal Report selection window will open, allowing the user to select a Crystal Report that will print the check. Posting of the Check Register program must still be done on a regular basis by head office staff.
| The advance Deduction will not be taken from a Driver/Vendor statement if the Check Register has not been posted. |
| Field | Definition |
|---|---|
Driver |
Select a Driver ID for the check. The Driver’s name and address will auto populate from the Driver Profiles program > Address Tab. Note: Use the 'Check Name' field on the Driver Profiles program > Pay/Remuneration Tab if it should be different from the Driver’s name. |
Bank Account |
Choose one of the valid bank accounts that the user has been given access to be selecting the edit pick icon. |
Check Number |
Select the ellipsis button to open a small window that will default to the next available check number in the system. This value can be overridden, if desired. |
Check Date |
Enter the date of the advance or select the Calendar icon to choose a date from a calendar menu. |
Deduction Code |
Choose a Deduction Code from the Driver’s Contract that should be used to the advance check. |
Amount |
Enter the amount of the advance check. The amount the user can enter here may be restricted by the value entered by the administrator in the Security Setup program > Security > Business Events > Misc > Customer Service Tab > 'Max DP Advance Allowed' field. |
Bill Number / Trip Number |
These fields will automatically populate based on the Freight Bill / Trip information. |
Filtering Options
Not Reviewed / Not Approved / Approved / Owed / Previous
You can set the status of a driver deduction entry to Approved in the Driver Pay Tab of the Customer Service program. Approving a pay entry allows it to be updated by the Driver Deduction Register program and included on a check. Normally, driver deduction entries are approved in the Driver Pay Audit program. Double-click on a deduction entry to approve it. The entry will turn from black text to green text.
The Driver records that can display/be added on this Tab are restricted by the Application Configurator program > CSERV.EXE > 'Display on Drv Ded Tab' option. If this option is set to 'Pay' then only Drivers that have Driver Pay records on the Driver Pay sub-Tab will display. If set to 'Trip' then only Drivers that have been assigned to Trips for the Freight Bill (visible on Trip Res’s Tab) can be added (including Trailers or Power Units that have a Driver ID attached to them (TRAILER.PAY_DRIVER, and PUNIT.PAY_DRIVER, respectively).
Additionally, only Driver Deduction Codes that have been flagged as 'Available in Customer Service' on the Driver Pay Contracts program > Deductions Tab will be available for selection.
Grid Fields
| Field | Definition |
|---|---|
Driver ID |
Will default to the driver record currently highlighted on the Driver Pay Tab. This cannot be changed. |
Ded Code |
Enter a Deduction Code as created in the Driver Pay Contracts program. Double-click for a selection form. |
Deduction Description |
Will default to the Description associated with the Deduction Code, as configured in the Driver Pay Contracts program. |
Date |
Will default to today’s date. You can manually enter a different date. |
Quantity |
Will default to '1'. You can change the value if you wish to deduct more than one instance of the Deduction code. The Functional Amount and Amount fields will recalculate by multiplying the value in this field by the value in the Rate field. |
Rate |
Will default to rate specified for the deduction code in the Driver Pay Contracts program. You can manually change the value. The Functional Amount and Amount fields will recalculate by multiplying the value in this field by the value in the Quantity field. |
Amount |
Will display the value of the Rate multiplied by the Quantity. |
Functional Amount |
Is a working field used for calculating the total pay. It will include foreign exchange amounts that are applied to the entry. It is a read-only field. |
Currency Code |
Will default to the currency specified in the Deduction code, as configured in the Driver Pay Contracts program. |
SOURCE_REG_ACC |
This field indicates which Register program the Driver Pay entry was posted in. |
Trip Number |
Will display Dispatch Trip Number that the Freight Bill was assigned to. Many of the advanced Driver Pay functions available via right-mouse click on this Tab require that a Trip Number (other than '0') be populated. |
User1 - User3 |
These additional fields can be utilized for future business needs. |
Context Menu
Driver Deduction
The user can use the 'Driver Deduction' right-click option on this Tab to post Driver Deduction entries while within the Customer Service program. Right-click to select the option on the Driver Deduction record and the Driver Deduction Register program will open, with the 'Trip Number' and 'Leg Date' fields populated form the Deduction detail record. The user can then select the 'Post' button to post all 'Approved' Deductions for the Trip.
| This right-click option may not be available, depending on the settings of the Security Setup program > Security > Business Events > Misc > Customer Service Tab. |
Driver Pay sub-tab
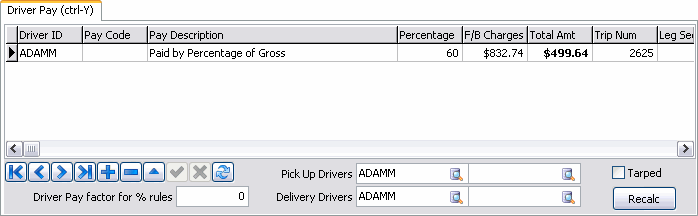
Approving Driver Pay Records
You can set the status of a driver pay entry (manual or automatic) to 'Approved' in the Driver Pay Tab of the Customer Service program (depending on your security clearance on the Security Setup program > Security > Business Events > Misc > Customer Service Tab). Approving a pay entry allows it to be updated by the Driver Pay Register program and included on a statement. Normally, driver pay entries are approved in the Driver Pay Audit program. Double-click on a pay entry to approve it. The entry will turn from black text to green text. For further information about the status color codes, refer to the Driver Pay Audit program documentation.
| Users that do not have the appropriate security clearance to Approve records can still do other status changes on them, such as to the 'Wait' status. |
| Field | Definition |
|---|---|
Pickup Drivers |
If a Pickup Driver was assigned to the Freight Bill in the Local Dispatch program, Quick Bill Entry program or Dispatch program, that drivers code will display in this field. You can manually assign a driver to this field by clicking on the edit button in the main navigator bar, then entering the driver code in this field. Double click for a selection form. The second Pick Up Driver field denotes the second Driver attached to a Freight Bill (i.e team Driver). |
Delivery Drivers |
If a Delivery Driver was assigned to the Freight Bill in the Local Dispatch program, Quick Bill Entry program or Dispatch program, that drivers code will display in this field. You can manually assign a driver to this field by clicking on the edit button in the main navigator bar, then entering the driver code in this field. Double click for a selection form. The second Delivery Driver field denotes the second Driver attached to a Freight Bill (i.e team Driver). |
Driver Pay Factor for % Rules |
This field is a Factor Field, not a percentage field, and the 'Min' and 'Max' fields in the Driver Pay program have to agree. There are a number of ways to use this field but here are a few examples. Let’s say you have three sites and you’ve labeled them as follows: 'Site 1' = Kelowna, 'Site 2' = Abbotsford, and 'Site 3' = Vancouver. You pay your drivers by percentage rules. If the site on the Freight Bill is 'Site 1' (Kelowna), you will pay 45% of the total charges to the driver. If the site is 'Site 2' (Abbotsford), then you pay your driver 50% of the total Freight Bill charges, and if the site is 'Site 3' (Vancouver), you will pay your driver 55% of the total Freight Bill charges. Your 'Min' and 'Max' factor for your first rule could be set at 1. Your 'Min' and 'Max' factor for your second rule could be set at 2, and your 'Min' and 'Max' factor for your first rule could be set at 3. Now, if the Freight Bill is created on 'Site 1', you would enter a '1' in the Driver Pay factor field, which would cause the first rule to be engaged and the Driver will be paid 45% of the total Freight Bill charges. If you feel you would use this option continuously, Contact TMW Support to discuss further, and a trigger could be developed where each time a Freight Bill is created, the system would check to see the site information entered, and add the appropriate 'Min/Max' factor that corresponds. You could also set up a situation where a driver may be paid different amounts depending on the pick up date. |
Tarped |
Place a checkmark in the box if this load must be covered by tarps. If you have also created a rule in Driver Pay Contracts where the tarp column appears as 'True', then the automatic pay system will match this checkbox with the Driver Pay Rule and create a pay amount for covering a load in tarps. Note: It is a tremendous amount of physical work for a Driver to cover a load in tarps, and therefore the Driver will be paid extra for this job. |
Recalc |
The 'Recalc' button can be used to refresh Driver Pay amounts based on changes in other TruckMate applications (i.e. a Driver’s Pay Contract is updated/changed in the Driver Pay Contracts program). |
Context Menu
| These right-click options may not be available, depending on the settings of the Security Setup program > Security > Business Events > Misc > Customer Service Tab. |
Driver Pay Register
The user can use the 'Driver Pay Register' right-click option on this Tab to post Driver Pay and Deduction entries while within the Customer Service program. Right-click to select the option on the Driver Pay record and the Driver Pay Register program will open, with the 'Trip Number' and 'Leg Date' fields auto-populated. Select the 'Post' button and all 'Approved' Driver Pay records for that Trip will be posted. After the Pay Register has completed, a confirmation box will pop up and ask if the user would then like to post Deductions. If the user selects 'Yes', the Driver Deduction Register program will also open with the 'Trip Number' and 'Leg Date' fields populated. The user can then select the 'Post' button a second time and all 'Approved' Deductions for the Trip will post.
Driver Pay Statements
Selecting this option will open the Driver Pay Statements program with the 'Trip Number' field automatically populated from the Driver Pay record, allowing you to print all Statements related to this entry quickly.
Pay Records Grid
| Field | Definition |
|---|---|
Driver ID |
For automatically generated percentage payments, the drivers code will display in this field. When you manually enter an Extra Payment for a driver, enter the drivers code (or double-click for a selection form) |
Pay Code |
When entering an Extra Payment, enter the Extra Pay code (as configured in the Driver Pay Contracts program). Double-click for a selection form. |
Pay Description |
In the case of an Extra Payment, this field will default to the Description associated with the Pay Code, as configured in the Driver Pay Contracts program. For automatically generated percentage payments, the description will be 'Paid by Percentage of Gross'.* * |
Trip Num |
For automatically generated percentage payments, the Trip Number to which the Freight Bill was assigned will be displayed. You can (optionally) manually enter a Trip Number, in the case of Extra Payments. |
Leg Seq |
For automatically generated percentage payments, the leg number from the trip to which the Freight Bill was assigned will be displayed. You can (optionally) manually enter a leg number, in the case of Extra Payments. |
Trip Status |
For automatically generated percentage payments, the current status of the trip to which the Freight Bill was assigned will be displayed. In the case of Extra Payments, this field will default to 'FINISHED'. |
Trailer 1 / Trailer 2 |
For automatically generated percentage payments, the Trailer ID’s of the Trailers in the order they were assigned to the trip to which the Freight Bill was assigned will be displayed. In the case of Extra Payments, you can manually enter a value in this field. |
Tarped |
Modify this field in the Driver Pay Contracts program, Pickups and Drops Tab by double-clicking in the column to toggle the switch from 'False' to 'True. Either entry will appear in the Customer Service program, Driver Pay Tab. If you wish to mark this load as requiring tarps, place a checkmark in the 'Tarped' box appearing in the Customer Service program, Driver Pay Tab, if this load must be covered by tarps. If you have also created a rule in Driver Pay Contracts where the tarp column appears as 'True', then the automatic pay system will match this checkbox with the Driver Pay Rule and create a pay amount for covering a load in tarps. |
Leg Date |
For automatically generated percentage payments, the Leg Date associated with the leg number on the trip to which the Freight Bill was assigned will be displayed. For manually entered payments, you can use the option in Application Configurator > Bill > CSERV.EXE - 'Default Leg Date to be used when user manually creates pay records in Driver Pay tab' to set a default value for this field. Available values for selection are 'Current Date' and 'Pick UP By' |
From Zone |
For automatically generated percentage payments, the From Zone on the trip leg to which the Freight Bill was assigned will be displayed. In the case of Extra Payments, the From Zone will be left blank. To enter a From Zone, double-click for a selection form. |
To Zone |
For automatically generated percentage payments, the To Zone on the trip leg to which the Freight Bill was assigned will be displayed. In the case of Extra Payments, the To Zone will be left blank. To enter a To Zone, double-click for a selection form. |
F/B Charges |
Displays the sum of the charges entered on the Details Tab. |
Percentage |
Displays the drivers pay percentage as configured in the Driver Pay Contracts program. This Percentage field in the Customer Service program, Driver Pay Tab, and the Minimum and Maximum Factor fields found in the Driver Pay Contracts program, Percentage Tab, must agree. |
Loaded Miles / Loaded Rate / Empty Miles / Empty Rate / Hours / Hourly Rate / Picks / Pick Rate / Drops / Drop Rate / Layovers / Layover Rate |
These fields are used for other types of driver pay, such as mileage pay and pick / drop pay. As the Driver Pay Tab in the Customer Service program only displays percentage payments, these fields are not used and no data will display. As a default, only Pickup and Delivery drivers are included in the percentage calculations; Any other drivers are not included. This default calculation rule can be changed to include all drivers involved in the freight bill, even if they didn’t pick up or deliver. To do that you need to set the option in Application Configurator > Driver Pay > PAYCON.EXE - 'Calculate Freight Bill Based Driver Pay on Drivers Other Than Pickup/Delivery Drivers' to 'True'. |
Other |
In the case of Extra Payments, the value will default to '1' (ie: one instance of the Extra Payment will be paid). You can change the value if you wish to pay more than one instance of the Extra Pay code. The Functional Amount and Total Pay fields will recalculate by multiplying the value in this field by the Other Rate. |
Other Rate |
In the case of Extra Payments, the value will default to the rate specified for the extra pay code in the Driver Pay Contracts program. You can manually change the value. The Functional Amount and Total Pay fields will recalculate by multiplying the value in this field by the value in the Other field. |
Total Amount |
In the case of an Extra Payment, the Total Amount will default to the Rate associated with the Pay Code, as configured in the Driver Pay Contracts program. For automatically generated percentage payments, the Total Amount will be the percentage paid to the driver (as configured in the Driver Pay Contracts program) multiplied by the sum of the charges entered on the Details Tab. |
Functional Amount |
Is a working field used for calculating the total pay. It will include foreign exchange amounts that are applied to the entry. It is a read-only field. |
Currency Code |
In the case of a manually entered Extra Pay entry, the currency will default to the currency specified in the Extra Pay code, as configured in the Driver Pay Contracts program. For automatically generated percentage payments, the currency field will be blank. The currency will be assigned to the pay entry based on the setup in the Driver Pay Contracts program when the entry is processed in the Driver Pay Audit program. |
Gross FB Charges |
This column will display the total Freight Bill charges less any Driver Deductions. This amount may vary depending on any preferences set up in the Interliner Tab in the Customer Service program. You can set this up as an automatic calculation by going to the Driver Pay Contracts program, Percentage Rules, Ded IP and set this to either 'True' or 'False'. The total Freight Bill charges are displayed in the F/B Charges column. These are the same amounts shown on the Detail Tab in the Customer Service program. |
Rule Group |
Will display the Rule Group as specified in the Driver Pay Contracts program. |
Override |
In the case of a manually entered Extra Pay entry, the default Override value will be 'True'. This tells the system that the pay was not generated automatically, but that it is acceptable for processing. In the case of automatically generated percentage payments, if you manually change any values associated with the pay record, you must change this flag to 'True' (the flag may change automatically) in order to prevent the system from over-writing your changes as further dispatch activity occurs. |
Override User |
Works in conjunction with the Override column. Once you adjust information on this Tab, the override username will appear in this column. Useful when tracking any changes made to the system. |
Override Date |
Works in conjunction with the Override column. Once you adjust information on this Tab, the override date and time will appear in this column. Useful when tracking any changes made to the system Payable Account pre-populated based on the entry in the Driver Pay Contracts program > Driver Pay Accounts Tab. |
Taxable |
Pre-populated based on the entry in the Driver Pay Contracts program > R&M Deductions Tab. |
Team Drivers |
The default is set at 'False'. This will automatically change to 'True' if there is more than one driver used in say, the pickup of this Freight Bill, as set out in the Dispatch program, this will automatically display as 'True.' This depends on whether you are using 'trip-based' or 'freight-bill' based rules. If the rule is 'trip-based', set this field to 'True' and then pay will only be generated when two drivers are assigned to the leg (as set up in the Dispatch program, on the Trip Grid). If the value is set to 'False', pay will be generated if only one driver is assigned to the leg. * This is different from a freight-bill based rule where payment occurs if a single driver is on the Freight Bill, but not if a team is. * Percentage rules are never trip based, they can only be Freight Bill based. * If you are paying drivers through Local Dispatch / Customer Service / Quick Bill Entry, it does not matter what value is entered in this field. |
SOURCE_REG_ACC |
This field indicates which Register program the Driver Pay entry was posted in. |
Gross Pay Deduction |
This field allows you to enter a dollar amount that will be applied as a Gross Pay deduction for the selected Driver. |
Freight Charge Deduction sub-tab
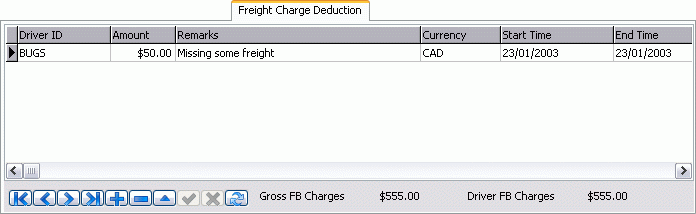
The records stored in this grid detail those deductions that affect the total freight charges. You can also use this Tab to pay local drivers an hourly amount, which will reduce the percentage amount paid to a Driver. For example, if you have a Driver paid by percentage, but need a local Driver for one Pick-Up, and the local Driver is paid by the hour, enter the local Driver’s information in this Tab, enter the amount, and this amount will be deducted from the amount paid to the Driver paid on a percentage basis.
| The behavior of this Tab is controlled by the 'Ded FB Deds' option on the Driver Pay Contracts program > Percentage Tab. |
| Field | Definition |
|---|---|
Driver ID |
Select the '+' button to add a new record and then double-click in the Driver ID column to select the driver of your choice. |
Remarks |
Enter any relevant remarks. |
Amount |
Enter the amount of freight charge deduction. |
Currency |
Will default to currency used in this Freight Bill. |
Start Time |
Will default to the current date upon the creation of a new record. Double-click to enter a different date, if required. |
End Time |
Will default to the current date upon the creation of a new record. Double-click to enter a different date, if required. |
Lunch |
This field allows you to specify any time that was given for a Lunch break for a driver. The field will default to '0.5' (one half hour) upon the creation of a new record. You may enter any other time simply by clicking within the field and entering a new integer value. |
Total Hrs |
Will calculate the total amount of time that will be deducted from the various options of this Tab. |
Gross FB Charges / Driver FB Charges |
These two fields will update with values as changes are made within the Freight Charge Deduction Tab. These fields are read-only and are uneditable. |
