Payroll Configuration layout
Pay Codes tab
Pay Codes describe each pay and deduction entry available for each payroll employee. A standard set of default payroll system codes are provided in the TruckMate database. These codes are required, and cannot be changed or deleted.
Pay codes are assigned to payroll departments on the Departments tab. Also, general ledger accounts are optionally assigned to individual Pay Codes on the Departments Tab. You can manually add additional pay codes to suit your company’s requirements.
At minimum, you will probably want to create pay codes on the Pay Codes tab for SALARY and HOURLY employees. You will also need to create special codes for items such as RRSP deductions and BONUS’s etc. as required.
Creating a new Pay Code
To create a new Pay Code in Payroll Configuration:
-
Go to the Pay Codes tab.

-
Click
 Insert.
 -
Make the appropriate entries to these fields:
Required field: *
Field Definition Code *
Enter a unique Pay Code. This can be up to ten characters in length.
If your Pay Codes are not already defined and you are starting from scratch, refer to the Sample Pay Code Reference section for some suggestions as to what basic pay codes to include.
See Sample Pay Code Reference for some examples of a basic set of Pay Codes to accommodate the Canadian T4 and RL1 forms and the US W2 form.
Description
Enter a description to provide information regarding the intended usage for this code.
User Defined
This field allows you to enter in an additional comment, free-form description of this pay / deduction Code, or a value to provide information when creating your own payroll reports.
OverTime Rate Multiplier
If this pay code will be used to record overtime payments to employees, enter the overtime rate in this field.
For example, if this pay code will be used to pay overtime at the rate of 'time and a half', enter 1.5 in this field. If this Pay Code will be used to Pay overtime at the rate of 'double time', enter 2 in this field. In the Employee Profile program, when you assign this code to individual employees, you will specify the base rate that will be multiplied by this factor to arrive at the overtime pay rate. If you leave this field blank, the value will default to '1' when you post the record.
Reporting Seq
Enter the Reporting Sequence value for this record to control the order the values will appear on reports.
Country
Set this value to CAN, US, or Both, to indicate whether the pay code is valid for use in Canadian Payroll only, US Payroll only, or Both.
Apply Deduction
This checkbox determines if payroll deductions will be allowed to be applied to the selected pay code (or not). (Default is True.)
The payroll deductions calculation procedure (PR_CALC_DEDUCTIONS) will check for this flag when calculating the total hours for deduction type (rate * amount).
Do Not Assess Vacation Pay
This checkbox determines if Vacation Pay is NOT included in your Payroll calculations for this Pay Code. (Default is False.)
Class *
Each pay code must be associated with a Class. When a pay code is used in payroll processing, the class determines how the amount will be applied to an employee’s pay, including, in some cases, how source deductions will be determined.
See Example of a Basic Payroll Pay Code Setup for examples demonstrating how pay and deduction codes can be set up for each class.
-
Click
 Post to save your entry.
 -
Once the basic pay code settings have been defined use the Pay Code > CAN and US tabs to specify where the Payroll and Returns Generator program will gather information from during the creation of taxation records and to generate a value into a particular box in your payroll year-end tax returns.
Pay Codes > CAN tab (T4 & RL1s)
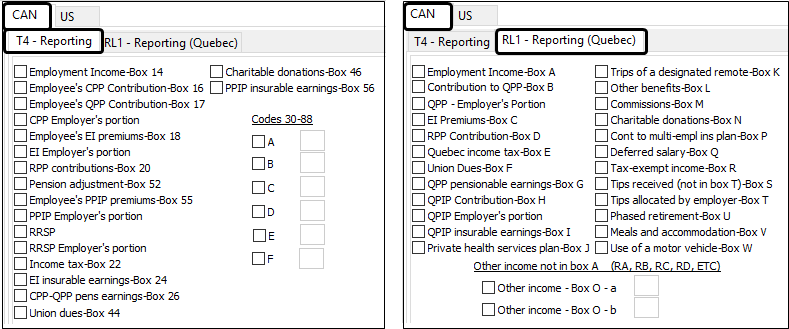
Browse through your pay codes and indicate which value they represent on both the T4 and RL1 tab checkboxes to tell the Payroll and Returns Generator program where to input these values when producing your tax return information.
|
See Sample Pay Code Reference for some examples showing how various pay codes are mapped to Canadian T4’s.
Pay Codes > US Tab (W2, Tax Override & Special Types)
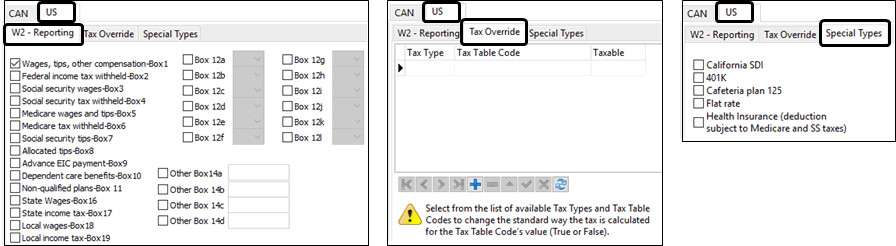
Use the US > W2 - Reporting sub-tab to specify where the Payroll and Returns Generator program will gather information from during the creation of taxation records and to generate a value into a particular box in your payroll year-end tax returns.
The codes supported in boxes 12A - 12D include:
A, AA, B, BB, C, CC, D, E, F, G, H, J, K, L, M, N, P, Q, R, S, T, V, W, Y, Z.
See Sample Pay Code Reference for some examples showing how various pay codes are mapped to American W2’s.
The Tax Override sub-tab allows you to add a State Tax Table, Local Tax Table, or Cost Allocation Table to a grid, that force the TruckMate system to override the standard way deductions are applied for the selected pay code prior to calculating the specified tax. This feature is only available for 'Deduction (before tax)' and 'Pension (RRSP)' type pay codes.
The Special Types sub-tab allows you to associate a pay code with different taxation categories specific to the United States. These include:
-
S: California SDI
-
K: 401K
-
C: Cafeteria plan 125
-
F: Flat rate
-
H: Health insurance (Deduction is subject to Medicare and SS taxes)
You can select more than one special types, (e.g., 'KFC').
Some considerations related to pay codes
-
Customized pay codes give the ability to allocate the associated company expense or liability to separate general ledger accounts. General ledger accounts are assigned to pay codes on the Payroll Configuration > Departments tab.
-
Customized pay codes are used to process pay items differently based on how the item relates to the governing Ppayroll authority.
-
Customized pay codes allow for flexible reporting. Keep in mind the basic requirements of producing payroll for your company and that you will need to regularly produce reportsyou’re your governing authority deduction remittances. You will need to produce information by employee for tax summary slips at the payroll year end and you may have internal reporting requirements. The more breakdown you have by pay code, the more flexibility you will have to create detailed custom reports as required for your company’s operation.
-
It is recommended that you differentiate between two particular pay codes: Deduction (after tax) and Earnings (non-taxable). Use the Deduction type code when paying out 'Advances', and use the Earnings-type code when paying out 'Reimbursements'. These are recommendations only- the Payroll Configuration program treats these pay codes exactly the same.
-
When setting up State tax codes, use the format 'STATEXX' where 'XX' is the recognized two letter State abbreviation. State Codes are listed in the telephone book.
-
There is a private health plan that is a taxable benefit available to residents of Quebec which is taxable for provincial purposes but not for federal. To use this plan the User must enter 'PQ-%' (where % is text that explains the code usage, such as INS for Quebec Health Insurance) as the pay code and select the pay class of 'Benefit (Taxable)'. Amounts attributed to this pay code will be treated as a taxable benefit in Quebec but not federally.
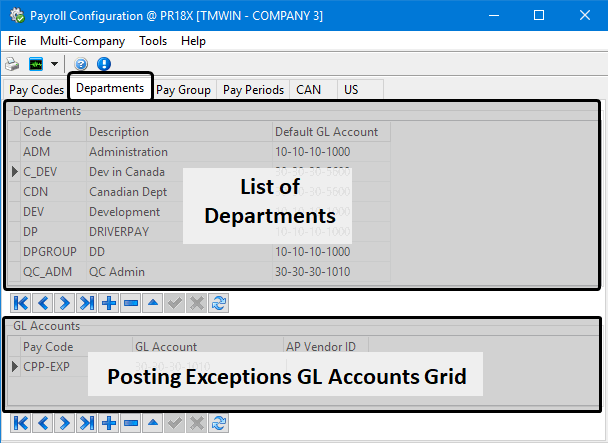
Departments tab
Payroll departments are used to group employees together. Departments are assigned to employees on the Employee Profiles program > Address Tab. You may have one department, or as many departments as you have employees, as dictated by your general ledger posting requirements. As every employee must be assigned to a department, it is necessary to create at least one department on the Departments tab before setting up your employee records.
The payroll Departments tab is also used to indicate posting exceptions for specific pay codes where something other than the default GL Account is used for a particular pay code for this department.
Creating a new payroll department
To create a new department in Payroll Configuration:
-
Go to the Departments tab.
A list of the existing departments is displayed in the top grid. -
Click
Insert from the Departments navigation bar.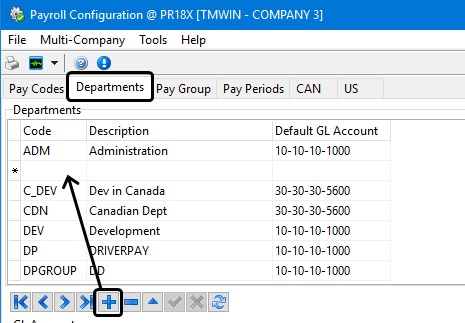
-
Make the appropriate entries to these fields in the grid. All fields are required.
Field Definition Code
Enter a unique code for each department required by your payroll accounting processes.
Examples may be: 'DRIVERS', 'ADMIN', 'OWNER', 'SHOP', etc. Once the department code is associated with employees (on the Employee Profiles program > Address tab), it will determine the general ledger accounts used for payroll process postings.
Description
Enter a description of what the code is to be used for. While some codes may be obvious, others may not. The description has no other purpose than to aid in describing to the operator what a specific code is used for.
Default GL Account
Double-click the field and select a valid general ledger account (as configured in the GL Chart of Accounts program).
The purpose of the Default GL Account is a 'catch-all' for any codes that get used in the payroll process that are not listed for that department in the GL Accounts grid below. The amount will post to this account by default. This feature can be taken advantage of in two different ways:
-
You may configure specific codes to post to specific GL accounts (in the GL Accounts grid below) while all others will always post to the default GL account.
-
For companies that have a complex and detailed general ledger, the default account can be used as an alarm. Throughout the usage of your payroll, you may be adding new codes and code types as your requirements change. When a new Code is added, it will also need to be added to each department. It is very easy to miss this step. If the code is not specified under a department, the amount will post to the default G/L Account. If the purpose of the default G/L Account is to catch these, there should never be anything posted to this account. If there is, this indicates a code is missing in the Department setup. There must be a default G/L Account specified for each department code.
-
-
Click
Post to save your entry.
GL Accounts grid
This grid is used to enter posting exceptions for each department. That is, you can configure posting references for specific pay codes on a department-by-department basis. If a code does not appear in this grid, the default account specified in the Departments grid above will be used.
To create a new entry in the GL Accounts grid:
-
In Payroll Configuration, go to the Departments tab.
A list of the existing departments is displayed in the top grid. -
Click
Insert from the GL Accounts navigation bar.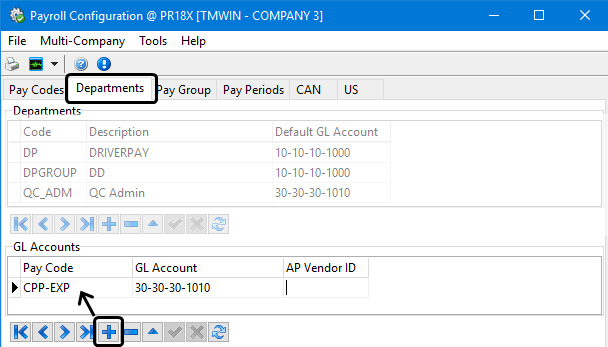
-
Do one of the following:
-
Make the appropriate entries to these fields in the grid.
Field Definition Pay Code
Double-click and select a valid pay code.
GL Account
Double-click and select the GL account (as configured in the GL Chart of Accounts program) that should be affected when amounts are processed for this pay code and department.
AP Vendor ID
Double-click to select the accounts payable vendor ID associated with this pay code and department. (These values are defined using the Customer & Vendor Profiles program.)
If the User sets the 'Vendor ID' field in the Employee Profiles program > Pay Info > Deductions tab to the Vendor ID displayed for a particular pay code here, that employee can have their deductions automatically turned into AP invoices when records for that pay code are processed by the AP Invoice Register program.
-
Use either of the following shortcut menu options:
-
Add System Pay Code
Use this shortcut menu option to add all the 'system' default pay codes (as configured on the Pay Codes tab). It will not add any custom pay codes.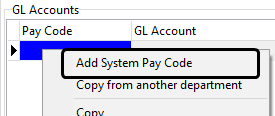
The general ledger posting account will be created as the default posting account specified for the active department. Once created, you can change the GL posting account for each of the individual pay codes.
-
Copy from another department
Use this shortcut menu option to choose an existing department to copy the pay codes from.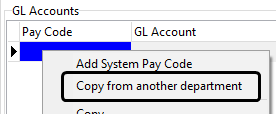
An identical set of payroll and posting account combinations will be copied from the selected department to this department. You should then review the new codes, adding new ones as required, removing non-required codes, and modifying GL accounts to suit the new department.
-
Note: Over time, as new pay codes are required and added, be sure to also add them to each department to ensure proper general ledger postings occur during Payroll processing. It does not matter if you have Codes listed under a department that you do not intend to use for that department. A posting will only occur if that Code gets used for that department.
-
-
Click
Post to save your changes.
Pay Group tab
Pay groups are used to group employees. Pay groups are assigned to employees on the Employee Profile program > Pay Information tab. When you generate a payroll batch (using the Payroll Time Sheets program), you will be required to specify a Pay Group. Pay groups are used to administer employees with similar Pay period frequencies. Also, they provide the flexibility to create separate Pay batches for internal processing requirements. You may have as few as one pay group or as many groups as you have employees. As every employee must be assigned to a group, it is necessary to create at least one pay group on the Pay Group tab before setting up your employee records.
Creating a new pay group
-
In Payroll Configuration, go to the Pay Group tab.
A list of the existing departments is displayed in the top grid. -
Click
Insert.
-
Make the appropriate entries to these fields in the grid:
Required field: *
Field Definition Code *
Enter a unique Pay Group code. This can be up to ten characters in length.
Description *
Provide information regarding the intended usage for this code.
PR Control Account
Can be used later when using the Payroll Time Sheets program to supply default account information automatically after indicating the Pay Group when creating time sheet entries.
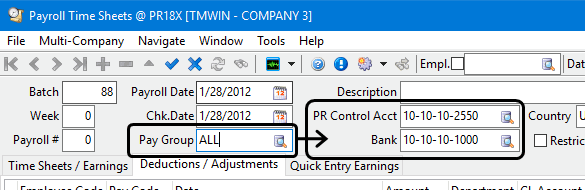
Bank Account
Can be used to supply default information in the Payroll Time Sheets program after selecting Pay Group.
-
Click
Post to save your entry.
Sample Setups for Departments and Pay Groups
Example 1
One office and all employees are processed together on the same Payroll. Drivers are not employees and are processed by an outside service.
-
Set up one department, OFFICE, and assign one Payroll expense account. All Payroll transactions are to be expensed to that one account. Assign all employees to OFFICE.
-
Set up one Pay group, OFFICE, and assign all employees to Pay group office.
-
When processing time sheet entries, use the recall by Group function to generate time sheet entries for all employees in the OFFICE Pay group in one shot.
Example 2
One office, but employee Payroll expenses are managed in separate GL accounts by Salary employees, Hourly employees, and Driver employees.
-
Set up three departments as SALARY, HOURLY, and DRIVERS. Assign each department a unique Payroll expense account from the GL Chart of Accounts. Assign employees to the appropriate departments.
-
You can now opt to create one Pay group, EVERYONE, and assign all employees to it, so that everyone’s Pay is processed in one batch, but three sets of Payroll expense entries are created, one for each department in the Payroll batch.
-
Or, you can create three Pay groups that match the departments so that each group of employees — SALARY, HOURLY, and DRIVERS — are processed in their own batches. Only one Payroll expense account is referenced by each batch when that batch is processed.
Example 3
Payroll for three offices (or terminals) must be processed so that each office and department has its own expense account, but all SALARY, HOURLY, and DRIVERS Pay are to be processed together.
-
Set up nine departments as SAL1, SAL2, SAL3, HRS1, HRS2, HRS3, DRV1, DRV2, DRV3 and assign each department its own Payroll expense account. Assign the appropriate employees to each department.
-
Set up three Pay groups, SALARY, HOURLY, and DRIVERS. Assign all the SAL1, SAL2, and SAL3 employees from the three terminals to the SALARY Pay group. Do the same for the other groups.
-
Now you can generate three Payroll batches, one for each Pay group, but you will get three separate sets of Payroll expense entries for each Payroll batch.
Pay Periods tab
The Pay Periods tab is used to configure your company’s payroll frequency. You may have as many pay frequencies as required. Pay periods are assigned to employees on the Employee Profile program > Pay Info tab > Pay Info.
Creating a new pay period including vacation levels
-
In Payroll Configuration, go to the Pay Periods tab.
A list of the existing pay periods is displayed in the top grid. The bottom grid displays vacation pay rates. -
Click
Insert.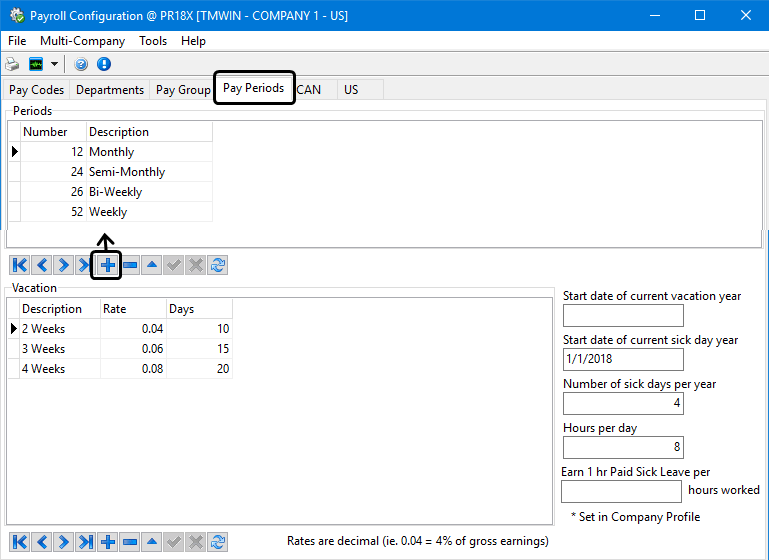
-
Make the appropriate entries to these fields in the Periods grid:
Required field: *
Field Definition Number *
Enter the number of pay periods in a payroll calendar year. Most often, once entered, these values will remain static and never need to be changed. But for weekly pay, the value may need to be altered to suit the current calendar year. This value is very important and must be set up accurately or your payroll calculations will be incorrect. Consult your governing authority payroll guide for the current year’s parameters.
Description
Enter a description of what each pay period represents. Example; 12 pay periods may have a description of Monthly, while 52 may have a description of Weekly. The description will display as a valid choice in the Employee Profile program > Pay Information tab.
-
Click
Post to save your entry. -
Make the appropriate entries to these fields in the Vacation grid.
The vacation grid is used to configure the minimum vacation pay assessments as dictated by the applicable governing authority, as well as any other vacation pay rates which your company requires. As there are two different standards in Canada for assessing vacation Pay (one by days earned and the other by remuneration earned), this grid requires both items to be specified. Vacation levels defined here are assigned to employees on the Employee Profile program > General > Address tab.
Field Definition Description
Enter a description of what each vacation pay level represents.
Rate
Specify the applicable percentage of gross earnings in decimal format (For example, 4% = 0.04).
Days
Enter the number of vacation days earned per annum applicable to the description (For example, 2 weeks would normally mean 10 earned vacation days per year).
-
Click
Post to save your entry.The fields on the right side of the Vacation grid will display the values set in Profiles > Company Profiles > Payroll tab for this company.
Field Definition Start date of current vacation year
Displays the start date of your company’s current fiscal vacation year. (m/d/yyyy format)
Start date of current sick day year
Displays your company’s allowable sick days per employee per year.
Number of sick days per year
Displays the start date of your company’s current fiscal sick day year
Hours per day
Displays the standard hours per day required.
Earn 1 hr Paid Sick Leave per hours worked
Displays the number of hours required to earn one hour of paid sick leave.
CAN tab
The CAN tab refers to Canada Customs and Revenue Agency (CRA) taxation rules. It is used to configure common taxation variables required for payroll processing that may often change and/or may require specific configuration for your company’s requirements. The details entered in this tab are designated by Canada Customs and Revenue Agency (CRA). Please consult your Payroll Deductions Guide available on the Canadian Revenue Agency’s web page for a detailed explanation and the proper variable amounts.
Tax Credit (TD1) sub-tab
The Canadian Tax Credit (TD1) sub-tab allows you to specify the current Canadian tax credit employee tax exemptions for your employees. Basic exemptions quite often change from year to year and sometimes semi-annually.
| These Claim amounts change throughout the year. Make sure that you monitor the changes and/or announcements at the CRA website. Consult your Payroll Deductions Guide available on the Canadian Revenue Agency’s web site for details regarding the proper variable amounts. |
Since the exemptions change often, the advantage of this method is you can have multiple exemption rates set up with starting effective dates specified. This allows the Payroll operators to pre-setup new rates that will automatically take effect for Payroll processing dated on or after the effective date. You may need to set up several exemption rates as you will no doubt have different groups of employees who can use the same exemption rate. The exemption rate is the amount specified on the 'TD1' form each employee is required to complete and submit at the commencement of employment and as often as Canada Customs and Revenue Agency (CRA) dictates.
Basic Canadian tax setup for a typical province
-
In Payroll Configuration, go to the CAN tab.
-
Go to the Tax Credit (TD1) sub-tab.
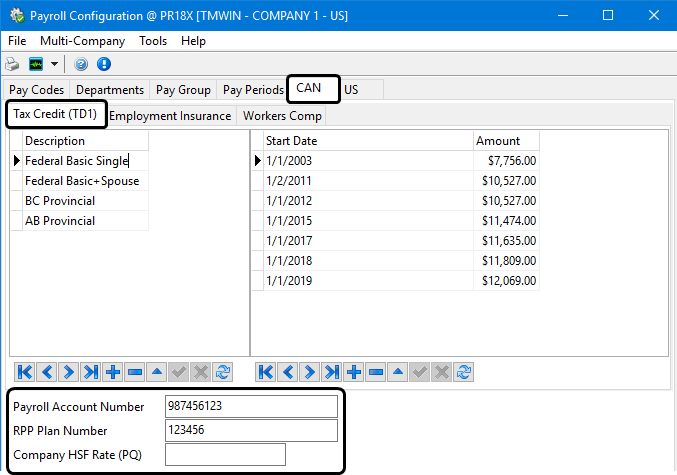
-
Verify the basic Canadian tax account configuration information appears in the fields at the bottom of the page.
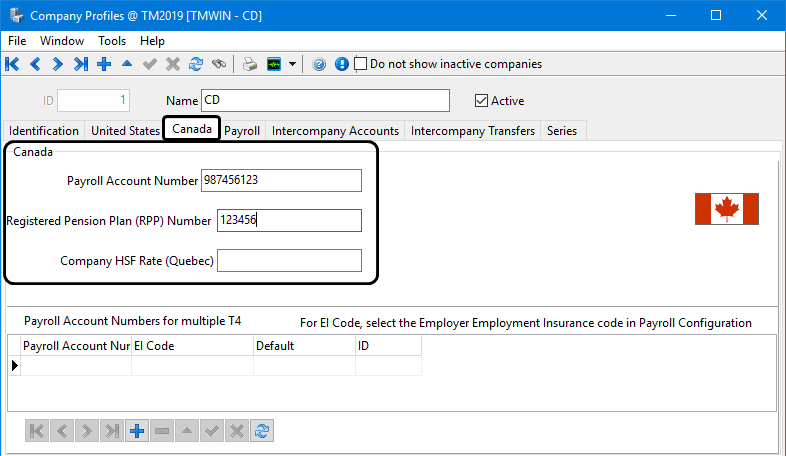
Field Definition Payroll Account Number
Your Company’s Canadian Revenue Agency’s Payroll Account Number.
RPP Plan Number
Enter your Registered Pension Plan number, if applicable to your Company.
Company HSF Rate (PQ)
In the province of Quebec, employers are required to make a contribution to the Health Services Fund. If applicable, enter your percentage contribution rate in this field. Refer to the Guide for Employers (Quebec) for information about determining your rate. If you enter a value in this field, a liability will be posted to the General Ledger when you update Payroll checks through the Check Register program.
These fields are all read-only within the Payroll Configuration program. They can only be edited in the Profiles > Company Profile program > Canada tab.
The next step is to create some tax credit exception codes and enter the details for each year’s start date.
-
Click
Insert using the bottom navigation toolbar for the Description grid on the left.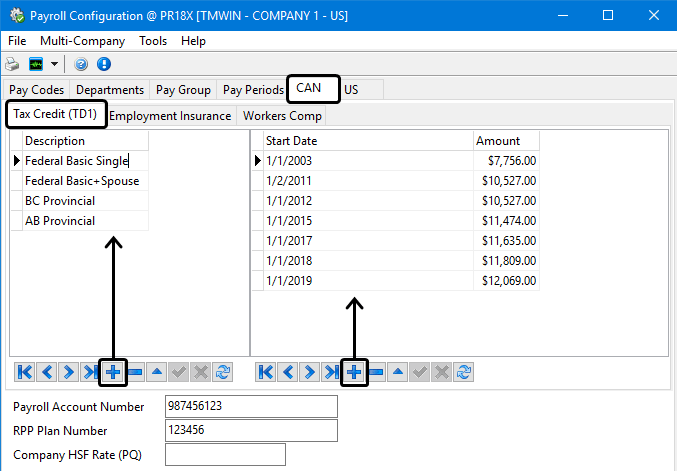
-
Click
Insert Record below the Start Date/Amount grid on the right to enter a new start date and amount for each exemption amount associated with the claim codes required for your company. (You do not need to enter and update every claim code for every province, just the ones you are actually using.)Required field: *
Field Definition Description *
Enter a description for each exemption amount required for your company.
Start Date *
For each Tax Credit description entered, you will need to specify a starting date on which the amount takes effect. The purpose of allowing multiple dates allows the Payroll operator to pre-configure new exemption rates as they change from year to year without affecting current Payroll processing prior to the effective date.
Amount *
Enter the appropriate tax credit amount with respect to this specific tax credit Description and the Start Date entered.
One suggestion would be to enter one for 'Federal Basic Exemption - Single' and one for 'Federal Basic Exemption - Married'. For example:

That may work for most of your employees. However, if your company has many employees this next solution based on claim amount values would likely work better for you.
Note: You will need to set up the Claim Codes every year for the current Provincial and Federal taxes and reflect any updates or revisions issued by the CRA.
For employees in any given earnings range, use the applicable claim Code with the claim amount being the mid-point for that range (add 1/2 of the difference between the two values to the first value).
Here is an example using the 2020 Claim Codes for the Province of British Columbia:
2020 British Columbia Claim Codes Claim code
Total Claim Amount ($)
Midpoint ($)
Amount field value in PRCONFIG.EXECODE0
No claim amount
0.00
CODE1
Minimum - 10,949.00
10,949.00
CODE2
10,949.00 - 13,413.00
12,181.00
CODE3
13,413.00 - 15,877.00
14,645.00
CODE4
15,877.00 - 18,341.00
17,109.00
CODE5
18,341.00 - 20,805.00
19,573.00
CODE6
20,805.00 - 23,269.00
22,037.00
CODE7
23,269.00 - 25,733.00
24,501.00
CODE8
25,733.00 - 28,197.00
26,965.00
CODE9
28,197.00 - 30,661.00
29,429.00
CODE10
30,661.00 - 33,125.00
31,893.00

To see a breakdown of claim codes by Province, refer to the Canadian Revenue Agency’s current web site information or the Province of Quebec’s Revenue Agency
Note: Refer to the Canadian Revenue Agency’s website for additional tax code information for items like eligible dependents, spouses or common law partner amounts, etc.
-
Click
Post to save your entries.
Federal tax credits
This section describes how to add new Federal claim code entries for 2020.
Changes to the Federal basic personal amount (BPAF) starting in 2020 mean the Federal Claim Code chart cannot be produced with ranges, as was previously done since the BPAF will be unique to each employee’s annual income. You still need to setup placeholders for the Federal claim codes, but in this case, the amount is calculated dynamically by the TruckMate software so starting with the 2020 tax year, you do not enter a value into the grid.
| In order for the software to calculate the Federal claim code information dynamically, the descriptions used for the Federal claim codes must end with a number. For example CODE1, CODE2, CODE3, etc. or Fed Code 1, Fed Code 2, Fed Code 3, etc. It must end with a number. |
To set up and populate the grid for the Federal basic personal amount calculations:
-
In Payroll Configuration, go to the CAN tab. You will see three additional tabs.
-
Go to the Tax Credit (TD1) sub-tab.
This screen contains a Description Grid and a Start Date/Amount Grid on the right. These grids are used to enter and update your TD1 information. -
Click
Insert using the bottom navigation toolbar for the Description grid on the left to create the Federal claim codes you will be using.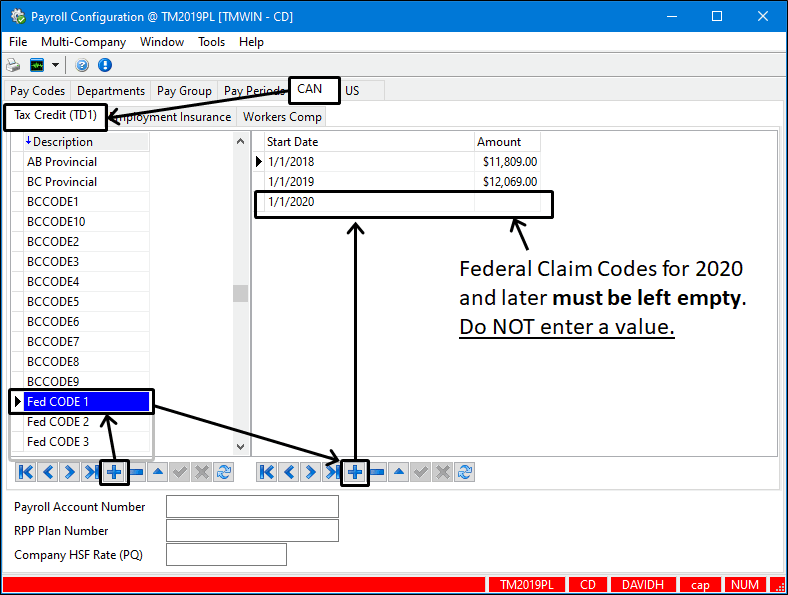
-
Select the claim code from the grid on the left and click
Insert Record below the Start Date/Amount grid on the right to create a new record for this claim code. (You do not need to enter and set up every claim code, just the ones you are actually using.) -
In the new detail line, enter the starting date (e.g., 1/1/2020) in the Start Date field, but leave the Amount field empty. Do NOT enter a value for Federal 2020 claim codes or later.
-
All the 2020 Federal claim code information and associated formulas for calculating the values is hard coded within the TruckMate (20.x+) software. You must have an entry for each Federal claim code you are using but in each case, leave the Amount field empty.
-
If you want to calculate any of the values manually, refer to the Payroll Deductions Online Calculator available online from the Revenue Canada website.
-
Click
Post to save the record.Note: The additional steps described are for users who are entering their Federal and Provincial TD1 information for the first time.
-
Go to the Employee Profile program (EMPLOYEE.EXE).
-
Select the CAN Tax menu item, and then click Can Tax.
-
Use the drop-down menu next to the Federal Tax Credit (E) (TC) option and select the appropriate Claim Code, based on the Employee’s Total Claim amount as shown on their TD1.
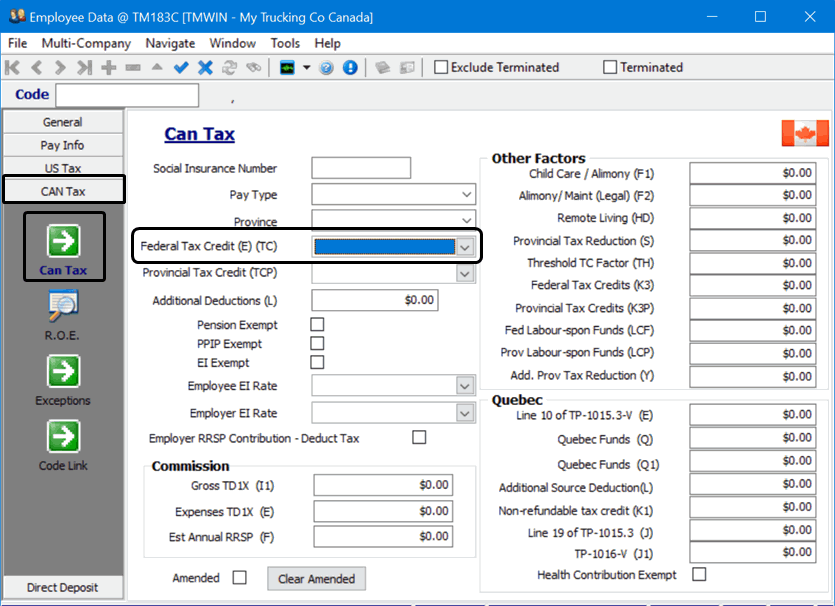
-
Similarly, use the drop-down menu next to the Provincial Tax Credit (TCP) option and verify the appropriate Claim Code for each employee. This is also a good opportunity to review the rest of the configuration information.
Nova Scotia tax credits
This section describes how to add new claim code entries for 2020 for the province of Nova Scotia.
Due to the Nova Scotia legislative changes to the Basic Personal Amount (BPA), the Claim Code chart cannot be produced with ranges since the BPA will be unique to each employee’s annual income. The Nova Scotia Claim Code chart income range is $1,600 between all claim codes once the BPA has been calculated. For example, if Nova Scotia’s BPA is $11,481 for a particular employee, then the claim code 2 range would be $11,481 - $13,081 and so forth up to claim code 10.
| In order for the software to dynamically calculate the Nova Scotia claim code information it requires that the descriptions used for the claim codes ends with a number. For example NSCODE1, NSCODE2, NSCODE3, etc. or Nova Scotia Code 1, Nova Scotia Code 2, Nova Scotia Code 3, etc. It must end with a number. |
-
In Payroll Configuration, go to the CAN tab. You will see three additional tabs.
-
Go to the Tax Credit (TD1) sub-tab.
This screen contains a Description Grid and a Start Date/Amount Grid on the right. These grids are used to update your TD1 information.
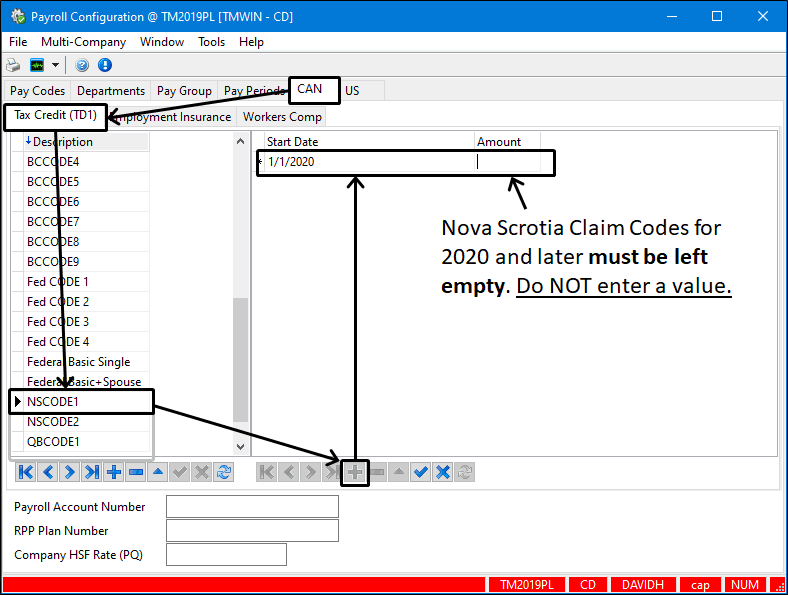
-
Select the claim code from the grid on the left and click
Insert Record below the Start Date/Amount grid on the right to create a new record for this claim code. (You do not need to enter and set up every claim code, just the ones you are actually using.) -
In the new detail line, enter the starting date (e.g., 1/1/2020) in the Start Date field, but leave the Amount field empty. Do NOT enter a value for Federal 2020 claim codes or later.
-
All the 2020 Nova Scotia claim code information and associated formulas for calculating the values is hard coded within the TruckMate software. You must have an entry for each Nova Scotia provincial claim code you are using but in each case, leave the Amount field empty.
If you want to calculate any of the values manually, refer to the Payroll Deductions Online Calculator available online from the Revenue Canada website.
-
Click
Post to save the record.
Employment Insurance sub-tab
Canadian employment insurance rates for the employee and employer contributions are set up here on the Employment Insurance tab. While there are two standard prescribed rates by Canada Customs and Revenue Agency (CRA), (one for the employee’s and one for employer’s contribution), there are allowable circumstances where your company may have more than one set of rates for different employees. You may set up as many employee and employer rates as required. For each rate description, you may have multiple start dates with applicable rates. This allows the Payroll operators to pre-configure new rates that will automatically take effect for Payroll processing dated on or after the effective date. Employment Insurance rates are assigned to employees in the Employee Profile program > Can Tax tab.
Canadian Employment Insurance setup
-
In Payroll Configuration, go to the CAN tab.
-
Go to the Employment Insurance sub-tab.
-
Verify the basic Canadian tax account configuration information appears in the fields displayed at the bottom of the page. (These fields are edited using the Profiles > Company Profile program > Canada tab.)
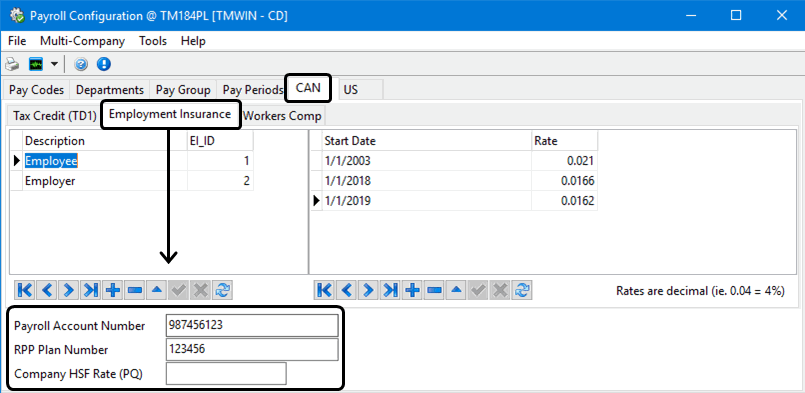
-
Click
Insert using the bottom navigation toolbar for the grid on the left.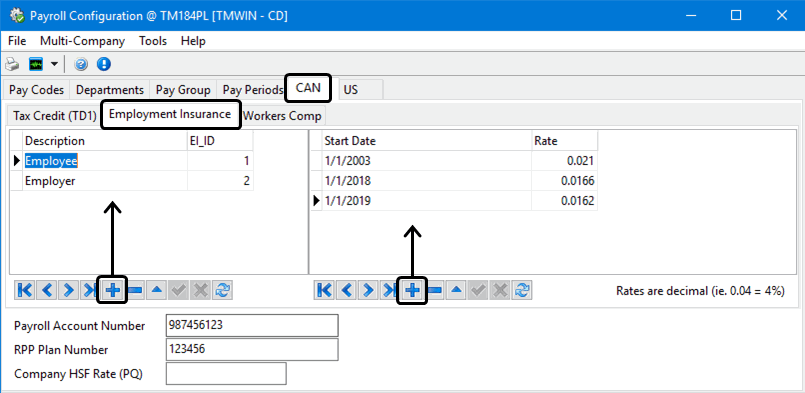
Enter a new start date and amount for each Employment Insurance rate required for your company. All fields are required.
Field Definition Description
Enter a description for each employment insurance rate required. For most Payroll applications, only two will be required, one for the standard employee contribution rate, and one for the employer contribution rate. This description is displayed when you assign the Employment Insurance Code to the employee in the Employee Profile program, on the Can Tax tab.
EI_ID
This ID value is assigned to this entry by the system.
Start Date
For each employment insurance description entered, you must specify a starting date on which the rate takes effect. The purpose of allowing multiple dates allows the Payroll operator to pre-configure new employment insurance rates as they change from year to year without affecting current Payroll processing prior to the effective date.
Rate
Specify the applicable employment insurance rate for the associated description in decimal format (.0255 = 2.55%). The percentage amount is dictated by Canada Customs and Revenue Agency (CRA)'s MC (Machine Computation) Payroll deduction guide.
Workers Comp sub-tab
While Worker’s Compensation is not really a Payroll item, it is included within the Payroll module to allow for ease of customized reporting and calculations. Workers compensation rates are based on gross amounts paid to employees. Multiple Worker’s Compensation rates can be set up on the Workers Comp Tab to allow for different rates to be paid for different types of work performed within your company.
Canadian Workers Compensation setup
-
In Payroll Configuration, go to the CAN tab.
-
Go to the Workers Comp sub-tab.
-
Verify the basic Canadian tax account configuration information appears in the fields displayed at the bottom of the page. (These fields are edited using the Profiles > Company Profile program > Canada tab.)
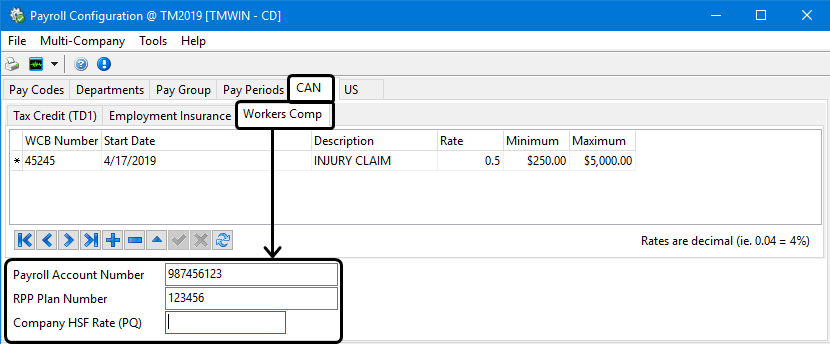
-
Click
Insert.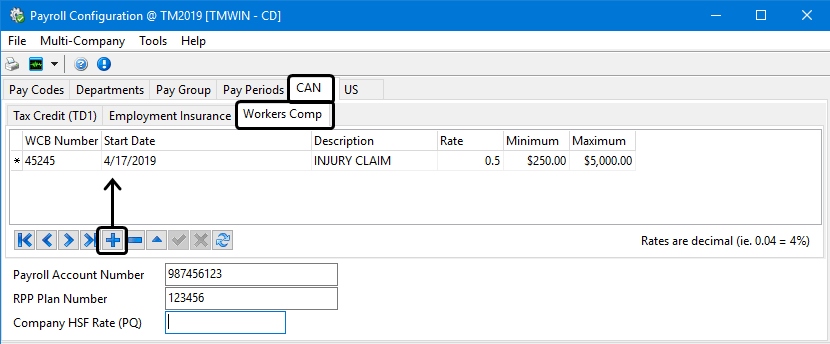
-
Enter the compensation rates as required. All fields are required.
For example, office staff will most commonly have a different compensation rate than shop staff or drivers. Create as many workers compensation records as is required for your operation. Worker’s Compensation numbers are assigned to employees on the Address tab of the Employee Profile program.
Field Definition WCB Number
The applicable governing authority’s assigned workers compensation number.
Start Date
Enter the date upon which this compensation record takes effect.
Description
Free format field to describe the workers compensation record.
Rate
Enter the applicable contribution rate for the compensation record in decimal format (.10 =10%)
Minimum
If a Minimum contribution is required for the workers compensation group, enter the amount here.
Maximum
If a Maximum contribution is applicable for the workers compensation group, enter the amount here.
US tab
The US Tab refers to US Payroll Taxation rules. It is used to configure common taxation variables required for Payroll processing for employees in American jurisdictions which may often change and/or may require specific configuration for your company’s requirements. Please consult the appropriate governing authority for proper amounts to enter in the fields.
For further information on Federal income tax withholding regulations and best practices, payroll-withholding regulations per State and to familiarize yourself with terms used, and review information such as wage withholding and advance earned income credit payment tables, refer to the Internal Revenue Service (IRS) website.
The Employer Identification Number (EIN) field is read only within the Payroll Configuration program. This value can only be edited in the Profiles > Company Profile program > US tab. This is also where the State ID Numbers and efile numbers are entered.

Social Security Tax sub-tab
The Social Security Tax sub-tab allows you to setup your Social Security Tax Rates and Date Ranges.
Entering US Social Security tax information
-
In Payroll Configuration, go to the US tab.
-
Go to the Social Security Tax sub-tab.
-
Verify the basic Canadian tax account configuration information appears in the fields displayed at the bottom of the page. (These fields are edited using the Profiles > Company Profile program > Canada tab.)
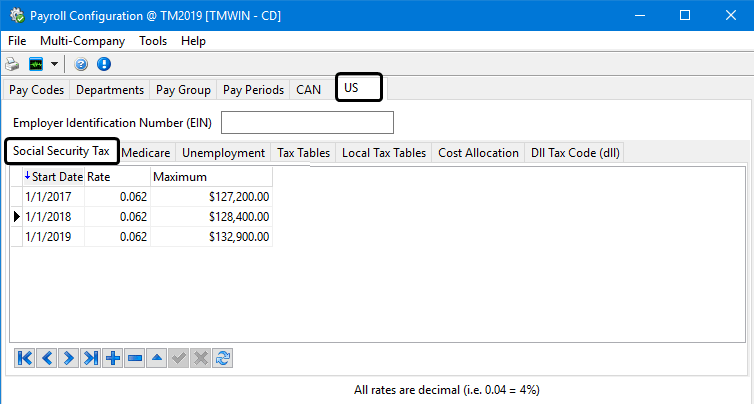
-
Click
Insert to add an entry for the current year. All fields are required.Field Definition Start Date
Enter the date on which the social security rate takes effect.
Rate
Enter the applicable social security contribution rate in decimal format (.062 = 6.2%).
Maximum
Enter the maximum earnings as specified by the appropriate governing authority.
Medicare sub-tab
The Medicare sub-tab allows you to set up your US Medicare Rates and Date Ranges.
Entering US Medicare information
-
In Payroll Configuration, go to the US tab.
-
Go to the Medicare sub-tab.
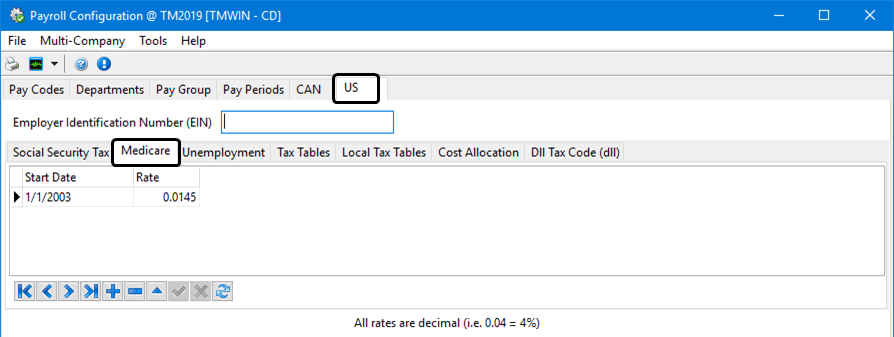
-
Click
Insert to add an entry for the current year. All fields are required.Field Definition Start Date
Enter the date on which the Medicare contribution rate takes effect.
Rate
Enter the applicable Medicare contribution rate in decimal format (.0145 = 1.45%).
Unemployment sub-tab
Federal Unemployment Tax Act rates are setup using the Unemployment sub-tab.
The value entered in the State column will always be a two digit code, but the actual code will depend on whether you are calculating FUTA or SUTA:
-
SUTA: Enter the standard two digit State Code for the applicable governing state.
-
FUTA: Enter 'US' for every record.
Entering US Unemployment information
-
In Payroll Configuration, go to the US tab.
-
Go to the Unemployment sub-tab.
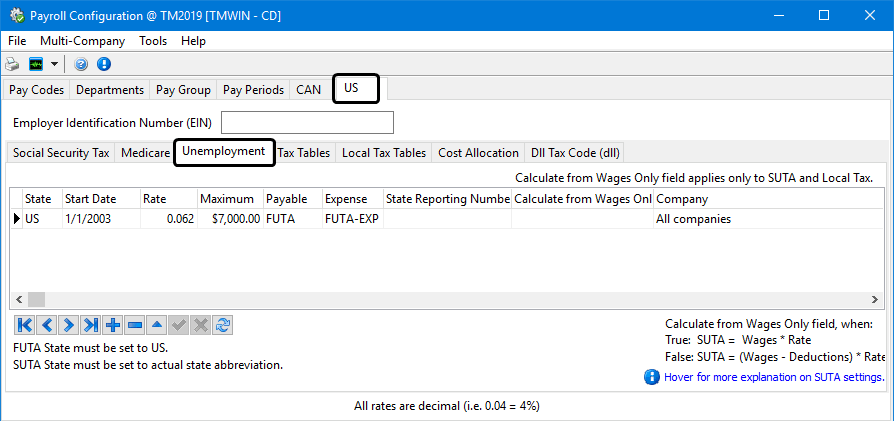
-
Click
Insert to add an entry for the current year. All fields are required.Field Definition Start Date
SUTA/FUTA start dates must be January 1 of the year in which the unemployment tax rate takes effect. No rate changes may be applied during the year.
Rate
Enter the applicable unemployment tax rate in decimal format (.062 = 6.2%).
Maximum
Enter the maximum contribution specified by the appropriate governing authority.
Payable
Enter a valid Payroll Code that references the company’s unemployment insurance liability posting. In combination with the department set up and assignment to each employee, this Code will ultimately reference the general ledger liability posting account. For most applications, use the 'FUTA' Payroll system Code. Double click for a Payroll Code selection form.
Expense
Enter a valid Payroll Code that references the company’s unemployment insurance expense posting. In combination with the department set up and assignment to each employee, this Code will ultimately reference the general ledger expense posting account. For most applications, please use the 'FUTA-EXP' Payroll system Code. Double click for a Payroll Code selection form.
State Reporting Number
Enter a valid State Reporting Number by typing it manually into this field.
Calculate from Wages Only
When set to 'True', the values for the State Unemployment Tax Act (SUTA) will be taken strictly from the Client’s Wages. When 'False', a Client’s 'Deductions' will be taken into account. The formulas are displayed near the bottom of the Tab window.
Note: This field applies to SUTA calculations only.
Company
Double-click in this field and select a Company ID for the SUTA rules. This field makes it is possible for a multi-company payroll to have a different SUTA rate for the same State. If you want to use the same rate for all companies, enter a '0 (zero)' in this field.
Payroll procedures have been modified to use the rate for the 'Company ID' assigned to the employee, and the Payroll and Returns Generator program has been updated to consider the 'Company ID' when using the SUTA rates for the 940 return.
Department Code
This field is used if 'Get SUTA rates based on Department' config option in the Application Configuration program > Payroll > PRREGISTER.EXE is set to True.
Tax Tables sub-tab
Through use of the combined two Grids, tax rates as specified by the IRS and/or State taxes are entered here on the Tax Tables sub-tab. In the upper Grid, the Code Description, Authority, and applicable Pay Code are entered. For each record in the upper Grid, there are multiple wage brackets with rate details created in the lower Table.
The lower Grid has a field for each record with an effective date. In this way, as tax rates change from year to year, the Payroll operator has the ability to pre-configure new tax rate Tables without affecting current Payroll processing prior to the new effective date. Tax Tables are assigned to employees on the Employee Profile program > US Tax Tab.
Entering US Tax Table information
-
In Payroll Configuration, go to the US tab.
-
Go to the Tax Tables sub-tab.
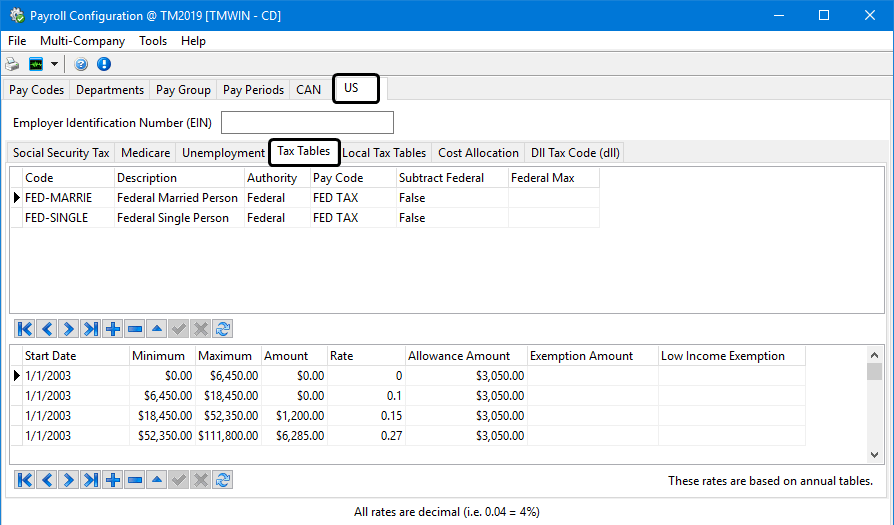
-
Click
Insert within each of the two grids to add new entries. All fields are required.Field Definition IRS and/or State taxes
Code
Enter a Tax Code (up to ten characters in length).
Description
Enter a description for the tax Table.
Authority
Double click for a drop down list box with the choices 'Federal', 'State', 'Local', and 'EIC' (earned income credit).
Pay Code
Enter a valid Pay Code that will be referenced by the system when calculating the tax item. Double-click for a Pay Code selection form. Pay Codes are configured on the Payroll Configuration > Pay Codes tab.
Subtract Federal
In some jurisdictions, the federal tax is subtracted from the net income before state tax rates are calculated. If this is the case, enter the value 'True' in this field. If not, enter 'False'. Double click in the field to toggle the value.
Federal Max
In some jurisdictions, there is a maximum amount allowable for the federal tax subtraction. That is, if the value in the 'Subtract Federal' field is true, there may be a maximum allowable amount of tax that can be subtracted from the net income before state taxes are calculated. Enter the maximum allowable federal tax amount in this field.
Tax Table Details Grid
Enter as many records as required for each Tax bracket or set of Tax brackets with identical effective dates.
Start Date
Enter the effective start date for this Tax bracket.
Note: Be careful to keep the start dates identical for each set of Tax brackets entered in order to avoid Payroll processing problems.
Minimum
As specified by the governing authority, enter the applicable low end of the wage bracket.
Maximum
As specified by the governing authority, enter the applicable high end of the wage bracket.
Amount
Enter the applicable tax reduction amount for the wage bracket as specified by the governing authority’s published tax rate Tables. After the tax rate has been applied to the gross wages, less any claimed tax allowances, the calculated tax amount is further reduced by this amount.
Rate
Enter the applicable tax rate for the wage bracket as specified by the governing authority’s published tax rate Tables.
Allowance Amount
As specified by the IRS published tax Tables, enter the amount for each claimed tax allowance for the appropriate married or single tax Table and for the Pay period frequency. The allowance amount is multiplied by the number of allowances claimed by the employee, which then reduces the gross income before the applicable tax rate is applied.
Exemption Amount
As specified by the IRS published tax Tables, enter the amount for each claimed tax exemption amount for the appropriate married or single tax Table and for the Pay period frequency. The exemption amount is multiplied by the number of exemptions claimed by the employee, which then reduces the calculated tax amount.
Note: It is important when entering information for the US Tax Tables (on the US Tab) that you use the Annual Tables. If you are a subscriber to the US Tax Payroll.dll file provided by Trimble, you do not need to enter custom Rates for each Tax Table code, as outlined in the 'Tax Table Grid' section below. The Payroll .dll will specify the Tax Rate breakdowns automatically, as long as your Pay Code is configured with a 'State' value in the 'Authority' field of this Tab.
Local Tax Tables sub-tab
The Local Tax Tables sub-tab provides an alternative method for entering tax rules. This functions the same as the Tax Tables sub-tab with some flexibility when multiple taxes are calculated for a single jurisdiction. This sub-tab is only used for configuring State and Local taxes.
Entering US Local Tax Tables information
-
In Payroll Configuration, go to the US tab.
-
Go to the Local Tax Tables sub-tab.
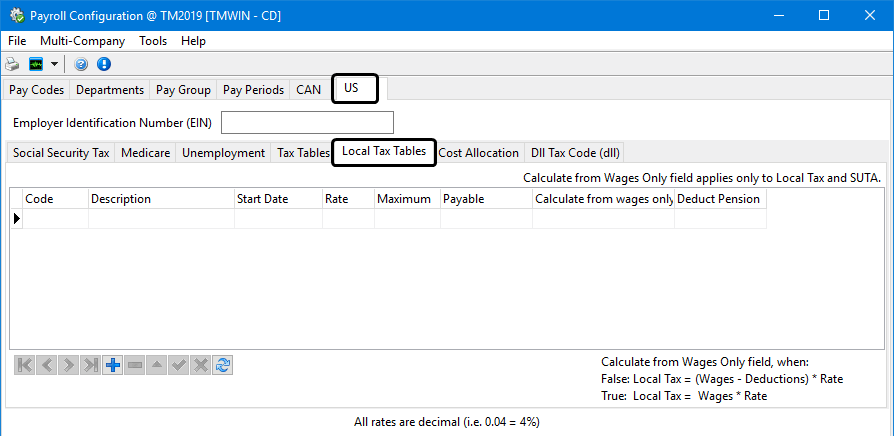
-
Click
Insert to add an entry. All fields are required.Field Definition Code
Enter a Tax Code (up to ten characters in length). When setting up State Tax Codes, use the format 'STATEXX. XX' being the recognized two letter State abbreviation.
Description
Enter a description for the tax table.
Start Date
Enter the start date for this tax table.
Rate
Enter the applicable tax rate as specified by the governing authority’s published tax rate Tables.
Maximum
As specified by the governing authority, enter the applicable high end of the wage bracket. Leaving this field blank or setting it to 'Zero' will cancel the limit check and will set the high end of the wage bracket for this tax table to be unlimited.
Payable
Enter a valid Pay Code which will be referenced by the system when calculating the tax item. Double click for a Pay Code selection form. Pay Codes are configured on the Payroll Configuration > Pay Codes tab.
Calculate from wages only
When set to 'True', the values for the Federal Unemployment Tax Act will be taken strictly from the client’s Wages. When 'False', a client’s 'Deductions' will be taken into account. The formulas are displayed near the bottom of the window.
Deduct Pension
If this field is set to False (which it is by default), then Pension will not be deducted from Wages before Local Tax Calculation. If set to True, Pension will be deducted before Local Tax Calculation. (The logic applies to calculations with or without use of US Payroll DLL.)
Cost Allocation Tax sub-tab
The Cost Allocation sub-tab allows you to setup and configure the details of your Allocation Codes.
Entering US Cost Allocation information
-
In Payroll Configuration, go to the US tab.
-
Go to the Cost Allocation sub-tab.
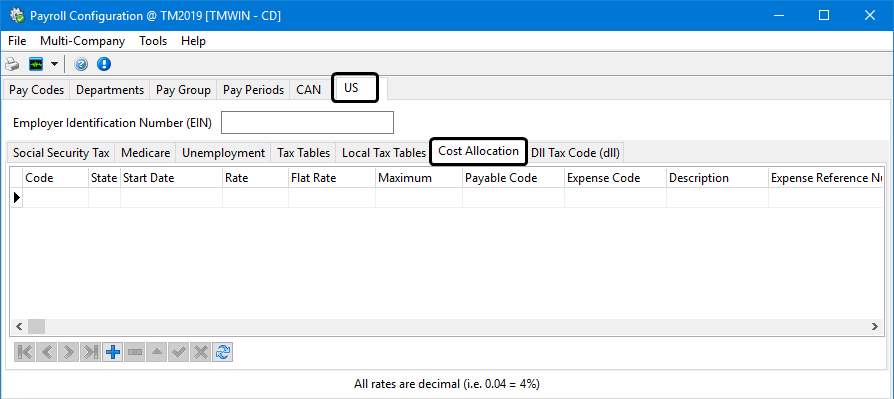
-
Click
Insert to add an entry. All entries are required.Field Definition Code
Enter an Allocation Code, up to 10 characters in length.
State
Enter the standard two digit state Code for the applicable governing State.
Start Date
This field will automatically populate up the creation of a new Detail line (when the '+' button is clicked).
Rate
Enter the applicable Allocation Rate as specified by the governing authority’s published Rate information.
Flat Rate
Enter a Flat Rate fee, if applicable.
Maximum
Enter a Maximum value that can be charged.
Payable Code
Double click within this field to select a Pay Code. Pay Codes are set up in the Pay Code Tab of this application.
Expense Code
Double click within this field to select an Pay Code to be used as the Expense Code. Pay Codes are set up in the Pay Code Tab of this application.
Description
This field will automatically populate when a Payable Code is chosen. If there is no associated Description to display, you may enter one simply by typing a Description into this field.
Expense Reference Number
This field will automatically populate when an Expense Code is chosen. If there is no associated Reference Number to display, you may enter one simply by typing a value into this field.
Use Flat Rate
If you would like to use the Flat Rate charge in your Cost Allocation procedures, set this field to 'True'. If you would like to use the value within the 'Rate' field, set this field to 'False'. You can change the value of this field by double clicking it.
Deduct Overtime
This field’s value indicates if the overtime portion of earnings should be deducted (or not) prior to calculating the amount of the cost allocation ('True' or 'False'). This will only apply to Pay Codes that are of a Class 'Over Time Earnings'.
If this is True, any earnings for the over time code will be divided by the Over Time Rate Multiplier to come up with the earnings as they are before inclusion of the over time premium. For this reason, it is important to ensure that the Over Time Rate Multiplier is set correctly (1.5 would equal time and a half).
DLL Tax Code sub-tab
The DLL Tax Code sub-tab is used to link your custom created Pay Codes to the actual two-character State Codes required by the TruckMate system.
Entering US DLL Tax Code information
-
In Payroll Configuration, go to the US tab.
-
Go to the Dll Tax Code (dll) sub-tab.
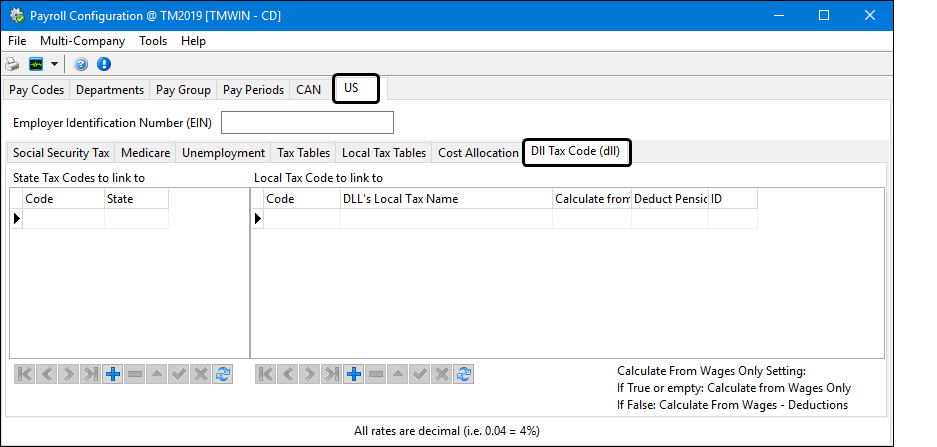
-
Click
Insert to add an entry for the current year. All fields are required.Field Definition State Tax Codes to link to
This section applies to State Tax Codes.
Code
Double click within this field to select a Pay Code from your system.
State
Double click within this field to select an actual State Code from your system. The Pay Code in the previous field will now be associated with this State.
Local Tax Code to link to
This section applies to Local Tax Codes.
Code
Double click within this field to select a Pay Code from your system.
DLL’s Local Tax Name
Double click this field to select a Local Tax from a list within your system. This list is automatically populated by the US Payroll 'DLL' file that is distributed with the Test US Tax TruckMate application. See the Test US Tax documentation for more information on this 'DLL'.
Calculate from Wages Only
This new field will either be set to 'True' or 'False'. It mimics the field with the same name in on the Local Tax Tables Tab, in that when set to 'True', the values for the Federal Unemployment Tax Act will be taken strictly from the client’s Wages. When 'False', a client’s 'Deductions' will be taken into account.
Deduct Pension
If this field is set to False (which it is by default), then Pension will not be deducted from Wages before Local Tax Calculation. If set to True, Pension will be deducted before Local Tax Calculation. (The applies to calculations with or without use of US Payroll DLL.)