Detention Billing


In trucking, a 'Detention situation' occurs when a Driver is made to wait by the Shipper or Consignee to pick-up or drop-off the freight. This is not a desired situation because it affects the operational schedule of the Carrier for the Driver made to wait, and potentially other resources needed to complete the movement of the freight later on.
The Detention Billing program functions like other TruckMate register programs in that it allows you to quickly and easily produce reports and Freight Bills for those Clients who have Detention records against them, allowing your business to pass detention costs onto the parties rightly responsible for them. The Detention Billing program relies upon Detention Rate Sheets, setup on the Rates Maintenance program > Detention Tab to determine the costs that will be passed along.
The Detention Billing program requires the use of a License Key. There are two License Keys available, #28000 and #28001. See the License Key Entry program for more information.
To access Detention Billing:
| From this location | Go to |
|---|---|
TruckMate Menu and TruckMate Task List |
Billing > Detention Billing |
Windows Start Menu |
TruckMate 20xx > Detention Billing |
Windows Explorer |
C:\Program Files (x86) > TruckMate 20xx > DetentionBill.exe |
Considerations for TruckMate Users
Carriers who want to implement TruckMate’s Detention Billing features should also consider the following:
-
Detention Billing requires real-time management tools on Driver or Equipment activity. This is only practical almost exclusively with a Mobile Communications integration.
-
Detention Billing requires a real-time mechanism for generating warnings to the 'Bill-To' party, 'Shipper', and/or 'Consignee'. This is best done via the TMW Service Host program > Scheduler Detention Service (with THE DAWG(r) integration).
Menu Bar / Toolbar
File Menu
Create Bills
![]() After you run the Crystal Report function by using the 'Preview Posting…' button, clicking the 'Create Bills' button will create Freight Bills to handle your Detention entries for the selected Client/Filters.
After you run the Crystal Report function by using the 'Preview Posting…' button, clicking the 'Create Bills' button will create Freight Bills to handle your Detention entries for the selected Client/Filters.
Audit
Selecting this option opens the Audit Detention Events window, which can be used to manually audit/update Detention events in the TruckMate Database.
Option
The Option menu contains four additional options.
-
Open Log File
Selecting this option will open the Detention Billing program’s Log File, 'DetentionBillLog.txt', which is created when Freight Bills are processed. -
Clear Log Files
Selecting this option erases any stored Log Files for the Detention Billing program. -
Remember User Setting
When this option is selected, all Filtering options chosen in the Detention Billing program will be remembered, so that the User can simply repeat the process at a later date. -
Purge Cancelled Events
This option is provided to allow the User to Purge 'Cancelled' Detention Events. This menu option will be by default NOT enabled. It will only be enabled when the following two conditions are met:-
The user has been given rights to purge events in the Security Setup program > Security > Business Events > Misc Tab.
-
The 'Cancelled' Status has been set in the Filter options.
The User can review the records before they purge them by opening the Audit window using the 'File Menu > Audit' option. However, the user must close the audit screen in order to use the purge function. Selecting this option will cause the program to delete from the database all records included by the Filter in the 'Cancelled' Status.
-
Preview Posting…
Clicking the 'Preview Posting…' button will open the Crystal Reports window common to many TruckMate programs, where you can select a Report Type and other options.
See the Crystal Reports Reference on Report Functions for more information.
Exit
 Selecting this option will close the Detention Billing program.
Multi-Company Menu
For more information on the Multi-Company options available from the Menu Bar, see the Multi-Company documentation.
Tools Menu
TruckMate Monitor
 Click the down arrow next to this button to access the various functions of the new TruckMate Monitor.
Remember Position / Size
Selecting this option will maintain the program window position and size upon close. When the program is re-opened, it will appear the same.
Help Menu
TruckMate Help
 Selecting this button will open the Detention Billing topic in the TruckMate Online Help file (the page you are currently viewing).
Service Portal
 Selecting this button will open an instance of your default Internet browsing software, with the https://www.tmwcare.com login page displayed.
About
 Selecting this button will open the standard TruckMate About window, which contains important information about the application you are currently using, including its version number (important for support calls).
Toolbar
Count
 Select this option to check if the filtering options you have specified will produce any Detention records. When this button is clicked, you will see in the extreme bottom left of the program window an integer representing the number of records found under the currently specified filtering criteria.
Filtering Options
Detention Type
Use the pull down menu to select which Detention Type you would like to use when searching for any Detention records. You can filter detention records by 'Trailer' (Demurrage) or by 'Driver'. You must have Detention Rate Sheets configured on the Rates Maintenance program > Detention Tab for each of the Detention Types you wish to use for Detention Billing.
Date Range
Select the checkbox next to the 'Date Range' field and use the pull down menu arrows to choose two dates for you Date Range. The Detention Billing program will only create Detention Invoices for those Freight Bills that fall within the Date Range you set here. You can also set a Date Range by right-clicking within the Date Range fields and accessing the Detention Billing program’s Context Menu:
Context Menu
The Detention Billing program’s Context Menu offers several options for quickly setting a Date Range. These options are fairly straightforward.
Client
Select the checkbox next to the 'Client' field to enable filtering by Client. Use the search button to select a specific Client if you only want Detention Invoices created for one Client, or leave it the field blank to create charges for all Clients. If you select a specific Client, then check the 'exclude' option to the right, you will filter on all Clients except the one currently selected.
Pick Zone
Select the checkbox next to the 'Pick Zone' field to enable filtering by Pickup Zone. Use the search button to select a specific Zone code if you only want Detention Invoices created for one Pickup Zone, or leave it the field blank to create charges for all Zones. If you select a specific Pickup Zone, then check the 'exclude' option to the right, you will filter on all Zones except the one currently selected.
Delv Zone
Select the checkbox next to the 'Pick Zone' field to enable filtering by Pickup Zone. Use the search button to select a specific Zone code if you only want Detention Invoices created for one Pickup Zone, or leave it the field blank to create charges for all Zones. If you select a specific Pickup Zone, then check the 'exclude' option to the right, you will filter on all Zones except the one currently selected.
Batch #
Select the checkbox next to the 'Batch #' field to enable filtering by Payroll Batch. Use the search button to select a specific Batch number if you only want Detention Invoices created for one Batch, or leave it the field blank to create charges for all Batches. If you select a specific Batch number, then check the 'exclude' option to the right, you will filter on all Batches except the one currently selected.
Processing Options
Site ID
Select a Site ID Code by clicking the search button and selecting a Site ID from those available on your system. The Site ID you select will be applied to the Detention Invoices that are created.
Service Level
Select a Service Level by clicking the search button and selecting a Service Level Code from those available on your system. The Service Level Code you select will be applied to the Detention Invoices that are created. Service Level Codes are configured in the Codes Maintenance program.
Detentions In
Choose either the 'Single Invoice' or 'Multiple Invoice' radio option in this section. If you choose 'Single Invoice', all of the Detention records that will be created based on the filters you have specified in the other fields will be included on one new Freight Bill. If you choose the 'Multiple Invoice' option, each Detention record will have an individual Freight Bill created.
Group By Zone
When working with 'Trailer' (demurrage) type Detention Bills, you have access to the 'Group By Zone' option. When the Invoices are created, selecting this button will group records with the same Zone Codes together.
Use Original Bill To
This option allows the use of original 'Bill To' code in trailer detention. If the checkbox is checked, the new trailer detention bill will use original bill’s 'Bill To' code as new 'Bill To' code in Detention bill. If it is not checked, the new trailer detention bill will still use Consignee or 'Bill To' code in detention rate sheet.
Audit Detention Events Window
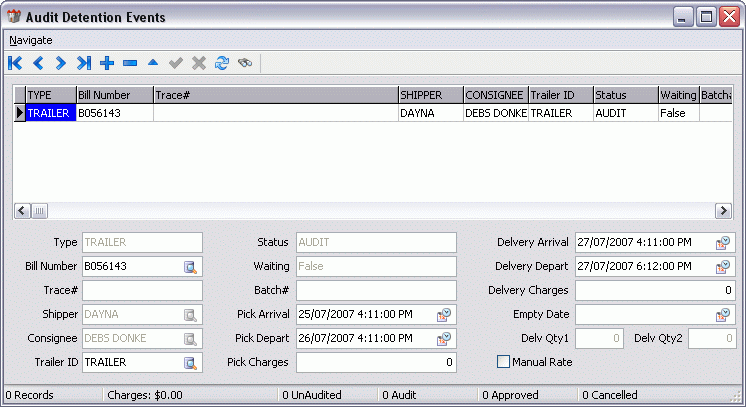
Select the '+' button on the TruckMate Navigation Bar to begin creating a new Detention record, or use the '<' and '>' buttons on the TruckMate Navigation Bar to browse through the existing records in your system.
You can search for Audit information by 'Trailer ID' by selecting the 'Find' icon on the TruckMate Navigation Bar.
Context Menu
Status Changes
Users will be able to update the status of selected records by using a hot-key combination or the Context Menu options as follows:
-
Records in 'Unaudited' Status can be updated to 'Audit' or 'Cancelled' any restrictions. However they cannot be marked 'Approved' if the 'Emptied Date' value is not set.
-
Records in 'Audit' Status can be updated to 'Cancelled' without any restrictions. These records can be reset to 'Unaudited', but any changes may be overwritten by automatic updates. These records can also be updated to 'Approved', but only if the 'Emptied Date' value is set.
-
Records in 'Cancelled' Status can be reset to 'Audit' without any restrictions. These records can also be reset to 'Unaudited', but any changes may be overwritten by automatic updates.
-
Records in 'Approved' status cannot be 'Cancelled'. These records can be reset to 'Audit' or 'Unaudited', but any changes may be overwritten by automatic updates.
Assign Batch
The Assign Batch option will apply a system generated batch number to those records which are marked as selected, which do not already have a batch number.
Export to File
Users will be able to save the selected records in the grid (filter results) by clicking on the Save button in the button bar. This will open a standard file window form where the user will specify a file name and file-type ('.txt' or '.csv'). If the user selects the '.txt' format, the records will be saved in fixed-width column format. If the user selects the '.csv' format, the records will be saved with commas to indicate a new column. In either case, text values will be enclosed in quote ("") marks and numeric values will not be enclosed in quotes. Decimals will be explicit.