Driver Statements
The Driver Statements program creates reports that list the pay and deductions entries that have a status of Owed for a driver or group of drivers. Additionally, if these statements are satisfactory, the program will create check entries (that can be viewed and printed in the Check Printing and Instant Check programs), or payroll entries, that can be viewed and processed in the Payroll Time Sheets program or automatic deposit entries that flow through to the Direct Deposit Program.
| The Driver Pay Type selected in the Selection Criteria section at the top of the window determines the type of check that will be created. |
To access Driver Statements:
| From this location | Go to |
|---|---|
TruckMate Menu and TruckMate Task List |
|
Windows Start Menu |
TruckMate 20xx > Driver Statements |
Windows Explorer |
C:\Program Files (x86) > TruckMate 20xx > PayStmt.exe |
Setting up Driver Statements
Application Configurator for Driver Statements
The following Utilities > Application Configurator options are listed under Configuration Options > PAYSTMT.EXE.
| Option | Definition | Values |
|---|---|---|
This option, when set to the default value ('True'), will display an error message when printing the driver pay statement if any driver’s Pay GL Account is not set to be 'Driver Payable' for every driver included in the Pay Statements batch. GL accounts for drivers can be set in the Departments Tab / Payroll Setup program (PRSET.EXE). |
|
|
Require Category |
Requires you to enter a value into the driver category field |
|
Creating and printing driver statements
This procedure is used to produce driver statement reports and it provides the option of going further and posting the data to generate entries in the check printing or payroll programs, and entries for direct deposit as appropriate for the driver pay types.
-
Open Driver Statements.
-
Select the Driver Pay Type.
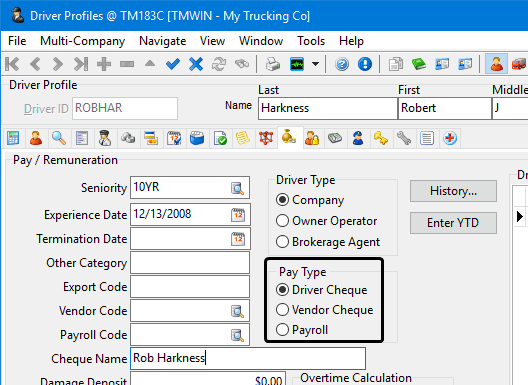
Note: The driver pay type is assigned to the drivers in the Profiles > Driver Profiles program > Pay / Remuneration tab.
-
The procedural steps and some of the entry fields displayed on the Driver Statement window are determined by the selected Driver Pay Type. The procedure and fields differ slightly and are described below separately for each driver pay type.
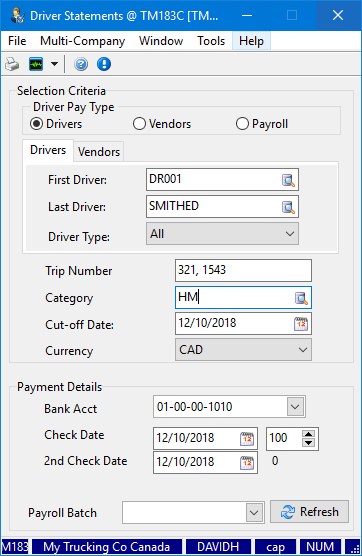
Drivers
-
Select Drivers as the Driver Pay Type.

Selecting this driver pay type will create statements and checks for drivers who have been assigned the pay type of Driver Cheese in the Driver Profiles program. The check can then be viewed/printed from the Check Printing and Instant Check programs, or it can generate automatic deposit entries that flow through to the Direct Deposit Program.
Note: If you specified an alternative name in the Check Name field on the Driver Profiles program > Pay /Remuneration tab, that name will be used on the check.
The Drivers tab is automatically selected when you select Drivers as the Driver Pay type.
-
Make the appropriate entries to these fields:
Required field: *
Field Definition First Driver *
Last Driver *
Use the
 pick-list to select the range of drivers to include.
These fields work in conjunction with the Driver Types field so you can specify both a range of drivers and a specific type of driver. (Driver type is assigned to drivers using the Driver Profiles program > Pay Remuneration tab.)
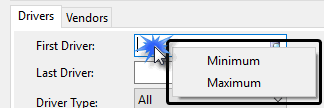
Note: Use the Minimum / Maximum options on the shortcut menu to include all the drivers with this pay type.
Driver Type *
Use the drop-down list to select a driver type.
Driver types are assigned to drivers in the Driver Profiles program > Pay / Remuneration tab.
Enter a trip number (or multiple trip numbers, separated by commas, e.g., 12, 37, 208) to print only those statements related to these Trip(s).
Category (optional)
Enter an appropriate category name (up to 10 characters) in the space provided. Entries here will appear in the Driver Pay Statements program when you select the search button. Driver categories are assigned to drivers using the Driver Profiles program > Pay / Remuneration tab > Other Category field.
Cut-off Date *
Select a cut-off date from the
 pop-up calendar to restrict the results. This date is compared against the Leg Date of driver payments, and against the Deduction Date of driver deductions.
Currency *
Select the currency from the drop-down list. Only pay and deduction items that are in the same currency will be included in the driver statements.
Bank Acct *
Select your bank account.
When you generate checks or direct deposit information (by clicking the Print Statements / Create Checks button at the bottom of the screen), they are created in the Accounts Payable module or Direct Deposit module, with the bank account specified here. Only accounts of the type Bank in the same currency as the base currency (as configured in the GL Chart of Accounts program), will display in the drop-down list.
Check Date *
Use the
pop-up calendar to select the date.The date selected here will be attached to the check when it is created in the Accounts Payable program.
Check percentage *
Indicate the Check Percent(age).
To create one check with a total that includes the sum of the driver pay and deduction entries, leave the value in this field set to "100". To split the amount between two checks, enter the percentage you want to assign to the first check in this field. The second check, with the remaining percentage, will be generated using the check date entered in the 2nd Check Date field.
2nd Check Date *
Enter a 2nd Check Date.
If you entered a value in the Check Percent field (to the right of the Check Date field), two checks will be created for the statement. The first will be with the Check Date and Check Percent specified above. The second will be created with the remaining percentage (displayed to the right of the 2nd Check Date field) and the date specified in this field.
Amount Owing Deduction Date
(Only displayed when relevant)Enter the Amount Owing Deduction Date if this field is displayed.
If the driver’s deductions are greater than his pay, a deduction will be created in the Driver Pay Audit program of the net amount owing. This deduction will be included on the next statement for the driver. Specify the date that deduction should have in its Deduction Date field.
Payroll Batch
(Only required field if Driver Pay Type is Payroll)Select the payroll batch using the drop-down list.
If the Driver Pay Type field is set to Payroll, you must select the Payroll Batch in which an entry will be created for the statement total for the driver. Payroll batches are created in the Payroll > Payroll Time Sheets program.
-
Once all the selection criteria and payment details information has been entered into the Driver Statements window, click the
 Print Statements / Create Cheques icon on the toolbar. See Printing statements and creating cheques.
Vendors
-
Select Vendors as the Driver Pay Type.

Selecting the Vendors driver pay type will create statements and checks for drivers who have been assigned the pay type of Vendor Cheque in the Driver Profiles program. The check can then be viewed/printed from the Check Printing and Instant Check programs, or it can generate automatic deposit entries that flow through to the Direct Deposit program.
Note: The Vendor Code specified on the Driver Profiles program > Pay /Remuneration tab will be used as the check’s payee.
The Drivers tab is automatically selected when you select Drivers as the Driver Pay type.
-
Make the appropriate entries to the fields:
Required field: *
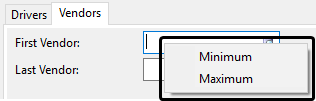
Field Definition First Vendor *
Last Vendor *
Use the
pick-list to select the range of vendors (and their associated drivers) to include.These fields work in conjunction with the Vendor Code assigned to drivers using the Driver Profiles program > Pay Remuneration tab.)
Notes:
-
When completing Pay Statements for Vendors, complete both the Vendor tab, and the Driver tab in the Driver Statements program.
-
Use the Minimum / Maximum options on the shortcut menu to include all the drivers with this pay type.
First Driver *
Last Driver *
Use the
pick-list to select the range of drivers to include.These fields work in conjunction with the Driver Types field so you can specify both a range of drivers and a specific type of driver. (Driver type is assigned to drivers using the Driver Profiles program > Pay Remuneration tab.)
Note: Use the Minimum / Maximum options on the shortcut menu to include all the drivers with this pay type.
Driver Type *
Use the drop-down list to select a driver type.
Driver types are assigned to drivers in the Driver Profiles program > Pay / Remuneration tab.
-
-
Make the appropriate entries to the remaining fields starting with Trip Number. These fields are described in the Creating and printing driver statements - Drivers.
-
Once all the selection criteria and payment details information has been entered into the Driver Statements window, click the
Print Statements / Create Cheques icon on the toolbar. See Printing statements and creating cheques.
Payroll
-
Select Payroll as the Driver Pay Type.

Allows you to create statements and payroll entries for drivers who have been assigned the pay type of Payroll in the Driver Profiles program. An entry will be created in the Payroll > Time Sheets Entry program for the sum of the driver’s pay and deductions. The payroll entry will be made in the batch specified in the Payment Details section.
The Payroll tab is automatically selected when you select Payroll as the Driver Pay type.
-
Make the appropriate entries to the fields as described in the Creating and printing driver statements - Drivers section.
Note: When the Driver Pay Type field is set to Payroll, you must select the Payroll Batch in which an entry will be created for the statement total for the driver. Payroll batches are created in the Payroll > Payroll Time Sheets program.
-
Once all the selection criteria and payment details information has been entered into the Driver Statements window, click the
Print Statements / Create Cheques icon on the toolbar. See Printing statements and creating cheques.
Printing statements and creating cheques
-
Once all the selection criteria and payment details information has been entered into the Driver Statements window, click the
Print Statements / Create Cheques icon on the toolbar to generate the driver statements and prepare the totals for check printing.The Report Selection form is displayed.
-
Select the PAYSTMT.RPT and click the Print Preview button.
-
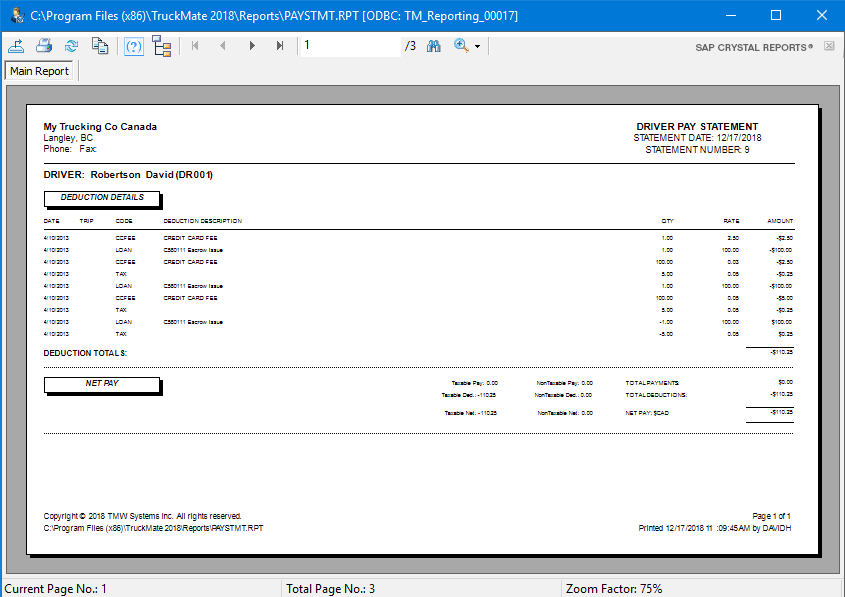
The Driver Pay Statement report will be displayed.
-
Click the
 printer icon at the top of the screen to send the report to the printer that is configured as the default printer for your workstation. See Printing Reports for more information on report functions.
 -
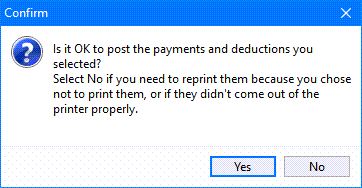
Close the print preview window.
-
A confirmation message will appear asking if you would like to post the payments and deductions.
-
Choose Yes to continue, or No to abort and start again. (Normally, you would only No if the statements did not print properly, or if the selection criteria were incorrect). The Post action does not create a general ledger posting. It simply converts the payment and deduction details into a summary total, and creates entries in the check printing, payroll programs, and direct deposit information.
-
Use the Accounts Payable > Check Printing or Instant Checks program to print the driver checks, and the Payroll > Payroll Time Sheets program to enter payroll deductions, audit payroll amounts, and revise direct deposit processing.
Note: When printing statements, if the amount is '0', the program will still create a CHECK_MSTR record for the '$0.00' check but it will have ‘tx_posted’ = True, ‘tx_to_be_printed’ = False and '`tx_reference' = '0 statement'`. This will update the DRIVERPAY, DRIVERDEDUCTIONS and DR_STMT_REPORT tables with the '`check_id'` and the Payroll and Returns Generator program will use these records when compiling data.
The system will generate an error message if in the Payroll Configuration program (PRSET.EXE) > Departments tab, the GL Account is not set to be 'Driver Payable' for every driver included in the Pay Statements batch. (The Type of Driver Payable is assigned to GL Accounts using the GL Chart of Accounts program > Account Info tab.)
This error message is controlled by the Application Configuration item (Display Error: Driver Pay GL accounts not set properly) under PAYSTMT.EXE in the Application Configurator program.
Creating an automatic deposit for a driver not paid through TruckMate payroll
There are three types of driver setups and instructions for each as described below:
Payroll
The Direct Deposit information is set up in the Employee Data program. After the Driver Pay Statements have been run through in the usual manner, begin the payroll processing. See the Driver Contracts instructions to create an automatic deposit.
Drivers
-
Set up the Direct Deposit information in the Driver Profiles program. Run the Driver Pay Statements, and if, after verifying, they are acceptable, say "Yes" to update the Driver Pay. All checks, both regular and Direct Deposit will be created. View or process regular checks through the Check Printing program, and view or process Direct Deposit checks through the Direct Deposit program. In the Direct Deposit program, you will see all the driver checks from the pay run that were to be sent as Direct Deposits.
-
In the Direct Deposit program, click on "Export" and the Export window will open up. Confirm the bank information has been set up correctly and that an export file path and/or name have been entered. Click "Export" again. A confirmation box will appear, select "Yes". The report select box will open and you should print the Direct Deposit Audit Report ('DDAUDIT.RPT').
Note: The Audit number will appear in the top right-hand corner.
-
Print or close this dialog box and a message box will then appear telling you that a Direct Deposit Audit has been created. Click "OK", and your file is now ready to be submitted to your bank. Run the Check Register program to update the checks.
Vendors
-
Vendor Direct Deposit information is set up in the Customer and Vendor Profiles program, Direct Deposit Tab. Run the Driver Pay Statements, and if, after verification, the information appears acceptable, say "Yes" to update Driver Pay information. All checks, both regular and Direct Deposit will be created. View or process regular checks through the Check Printing program, and view or process Direct Deposit checks through the Direct Deposit program. In the Direct Deposit program, you will see all the driver checks from the pay run that were to be sent as Direct Deposits.
-
In the Direct Deposit program, click on "Export" and the Export window will open up. Confirm the bank information has been set up correctly and that an export file path and/or name has been entered. Click "Export" again. A confirmation box will appear, select "Yes". The report select box will open and you should print the Direct Deposit Audit Report ('DDAUDIT.RPT').
Note: The Audit number will appear in the top right-hand corner.
-
The audit number will appear in the top right-hand corner). Print or close this dialog box and a message box will then appear telling you that a Direct Deposit Audit has been created. Click "Okay", and your file is now ready to be submitted to your bank. Run the Check Register program to update the checks.