Manifest Maintenance
| As of TruckMate 2022.4, Manifest Maintenance is no longer available. For more information, see the 2022.4 release notes. |

The Manifest Maintenance program is used to pre-plan Trips by assigning Freight to a manifest (and, at the same time, to a Trip). You can group Freight located (and destined for) a terminal onto Trips, assign Trailers to those Trips, and release those Trips to the Dispatch program when they are ready for activation. Also, the Manifest Maintenance program can be used to generate bar Code labels for Freight (using a printer that has the bar coding functionality). Many of the functions that can be performed in the CrossDock program can also be performed in the Manifest Maintenance program. However, in the Manifest Maintenance program, in order to assign Freight Bills to Trips, you must know the Freight Bill number or trace number of the Freight Bills you wish to assign, rather than selecting the Freight Bills from a Grid. Trips created in the CrossDock program can be viewed in the Manifest Maintenance program. However, Trips created in the Manifest Maintenance program are not displayed in the CrossDock program, because the Manifest Maintenance program does not Trips into door locations.
To access Manifest Maintenance in TruckMate 2022.3 and earlier:
| From this location | Go to |
|---|---|
TruckMate Menu and TruckMate Task List |
Dispatch > LTL > Manifest Maintenance |
Windows Start Menu |
TruckMate 20xx > Manifest Maintenance |
Windows Explorer |
C:\Program Files (x86) > TruckMate 20xx > Aman.exe |
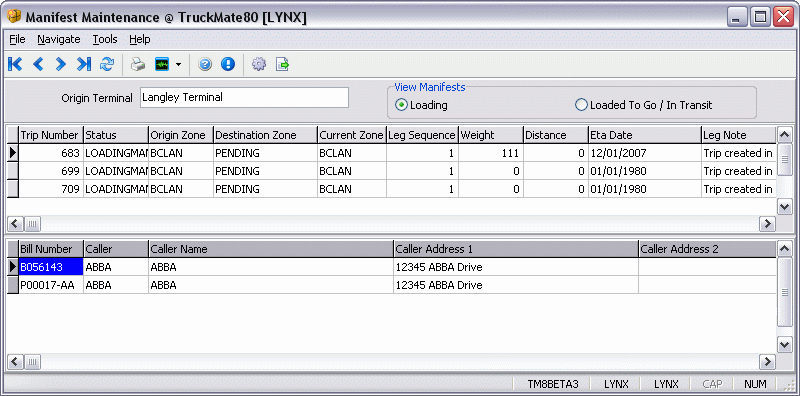
The program screen is divided into the following areas: terminal information and filter, Trip information, manifested Freight Bills, and other functions.
How Do I?
How do I Pre-plan Trips using a Manifest?
The Manifest Maintenance program is used to pre-plan trips by assigning freight to a manifest (and, at the same time, to a trip). You can group freight located (and destined for) a terminal onto trips, assign trailers to those trips, and release those trips to the Dispatch program when they are ready for activation. Also, the Manifest Maintenance program can be used to generate bar code labels for freight (using a printer that has the bar coding functionality). Many of the functions that can be performed in the CrossDock program can also be performed in the Manifest Maintenance program. However, in the Manifest Maintenance program, in order to assign Freight Bills to trips, you must know the Freight Bill number or trace number of the Freight Bills you wish to assign, rather than selecting the Freight Bills from a grid. Trips created in the CrossDock program can be viewed in the Manifest Maintenance program. However, trips created in the Manifest Maintenance program are not displayed in the Crossdock program, because the Manifest Maintenance program does not trips into door locations.
-
Open the Manifest Maintenance program (AMAN.EXE), click: Start > Programs > TruckMate 20xx > Dispatch > LTL > Manifest Maintenance.
-
Select the terminal where you want your trip to start from using the navigational bar in the top right hand side of your screen.
-
In the top half of the window, use your Context Menu (right-click) to select 'New Trip'.
-
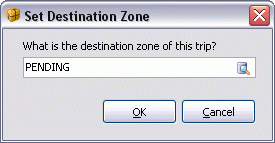
Use your Context Menu (right-click) again and select 'Set Destination'. In the pop-up dialog box, select the destination by clicking on the search button. Start typing the zone code or description in the 'Filter' text box, and once you locate the zone you were looking for, double-click on it to select it, or, alternatively, use the down-arrow to highlight it and press 'Enter'.
-
In the bottom half of the window, use your right mouse menu and select 'Match Freight Bill'. Enter the Freight Bill number and click 'OK'.
-
Repeat this step for every Freight Bill you want to assign to the trip, and select 'Cancel' when you have entered all the Freight Bills you wish to assign to your trip. (If you don’t know the Freight Bill number, you can also assign Freight Bills to your trip by selecting 'Match Bill by Trace No'.
-
When your trip is ready and the trailer is loaded to leave, select the trip with your cursor, right click, and select 'Set Loaded to Go'. The trip is now available in the Dispatch program.
How do I Create Bar Code Labels for Freight?
-
Open the Manifest Maintenance program (AMAN.EXE), click: Start > Programs > TruckMate 20xx > Dispatch > LTL > Manifest Maintenance.
-
Click on the 'Print Bar Code Labels' button found at the end of the navigational bar in the top right hand side of the window.
Note: You must have a printer that is bar code enabled (capable of printing in bar code format) in order to generate bar code labels.
-
Select the terminal site for which the Freight Bill(s) will apply.
-
Enter the `Number of Labels' you wish to generate and then click the `Generate and Print' button. From the report window, select the report you wish to print and then click `Okay'.
Note: New Freight Bill numbers will be generated for the number of labels specified.
-
You can also generate a single bar code label for an existing Freight Bill number by entering the Freight Bill number in the text box found in the bottom left hand corner, then click the `Print Label' button. From the report window, select the report you wish to print and then click 'Okay'.
Menu Bar / Toolbar
File Menu
Print Reports
![]() Selecting the Print Reports button will bring up the Bar Code Labels window, which allows you to print Bar Codes for the Trips in a selected Site. For more information on Report functionality in TruckMate, see the Crystal Reports Reference.
Selecting the Print Reports button will bring up the Bar Code Labels window, which allows you to print Bar Codes for the Trips in a selected Site. For more information on Report functionality in TruckMate, see the Crystal Reports Reference.
Exit
![]() Closes the Manifest Maintenance program.
Closes the Manifest Maintenance program.
Multi-Company
For more information on the Multi-Company options available from the Menu Bar, see the Multi-Company documentation.
Tools Menu
TruckMate Monitor
![]() Click the down arrow next to this button to access the various functions of the new TruckMate Monitor.
Click the down arrow next to this button to access the various functions of the new TruckMate Monitor.
Remember Position / Size
Selecting this option will maintain the program window position and size upon close. When the program is re-opened, it will appear the same.
Help Menu
TruckMate Help
![]() Selecting this button will open the Manifest Maintenance topic in the TruckMate Online Help file (the page you are currently viewing).
Selecting this button will open the Manifest Maintenance topic in the TruckMate Online Help file (the page you are currently viewing).
Service Portal
![]() Selecting this button will open an instance of your default Internet browsing software, with the https://www.tmwcare.com login page displayed.
Selecting this button will open an instance of your default Internet browsing software, with the https://www.tmwcare.com login page displayed.
About
![]() Selecting this button will open the standard TruckMate About window, which contains important information about the application you are currently using, including its version number (important for support calls).
Selecting this button will open the standard TruckMate About window, which contains important information about the application you are currently using, including its version number (important for support calls).
Toolbar
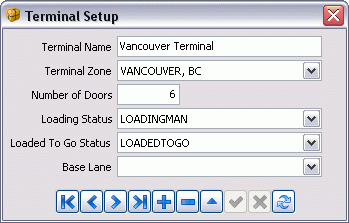
Terminal Setup
![]() Select this button to open the Terminal Setup window, where you create and edit terminal definitions.
Select this button to open the Terminal Setup window, where you create and edit terminal definitions.
| Field | Definition |
|---|---|
Terminal Name |
Enter a name for this Terminal. |
Terminal Zone |
Select the Zone Code that corresponds with this terminal from the drop down list box. Only Zone Codes that have been flagged as Terminal zones in the Codes Maintenance program are available for selection. |
Number of Doors |
Enter the Number of Doors available at the selected Site. |
Loading Status |
When you use the New Trip option from the Trip Grid Context Menu, a new Trip is created. While the Trip is visible in the Dispatch program, is cannot be activated until it is released in the using the Set Loaded to Go menu option. Until that time, the status Code selected here will be displayed as the Trip’s current status in the Dispatch program. Only status Codes of the Assignment Code behavior will be available for selection here. |
Loaded To Go Status |
When the Loaded to Go status is assigned to the Trip (using the Set Loaded to Go menu option in the Trip Grid menu), the status Code selected here will be assigned to the Trip. Only status Codes of the Assignment Code behavior will be available for selection here. |
Base Lane |
This option controls the lane filter default for the terminal, but does not apply in this program. |
Assign Trailers
![]() Select this button to assign a Pickup Trailer to the specified Freight Bills using the Trailer Assignment window. The Trailer can then be viewed in the Quick Bill Entry program, in the 'Pickup Trailer' field.
Select this button to assign a Pickup Trailer to the specified Freight Bills using the Trailer Assignment window. The Trailer can then be viewed in the Quick Bill Entry program, in the 'Pickup Trailer' field.
Starting Bill
Enter the number of the first Freight Bill to which you want to assign a Pickup Trailer.
Ending Bill
Enter the number of the last Freight Bill to which you want to assign a Pickup Trailer.
Trailer Number
Select the Trailer Code by clicking the search button and selecting a Trace Number that you want to assign to the Freight Bills as the Pickup Trailer.
This is for informational purposes only, and does not affect the Trailer assignments on the Trip in the Dispatch program. To assign a Trailer to a Trip, double click in the Trailer field in the Trip Grid.
Header Information
Origin Terminal
Displays the Terminal Name of the terminal that is currently selected. You can change the selected terminal by using the arrow buttons to the left of the Terminal field. You can also update the information displayed with any changes from the database by clicking on the refresh button.
View Manifests
These options filter which manifested Trips appear in the top Grid based on their status. The 'Loading' option filters the display to only those Trips which are still being planned or are loading, while the 'Loaded To Go / In Transit' option filters the display to only show those Trips which are already in progress.
Trip Grid
This Grid offers summary information about only those Trips created in this program. Once these Trips are marked with the loaded to go status associated with the current terminal, they disappear from this program and appear in the Dispatch program > Trips Grid. If a Trip which was created in this program and marked loaded to go must be edited, you can make it appear in this program again by setting the View Manifests filter to 'Loaded To Go / In Transit'.
Context Menu
Most of the work to be done to Trips is contained in this menu.
New Trip
This option generates a new Trip number (using the same number generator used by all the dispatch programs which can create new Trips), which is the starting point of most TruckMate Dispatch operations. The newly created Trip will default its starting zone to the zone associated with the current terminal and will have a current status matching the Loading Status for the current terminal.
Set Destination
The Zone where the Trip is to be ended must be supplied by the user on the Set Destination Zone window. Manifest Maintenance, unlike Dispatch, does not default the destination zone for the Trip based on the delivery zone of the first Bill to be assigned to the Trip.
Print Manifest
When all Bills have been assigned to the Trip and any additional Trip legs required for deliveries have been created, you can print a manifest of the Trip via this option. Selecting this item opens the report selection screen where you can choose from either the standard TruckMate manifest crystal report or a custom crystal report.
Print Load Card
This option works in much the same way as the above option except that the report selection screen offers the user a list of load card reports.
The distinction between the two is that a manifest is a detailed listing of the load contents intended for the shipper, consignee, or dock master to review. A load card is a summarized listing of the picks and drops intended for the driver.
Set Loaded to Go
Once the contents of the load are confirmed as loaded by a dock master or driver, the Trip can be set Loaded To Go, releasing it to the Dispatch program where the Trip can then be assigned drivers, equipment, etc. and processed.
Optimize Trip
The Trip Optimizer window offers you the ability to edit the Trip legs and assign Freight Bills to be picked or dropped in whatever order required. For more information about this function, a more complete description is available in the Dispatch topic.
Find Trip
Select this option to search for a Trip based on its Trip Number. If a matching Trip is found, its details will display in the Manifest Maintenance program.
Unmatch Trailer
This option allows you to remove any Trailers assigned to the Trip through the Trailer assignment button at the top of the screen. You can also un-match any Trailers assigned to a Trip which was already sent to Dispatch if the View Manifests filter is set to Loaded To Go / In Transit. This however, is not recommended if the Trip was already put into motion by the Dispatch program.
Cancel Trip
Selecting this option will delete the Trip from the screen. This option is disabled if Bills have been assigned to the Trip, since you cannot cancel a Trip with resources assigned to it. You must de-assign all Bills and (if the Trip was released to the Dispatch program) any drivers and equipment before you are allowed to cancel a Trip.
Trip Notes
This option opens the Trip Notes window, where any comments or directions can be entered for dispatch to review. You will be prompted to Save the Notes upon clicking the 'Close' button.
Create Delivery Legs
When your Trip is first created, it only has one leg - which goes from the terminal to whatever destination zone was set using the 'Set Destination' function. If the Bills added to the Trip are to be delivered at intermediate points, additional legs must be inserted to account for these way points. This function attempts to determine what those intermediate points are and insert appropriate Trip legs.
Trip Status Change
This function is only available when the View Manifests filter is set to 'Loaded To Go / In Transit'. Selecting this option opens the Trip Status Change form, borrowed from Dispatch. This is available here to allow users to set a Trip back into motion if it was brought back to this program for editing while in progress.
Freight Bill Grid
The Freight Bill Grid lists those Bills which have been matched to the Trip highlighted in the Trip Grid. Use the Context Menu to add or remove Freight Bills from this Grid. Users should note that you must already know what Bills are available to be matched to this Trip since there are no pick lists provided.
Context Menu
View Freight Bill
This option will open an instance of the Customer Service program with the currently selected Freight Bill’s details displayed.
Match Freight Bill
This item opens the Match Freight Bill window. You must supply either a valid Freight Bill number or a Trace number and then click on 'OK'. TruckMate will try to fetch a freight bill with a number that matches the entered value. If no match is found, TruckMate will assume the entered value is a trace number, and will fetch the freight bill with a trace number that matches the entered value. The window will remain open until you have entered the last of the Bills you wish to match to the Trip. Use the '<Esc>' (escape) key or click on the 'Close window' button to close the window.
The Bills you match to the Trip do not appear in the Grid until the window is closed. Matching the Freight Bill to the Trip causes the Freight Bill’s current status to move to 'ASSGN' (or whatever your assignment status is).
Unmatch Freight Bill
This item removes the currently highlighted Bill from the program. Unmatching the Freight Bill from the Trip causes its current status to move from 'ASSGN' to 'AVAIL'.
Match Bill By Trace No
If you know the trace number assigned to the Freight Bill, you can match it to the Trip using this value instead of by the Freight Bill number. However, this function only works if the Trace Number Type assigned to your Trace number (in the Codes Maintenance program > Trace Number Types Tab) matches the Application Configurator program > AMAN.EXE > 'Trace Type to Create' option, which determines which Trace Type to create.
Skid Dimensions
This option will open a menu displaying Skid Dimensions data for the current Trip. When creating a Trip in Manifest Maintenance, you will be prompted if 'Skid Dimensions' will be required for the new Trip. Selecting 'Yes' will enable this option; choosing 'No' will make this option unavailable. See the Customer Service program for more information on the Skid Dimensions window.
Attach / Open Related Files
Selecting this option will open the Attach / Open Related Files window, which allows you to attach documents or images to the selected Freight Bill.