Mobile Communications Macro Setup procedures

General Tasks
How do I Create Macros?
-
Open the Communications Macro Setup program (MACRODEF.EXE), click: Start > Programs > TruckMate > Mobile Communications > Communications Macro Setup
-
Select the 'Macro' menu (from the pull-down menu at the top of the screen), and select 'New Macro' and the network type.
-
Select a macro number that is 'Available' and not 'Reserved'. Be sure to select from the 'Forward' macros (you’ll notice Forward macros on the left side of the page) if it is a message to go from the Dispatcher to the truck or 'Return' macro (you’ll notice Return macros listed on the right side of the page) if it is coming from the truck to the Dispatcher. Once you select your macro, ensure you have chosen either Forward, or Return from the radio buttons at the bottom of the screen. You should see your macro number in the 'New Macro Number' field also at the bottom of the screen. When ready, select 'Okay'.
-
Click on 'New Object (Ins)' button to create an object. Your macro will be created in the top right-hand side of the screen.
-
Select the 'Field Type' from the drop-down menu. Each type has specific information (i.e. Freeform Text will need an Object Name).
-
Select a 'Forward Action' for the object from the Forward Action field. For example, if you selected Freeform Text as your Field Type, you could select 'Attach Highway Directions to Shipper' in the Forward Action field.
-
Insert any other objects that are necessary for your macro and place them in your preferred order.
-
In the 'Title' field, enter your preferred name for this macro.
-
Save the macro using the 'Save' button.
How do I Send a Driver’s Operating Hours to the Log person, not Dispatch, using a Macro?
-
Open the Communications Macro Setup program (MACRODEF.EXE), click: Start > Programs > TruckMate > Mobile Communications > Communications Macro Setup
-
Create a User-Defined data type. From the Macro menu at the top of the screen, select 'Define User Datatypes'. A User Datatype Definer window will appear.
-
Use the '+' button in the top navigational bar and enter a new Title 'Direct to Specific Person'. Enter a key size, and select 'Return'.
-
Use the '+' button on the bottom navigational bar to enter records that will appear in the top grid. For example, you would enter a Key Value, and Data, and select a Treat as Datatype from one of the entries shown. The information entered will appear in the top grid.
Note: By specifying '1' in the Macro, you can direct to the user group 'Auditor'. At this time, there is no way to direct to the user group by macro number
-
Close the User Datatype Definer dialog box and return to the main menu of the Communications Macro Setup program. Select 'Macro' from the top menu bar, 'New Macro', and then select your network type.
-
You’ll be brought to the Define New Macro window where you can now select a macro number that is 'Available' and not 'Reserved'. Be sure to select from the 'Return' macros. Once you select your macro, ensure you have chosen 'Return' from the radio buttons at the bottom of the screen. You should see your macro number in the 'New Macro Number' field also at the bottom of the screen. When ready, select 'Okay'.
-
Click on 'New Object (Ins)' button to create an object. Your macro will be created in the top right-hand side of the screen.
-
Select the 'Field Type' from the drop-down menu. Scroll to '18 User Type'. In the 'Return Action Box' below you’ll see the 'Direct to Specific Person' datatype created earlier, select it.
-
Insert any other objects that are necessary for your macro and place them in your preferred order.
-
In the 'Title' field, enter your preferred name for this macro.
-
Save the macro using the 'Save' button.
PeopleNet Tasks
How do I Create a PeopleNet Return Macro to update Freight Bill Information?
When a Driver sends a Macro via his PeopleNet software back to Dispatch, it is helpful to have these messages automatically update the Freight Bill 'pieces' and 'weight' information.
-
Open the Communications Macro Setup program (MACRODEF.EXE), click: Start > Programs > TruckMate > Mobile Communications > Communications Macro Setup
-
Create a new 'Return' PeopleNet Macro by selecting the 'File' menu, then 'New Macro', then 'PeopleNet'. Choose one of the 'open/undefined' Macro slot numbers.
-
Select the Macro number you wish to use from the 'Return Macros' section.
-
Insert some objects into the Macro by selecting the 'New Object' button. On the Data Type Selection Tab, select the '01 - Number' field type and choose the 'Update Pieces' option. Configure any other values on the other Tabs as you require.
-
Insert another object into the Macro by selecting the 'New Object' button. On the Data Type Selection Tab, select the '01 - Number' field type and choose the 'Update Weight' option. Configure any other values on the other Tabs as you require.
-
Insert any other objects you require for this return macro then select the 'Save' button to save your settings.
-
Ensure that your PeopleNet Form has the same fields defined.
-
Open the Communication Manager program (COMMGR.EXE), click: Start > Programs > TruckMate > Mobile Communications > Communication Manager. Opening the program will automatically begin the processing of Macros to be sent/received by the PeopleNet device.
-
Once the message has been sent, check the Freight Bill details in the Customer Service program, Details Tab. The Freight information should have the changes from the message automatically accounted for.
How do I Upload Macros to PeopleNet?
-
Open the Communications Macro Setup program (MACRODEF.EXE), click: Start > Programs > TruckMate > Mobile Communications > Communications Macro Setup
-
Create a new 'Forward' or 'Return' Macro as usual.
-
When complete, select the 'PeopleNet' option in the 'Networks' section and de-select any other options to filter out any other Macros that may be in your system.
-
Select the 'Export Menu > Export To > PeopleNet' option on the Menu Bar. A small window will appear, asking you for the upload path. Enter the URL path to the PeopleNet Fleet Manager (PFM).
-
Select 'OK'. MACRODEF.EXE then creates a script file for each macro in the PeopleNet directory. This script file is then be directly loaded to the PFM.
How do I Associate TruckMate Macros with PeopleNet Forms?
-
Open the Communications Macro Setup program (MACRODEF.EXE), click: Start > Programs > TruckMate > Mobile Communications > Communications Macro Setup
-
Create a new 'Forward' or 'Return' Macro as usual.
-
Select the 'Import' Menu and choose the 'Import PeopleNet Definitions' option. The PeopleNet Forms window will display.
-
Select the 'Download Definitions' button to get the current form set from the PFM (PeopleNet Fleet Manager). Note that you need to supply the 'Company' and 'Password' information in their respective fields (lower right).
-
Use the navigation buttons to scroll through the different PeopleNet forms. The 'FWD' and 'RET' checkboxes indicate if the form can be used for 'Forward' and/or 'Return' Macros.
-
Enter the correct TruckMate Macro number into the 'TruckMate Macro ID' fields to associate a given Macro with a given Form.
How do I Export a PeopleNet Macro?
-
Open the Communications Macro Setup program (MACRODEF.EXE), click: Start > Programs > TruckMate > Mobile Communications > Communications Macro Setup
-
Create a new 'Forward' or 'Return' Macro as usual.
-
Before you export a macro, make sure you’ve set all of the Foreign Data Types, using the 'Foreign Type' field on the Object Properties window > Options Tab. Otherwise, PeopleNet won’t know what kind of data type to use for that field.
-
Export the macro by opening the Export Menu and selecting 'Export To > PeopleNet'. If any problems occur, the system will notify the User. Otherwise, the macros get saved as '.frm' files in the specified directory (usually 'C:\pplnet').
-
Log onto the PeopleNet website, enter the company page and the form creation manager. Select the 'Create form from Script' option.
-
You can then cut and paste the code from the '.frm' file that the Macro Setup program created, or you can use the 'Browse' button on the website to load the file for you. Then just check the checkbox and press the 'Create' button.
-
The new form is added to the bottom of the list in form manager. At this point, it is NOT yet active. You have to check the 'Use' checkbox, then press the 'Submit' button. This will activate the macro and schedule it for dissemination to the truck fleet.
-
Back in the Macro Setup program, open the Import Menu and select the 'Import Peoplenet Definitions' option. The PeopleNet Forms window will appear.
-
Now, just select the 'Download Definitions' button and Macro Setup will download the form definitions from PeopleNEt, especially the 'PeopleNet Form ID' which we need to associate with our macros. Macro Setup will then attempt to match the PeopleNet form with the TruckMate macro by name.
In some cases, you may need to manually associate a form with a macro. You can do that on the PeopleNet Forms window by using the 'TruckMate ID' field, or in the Macro Editor window’s 'External Macro Mapping' field.
How do I Create a Bidirectional PeopleNet Form?
-
Open the Communications Macro Setup program (MACRODEF.EXE), click: Start > Programs > TruckMate > Mobile Communications > Communications Macro Setup.
-
Create both a 'Forward' and 'Return' PeopleNet Macro as usual, but have all use all of the same fields in both Macros.
-
Select the 'Import' Menu and choose the 'Import PeopleNet Definitions' option. The PeopleNet Forms window will display.
-
You then upload one of the scripts to the PeopleNet Fleet Manager, but assign both Macros to use the resulting form.
Cancom/Omnitracs (Xata/Geologics/Highway Master)
How do I Address Messages to a Specific User?
Currently in TruckMate the system defaults to sending messages to distribution groups, but in some cases TruckMate Users would like Drivers to send messages to individuals within the company, instead of sending it to a group of Users. Below are the steps detailing the setup required for these kinds of messages.
-
Open the Communications Macro Setup program (MACRODEF.EXE). To do this, click: Start > Programs > TruckMate > Mobile Communications > Communications Macro Setup
-
Open the 'Macro' menu on the Menu Bar, then select the 'Define User Dataypes' option. This will open the User Datatype Definer window.
-
In this section of the program you will be able to customize the way your driver can send a message to your user. Instead of them having to know each and every persons user you can shorten the name by following the example below. Of course you can always put the users full name in.
-
Create the 'Title' for the user datatype field name in the 'Title' field.
-
the 'Max Length' value can range from 1-10. Using 2 digits will simplify the use of the macro.
-
Because this macro is originating from the driver select 'Return' in the 'Macro Direction' section.
-
Entered Value: This is the value that the Driver will type (example: 'LX').
-
Actual Value: This is the value that TruckMate will convert the Driver’s 'Entered Value' to (example: 'LYNX').
-
The 'Data Type' value should be set to 'Text'.
-
Select 'Address Message' for the 'Action' value.
-
-
In order for the User datatype above to work you need to setup User Groups for each individual. Distribution setup can be done through the Mobile Communications program.
-
Open the Communication Manager program (COMMGR.EXE). To do so, click: Start > Programs > TruckMate > Mobile Communications > Communication Manager
-
Click the 'Configuration' option in the Menu Bar (under the 'File' menu) or on the Toolbar. The Configuration window will display.
-
Click the Distribution Tab, then click the 'Setup' button. The Distribution Setup window will display.
-
Use the '+' button to create a new Distribution group. When you create your group for the username click on the corresponding User and hit the red arrow button to move them to the Distribution List column.
-
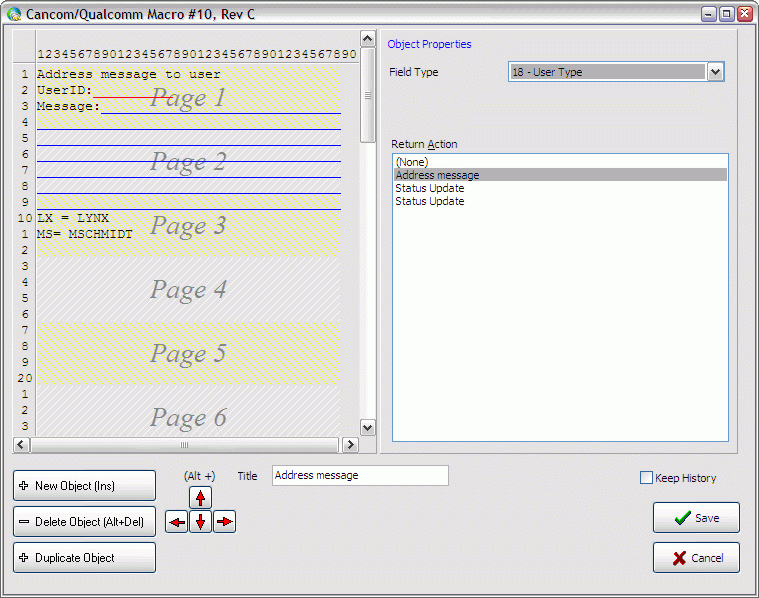
Go back to the Communication Macro Setup program and create a new 'Return' macro.
-
Here is an example of a message addressed to a specific User. Note that the two main fields are your custom field that you have created (Address message) and the Message field return action is just 'text'. The two items below are just plain text to help the Driver remember the codes we defined in the user field.
-
Now, open up the Message Center program (MESSAGECENTRE.EXE).
-
Once the message is received, check your message center for your addressed message. To ensure that you only see messages addressed to you, uncheck the 'Incl. Not Owned' option in the 'Return options' section.
How do I Setup Omnitracs Hours of Service (QHOS) Functionality?
QHOS is an OmniTracs and MCP100 feature designed to monitor driver hours and duty status changes over the course of their duty cycles. The QHOS system uses a combination of sensors attached either to the J-1708 bus or the axle and a communication unit attached to the vehicle. Driving time and duty status activity is collected and processed on a real-time basis. The cumulative data for the duty statuses allow safety managers to determine whether or not drivers are in compliance with hours of service regulations based on the number of on duty and driving hours a driver has remaining within specific time intervals.
Optionally, the QHOS feature can be integrated to a dispatch system to manage driver and vehicle availability for load assignments. As with tracking of drivers' duty status changes, the functions of QHOS integrating with dispatch operations is accomplished using QHOS Web Services.
To interface QHOS with TruckMate, the following are required:
-
TruckMate 2010 or higher
-
All the customer’s trucks must be hooked up for QHOS
-
Customer must have access to the QHOS website
Setup the QHOS Macros
-
Open the Communications Macro Setup program (MACRODEF.EXE). To do so, click: Start > Programs > TruckMate > Mobile Communications > Communications Macro Setup.
-
Select the 'Export' menu and select the 'Export QHOS Macros' option. The Export QHOS Macros window will appear.
-
For each of the Macros listed here ('QHOS Violation', 'QHOS Alert', 'QHOS Logs', 'HOS LOGIN B', 'HOS CHG DUTY B', 'HOS APPROVE B', 'HOS REQUEST LOGS B', 'HOS SWITCH DRIVER B'), select the 'Find' button and define which Macro slot you wish to use. Make reference of the numbers chosen here.
-
The customer will need to contact Omnitracs to specify which Macro Numbers the QHOS Macros are in. This will allow the QHOS server to process the QHOS Macros. Click 'OK' and the QHOS Macros will be exported directly to the Qtracs database and then sent to the trucks.
Communication Manager Setup
No specific setup needs to be completed for this application, but the User requires the latest version of COMMGR.EXE (8.0.28.1) in order for the QHOS Macro messages to be properly imported into the database and viewable by the dispatchers.
Driver Profiles Setup
-
Open the Driver Profiles program (DRIVERS.EXE). To do so, click: Start > Programs > TruckMate > Profiles > Driver Profiles.
-
Select the Details Tab and specify the Depot for the selected Driver in the 'Depot ID' field.
-
A password must be specified for the Driver as well. Select the Passwords Tab. Select the 'Setup' button (this button may need to be enabled for the current User in the Security Setup program > Security > Business Events - Misc Tab).
-
Set the 'Code' value to 'QHOS' and save the record. It is recommended that the 'Username' be the same as the 'Driver ID' for simplicity. After the 'Depot ID', 'Username' and 'Password' have been set, the User can save the Driver record profile. The User will need to update all the Drivers that are going to be using QHOS with these new fields.
Power Unit Profiles Setup
-
Open the Power Unit Profiles program (PUNIT.EXE). To do so, click: Start > Programs > TruckMate > Profiles > Power Unit Profiles.
-
Click on the Misc Tab and then double click the 'Depot ID' field to select the appropriate Depot ID.
TMW Windows Service Host Setup
-
Open the TMW Windows Service Host program (MADSERVICEHOST.EXE).
-
In the left side menu, right-click the 'Omnitracs Hours of Service' item and select 'Properties'. The QHOS Properties window appears.
-
Enter the following information:
Field Definition URL
Enter the URL to the QHOS production server. By default it should come up with a predefined URL.
Customer Name
Enter the Customer Name that was setup by Omnitracs to access the QHOS Web Site.
User Name
Enter the User Name that was setup by Omnitracs to access the QHOS Web Site.
Password
Enter the Password that was setup by Omnitracs to access the QHOS Web Site.
Log File Path
Specify the folder where the logging information for QHOS will be stored on the hard drive.
Rotate
Specify how many days the MadServiceHost should rotate the log files. By default it will keep 30 days worth of log files.
Export Driver Hours
Specify in minutes how often the MadServiceHost should contact the QHOS web site to download the Driver Hours.
AutoStart
If this feature is turned on, then when MadServiceHost has finished loading the QHOS Service will automatically start. If this feature is turned off, then the user must manually start the QHOS service after loading the MadServiceHost.
Auto Insert New Drivers
If the user has setup new drivers on the QHOS web site and hasn’t created them up in TruckMate. Then when this feature is turned on, the QHOS Service will automatically insert the new driver into TruckMate.
-
Click 'OK' to save the changes.
-
Start the QHOS Service by right-clicking the 'Omnitracs Hours of Service' option and selecting the 'Start' option. If the service is already running, you must select 'Stop', and then select 'Start'.
Viewing the Service Activity Log
-
While still in the TMW Windows Service Host program (MADSERVICEHOST.EXE), left-click the '+' button next to the 'Omnitracs Hours of Service' item. Double click the 'Activity Log' item that appears.
-
The Activity Log will appear in the right side program window. The user can select the various logging levels to show detailed or standard logging information.
QHOS Macro Process
-
The Driver would sign into his mobile device by using the QHOS Login Macro. By specifying his 'Driver ID' and 'Password'. Once logged in he can change his duty statuses, request driver logs, etc. QHOS also tracks when the Driver is driving and how long he is driving. Once he has finished for the day he would log out of the mobile device by using the QHOS Login Macro. The QHOS website provided by Omnitracs manages the Driver hours, reporting, and making sure the hours are in regulation.
-
In TruckMate when a Load Offer is sent to the Driver, the TMW Windows Service Host program automatically sends the Load and Unload Date/time, Freight bill number, etc. to the QHOS Web site.
-
The Driver hours are downloaded from the QHOS Website and imported into TruckMate. The database table that the hours are imported into is DRVCALL. This is a standard table for other Hours of Service Return Macros. The Dispatcher can view these Driver Hours by going into Driver Call In program, searching for the driver, and clicking on the Hours Tab.