Managing and tracking

Managing
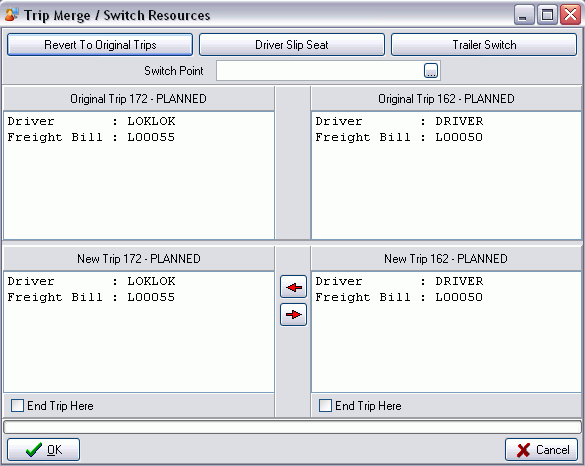
How do I switch/merge resources in Dispatch?
The Merge / Switch Resources option is used to transfer resources (freight bills, drivers and / or equipment) from one trip to another. To use the option, both trips must be active (ie, one leg must have the Leg State of Active). Only the resources assigned to the trip’s active leg will be available for merging and splitting. To activate the menu option, hold down the <CTRL> key while click on a trip. The trip will become highlighted. (You can un-highlight the trip by using <CTRL> - left click again.) Then right-mouse click on the second trip and select the Merge / Switch Resources option.
The trip switch/merge option can also be used to take the resources from two trips and combining them all onto one trip, or taking certain resources from one trip and putting them on another trip.
-
In Dispatch program, hold the <Ctrl> key and select the first trip to be switched/merged. Every leg of the trip should now be selected.
-
Release the control key and select the next trip to be switched/merged. The trip number of the 2nd trip should now be highlighted.
-
On the Context Menu select Merge/Switch Resources. The Trip number displays for information purposes.
-
The Trip/Switch Resources window displays. The configuration of the original trip displays in the two sections at the top. Beneath, changes made through the Driver Slip Seat, Trailer Switch, or manual exchanges are displayed. To manually select exchange items, click on the item that you want to transfer in the New Trip section, then click the arrow that points to the other trip. You can select more than one item for transfer by holding down the <CTRL> key while you click on resources.
-
In the Switch Point field enter the zone code where the switch/merge is taking place. The search button on the right of the field will provide the selection of zones from the zone tree.
-
Now you’ll see the "Original Trip" (on top) and "New Trip" (on bottom) fields. In the "New Trip" area, on either side, press and hold the control key and select the resources to be moved to the other trip.
How do I add a container directly to an available freight bill?
This option provides the ability for the dispatcher to assign a container directly to an available Freight Bill prior to trip assignment. This feature is used in the case where the container information is not known when the Intermodal Freight Bill is posted.
To allow Intermodal Freight Bills to be created without the container defined, thereby enabling this feature the Application Configurator program > CSERV.EXE option 'Require Container ID' for the Customer Service program must be set to 'False'.
-
In Dispatch, Freight Bills grid select the available Freight bill that requires the container assigned.
-
Select Quick New from the context menu to create the container requiring assignment.
OR
when the container already exists, select it in the containers grid.
-
With the container selected, select Assign to AVAIL Freight Bill from the context menu. The container is added to the freight bill and displays in the Container column of the Freight Bill grid. The container information also becomes available in the Customer Service program > Intermodal tab.
How do I add a container to a repositioned trip?
The Add to Reposition Trip feature provides the ability to assign a container to a trip created during the reposition of a driver to a spotted container. In a reposition, the trip is created but "hidden" or not available in the trips grid and this feature provides the ability to assign the container to the "hidden" trip.
For example:
A spotted trip exists in zone BCLAN that has a loaded container destined for zone BCVAN.
The Driver and Power Units current zone is BCABB.
When the Driver and Power Unit get assigned to the spotted trip a reposition trip is automatically created to cover the move for the Driver/Power Unit from BCABB to BCLAN.
The driver picks up an empty container in BCABB that also needs to go to BCLAN.
The driver calls in the empty container information and the dispatcher can add the empty container to the reposition "hidden" trip by using this feature.
Steps to follow to assign resources to the spotted trip:
-
In Dispatch, select the spotted trip in the trips grid.
-
Assign the Driver and Power Unit to the spotted trip.
-
Dispatch the spotted trip. A Reposition Warning message displays. Select Yes.
-
The Empty Trip Information message displays, including "hidden" trip number. Select OK.
Steps to follow to assign container to the repositioned trip:
-
With the previously spotted trip selected in the trips grid, select the Containers tab.
-
Select Quick New from the context menu to create the container requiring assignment, or when the container already exists, select it in the containers grid.
-
With the container selected in the grid, select Add to Reposition Trip from the context menu.
-
The Assignment Confirmation message displays, including trip number.
-
Make a not of the "hidden" trip number to review the details, if required. Select OK.
-
The container is assigned to the reposition trip. You can confirm the trip details, including the container assignment in the Trip Envelope Processing program.
Tracking
How do I setup delivery confirmations?
The ability to setup to send confirming e-mails once delivery of the product has occurred is available in THE DAWG(r) .
How do I setup mobile communications?
The ability to setup and log communication events between TruckMate and the remote communication devices is available in the Communications Manager program.
The ability to setup preferences and track communications such as load offers between Dispatchers and Drivers (communication devices) is available in the Message Center program.