Stock Receipts

When stock is received from vendors, add it to inventory using the Stock Receipts program. After entering a detail line, you must Post the line item using the context menu option before you can use the stock elsewhere in the Repairs & Maintenance module.
Note: This is not the place to make inventory adjustments, such as starting inventory balances and periodic inventory-count adjustments. Use the Stock Adjustments program for those tasks.
To access the Stock Receipts program:
| From this location | Go to |
|---|---|
TruckMate Menu and TruckMate Task List |
Repair & Maintenance > Stock Receipts |
Windows Start Menu |
TruckMate 20xx > Stock Receipts |
Windows Explorer |
C:\Program Files (x86) > TruckMate 20xx > RMStock.exe |
How Do I?
How do I Add Received Stock to the Inventory using the Stock Receipts program?
When stock is received from vendors, add it to inventory using the Stock Receipts program. Note that this is not the place to make inventory adjustments, such as starting inventory balances and periodic inventory-count adjustments. Use the Stock Adjustments program for those tasks.
After entering a detail line, you must Post the line item using the context menu option before you can use the stock elsewhere in the Repairs & Maintenance module.
-
Open the Stock Receipts program (RMSTOCK.EXE).
-
Go to the "+" sign on the bottom navigational bar and select it. Enter all stock information in the fields.
-
Then, go to the 'Parts' tab and select the "+" button from the navigational bar. Enter the relevant details by double-clicking in the columns, and then selecting the appropriate account, and trans code. Enter the required info in the detail line. The serial number, (sn), is only required in certain circumstances. Continue to enter the quantity, and the rate. The Stock Receipts program will calculate the cost and taxes (as per your set up).
-
Go to the 'Notes' tab and enter any notes, as applicable.
-
Go to the GL tab and decide if you want your journal entries posted. If you do not, place a checkmark in the box labeled 'No Journal Entries'. If you do, leave the box without a checkmark.
There is an Application Configurator option for this feature. Refer to the Application Configurator for RMCONFIG.EXE for more information.
-
Go back to the 'Parts' tab, and using your right mouse menu, select 'Post' for each detail line, or alternatively, you can post all of the items at once.
-
Go back to the 'GL' tab to ensure accuracy before posting to the GL, if applicable. Correct any incorrect entries.
-
Go to the header information and change the 'Status' to 'Complete', by using the pull-down box. Update this information using the Stock Receipts Register program.
Menu and toolbar options
This topic describes menu and toolbar options and functionality that are specific to the Stock Receipts window.
For information about common menu and toolbar options (i.e. File menu, Refresh, Multi-Company, etc.), see General menu and toolbar options.
Tools Menu
Set to Complete
![]() Select this button to set a Stock Receipt record with either 'Entry' or 'Posted' status to 'Complete' status.
Select this button to set a Stock Receipt record with either 'Entry' or 'Posted' status to 'Complete' status.
Set to Entry
![]() Selecting this option will give the currently displayed Stock Receipt the status of 'Entry'.
Selecting this option will give the currently displayed Stock Receipt the status of 'Entry'.
Get PO Parts
![]() When you enter the desired PO # in the 'PO' box noted above, you must also click the 'Get PO Parts' button. This will create a separate line of your requested PO # information to the Parts List grid.
When you enter the desired PO # in the 'PO' box noted above, you must also click the 'Get PO Parts' button. This will create a separate line of your requested PO # information to the Parts List grid.
Create Stock Receipt from PO
![]() This is the recommended method to use if your company uses the 'Purchase Order' functionality. You do not need to create a new Stock Receipt record first. You can simply click this button to create a new 'Stock Receipt' from an existing 'Approved' Purchase Order. Another dialog box will open confirming if you want to create a new stock receipt from this PO. If you enter 'Yes', a calendar menu will open so that the user can determine the Stock Receipts entry date (see note below). The 'Select Purchase Order' dialog box will then open, where the user can locate a PO number in the grid and click 'OK'. This will then copy over all information from your Purchase Order, including Parts and Vendor information and will create the Stock Receipt automatically for you. You can then adjust the quantities and prices in the grid below.
This is the recommended method to use if your company uses the 'Purchase Order' functionality. You do not need to create a new Stock Receipt record first. You can simply click this button to create a new 'Stock Receipt' from an existing 'Approved' Purchase Order. Another dialog box will open confirming if you want to create a new stock receipt from this PO. If you enter 'Yes', a calendar menu will open so that the user can determine the Stock Receipts entry date (see note below). The 'Select Purchase Order' dialog box will then open, where the user can locate a PO number in the grid and click 'OK'. This will then copy over all information from your Purchase Order, including Parts and Vendor information and will create the Stock Receipt automatically for you. You can then adjust the quantities and prices in the grid below.
Note: Depending on the Application Configurator program > RMSTOCK.EXE > 'Use Stock Header Date' config setting, the calendar menu will default to either the Purchase Order’s creation date ('True') or the current date ('False').
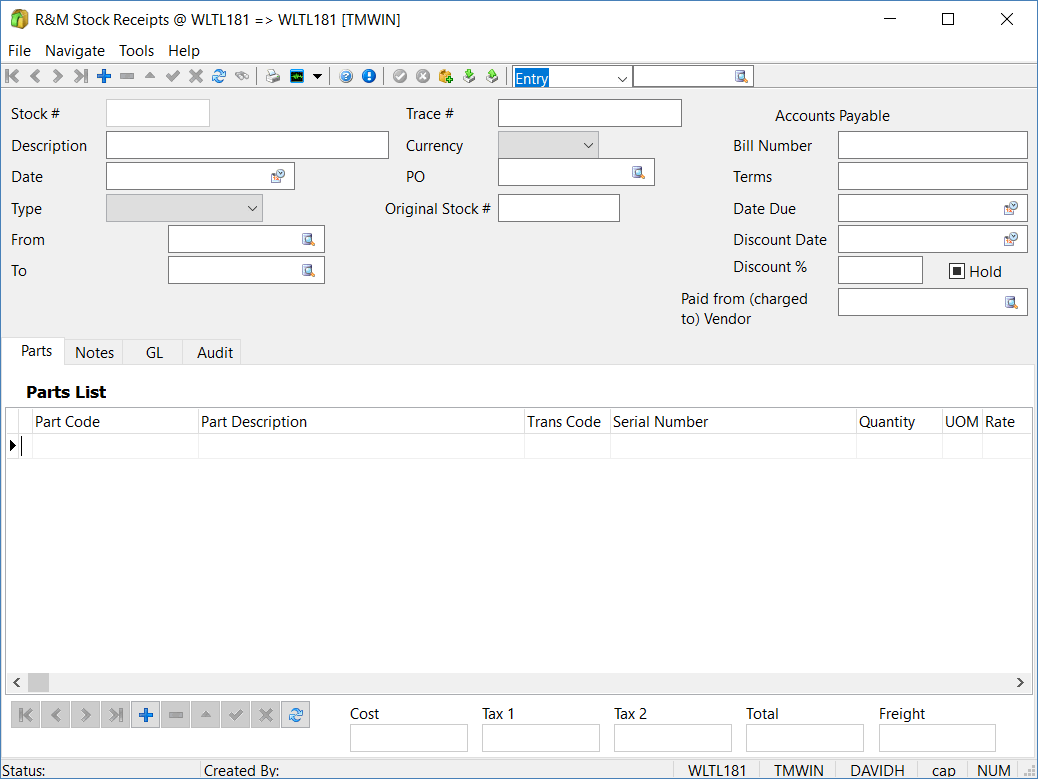
Header Information
The Header Section of the Stock Receipts screen is used to display information for the selected stock receipt or to create new Stock Receipts.
Status
When you enter a new inventory receipt, the Status is set to 'Entry' by default. When the Status is set to 'Complete' (via the 'Set Complete' button) the inventory adjustment will no longer display in the Stock Receipt program. A third status, 'Cancel', will be set on inventory records that are deleted by the user. When the user selects the 'X' button (delete) on the TruckMate Navigation Bar, he/she will be prompted to set the selected record to 'Cancel' status. No records are every actually deleted from the R&M system.
Note: Set the filter below to 'Complete' to view completed inventory receipt records. 'Complete' means these records are ready to be updated through the Stock Receipts Register, and then the records become 'Posted'. Also, once marked as 'Complete' the user cannot make changes to the entry but the entry can now be posted.
Shop Code
Select the Shop Code for the Stock Receipt.
Stock #
This is a system generated number that is created when you enter a new record by clicking on the '+' button.
Description
This is a free form entry field where you can supply a description of the Stock Receipt. If you have created the stock receipt from a PO, this field will be populated with 'Stock Receipt from PO #'.
Date
Will default to today’s date. Double-click for a calendar selection form.
Type
The default value of 'Receipt' will be entered here automatically upon the creation of a stock receipt. The other choices here are: 'Move' (used when moving stock from one location to another) and 'Credit' (used when issuing a credit).
From
This is where the stock is coming from. This field will automatically default to 'VE' (Vendor) if the 'Type' is set to 'Receipt' or 'Credit'. If you have selected 'Move' as the 'Type', then this field will automatically default to 'SH' (Shop). Double click in this field or click on the search button to access a list of available options to select from. These options will be based on whether it is set for a Vendor or Shop code. Vendor codes are configured in the Customer & Vendor Profiles program and the Shop codes are configured in the R&M Configuration program.
To
This is where the stock is going to. This field will automatically default to 'SH' (Shop) for all records created. Double click in this field or click on the search button to access a list of available 'Shop Codes' to select from.
Created By
This will display the user’s login name that created the record, as configured in the Security Configuration program.
Trace #
Enter a trace number, if required, for reference or sorting purposes. This value is not used elsewhere in the system.
Currency
Select the currency of the invoice from the drop down list box.
PO
If your company uses 'Purchase Order' functionality, you would enter the PO number here, up to 20 characters, if you know it (or select the search button for a list of available Purchase Orders for R&M that are 'Approved'). If you use this method, you must also click the 'Get PO Parts' button to retrieve the associated parts in the bottom grid.
Since the introduction of the 'Create PO from Stock Receipt' button, the above method has become obsolete, and we strongly suggest you use this new button instead.
Context Menu
Imaging
Available from the Header section (and anywhere else besides a grid), this option allows you to interface with your Third Party Imaging software. See the Codes Maintenance program for more information on setting up your Imaging software, and the Document Imaging Overview for more information on specific Third Party providers.
Accounts Payable
Bill Number
Enter the Vendor’s invoice number here. If this is left blank, the program will use the Stock Receipt # instead.
Terms
This automatically defaults with the 'Terms' set up for the Vendor ID on the selected Stock Receipt. This value is set up under the Customer & Vendor Profiles program (A/P tab).
Date Due
This automatically defaults with a date based on the stock receipt date plus the number of days set up in the 'Pmt. Days' field in the 'Customer & Vendor Profiles' program (A/P tab) for the Vendor ID on the selected Stock Receipt.
Discount Date
This automatically defaults with a date based on the stock receipt date plus the number of days set up in the 'Disc. Days' field in the Customer & Vendor Profiles program (A/P tab) for the Vendor ID on the selected Stock Receipt.
Discount %
This automatically defaults with the 'Discount %' field in the Customer & Vendor Profiles program (A/P tab) for the Vendor ID on the selected Stock Receipt.
Hold
Check this flag if this stock receipt is to be placed on 'Hold'. When the stock receipt is updated in the A/P Inquiry program, the hold field will show as 'TRUE'.
Parts Tab
The information found on the Parts Tab grid is pulled based on the 'Part Number' and the data you set up for that part number in the R&M Configuration program. All parts that are either entered here or attached to a Purchase Order will be displayed here. There are also quite a few options listed in the Context Menu (access by right clicking in this grid).
Part Code
Double-click to display and select a part code (you must post your header record first). If the part code is new, cancel the selection, click the right-mouse button in the part grid, and select 'Add Part Code' from the menu. Part Codes are configured in the R&M Configuration program.
Part Description
This field will automatically populate when a 'Part Code' is selected. Displays the 'Description' associated with each 'Part Code'.
Trans Code
Double-click to display and select a code that describes this stock receipt transaction. Only transaction codes that match the From and To location types specified in the header will be available for selection. Transaction codes are configured in the R&M Configuration program.
Serial Number
If the part class to which the part code belongs is defined as requiring a serial number, enter the serial number here. Part classes and codes are configured in the R&M Configuration program. Note, you can leave the serial number field blank until you attempt to post the record (using the right-mouse Post menu option).
Quantity
Enter the number of items received. For items that have serial numbers, the quantity will always be '1', as each serialized item must be entered on its own line. If you enter a part that is not within the current Shop’s inventory, a warning will display.
UOM
Double-click to select the Unit of Measurement for the given part.
Rate
Enter the cost of one item. When you use the <TAB> key to move to the next field, the 'Cost', 'Tax 1', 'Tax 2' and 'Total Cost' fields will be calculated (the Cost field will be calculated depending on the setting of the Cost field in the Transaction Code tab of the R&M Configuration program). Tax Rates are reset whenever a User adds or changes a Part Code on a detail line. If no 'Tax 1' or 'Tax 2' values are showing up, they may be exempted (for both Parts and/or Labor) in the R&M Configuration program.
Note: Tax 1 and Tax 2 are calculated based on the setup in the Tax Calculation Configuration program. Individual vendor settings are not taken into account at this time; full tax functionality will be added when the Accounts Payable interface is added to the Repairs & Maintenance module.
Cost
Will default to the value in the Rate field multiplied by the value in the Quantity field.
Remarks
For reporting and reference purposes, you can enter free format remarks that are pertinent to this selected record.
Date
Automatically populates with the current date upon entry of a record.
ID
Automatically populates with the 'ID' value for the selected Part Code.
Inv. Amount
Displays the current amount of the selected Part within the current Shop (as chosen in the top section of the main screen). This information is used for Cycle Counts.
Count
Displays the last available 'Count' number of the selected Part within the Shop inventory. This value is entered in the 'Cycle Count' tab as the inventory within a Shop is manually counted.
Context Menu
Post
Will add the detail line to inventory, making it available in the R&M Work Orders program. A 'P' will appear on the far left of the row to indicate that the item has been posted. The Status on the Stock Entry header cannot be changed to 'Complete' until all line items are posted. When a line item has been posted, you can no longer make changes to it. A journal entry for the receipt of the stock will be created based on the GL Account setup on the GL Tab of R&M Configuration screen. Running the Stock Receipts Register program will update these adjustments.
Post All
Posts all items in the grid and adds a detail line to inventory, making it available in the R&M Work Orders program. Refer to the 'Post' topic above for further detail.
Reverse Post
Will remove the item from inventory. You will be able to make changes to the line item after reversing the post.
Reverse Post All
Will remove all items from inventory for the selected Shop. You will be able to make changes to the line item after reversing the post.
Add Freight Charges
If some of the parts coming in on this shipment are going to be sold to another party, you may enter the charges by clicking this option. Any charge entered will be broken down across all the part detail lines, divided in a ratio determined by the 'Cost' field.
Warranty Parts
If the item has a serial number, the Warranty Parts menu option will be available. The fields on the Warranty form correspond to those on the Warranty tab of the R&M Maintenance program. See that documentation for further information on maintaining warranty records. Use the Get Warranty button to use the last warranty from this Part Code / Vendor Code combination.
Core Returns
The fields on the Core Returns form correspond to those on the Core Returns tab of the R&M Maintenance program. See that documentation for further information on maintaining Core Return records.
Add Part Code
You can add a part code 'on the fly' from the Stock Adjustments Entry program, the same way you would from the R&M Configuration program. Choose the 'Create New Part Code' option from the right-mouse menu. See the R&M Configuration section of documentation for information on adding part codes.
Vendor Part Codes
Sometimes a Vendor will use different Part Codes than a manufacturer. In this case, clicking this option will open a new window that will display all of the alternate Part Codes for the selected detail line. These Part Codes are set up in the Part Number > Vendor Parts tab of the R&M Configuration program.
Part Notes
Clicking this option will open the Notes Tab of the R&M Configuration program’s Part Number Tab.
Check Inventory
Displays an Inventory Search form where you can search for inventory based on a number of criteria.
History Reports
Selecting this button will bring up a History Report window where you can specify history options and print a report.
Reports
Selecting this button will bring up a new window where you may select your desired report. See the documentation for R&M Maintenance for more information on reporting.
Copy and Insert
The Copy Insert function is useful for entering multiple identical items of stock with serial numbers. For example, say you receive a shipment of twenty batteries. Enter the first battery, post the entry, then select Copy Insert off the right-mouse menu. Another entry will be created using all the same details except the serial number. Enter the serial number, post the new entry, then select Copy Insert again. Continue until all the items have been entered.
Attach/Open Related Files
Selecting this option will open the Attach / Open Related Files window, which allows you to add images or documents to the selected record.
Notes Tab
This is simply an extra Notes field where you can enter any relevant notes for this Stock Receipt. These notes are for information purposes only and are not used elsewhere.
GL (General Ledger) Tab
The GL Tab will display 'GL Entries' as they pertain to the Part Class of the parts listed on the 'Parts' tab. The GL distribution is based on what was set up in the R&M Configuration program > GL Tab for each part class. The GL entries are created when you 'post' a part.
No Journal Entries
If this flag is checked, then NO Journal/GL entries are created when posting Parts/Labour records. When the 'No Journal Entries' flag is checked, it will automatically overrule the Transaction Codes CostInv field (which may be set to create Journal / GL records). The user can uncheck the 'No Journal Entries' flag and Journal/GL entries will be created as specified according to the Transaction Code’s setting.
The flag’s default setting can be controlled via the Application Configurator > Repairs & Maintenance > RMCONFIG.EXE > 'Default No GL' option.
Tax on Tax
If you would like to apply 'Tax on Tax' (ie: add a separate tax onto an already taxed amount) check this checkbox option.
GL Account Code
Once posted, these fields will pre-populate. Double-click to display and select an account code. Account codes are defined in the General Ledger Chart of Accounts - Account information.
Description
Automatically populates with the 'Account Code' description of the selected GL Account.
Type
Automatically populates with the 'Account Type' of the selected GL Account.
Debit Amount
Once posted, these fields will pre-populate. If needed, manually enter the amount to be debited. This information is also displayed in a read-only text field near the bottom of the screen.
Credit Amount
Once posted, these fields will pre-populate. If needed, manually enter the corresponding debit amount. This information is also displayed in a read-only text field near the bottom of the screen.
Audit Tab
The Audit Tab displays the User ID who created the Stock Receipt, as well as list the user who may have modified it and the date it was modified.
Filters
Status
When you enter a new inventory receipt, the Status is set to 'Entry' by default. When the Status is set to 'Complete' (via the 'Set Complete' button) the inventory adjustment will no longer display in the Stock Receipt program. A third status, 'Cancel', will be set on inventory records that are deleted by the user. When the user selects the 'X' button (delete) on the TruckMate Navigation Bar, he/she will be prompted to set the selected record to 'Cancel' status. No records are every actually deleted from the R&M system.
Note: Set the filter below to 'Complete' to view completed inventory receipt records. 'Complete' means these records are ready to be updated through the Stock Receipts Register, and then the records become 'Posted'. Also, once marked as 'Complete' the user cannot make changes to the entry but the entry can now be posted.
Shop
Choose a Shop Code from the menu to filter receipt records by their 'Shop'. Double-click the search button to access available Shop Codes.
Search
Clicking the 'Search' button allows you to Search for receipt records. Use the 'Filter' options described above to limit your Searches as well.