Detail tabs: General Ledger - Interline Payable

This topic discusses the following tabs:
-
General Ledger
-
IMC
-
Interline Payable (I/P)
General Ledger
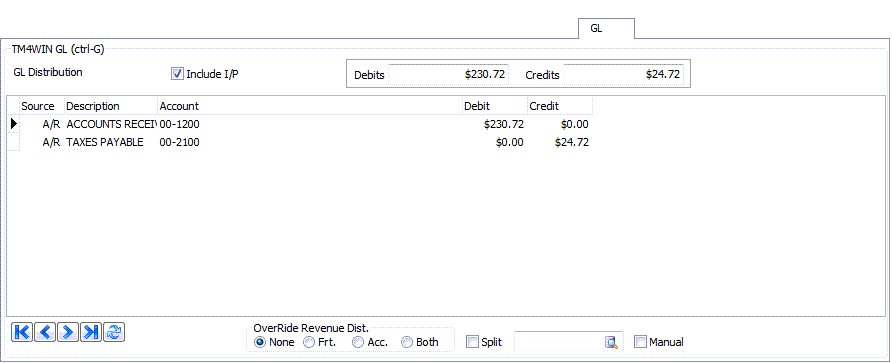
The General Ledger Tab displays the automatic GL postings that are created based on the configuration of the GL Distribution Setup program and the Distribution Code specified in the Bill-To customer’s profile (as configured in the Customer & Vendor Profiles program). You can add, change and delete the entries that are automatically made here at any time until the bill is processed through the Billing Register program. Once the bill has been registered, you can no longer add, change or delete entries.
The GL Tab in Customer Service details the amounts which will be posted to each General Ledger account for the Freight Bill, COD charges, and Interline charges.
|
If you set up inter-company (I/C) accounts for each currency (in company profiles), and go into Carrier Assign to assign the special interliner code from another company, which causes the related I/C freight bill to be created in that other company, then:
If you still have only one I/C row setup (per company pair) in the Company Profiles program, then each "due from" or "due to" amount will be combined into a single row (converted to the GL account company’s base currency). |
| Field | Definition |
|---|---|
Include I/P |
This option is only accessible if the selected Freight Bill has Order Interline records associated with it, If not, this checkbox will be greyed out. If this checkbox is selected, the Interline Payable GL records will be summed by account, for all order interlines on the freight bill, and will be displayed in the GL tab’s grid. Note: Even if the selected freight bill’s Manual-GL option is set to 'True', the user will NOT be allowed to edit the IP related GL entries, these entries are Read-Only. If the configuration option 'Auto-approve IP on FB Approval' in Application Configurator > Billing > CSERV.EXE is set to 'False', the user would have to use the IP Audit program in order to approve the IP GL record (set the status from 'N' to 'S'). If 'Auto-approve IP on FB Approval' in Application Configurator > Billing > CSERV.EXE is set to the default value of 'True', the approval of the IP record will be done automatically when the Freight Bill is approved. |
Debits / Credits |
Displays the sum of the debit and credit entries in the grid. |
Grid Information
| Column | Definition |
|---|---|
Description |
The General Ledger Account Description, as configured in the GL Chart of Accounts program, displays in this field. |
Account |
The General Ledger account code, as configured in the GL Chart of Accounts program, displays in this field. When making manual entries, you can double-click for a selection form. Only those GL Accounts configued as 'Active' (via the 'Active' flag in GLM.EXE) will display in the double-click selection form. If a User attempts to manually enter an 'Inactive' GL Account in this field, Customer Service will produce an error message. |
Debit |
If the posting is a Debit, the amount of the debit will be displayed in this field. |
Credit |
If the posting is a Credit, the amount of the credit will be displayed in this field. |
Context Menu
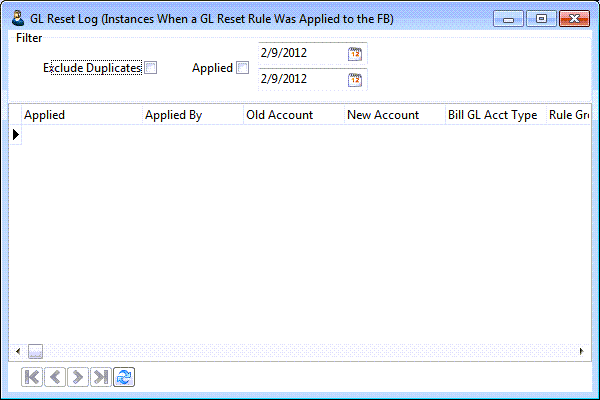
View GL Reset Log
Every time a GL Reset rule causes a GL account number to be changed on a FB, an entry is logged to a log table (GL_RESET_LOG). Selecting this option invokes the GL Reset Log window with a read-only grid containing all the GL reset instances for a specific freight bill. Information on the grid include the GL account number before and after applying the rule. In addition, the grid contains two columns indicating when and by whom the rule was applied. The grid also shows basic information about the reset rule.
| Field | Definition |
|---|---|
Exclude Duplicates |
Every time a FB is updated and saved in Customer Service, the GL is re-calculated. So, a single FB may have the same account change (from account A to account B due to rule N) many times. To see all the changes, leave this filter unchecked. But to see just the unique/distinct changes, check this filter. If the filter is checked and some duplicates are hence hidden, the who/when data displayed will be from the most recent change (for the FB/GL account/rule combination). |
Applied |
If checked, the first grid column, 'Applied', is filtered for the specified date range. |
Grid Data
| Column | Definition |
|---|---|
Applied |
This field answers the When? question, it displays the date the rule was applied. |
Applied By |
This answer the Who? question, it displays the user name of the person who applied the rule. |
Old Account |
This the account before applying the reset rule to the freight bill. |
New Account |
This is the new account after applying the rule. |
The rest of the fields on this grid are either fields describing the Reset Rule that was applied to the freight bill as it was defined in the GL Distribution Setup program > GL Reset Grid or some additional information about the freight bill details as defined in the Customer Service program > Details Tab.
Override Revenue Distribution
The purpose is to set up General Ledger splits or distributions so that a split of GL accounts can be substituted in place of a single G/L Account. For example, on certain Freight Bills, you may wish to split freight revenue and/or accessorial charges among more than one G/L Account.
| You must specify the distribution among G/L Accounts by percent, and the total must be 100%. |
If the 'Manual' option is not checked on the G/L Tab, then the G/L account(s) for Freight Revenue is determined by the Account or 'Split Code' specified in GL Distribution Setup program (based on the 'dist.code' assigned in Client Profile or 'dist.code' determined by procedure CUSTOM_GL).
The G/L account(s) for Accessorial Charges is determined by the Account or 'Split Code' specified for each individual Accessorial Charge in the Codes Maintenance program. On the G/L Tab, you can specify an Account or Split to override these 'normal' accounts for either freight revenue or accessorial charges or both. The default override 'apply to' (GL Override Apply To) (none, frt, acc or both) and default override type. The ability to use GL Override Split functionality can be set up in the Application Configurator program.
| Option | Definition |
|---|---|
None |
Select this option if you do not wish to use the override revenue distribution option. |
Frt |
Select this if you want to use the Override Revenue GL Distribution for the 'Freight Charges Only.' |
Acc |
Select this if you want to use the Override Revenue GL Distribution for the 'Accessorial Charges Only.' |
Both |
Select this if you want to use the Override Revenue GL Distribution for both the freight charges and the 'Accessorial Charges.' |
Split |
If you usually have the override set to none, but you want to override for this particular Freight Bill, check this box and double click to select the split code that you want to use. You can use this in conjunction with 'FRT', 'ACC' or 'BOTH'. |
Manual |
If you wish to manually create the GL distribution for the Freight Bill, check the Manual box before adding information on the other Tabs. This will prevent the system from automatically creating the distribution postings. If entries already exist when you check the box, you will have to manually delete them. 'Void' Freight Bills that are created using the Void and Rebill function in the AR Inquiry program will have this flag checked by default. Note: This option does not apply to IP GL records. Even if this option is selected, the user will not be able to manually change the GL distribution of an IP GL record. |
Intermodal Marketing Company (IMC)
An Intermodal Marketing Company (IMC) operation typically manages the movement of freight from origin to destination through a number of carriers. The freight moves within a container and passes through multiple carriers from origin to destination. As the name implies, at least one leg of the movement is handled by rail. (IMC requires a TruckMate IMC license (40010). The option will not appear if the license is not present.)
Shipment sub-tab
This tab allows you to define a customer for each function of the IMC plan. Use the edit pick to select the involved customer for each function.
Times sub-tab
This tab is where you specify times and time constraints for your IMC plan. Use the calendar button to select the time constraint for each action.
CH Bill sub-tab
The Chassis Bill tab allows you to specify dates for different freight bill changing points.
| Field | Definition |
|---|---|
Notify Date |
Click the search button to select a date of Notification. |
FB from Rail Yard |
Click the search button to select the date that the Freight Bill was processed through a Rail Yard, if applicable. |
FB To Consignee |
Click the search button to select the date that the Freight Bill was received by the Consignee. |
Empty Notify |
Click the search button to select the date that Notification of a Freight Bill’s empty status was received, if applicable. |
First Trip After |
Click the search button to select the 'First Trip After' date, if applicable. |
Invoiced / Freight Bill / Amount |
These fields will populate automatically as their values are updated within the Customer Service program. |
Mark NA |
Click this button to mark the current Chassis Freight Bill as 'N/A' (Not Applicable). After clicking this button, you will be prompted to confirm, and if confirmed, the 'Invoiced' status of the Freight Bill will be set to 'NA'. |
RB sub-tab
The Rail Billing tab consists of a grid showing the origin and destination of the rail shipment along with the Movement Type, and the lower part of this tab displays cost related information.
Revenue sub-tab
This tab displays the different revenue components and charges and the total revenue from the IMC plan.
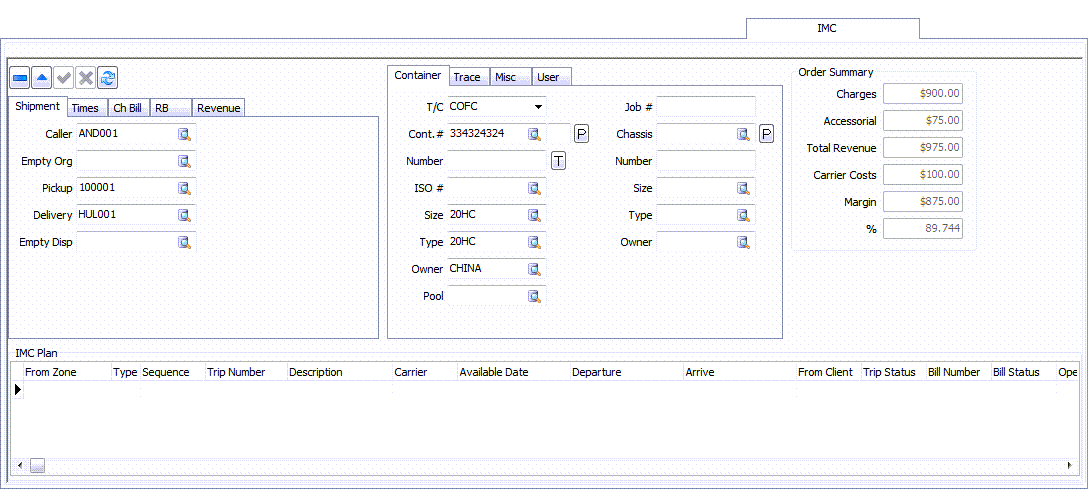
Container sub-tab
You can use this tab to enter information regarding containers involved in the IMC plan.
| Field | Definition |
|---|---|
T/C |
The two options offered by the drop-down list: 'COFC' (Container on Flat Car) or 'TOFC' (Trailer on Flat Car). These indicate what type of container is to be moved. 'COFC' containers require a Chassis. 'TOFC' have their own wheels. |
Job # |
Enter a Job # (if required) for the Container movement. If you are working with a 'Master' order with multiple Containers (and Freight Bills), you can link the child orders together via their 'Job #' value. |
Cont # |
Enter a Container ID or code as set up in the Container Profiles program, or use the 'P' button to create a container 'on the fly'. The values in the pop-up form will appear in the Container Info area after the form is closed. |
Chassis # |
Enter a Chassis ID or code or use the 'P' button to create a Chassis 'on the fly'. The values in the pop-up form will appear in the Chassis Info area after the form is closed. |
ISO # |
Enter the Container’s ISO # (if applicable). |
Number / Size / Type / Owner |
These fields will populate following the use of the 'Quick Entry' popup forms, or, you can manually enter the data by clicking the search buttons and selecting the available values from your system. |
Pool |
Enter the Container Pool number if applicable. |
Trace sub-tab
| Field | Definition |
|---|---|
Customer |
Enter a valid customer number or click the search button to view customer numbers already entered on your system. |
Card Num |
Enter a Card number, if applicable. |
Pickup Num |
Enter a Pickup number, if applicable. |
Seal Num |
Enter a Seal number, if applicable. |
Reference Num |
Enter a Reference number, if applicable. |
Shipment Num |
Enter a Shipment number, if applicable. |
Release Num |
Enter Release Number if appicable |
Trip Num |
Enter Trip Number if applicable. |
Misc Tab
| Field | Definition |
|---|---|
In Bond |
Place a check in this option if the current InterModal shipment has an 'In Bond' status. 'In Bond' usually refers to a shipment that has not yet cleared Customs. |
OBL Hold |
Place a check in this option if the current InterModal shipment has an 'OBL Hold' status. |
Cleared Date |
Click the Calendar button to select a Cleared Date, referring to when the shipment cleared Customs. |
Delivery Order |
Enter the Delivery Order date. |
Rail Dest |
Enter the Rail Destination. |
Rail Status |
Enter the Rail Status |
Rail Date |
Enter the Rail Date. |
User Tab
These fields are optional additional fields that are updated via the Intermodal User Fields Context Menu option. You can use these fields to provide and store additional information about IMC plans.
Order Summary
This section contains read-only fields that summarize the IMC order financial elements.
IMC Plan
This grid allows you to detail your IMC movement from start to end. Each row will represent a movement from one location to another. You can later use the context menu options to create a trip based on your IMC plan.
Context Menu
| Option | Definition |
|---|---|
Stop IMC Plan Recalc / Allow IMC Plan Recalc |
This option toggles between stopping and allowing the recalculation of an IMC plan. The caption of this option changes according to the currently selected option. Furthermore, the 'Recalc IMC Plan' option (see below) switches between active and inactive (grayed out) according to the selected option as well. |
Recalc IMC Plan |
The availability of this option depends on whether the IMC plan recalculation is stopped or allowed (see above). If allowed, you can recalculate the IMC plan by selecting this option. |
Split IMC Leg |
This option will split the selected IMC movement leg. When this option is chosen, a search window is displayed to allow you to select a client. The 'Next Zone' value of the current IMC movement will become the zone code of the client selected for the split leg. The new IMC split leg will go from the client zone to the original 'Next Zone' of the first IMC movement leg. Note: Once you create a trip for your IMC plan, you are no longer allowed to split legs. However, you can allow splitting legs of an IMC plan after trip creation by setting the Configuration Option 'IMC Routing - Split IMC Leg after IMC trip creation' in Application Configurator program > CSERV.EXE to 'True'. |
Delete IMC Leg |
This option will delete the selected IMC movement leg. Note: Once you create a trip for your IMC plan, you are no longer allowed to delete legs. However, you can allow deleting legs of an IMC plan after trip creation by setting the Configuration Option 'IMC Routing - Delete IMC Leg after IMC trip creation' in Application Configurator program > CSERV.EXE to 'True'. |
Create IMC Trip |
Selecting this option will create a new Dispatch trip for all of the IMC freight bills attached to the current IMC movement. For this option to work, you need to set the application configuration option in Application Configurator program > CSERV.EXE - 'IMC Routing - Create IMC Trip' to 'True'. |
Cancel IMC Trip |
This option will cancel the created trip (if any). For this option to work, you need to set the application configuration option in Application Configurator program > CSERV.EXE - 'IMC Routing - Cancel IMC Trip' to 'True'. |
Carrier Find Near |
Selecting this option will open the Find Near window, with the Freight Bill and Carriers Tabs automatically selected, which makes choosing the correct Carrier for the movement much easier. |
Carrier History |
This option opens the Carrier History window for you. If a carrier is already assigned to your IMC plan, the window will show the history of the assigned carrier. If no carrier is assigned, you can use the filters on the Carrier History window to view carrier history information of your choice. |
Quick Carrier Assign |
Selecting this option will open the Quick Carrier Assign window, which allows you to setup a new Carrier and immediately assign it to the selected trip portion. |
Operations Code |
The 'Operations Code' option is used to assign unique operation codes (as defined in the Codes Maintenance program > Operation Codes Tab) to each leg of the terminal plan. Because each movement’s operations code can be different, this allows the user to assign each portion of the trip to a specific dispatch board. For example, an operations code for in-house trucking would assign the leg to the in-house trucking division; for LTL freight, the linehaul portion of the trip could be assigned to a consolidator group (using their respective operation code). |
Change FB Status |
Selecting this option will open a Freight Bill Status Change window, which allows you to change the current status of the selected IMB freight bill. |
Print Load Offer |
Selecting this option will open the Crystal Report Selection window, allowing you to print a load offer based on a Crystal Report. For more information on Report functionality in TruckMate, see the Crystal Reports Reference. Note: The 'Print Load Offer' option can only open reports with a data set that has a 'Detail_LIne_ID' field. |
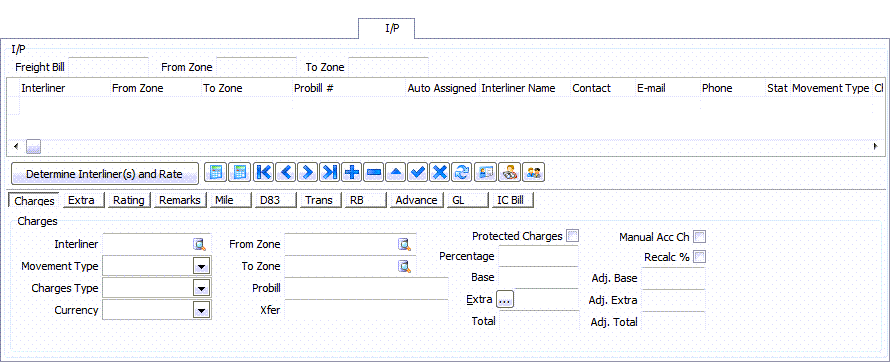
Interline Payable (I/P)
If the Freight Bill is to be carried by an Interline Vendor completely or in part, the Interline Payable Tab is where the Interline charges are entered to make it possible to compare expenses to revenue. When the Freight Bill is updated through the Billing Register program, the records are transferred to the Interline Payable Audit program. After updating though the Interline Payable Audit Register program, the records will become part of your outstanding Accounts Payable data. Interline records can also be created using the Carrier function in the Dispatch program.
|
Header
| Field | Definition |
|---|---|
Freight Bill |
Re-states the Bill Number that appears in the upper left-hand corner of Customer Service. This is a read-only value. |
From Zone |
Re-states the Pick-Up zone in the Shipper area of Customer Service. This is a read-only value. |
To Zone |
Re-states the Delivery zone in the Consignee area of Customer Service. This is a read-only value. For auto-created Order Interline records for Beyond Movements,the value assigned to this field is controllable by an application configuration option. You can set CSERV.EXE >'Determine IP To Zone' configuration option to either 'END_ZONE' or 'CARE_OF_ZONE'. |
Grid Information
Use the '+' button on the I/P Tab navigational bar to enter a new record. The fields within this grid will populate automatically once an Interliner is chosen using option below.
| The default is to allow users to edit the IP tab as long as the selected Freight Bill has NOT been interfaced (run through the billing register). However, this constraint can be relaxed via a security option 'Allow Edit of Posted (Bill Reg) FB - IP Tab' in Security Setup Program > Security > Business Events > Approving Printing. Selecting this option for a user will allow that user to edit the IP details even if the Freight Bill has been approved. |
| Column | Definition |
|---|---|
Contact Information |
Three fields ('Contact', 'E-mail' and 'Phone') have been added to display the Interliner Contact information (as entered in the Customer & Vendor Profiles program for the selected Interliner Vendor. |
Consolidated ID |
A new feature was added to TruckMate which allows the user to consolidate the IP rates on a trip based on a single delivery point, where there could be multiple freight bills associated. This column is the ID of the consolidated rate (if applicable). |
Child FB # |
This field displays the source freight bill number that originated the IP record. |
Buttons
Determine Interliner(s) and Rate
The Determine Interliner(s) and Rate button has the system automatically determine the appropriate Interline for the Freight Bill and to calculate the corresponding Interline charges.
This function will check the configuration for the Start Zone in the Codes Maintenance program. If an Interline has been assigned to the zone, a record will be created here. The Rates Maintenance program will be checked to determine if the Interline is assigned to a rate sheet that fits the rating criteria on the Freight Bill. If one is found the rate will be automatically determined.
Re-rate
Clicking on the 'Re-Rate' button re-calculates the Interline charges. For example, if you change the 'From Zone' or 'To Zone' values, or change the values on the Details Tab, the Interline rate may be affected. This button is used to re-generate the Interline charges based on the Freight Bills current data.
Re-Rate Extra Charges
Clicking on the 'Re-Rate Extra Charges' button re-calculates the Interline Extra Charges, if there are any. This button is used to re-generate the Interline Extra Charges based on the Freight Bills current data.
Add / View E-Check Advances
See "Add/View E-Check Advances" below for more information.
Find Carrier Near
 This button opens the Dispatch program > Find Carrier Near window , allowing full Carrier search capabilities from within Customer Service, where the IP records are often created. There have also been several logic updates based on this button:
Carrier quotes can now be linked to either a trip leg or a FB. In fact, the Carrier Quotes grid in the Carrier History Tab now has a 'Bill Number' column. Either 'Trip' and 'Leg #' are populated and 'Bill Number' is blank (indicating the quote was entered via the Dispatch program), or 'Trip' and 'Leg #' are zero and 'Bill Number' is populated (indicating quote was entered via Customer Service).
When Find Carrier Near is called from Customer Service, the top section is defaulted to the Carrier Buy Tab (with info displayed from the FB in Customer Service). If you go to the FB Tab, you will see all FB’s that match by 'Bill Number', with the specific one (from CSERV.EXE) selected in the grid. For example: if you click the 'New' button from an NA bill, the Carrier Buy Tab will show info for the correct FB, and the FB tab may show many NA bills, but the "selected" row in the grid is the correct one.
Since you may now call Find Carrier Near based on an NA bill, of which you may have many in the system, 'Shipper'/'Consignee ID'/'Name' columns have been added to the Find Near window > FB Tab.
If you close Find Carrier Near via a 'Use Carrier' right-mouse-click (there are several), then you will be put into insert mode in the Customer Service program > IP Tab with the interliner (and possibly the base charges, depending on which 'Use Carrier' option was selected) pre-filled. You must complete any missing fields and click save.
| This button will be disables if the currently displayed Freight Bill has been interfaced to billing (i.e. is read-only). |
Pro-Bill Detail Sub-Tabs
These Tabs store additional information about the Interline Probill record currently displayed.
Charges
This sub-tab allows you to view and edit information related to the charges for the selected IP record. If the freight bill has already been interfaced (run through the billing register), no changes can be made to the charges, no changes can be made to 'Charges Type Flag' nor can the 'Protected Charges' flag be toggled, even if the security setup option 'Allow Edit of Approved FB - IP Tab' is set to 'True'. Furthermore, if one or more IP records has a D83 tariff amounts assigned to it and has been accrued, you can’t change the charges to your client. D83 amounts are dependant on charges to the client.
| Field | Definition |
|---|---|
Interliner/Interliner Profile |
Select an Interline Carrier by entering the Vendor Code, or click on the search button for a search form. Only Vendors configured as Interliners in the Customer & Vendor Profiles program will be available for selection. if you wish to view the profile of the selected vendor (interliner), select the 'Profile' button adjacent to the 'Interliner' field, this will display the selected interliner’s record in the Customer & Vendor Profiles program. |
Movement Type |
Refers to the segment of the trip on which the Interline carried the freight. Your choices are: 'Advance', 'Beyond', 'LineHaul', 'CrossDock' and 'Other'. |
Advance interlining |
'Advance' interlining is a freight movement where the Interline transports the freight from a Shipper to a junction point. The main carrier takes it from the junction to the destination. |
Beyond interlining |
'Beyond' interlining is a movement where the main carrier takes the freight to a junction point and transfers it to an Interline, who carries it to its destination. |
LineHaul interlining |
'LineHaul' interlining should be selected when the movement is from one port/city to another over a long distance (usually in excess of 1500 miles). |
Crossdock interlining |
This option allows for the assignment of a Crossdock Carrier and subsequent calculation of a Crossdock fee for the Carrier. This movement type allows you to charge a fee for any Agent/Interliner that completes a Crossdock move for you. You can also setup related Accessorial Charges for Crossdock moves on the Codes Maintenance program > Accessorial Charges Tab. |
Other interlining |
'Other' interlining is available for circumstances that do not fall into the above categories. |
Charges Type |
Select whether the Interline charges are a 'Payable' or a 'Receivable'. If you are billing the customer for the Interline charges, it will be a Payable because you will have to pay the Interline. However, if the Interline is billing the customer, the charge will be a Receivable, because the Interline will have to pay your company. You can only select the Receivable radio button if the selected Interline has a Client ID specified in their profile (in the Customer & Vendor Profiles program). This is because the Interline charge will be posted to the Accounts Receivable module when the Freight Bill is processed through the Billing Register program. |
Currency |
Select the currency in which you pay (or receive payment from) the Interline from the drop down list. The currency will default to the currency selected in the Freight Bill header. Currency codes are defined in the Codes Maintenance program. |
From Zone / To Zone |
These fields allow you to designate the points the Interline carrier moved the bill from and to. If the Interline did the entire move - then these points will match the Freight Bill from and to zones. If the Interline only carried the load part of the way, this allows you to indicate where the transfer was made. Both fields provide an search button to look-up the appropriate 'Zone Code'. |
Probill |
Is used to record the Interliner ProBill Number. This will become part of the record in the Interline Payable Audit program. Also, the number entered here will become a Trace Number for the Freight Bill, and will also be displayed on the Trace # Tab. |
Xfer |
This field is used to enter free-form notes about the transfer, if one was made. This is optional, and for reference purposes only. |
Protected Charges |
If your billing charges are calculated on top of the Interline carrier’s charges, place a checkmark in the box provided. The total charges to your customer will then be summed from the charges on the load detail lines, accessorial charges (if any), and the Interline charges. If the Interline charges are not protected, they will not be added to the Freight Bills total charges, and your customer will be billed as normal from the amounts from detail lines and accessorial charges (if any). |
Percentage |
If the Interline carrier is paid based on a percentage of your freight charges, enter that percentage here. The Base charges will calculate by multiplying the Percentage by the total charges entered on the Details Tab. Note: If the Accessorial charges on the Freight Bill are flagged 'INT_CHARGES = True', then they are included in the percentage calculation, if not, you must enter a value manually into the percentage field. |
Base |
This field will display the percentage value multiplied by the Freight Bills total charges from the Billing Tab. You can also enter a manual amount in the Base field. If the charge was automatically rated, the results will display here. |
Extra |
Add an accessorial charge to an Interline pro-bill by clicking on the search button beside the field. You will be taken to a separate grid, where you can add Extra Charges and their associated details. |
Total Charges |
This field represents the sum of the Base charges and the Extra charges. |
Adj. Base / Adj. Extra / Adj. Total |
These fields will show the Interline Payable totals after adjustment in the IP Audit program. These fields are all read-only. |
Extra
This sub-tab allows the user to add extra charges to the selected IP record. The 'Charges' button allows the user to go back to the 'Charges' sub-tab, which makes it easier for the user to go back and forth wile entering charges for the selected IP record. Form within the 'Charges' sub-tab, the user can use the ellipses button adjacent to the 'Extra' field to navigate back to this 'Extra' sub-tab.
Rating
| Field | Definition |
|---|---|
Do Not Rerate |
Check this option to disallow Re-rating on the selected Freight Bill. |
Rate Sheet Override |
Check this option to override the Rate Sheet associated with this Interliner, if there is one displayed in the fields below. If you select the Override option, you must provide the Rate Sheet values manually using the options within the I/P Tab. |
Rate Sheet Description/Number |
These fields will display a description and system number of the Rate Sheet currently being used for the selected Interliner. |
Mileage
As long as your Mileage Server program is running, you can quickly calculate the mileage associated with this trip by clicking the 'Calc. Mileage' button or you can enter the mileage manually. This Tab offers the same function as the Freight Bill header’s 'Mileage' button.
|
Docking
| Field | Definition |
|---|---|
Status Code |
Enter a Status Code here, or click the search button to view more selections. |
Free-form field |
Enter an explanatory sentence regarding the selected Status Code in the space provided, if required. |
D83
The Rocky Mountain Tariff Bureau Inc.(RMB) Division Sheet D83 is an accepted industry standard used in determining the division of revenue between multiple Carriers moving a single load. The D83 Tariffs are based on the assumption that two (or more) Interliners are involved in a Freight Bill, and will split the revenue according to set percentages. Whenever an Interliner is involved in a Freight Bill, the D83 calculations assume the involvement of the user’s trucking company as well.
For more information on D83 Tariffs, see D83 Tariff Import.
| Field | Definition |
|---|---|
Leg ID |
Will display '1', '2', or '3' based on the current Leg of the Freight Bill, depending on the Interliner setup. If the selected Interliner is the 'Advance' Interliner, for example, the Leg ID will display '1'. |
Pct |
Displays the Percentage of the revenue split for the current Interliner. |
Rev |
Displays the Revenue for the current Interliner, based on the Freight Bill’s charges and the Percentage field for the Interliner. |
Carrier |
Enter the Carrier ID for the Interliner that will complete the current Leg of the trip. |
Start |
Displays the Starting Zip Code for the trip Leg. |
End |
Displays the Ending Zip Code for the trip Leg. |
Min Fact |
The 'Min Fact' is a factor used in D83 calculations that is based on the Zip Codes involved in the trip. For more information on D83 factors see the documentation for the Rates Maintenance program. |
Div Min |
The 'Minimum Division' field refers to the breakdown of charges across the companies involved in the multi-leg trip process. It specifies the Minimum Revenue that will be given to an Interliner. |
Is Low |
If the current Freight Bill is a two-Carrier split, this field will display 'True' or 'False' depending upon the current Carrier. If the current Carrier is the one with the lower Percentage of the Revenue Split, this field will display 'True'. |
Used Min |
Will display 'True' or 'False'. If 'True', when a Minimum Revenue value is reached, it will be given to the current Interliner. |
Below Min |
This field will display 'True' in the rare situation where there are three companies involved in a split (2 Interliners + Trucking Company) and there is not enough Revenue to meet their pre-defined Revenue Minimums. In this case, the Revenue of the Freight Bill will be split evenly across all three parties involved. |
Rate Sheet |
Enter the Rate Code ID for the Rate Sheet you have created to handle D83 transactions. You may set this Rate Sheet up in the Rates Maintenance program. In order for this field to populate, the Rate Sheet you create must also be attached to a specific Vendor. |
FB Charges |
Will display any charges associated with the current Freight Bill. |
FB Rev |
Will display the Freight Bill’s Revenue total. |
FB Acc Ch |
Will display any Accessorial Charges associated with the current Freight Bill. |
D83 Fact |
Displays the D83 Factor used in the Revenue calculations for the current Interliner. This factor is based upon the Zip codes involved in the trip. |
Adj % |
Manually adjusts the Revenue Percentage of the D83 Rate Sheet for the current Interliner. |
Adj Rev |
Manually adjusts the Revenue dollar value of the for the current Interliner. |
Transfer
The Transfer Tab allows a 'Beyond' Interliner movement to be transferred to a different Interliner. A new 'Beyond' order Interliner record is created and the existing record is changed to 'Cross Dock'. Select the Interliner using the Database Search button in the field provided, then use the 'Transfer' button to make the switch.
Rail Billing (RB) Tab
| Field | Definition |
|---|---|
Contract / Route / Tariff / Service |
These values are pulled from the List type Rate Sheet used by the Rail Billing Carrier. |
Rule 11 / Rule 11 Button |
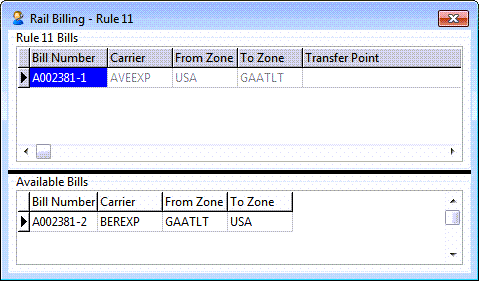
Selecting the Rule 11 button will open the Rail Billing - Rule 11 window, which allows you to add IMC freight bills for Rail Billing. Note: This button can only be selected when working with container movements.
The Rail Billing - Rule 11 window is divided into two sections: the top grid shows which container movement bills have been allocated for rail billing, and the bottom grid shows which bills are available to be added. Double click the Transfer Point column to select a Transfer Point location for the Rail Billing movement. The values available in this field are based off the setup IM Setup program > Rail Billing Tab and the 'Carrier' / 'From Zone' combination for the bill. To remove a freight bill from the top grid, right-click on the bill and select Remove from Rule 11 on the context menu. To add a bill to rail billing, right-click on it in the bottom grid and select Add Bill for Rail Billing on the context menu. |
Advance
The Advance Tab shows information about I/P Advances. Here, the Trip Number can be used to know if the check is assigned against the trip or the freight bill.
GL Tab
The GL Sub-Tab displays the GL entries for the selected IP record. Even though the same data can be viewed from the GL main tab in customer service, the GL entries related to IP records are Display-Only from that tab (the user can’t edit) , even when the 'Manual GL' checkbox is selected. However, in this GL sub-tab, if the 'Manual GL' checkbox is selected, the user will be able to edit GL entries for the selected IP record. Further more, the user can use the 'Approve / UnApprove' buttons to approve or disapprove an IP record (change the interface status between 'N' and 'S').
The normal acceptable procedure from an accounting stand point is to have all I/P records' approval dates and the FB approval date fall in the same accounting (GL) period. However, there is an application configuration option which can be set in Application Configurator > Billing > CSERV.EXE - 'Allow A/R and I/P GL to different GL periods' to allow approving transactions even if there is a GL period mismatch in the approval dates of the related records.
| To approve an IP record, it must be in balance, you can check the balance of an IP record by selecting the '?' button. This will inform you if the IP record is in balance and gives you the reason if not. |
IC Bill
In a multi-company environment, when a new IP record with IC (Inter Company) vendor is created, a new IC bill in the vendor’s company will be created. The company’s 'Client Id' will be used for the 'Caller' or 'Bill to', and 'Pickup at Zone' and 'Care of Zone' will be used as IP’s 'From Zone' and 'To zone' respectively.
This tab shows details of the created IC (Inter Company) IP record. The tab shows the 'Site Id', 'Name' and the 'Bill Number'. The user can select a 'Site ID' using the search button available in the 'Site ID' field. In addition of having a record in this tab, when an IC IP record is created, a Bill Number will also be created in the 'Trace' tab.
When the IC IP record is removed, the IC bill will be cancelled, the trace number/IC bill information will be removed. If the IC bill is already on a trip, interfaced or consolidated, then the IP record cannot be removed.
Multiple IC IP records can be created for a single bill if users need to assign the bill to more than one IC carrier.
Add/View E-Check Advances
![]() Selecting this button after a Carrier has been assigned to a freight bill will open the E-Checks window, which will allow you to pay an interliner prior to receiving payment from the freight bill clients. There are two ways that the user can create an advance check: by creating a manual company check or by debiting a real-time TChek or Comdata card account.
Selecting this button after a Carrier has been assigned to a freight bill will open the E-Checks window, which will allow you to pay an interliner prior to receiving payment from the freight bill clients. There are two ways that the user can create an advance check: by creating a manual company check or by debiting a real-time TChek or Comdata card account.
E-Checks Tab
The E-Checks Tab is used to create an instant advance payment to a real-time fuel card vendor (Comdata or T-Chek) for the interliner movement. To use this feature, you need to have a real-time vendor configured and working in the Fuel Card Management program. The tab will also show any existing E-Checks for the currently displayed ORDER_INTERLINER record.
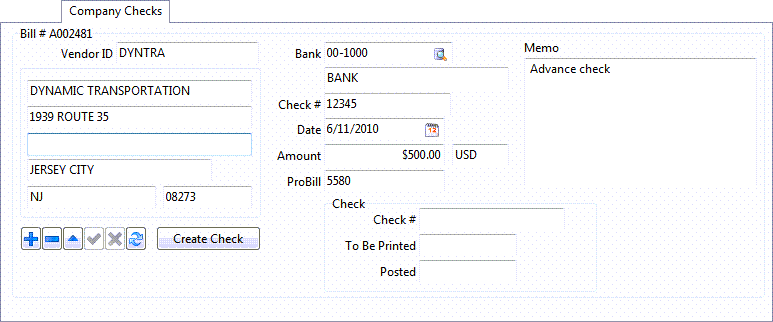
Company Checks Tab
The Company Checks Tab is used to create a check that will be later sent to the interliner vendor.
| Field | Definition |
|---|---|
Vendor ID / Address Information |
These fields will automatically populate when the user selects the '+' button to begin creating the advance check, based on the interliner vendor added to the Customer Service program > IP Tab. This information is pulled from the Customer & Vendor Profiles program. |
Bank / Description |
Enter the bank account that should be credited by the advance check. When a bank account is entered, its description (as entered in the GL Chart of Accounts program) will populate. |
Check # |
Manually enter the check number in this field. |
Date |
Provide a date for the advance check by entering it manually or by selecting from the calendar menu. |
Amount / Currency |
Enter a dollar amount for the advance check. The currency will automatically populate based on the currency of the bank account entered above. |
ProBill |
If a Probill number is required by the interliner, enter it in this field. The Probill number will be used as the bill number in the Accounts Payable system if it is entered. |
Memo |
This is a free-format field for any notes related to the advance check. |
Selecting the Create Check button will create the AP check for the interliner based on the entered information on this form. The check will then be available for viewing in the AP Inquiry program (right-click Vendor ID in top grid and select 'View Advance Checks') and for printing.
When the user selects the Create Check button, the three fields to the right ('Check #', 'To be Printed' and 'Posted' will populate with data). These last two of these fields will update as the check clears the AP processes.