Trip Details section

The Trip Details section, located in the upper middle section of the Multi Mode Dispatch screen, provides more information (like the drill-down functionality of other programs) for a trip selected from the Active Trips section. It comprises the following tabs:
-
Trip Summary
-
Trip Legs
-
Freight Bills
-
Seal #
Trip Summary tab
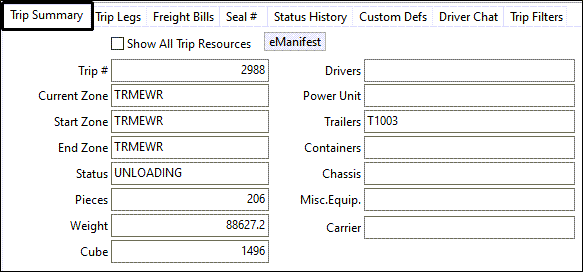
The Trip Summary tab provides detailed information about the trip that is currently selected in the Active Trips section, including 'Trip #', 'Current/Start/End Zones', 'Status', etc. The fields displayed are all read only.
| Icon/Keybd | Menu Option | Definition |
|---|---|---|
<Shift+Ctrl+D> |
Show All Trip Resources |
This checkbox determines whether to include the resources associated with ALL the trip legs associated with this trip as opposed to only the trip resources associated with the current leg. |
<Ctrl+F> |
eManifest |
This button function checks to see if the trip # passed from the Trip # field on the Trip Summary tab has any manifests associated to it. If there is 1 manifest then the eManifest application is launched showing this manifest. If there are multiple manifests associated to this trip the Select Manifest window will come up and you can select one of the manifests to launch eManifest and display the selected manifest. Note: This button is only enabled if CUSTOMS_LICENSE (49000) is installed. |
Context Menu - Trip Summary
The following options are available from all tabs in the Active Trips section. Most options are common to all of the tabs and an asterisk indicates this option is only available on some of the tabs as described.
| Icon/Keybd | Menu Option | Definition |
|---|---|---|
<Shift+Ctrl+D> |
Toggle Design Mode |
Allows those with security permission, access to the Screen Design mode where you can create and save different layouts. See Custom Screen Design Mode and the Security Configuration program > Security > Business Events > Screen Design section. |
<Ctrl+F> |
Full Screen |
Expands this grid to fill the whole screen view. Use <Ctrl+F> as a toggle to return to the previous view. |
Trip Legs tab
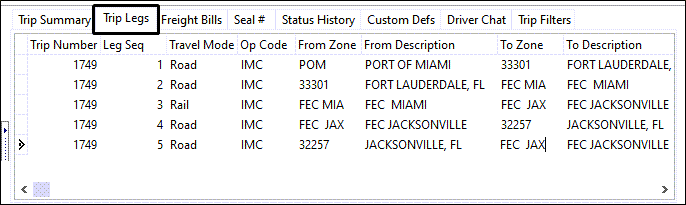
The Trip Legs tab displays details for whichever trip is selected in the Active Trips section, and is particularly useful for intermodal companies. Each line in this grid displays a leg sequences for that trip. There is also a column called 'Travel Mode' that displays the mode of transit for the trip during that particular leg. Using this, the user can, for example, designate that the trip will take a shipment from one terminal to a rail yard, then to another rail yard, then to another terminal, and then to an ocean liner; the user can follow the entire process using the Travel Mode column.
| Icon/Keybd | Menu Option | Definition |
|---|---|---|
<Shift+Ctrl+D> |
Toggle Design Mode |
Allows those with security permission, access to the Screen Design mode where you can create and save different layouts. See Custom Screen Design Mode and the Security Configuration program > Security > Business Events > Screen Design section. |
Carriers |
Sub-menu provides access to several carrier related functions.
|
|
Booking Number |
Opens the Booking Numbers window which allows you to manually create booking information records, and/or assign them to a trip leg, and store the data associated to them. |
|
<Ctrl+G> |
Change Op Code |
Opens the Select Ops Code window. |
<Ctrl+F> |
Full Screen |
Expands this grid to fill the whole screen view. Use <Ctrl+F> as a toggle to return to the previous view. |
<Ctrl+O> |
Optimize Trip |
Opens the Load Optimizer window, allowing users to edit trip legs and assign Freight Bills to be picked or dropped in whatever order required. |
<Ctrl+H> |
Show/Hide Finished Legs |
Toggles between Show and Hide to determine whether to display the completed trip legs in the grid. |
Deassign |
This option allows the user to unassign and remove an assigned resource from the trip. |
|
NEW |
Mobile Messaging |
Sub-menu includes:
|
NEW |
Reset Leg State |
Toggles the leg state between PLANNED and ACTIVE for the legs in a dispatched trip.
|
|
Copy |
Copies the details of the selected entry. |
|
Select All |
Selects every record in the grid. |
|
Clear Multi-Row Selection |
Clears all the selected records. (You can use Ctrl+Click to select multiple records.) |
See Common Shortcut Menu Options in the Active Trips section for descriptions for these shortcut menu options common to many of the grids on the Multi Mode Dispatch window.
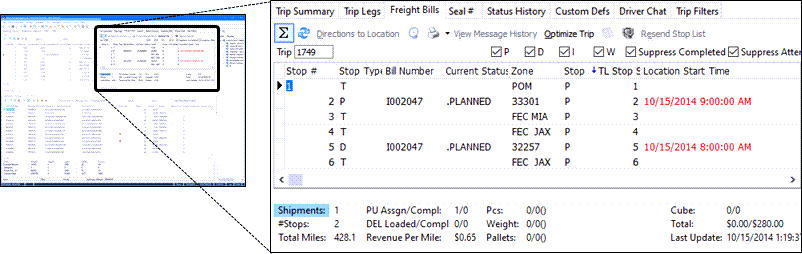
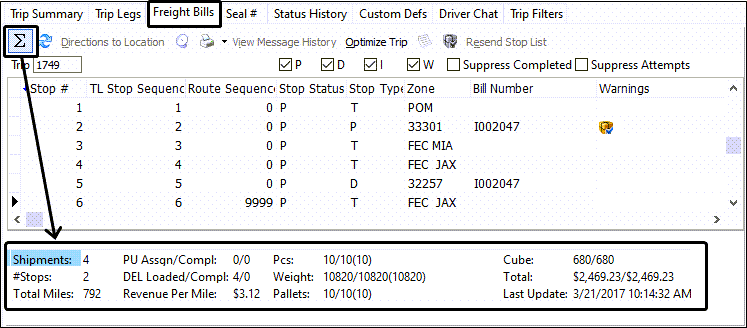
Freight Bills tab

The Freight Bills tab displays any Freight Bills (and the associated details) that have been assigned to the trip that is currently selected in the Active Trips section.
A summarized set of information displaying a total for all of the freight bills for this trip is displayed at the bottom of the grid.
Toolbar - Freight Bills

| Icon/Keybd | Menu Option | Definition |
|---|---|---|
|
Toggle Summary Information |
Toggles the summary information section (the grey area beneath the grid) on and off.. |
|
Refresh |
Select this button to refresh the records available on the grid. |
Directions to Location |
Selecting this option will display the directions from the user’s default site to the zone code of the terminal site. This function requires that the Mileage Server program is running and using recognized third-party mileage software (such as PC*Miler, ProMiles or Microsoft MapPoint). |
|
|
Load Offer |
The Load Offer function is used to send a 'Load Offer' message to the driver for review/acceptance. The message is sent though the Mobile Dispatch system to the mobile device installed on the power unit that is assigned to the trip. You can also send a different macro than the Load Offer macro, or a free-form message. The Load Offer macro is configured in the Communication Macro Setup program with the specific information required for your Load Offer communication and displayed on the Load Offer window. Load Offer functionality is enabled for Resources that have multiple Mobile Communications devices. When sending a Load Offer you will be prompted for the mobile device to send to if more than one is available, and the load offer macro to use if more than one is available. |
Print Batched Reports |
This option allows you to print a variety of reports. Selecting the 'Printer' icon will print a Trip Manifest report (MANIFEST.RPT), whereas selecting the drop-down arrow next to the 'Printer' icon will allow you to select from other options, as follows: |
|
* Trip Manifest |
Selecting this option will print a Trip Manifest report (MANIFEST.RPT). This is the same as selecting the 'Printer' icon itself. This is the same report that TruckLoad Dispatch uses. |
|
* Delivery Receipts |
Selecting this option will print a Delivery Receipt. Note that this report is a new type (cannot use the standard 'DLVRECPT.RPT' designed for the Invoice Printing program). The Crystal used by this report MUST have the CITYD_TRIP_DETAILS table linked into the main report. (The grid is populated from this same table.) |
|
* Reports |
Selecting this option will open the Report Selection window with no default report, allowing you to select from any report available to the regular (TruckLoad) Dispatch program. |
|
* Setup Batch Reports |
@ Selecting this option will bring up the standard Report Selection screen, where multiple reports can be added into a specific Reporting Batch. |
|
* Print Batched Reports |
Selecting this option will print all of the reports in the list that is setup in the 'Setup Batch Reports' window. |
|
* Print Preview |
if this flag is checked, batched reports will preview to the screen and will need to be printed from the Preview window, if desired. If unchecked, the reports will (all) print directly to the printer without preview. This setting is saved on the individual machine, so when you open the City Dispatch program again, it will have the same setting (checked or un-checked). See the Crystal Reports Reference > Dispatch Module section of the Help File for more details regarding the Dispatch reports. |
|
View Message History |
Selecting this option will open a window detailing any messages associated with the selected Freight Bill. |
|
<Ctrl+O> |
Optimize Trip |
This option is the same function as is offered in the Dispatch program. The Trip Optimizer window offers you the ability to edit the trip legs and assign Freight Bills to be picked or dropped in whatever order required. In the case of multi terminal trips (Terminal 1 → Terminal 2 → Terminal 3), if the system finds a leg with a 'To Zone' appears on an 'I' (Interliner) or 'D' (Delivery) in term plan, or is the 'Care of Zone' for the bill, a 'Drop' will occur. |
|
Freight Bill Notes |
Selecting this button will display any notes associated with the currently selected trip or freight bill. The notes window has several of its own tabs near the bottom of the window, which are used to enter notes for the different aspects of the selected freight bill. The default tab is the billing tab, where you may enter notes relating to the billing information of the freight bill. Clicking on any of the other tabs will allow you to enter free-form notes for the container, driver, etc. |
|
View Shipping Instructions |
Displays any shipping instructions that have been attached to the client(s) included on the associated freight bill. Shipping instructions are created in the Codes Maintenance program > Shipping Instructions tab, and attached to specific clients in the Customer Profiles program > Shipping Instructions tab. |
Resend Stop List |
A user can click this button to resend the stop list when they are finished with re-sequencing of stops. A warning popup will show if the dispatcher has not clicked on this button before moving anywhere else in the Multi Mode Dispatch application. |
Filter Options

| Option | Definition |
|---|---|
P (Pickups) |
Check this flag to filter the grid by freight bills that are pickup-type bills. |
D (Deliveries) |
Check this flag to filter the grid by freight bills that are delivery-type bills. |
I (Interliner) |
Check this flag to filter the grid by freight bills that are interliner probill-type bills. |
W (WayPoints) |
Check this flag to display or hide WayPoints to allow for the planning of terminal-to-terminal trips. |
Suppress Completed |
If this option is checked, any freight bills with a status of "Completed" will not show in the grid. |
Suppress Attempts |
If this option is checked, any freight bills with a status of P01, P02, etc. (attempted/missed picks) or D01, D02, etc. (attempted/missed delivery) will not show in the grid. Attempted/missed picks and deliveries are status codes for pickup and delivery behavior that are assigned specific rules on the Codes Maintenance program > Status > Additional Rules tab to reflect a situation where the shipper arrives at a terminal and the allotted freight is not available for pick or delivery, for whatever reason. NOTE: The "P01" status code on a freight bill designates that one attempted pick has occurred ("P02" means two attempts have been made). Depending on the Status Code setup, freight bills that are set to an attempted pick/delivery status may disappear from the grid. |
Context Menu - Freight Bills tab
| Icon/Keybd | Menu Option | Definition |
|---|---|---|
<Shift+Ctrl+D> |
Toggle Design Mode |
Allows those with security permission, access to the Screen Design mode where you can create and save different layouts. See Custom Screen Design Mode and the Security Configuration program > Security > Business Events > Screen Design section. |
Select All |
Select every record displayed in the grid. |
|
<Ctrl+R> |
Clear Selection |
De-select and selected records in the grid |
<Ctrl+F> |
Full Screen |
Expands this grid to fill the whole screen view. Use <Ctrl+F> as a toggle to return to the previous view. |
<Ctrl+M> |
Unmatch Bill(s) |
This option allows a user to unmatch a bill (or several bills) to a planned trip, putting the bill(s) back to the original status (before it was matched to a trip). |
Reassign Bill(s) |
Allows you to unmatch and reassign a freight bill from one trip/trap to another trip/trap in one step. Displays a Reassign to Trip window where you enter the new trip number. |
|
Directions to Location |
Selecting this option will display the directions from the user’s default site to the zone code of the terminal site. This function requires that the Mileage Server program is running and using recognized third-party mileage software (such as PC*Miler, ProMiles or Microsoft MapPoint). |
|
Change Status |
This option allows you to change the freight bill’s status value. The status codes available from this menu are defined in the Codes Maintenance program > Status Codes tab. For example, if you change the status to 'Finish Unloading', and the freight bill is the last one on the last leg of the trip, TruckMate may ask if you are finished with the trip and if your answer is no, TruckMate will add an empty leg to the trip and change the trip status to DISPATCH. If you want to avoid this situation and just keep the trip as is, set this application configuration option in Application Configurator program > Dispatch > DISPATCH.EXE - Trip Status after Stopoff Leg to 'None'. The default value for this option is set to 'Dispatch'. |
|
Freight Bill Notes |
Selecting this button will display any notes associated with the currently selected trip or freight bill. The notes window has several of its own tabs near the bottom of the window, which are used to enter notes for the different aspects of the selected freight bill. The default tab is the billing tab, where you may enter notes relating to the billing information of the freight bill. Clicking on any of the other tabs will allow you to enter free-form notes for the container, driver, etc. |
|
View Custom Defined Fields |
Opens the Custom Defined Fields window to display and information entered into any custom fields. |
|
|
Shipping Instructions |
Displays any shipping instructions that have been attached to the client(s) included on the associated freight bill. Shipping instructions are created in the Codes Maintenance program > Shipping Instructions tab, and attached to specific clients in the Customer Profiles program > Shipping Instructions tab. |
|
Change Delivery Terminal |
Opens a small window that will allow the user to alter the freight bill’s ending zone. |
|
Set Direct |
When working with 'pick' door bills, the user can select this option to set the shipment to 'Direct' status. |
Freight Bill Routing Plan |
This option will open the Routing window, which is the same as the LTL/Routing tab in the Customer Service program, and is used to view (and alter) terminal plans, perform intermodal marketing company (IMC) functions and for LTL freight forwarding. |
|
Set Via Zone… |
Selecting this option will bring up a selection window where the user can specify an additional zone to add to the current trip. |
|
<Ctrl+Alt+D> |
Adjust Delivery Date - Late Pickup |
This option is only available if the 'SLM Calculate Delivery After Save' config option in CSERV.EXE is set to 'True'. Selecting this option will take the selected orders (selected using multi select option), and update order by setting 'Late Pickup Cutoff = True', 'set SLM_OVERRIDE = False', and recalculate 'Delivery Time'. NOTE: This option will not work if Delivery Appointment is set, Late Pickup is already set or Delivery Date cannot be calculated. |
<Ctrl_S> |
Update Stop Sequence |
Refresh the stop sequence order for the legs to reflect recent changes. |
Update Freight Bill(s) |
Refresh the information in the freight bill to reflect recent changes. |
|
<Ctrl+O> |
Optimize Trip |
This option is the same function as is offered in the Dispatch program. The Trip Optimizer window offers you the ability to edit the trip legs and assign Freight Bills to be picked or dropped in whatever order required. In the case of multi terminal trips (Terminal 1 → Terminal 2 → Terminal 3), if the system finds a leg with a 'To Zone' appears on an 'I' (Interliner) or 'D' (Delivery) in term plan, or is the 'Care of Zone' for the bill, a 'Drop' will occur. |
NEW |
Mobile Messaging |
Sub-menu includes:
|
View Intermodal Destuff FBs |
This feature, which is disabled for all freight bills except for loaded intermodal freight bills, will display all intermodal (deliveries, de-stuff, etc.) freight bills linked to that intermodal movement. |
|
Barcode Item Details |
Opens the Barcode Item Details window, in which the user can add, delete, and view barcode information. |
|
Failed PARS Processing |
If the Canadian customs CCN (Cargo Control Number) Type = ‘PARS’ this will start the Dispatch program’s Failed PARS process to mass update the Manifest From/To and Location of Goods fields as well as mass generate the new Cargo Control Number. The Pre-Arrival Review System (PARS) allows Customs Brokers to submit shipment release information (provided by the importer and carrier) to the Canada Border Services Agency (CBSA) for review and processing before the goods arrive in Canada. |
See Common Shortcut Menu Options in the Active Trips section for descriptions for these shortcut menu options common to many of the grids on the Multi Mode Dispatch window.
Special Grid Features
Here is a brief description for some of the specialty columns available in some of the Trip Details grids.
| Option | Definition |
|---|---|
Warnings |
Click here for more information about the nature of the freight bill warning icons depicted in this field. |
Late |
This field is available in the grid and indicates whether the freight bill has a status with 'Late' behavior code or not. 'True' indicates a 'Late' behavior code. |
Active Trip |
This field is also available in the grid and displays the 'Trip Number' if the freight bill is on an active leg of a trip. |
Seal # tab

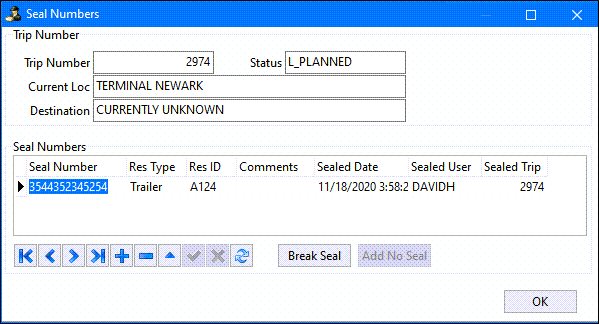
The Seal # tab provides details and status history of the seal activity that affected the currently selected trip in the Active Trips section. The grid is mainly a read-only grid with the exception the user 'Seal Numbers' field that can be edited using a right mouse click option ('Edit Seal Numbers'). This feature was added to give the user a way to edit seal numbers that are not linked to a status change.
Context Menu - Seal # tab
| Icon/Keybd | Menu Option | Definition |
|---|---|---|
Edit Seal Numbers |
Opens the Seal Numbers window which can be used to edit the seal number information and break seals.
|
See Common Shortcut Menu Options in the Active Trips section for descriptions for these shortcut menu options common to many of the grids on the Multi Mode Dispatch window.
Status History tab
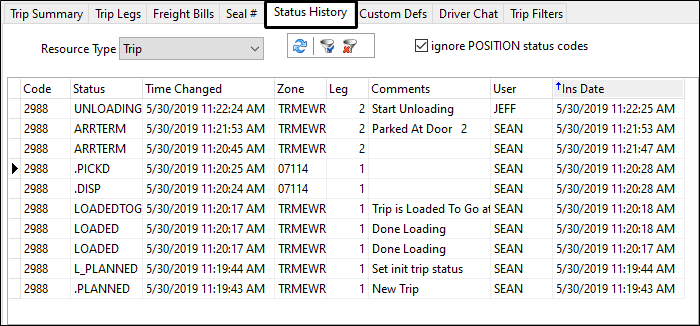
The Status History tab displays a list of the sequential status events that have occurred so far for this trip.
Custom Defs tab

The Custom Defined fields tab displays any custom defined field information. Custom Defined fields are created using the Profiles > Codes Maintenance program > Custom Defined Fields tab.
Driver Chat tab

The Driver Chat tab will display any chat text created by a mobile device associated with this trip to capture and display any driver correspondence.
Trip Filters tab
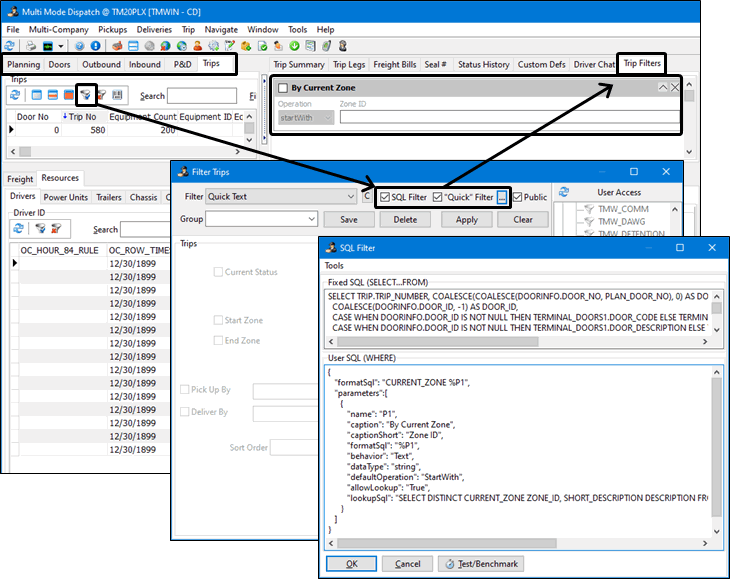
A feature available in the Multi Mode Dispatch program allows you to create and add your own collection of Quick Filters to various grids. You can display them in any combination and can activate them independently or together.

For more information, see Quick Filters.