Job Quote

The Job Quote application has been designed with recursive shipping in mind, and provides a means for Companies that need many freight bills created for a single job site to create multiple freight bills on a recursive basis. The Job Quote application is intended to be used as a way of creating a job proposal that will require work over a period of time (and that will include many trips to and from the job site- requiring multiple Fright Bills). Once this initial Quote is accepted, the Job Quote program can be used to quickly and easily create Freight Bills automatically, on a day-by-day basis, without even opening the Customer Service program.
| Security in the Job Quote application is maintained by the Security Setup program. See that documentation for a list of available security options. |
The Job Quote application is divided into four sections: the Customer Service styled Header section, where the User configures the main aspects of the Quote, the Tonnage Rates section, where the commodity(ies) used in the Quote are defined and given rating details, the Driver Pay Rules section where Driver pay details are inputted, and the User Condition section, where custom SQL can be entered into the application.
To access Job Quote:
| From this location | Go to |
|---|---|
TruckMate Menu and TruckMate Task List |
Billing > Job Quote |
Windows Start Menu |
TruckMate 20xx > Job Quote |
Windows Explorer |
C:\Program Files (x86) > TruckMate 20xx > JobQuote.exe |
Menu Bar / Toolbar
File Menu
Print Reports
 Selecting the Print Reports button will bring up the report selection window, common to many TruckMate applications. Here, you will select a report file from those available in your system and a Crystal Report will be generated.
For more information on Report functionality in TruckMate, see the Crystal Reports Reference.
Exit
 Closes the Job Quote program.
Multi-Company
For more information on the Multi-Company options available from the Menu Bar, see the Multi-Company documentation.
Navigate Menu
The Navigate Menu contains the standard TruckMate Navigation Bar that is used to browse the records in your Database, as well as the following options.
Refresh
 Select this option (or use the '<CTRL><F5>' hot key combination) to refresh all sections/grids of the Job Quote program.
This option is also available on the Toolbar.
Find
 Selecting this option opens the Select Bill window, which you can use to quickly locate a specific Job Quote in your Database by a number of criteria. You can select the 'down' arrow next to this option on the program Toolbar to select from 'Basic' or 'Advanced' searching styles.
-
Basic Search: similar to searching in other TruckMate programs. However, if using the Basic Search, after selecting 'Find', you may be presented with an Options window, which allows the user to teak the search slightly.

Closing this form by selecting the 'X' will cancel Basic Search, closing it by selecting the 'OK' button will perform search taking the following user selections into consideration:
Exclude Cancelled
Selecting this flag will exclude any Job Quotes with 'Cancelled' Status from the Search.
Currency
Use the drop-down menu to select a Currency value. Only those Job Quotes with this Currency will be included in the search.
-
Advanced Search: the Advanced Search window allows more options than the Basic Search.
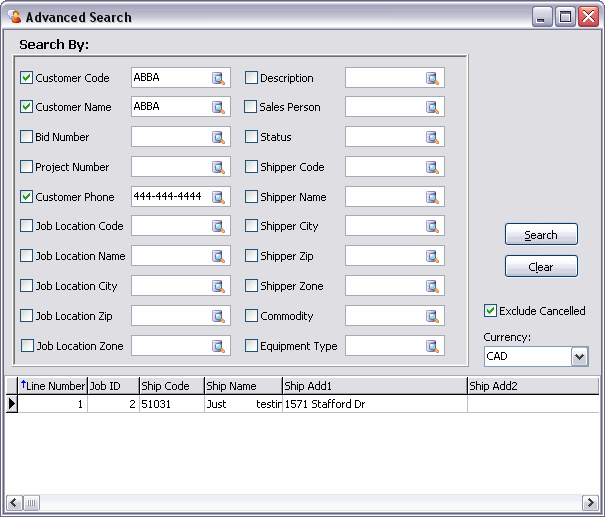
Choose any number of criteria for the search by flagging the appropriate search criterion, and then using the Database Search button to choose a value. Select the 'Search' button when ready.
Exclude Cancelled
Selecting this flag will exclude any Job Quotes with 'Cancelled' Status from the Search.
Currency
Use the drop-down menu to select a Currency value. Only those Job Quotes with this Currency will be included in the search.
Note: If you flag the 'Always start with advanced search' option under the Tools > Preferences > Display Options window, the Advanced Search will automatically appear whenever the user selects this icon.
Tools Menu
TruckMate Monitor
 Click the down arrow next to this button to access the various functions of the new TruckMate Monitor.
This option is also available on the Toolbar.
Remember Position / Size
Selecting this option will remember the window position & size upon close. When the program is re-opened, the window will appear with the same dimensions.
Refresh Security
Selecting the 'Refresh Security' option will reload the Job Quotes program with any changes that have been made to the security settings in the Security Setup program.
Setup
Selecting the 'Setup' option will open the Setup Window, which allows you to define Industry Codes for use with the Job Quote application.
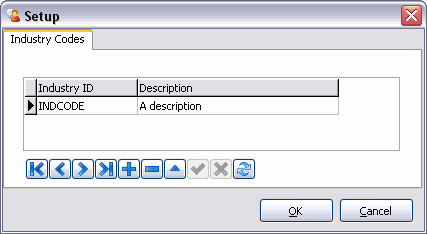
Click the '+' button on the TruckMate Navigational Bar to add a new Industry Code record.
Enter an ID Code for your new Industry Code in the 'Industry ID' field, and enter a short description in the 'Description' field.
Industry Codes are only used in the Job Quote application, and don’t really affect the usage of data- they are merely used to let the person receiving your proposal what industry your Company operates in.
Preferences
There are two sub-options in the 'Preferences' menu option:
-
Display Options
The Display Options window controls how the Job Quote program is displayed to its Users.
Show Toolbar
Like the 'Show Toolbar' option on the main Options Menu, this option will toggle the Job Quote program Toolbar on/off.
Status Bar
These two options affect the two fields at the bottom of the Job Quote program’s main window. If the 'Display the Job Quote Status' option is checked here, a field with the text 'Quote status:' will appear in the bottom left corner of the application, displaying the current status of the Quote the User is working with.
If the 'Display remaining number of uses allowed' option is checked here, the text 'Remaining number of copies allowed' will appear in the bottom left corner as well, with the remaining number of copies displayed (based on the amount you specify when 'Posting' a Quote, minus any times the Quote has previously been copied).
Cancelled Quotes
Enabling this option will tell the Job Quote application not to display any Quotes with a status of 'Cancelled' (set by the 'Cancelled' checkbox in the Header section) while the User is scrolling through the Quote records using the TruckMate Navigational Bar.
Search
Flagging the 'Always Start With Advanced Search' option will set the search window (accessed via the 'Navigate' Menu or Toolbar) to automatically display the Advanced search options, instead of the Basic search.
-
Warnings
The Warnings window controls what kind of visual and audible notices the Job Quote program presents its Users while it is being used.
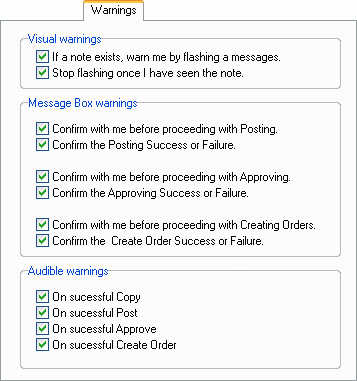
Visual warnings
These two options control how the program behaves when Note information exists. The first option, if checked, will cause the text 'See Note' to flash near the bottom of the program’s main form when a new Note exists. The second option tells the Job Quote program to stop flashing this text once a User has clicked it and read the Note.
Quote Notes are entered using the Job Quote Toolbar’s 'Note' button.
Message Box Warnings
These six options control the confirmation windows that appear while moving a Quote through the overall Job Quote process. Checking these options will provide the User with prompts that will confirm his/her choices before proceeding with Quote Posts, Approvals, and the creation of Freight Bills. If you find these windows unnecessary, un-check these options to speed up the process.
Audible warnings
The Job Quote program has been designed to provide audio queues when the User completes certain Quote tasks (Copying, Posting, Approving and Creating Orders). If you would like to hear these audio queues, select these checkbox options.
Help Menu
TruckMate Help
 Selecting this button will open the Job Quote topic in the TruckMate Online Help file (the page you are currently viewing).
Service Portal
 Selecting this button will open an instance of your default Internet browsing software, with the https://www.tmwcare.com login page displayed.
About
 Selecting this button will open the standard TruckMate About window, which contains important information about the application you are currently using, including its version number (important for support calls).
Toolbar
Find…
See the 'Navigate' Menu for more information on Basic and Advanced Searches.
Notes
![]() Clicking this button will open the Job Quotes Notes window, where you can enter free format Notes regarding the Quote you are currently working with on two different Tabs ('Collection Notes' and 'Credit Notation'). The various context menu options available in the Notes window will allow you to change the font/size of the text you are entering.
Clicking this button will open the Job Quotes Notes window, where you can enter free format Notes regarding the Quote you are currently working with on two different Tabs ('Collection Notes' and 'Credit Notation'). The various context menu options available in the Notes window will allow you to change the font/size of the text you are entering.
| When a User inputs Notes into this window for a particular Job Quote (and if the 'Visual Warnings' in the Preferences Menu are set) the text 'See Note' will appear flashing at the bottom of the main Job Quote program window. Clicking this flashing text will take the User to the Note window with the Note text displayed. |
Launch Customer Service
![]() Clicking this button will open an instance of the Customer Service program (or will switch the window focus to an already running instance).
Clicking this button will open an instance of the Customer Service program (or will switch the window focus to an already running instance).
Launch Dispatch
![]() Clicking this button will open an instance of the Dispatch program (or will switch the window focus to an already running instance).
Clicking this button will open an instance of the Dispatch program (or will switch the window focus to an already running instance).
Header Section
Styled after the Customer Service program, the Header section of the Job Quote program lets you define the Bidding information for the Job Quote.
Audit Information
Job #
This field displays the Job Quote number of the Job Quote you are currently working with. Selecting the '+' button on the TruckMate Navigation bar will populate this field with an automatically generated (sequential) integer value that will be applied to the Quote.
Created By
This field displays the User name of the person who created the displayed Job Quote. This field is uneditable and for information purposes only.
Date / Time
This field displays the date and time the Job Quote proposal was initially created. This field is uneditable and for information purposes only.
Sales Information
This section is intended to record data reflective of the nature of the proposal.
Sales Rep.
Click the search button to choose the Sales Representative that is in charge of the proposal. This field will be based on the User IDs from your system, and is optional.
Budget Amount
Enter the dollar amount that is being proposed as a budget for the project.
Currency
Click the search button to select a Currency Code from your system. This field tells the person receiving the proposal what currency the proposed budget will be in. This field defaults to the 'base currency' of your system, as configured in the Codes Maintenance program > Units Tab.
Project / Job No.
This field is optional. If your Company has given you a Project Number that will be referenced when dealing with this proposal, enter it in this field. This value is not used in any other TruckMate modules.
Customer Information
These fields of the Customer Information section apply to your Company, and behave exactly like those found in the header section of the Customer Service program. If you make any mistakes when using these options, you can use the '<Ctrl><O>' hotkey combination to erase all the data from the fields.
The four buttons in this section offer the user a way to look up a Customer Code, view specific information about a customer, or update the customer profile with the information entered in the fields address phone, and contact fields below. Using these buttons will pop-up windowes or forms that offer more information than can be displayed in the main screen area.
Customer Code
Enter the Customer Code manually or select the Customer Profiles code for the caller by clicking the 'Find' button. The information here will default according the Customer Code selected. The name and address values from the Customer & Vendor Profiles program will be used.
Find Button
![]() The 'Find' button will display a search form that displays customers configured in the Customer & Vendor Profiles program. If you have entered data in the Customer Name and Address fields, only records that match the data will be displayed. See the Customer Service program for more information.
The 'Find' button will display a search form that displays customers configured in the Customer & Vendor Profiles program. If you have entered data in the Customer Name and Address fields, only records that match the data will be displayed. See the Customer Service program for more information.
Additional Caller Info
![]() Selecting this button will opens the Client / Information Specifications pop-up form where you can view pertinent information such as the Client name, E-Mail, fax number, and opening and closing hours. See the Customer Service program for more information.
Selecting this button will opens the Client / Information Specifications pop-up form where you can view pertinent information such as the Client name, E-Mail, fax number, and opening and closing hours. See the Customer Service program for more information.
Profile Button
![]() Clicking the 'Profile' button will allow you to add or update information to the Client profile by using a Quick Entry form.
Clicking the 'Profile' button will allow you to add or update information to the Client profile by using a Quick Entry form.
LTL Delivery Options Button
Clicking the 'LTL Delivery Options' button opens a pop-up form where additional LTL Delivery information can be viewed and stored. See the Customer Service program for more information.
Phone / Fax / Cell Menu
Use the first pull-down menu to choose from either 'Phone', 'Fax' or 'Cell', and then enter the appropriate number in the field to the right. This information will appear on the proposal invoice so that whomever receives it will know how to contact your Company.
Contact / Email / Caller Menu
Use the second pull-down menu to choose from either 'Contact', 'Email' or 'Caller', and then enter the appropriate value in the field to the right. This information will appear on the proposal invoice so that whomever receives it will know who to contact for further information regarding the proposal.
Job Location
The Job Location section functions exactly as the Customer Information section above, but pertains the Job Site that the proposal is attempting to attain. There is, however, one field in addition to those outlined in the Customer Information section:
End Zone
Click the search button to select a Zone Code from those available in your system. This Zone Code tells the TruckMate system where the Job Site is located, in order for Trips to be properly dispatched to and from the location. Zone Codes are configured in the Codes Maintenance program.
Bidding Date Information
These fields relate to the Dating information of the proposal and its acceptance / rejection.
Bid Date
The date in this field represents the date that the Bid proposal was originally created, and will default to the current date. Click the icon on the right side of the field to open a calendar select form that will allow you to choose an alternate 'Bid Date'.
Bid Exp. Date
The date in this field represents the date that the Bid proposal will expire, or, in other words, the final date that your Company is willing to honour the terms of the proposal. Click the icon on the right side of the field to open a calendar select form that will allow you to choose an alternate 'Bid Expiry Date'.
Quote Exp. Date
The date in this field represents the date that the Quote will expire, or, in other words, the final date that the displayed quote details can be used to create new Freight Bills. The User may select the calendar icon within this field to revise the Expiry Date, if necessary. Users should edit this value before adding new rates to a Job Quote.
Quote Approve Date
This field will populate with a Date when the User clicks the 'Approve' button, and will let other Users viewing the
Description
This is a free-form text entry field that will allow you to enter a short description of the nature of the proposal your Company is making. Simply click within this field and enter text using your keyboard, as you would in other 'Notes' fields within TruckMate.
Program Buttons
The buttons on the right side of the program control how the proposal is moved through the Bidding process, allowing you to Approve, Print, or Copy the Bid, or Create Freight Bills based on the details of the Bid.
| Some of these buttons will be enabled/disabled depending on the current status of the proposal (i.e. the 'Approved' button will disappear after the Bid has been approved, and the 'Create Order' button will not appear until the Bid has been approved, and so on). |
Copy
Clicking the 'Copy' button will copy the details of the Quote currently displayed, as long as the Quote has some a value greater than '0' in the 'Remaining number of copies allowed' field at the bottom of the Job Quote program form. When a User clicks this button, a small warning window will appear, prompting the User for confirmation. Click 'Yes' and the Copy Quote window will appear.
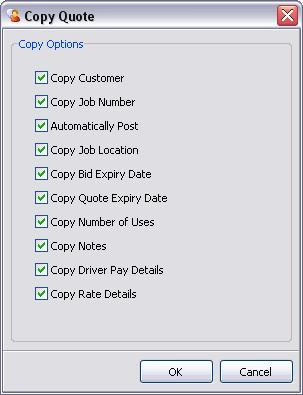
Choose the information that you would like to have copied into the new Quote and click 'OK' to copy the Quote. See the Create Order window for descriptions of these specific options.
Clicking the 'Print' button will print the details of the Bid using a Crystal Report. When a User clicks the 'Print' button, a report selection screen will appear, in which the User must choose the Crystal Report that will be used to format the printout. Once the report is selected, a report preview screen will display how the formatting is applied, and the User will have the option to print the report.
For more information on Report Functionality, see the Crystal Reports Reference on Report Functions.
Post
The 'Post' button is used to accept the initial details of the Bid and allow it to move forward in the proposal process. When a User clicks the 'Post' button, the Post Job Quote window will open with some additional options.
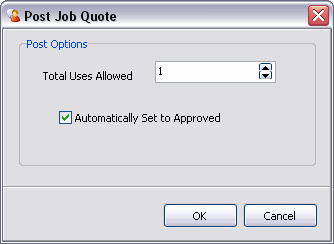
The 'Total Uses Allowed' value that the User is required to select here tells the JobQuote application how many times this Bid can be copied (when a User clicks the 'Copy' button). At the bottom of the JobQuote program’s main form, there is a section that lists the 'Remaining number of copies allowed', and then displays the value that is entered here.
As other Users use the 'Copy' button to copy this Bid, that number will decrease. When the total number of copies is used up, the 'Copy' button will be disabled for this particular Bid.
The 'Automatically Set to Approved' flag, if checked, will automatically approve all of the Bids created when this Bid is copied using the 'Copy' button. If this flag is not checked, the User will have to 'Post' and then 'Approve' each copy of this Bid separately.
Approve
Following the posting of a Bid, the 'Approve' button will be selectable, which a User can click to approve the Bid details. Clicking the 'Approve' button will display a small window that lets the User know that clicking the 'Approve' button will set the Bid’s status to 'Approved'. Click the 'OK' button to close this window and open a calendar selection menu, where you must choose an approval date.
Once a Bid has been approved, the date value you selected will be populated into the 'Quote Approved Date' field, and the 'Create Order' button will become available.
Create Order
The 'Create Order' button will create a Freight Bill, based on the details of this Bid, in the Customer Service program. When a User clicks the 'Create Order' button, the Create Loads from Quote window will display, which offers several options for controlling how the Freight Bills will be created (and what details they will contain).
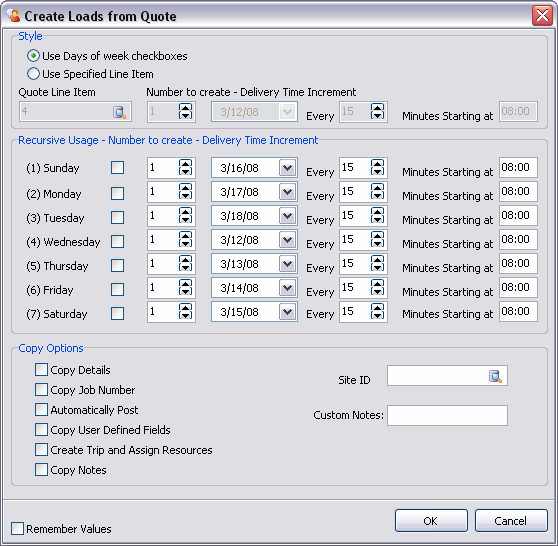
The two radio buttons in the 'Style' section control how the ensuing Freight Bills will be created. If the User selects the 'Use Days of the week checkboxes' radio option, the fields in the 'Recursive Usage - Number to create - Delivery Time Increment' section will become available; if the User selects the 'Use Specified Line Item' radio option, the fields directly below these two radio options will become available.
Use Days of the week checkboxes
Selecting this option will enable the 'Recursive Usage - Number to create - Delivery Time Increment' section, which is broken down into a number of options, divided into the days of the week (Sunday being '1' all the way to Saturday '7'). This section is used to setup automatic recursive Freight Bill creation.
For Example:
A User places a check in the checkboxes next to '(2) Monday' and '(4) Thursday'. The Date fields to the right of these checkboxes automatically default to the start of the next calendar week, but the User would like to have these Freight Bills created the following week (two weeks later), so he/she selects the dates necessary using the calendar menus. Next, the user inputs the letter '30' into the 'Time Increment' field (meaning every half an hour) and sets the 'Start Time' field to 12:00 (based on a 24 hour clock).
With these options selected, Freight Bills will be created (based on this Bid) every half an hour from Noon until Midnight on Monday and Thursday of the calendar week selected in the date field. If a User wanted to carry this functionality into the next week, or even further, he or she would merely need to copy the Bid details (using the 'Copy' button) and change the Date values here (and make sure that the 'Remember Values' flag is checked below).
Use Specified Line Item
Selecting this option will enable the 'Use Specific Line Item' section, which appears as in the following image. This section is used to setup automatic recursive Freight Bill creation based on a detail line in the Tonnage Rates section.
![]()
For Example:
A User selects a Line Item value by clicking the search button and choosing from the detail lines in the Tonnage Rates grid (in the above example the User chose line '4'). The User then limits the number of Freight Bills to be created using the next field, chooses a Date that they would like the Freight Bills to be created on, and then sets a 'Time Interval' and 'Start Time' value.
In the above example, a Freight Bill will be created on March 12, 2008, every fifteen minutes, starting at 8AM, until fifty Freight Bills have been created.
Copy Options
The options in this section control what Bid Quote information is passed into the Freight Bill in the Customer Service program. Most of these options are straightforward, but a few require further explanation:
Copy Job Number
Selecting this option will insert the 'Job Number' value as a Trace Number (B) on the Freight Bill order that is created.
Automatically Post
Selecting this option will automatically set the Freight Bill’s status to 'Posted' in the Customer Service program, eliminating an extra step.
Create Trip and Assign Resources
Selecting this option will automatically create a Trip in the Dispatch program, based on the Zone Code of the 'Customer' and 'Job Location' Zone Codes, and will assign the Resources specified in the Tonnage Rates grid detail lines.
Copy Notes
Selecting this option will copy whatever text has been entered into the 'Description' field of the Header section into the 'Notes' field in the Customer Service program.
Site ID
Click the search button in this field to select a Billing Site for the created Freight Bills. Site IDs are configured in the Codes Maintenance program > Site Tab and used to organize Freight Bills in the Customer Service program.
Remember Values
Checking this option will save all of the options the User has chosen on the 'Create Loads from Quote' window, so that the next time a User clicks the 'Create Order' button, all of the fields will be identical. This is useful for setting up a copied Quote for Freight Bill creation in the following week.
Cancelled
Placing a checkmark in this checkbox will set the Quote’s status to 'Cancelled'. When viewing a cancelled Quote, the 'Create Order', 'Copy' and 'Post' buttons are disabled, disallowing the creation of Freight Bills. If a Quote is cancelled, there will be red text at the bottom right corner of the Job Quote form that reads: "This quote has been Cancelled".
| You can also set a Preferences Menu option that will tell the Job Quote program not to display Quotes with a 'Cancelled' status when you are browsing through the Quotes in your system using the TruckMate Navigational Bar. |
Tonnage Rates Section
The Tonnage Rates section consists of the Tonnage Rates Grid, which allows you to enter more specific details concerning the Quote, such as the type of freight being shipped, the rate at which the freight will be shipped, or anything else you would like ton include.
Click the '+' button on the TruckMate Navigational Bar to add a detail line record. When you enter a value in the 'Ship Code' field by double-clicking and selecting a Customer Code from those in your system, their details will be populated automatically into the 'Address' fields, based on the information for that Client in the Customer & Vendor Profiles program.
Users are not allowed to edit the 'Rate' values on Job Quotes which have been used to create Freight Bills. To add a new tonnage rate for an existing line, the user will first highlight the line they want to generate a new entry for. In the case where there are already multiple entries, it will not matter which one is selected. The user then will select the 'Copy Tonnage' button (see more info below).
| Not all fields are required to be filled out when using the Grid- if any of the required fields are left empty, however, the program will display a warning message and tell you what fields need to be populated with data before saving. |
Effective Date / Expiry Date
These values will be used to define a unique period when a specific Tonnage 'Rate' will be used. Specifically, by adding these values users will be able to create multiple records against the same line number, indicating a series of periods and rates. These periods cannot overlap. Expiry dates cannot extend beyond the expiry date of the Job Quote itself.
Example: Note that the effective and expiry dates between ranges do not overlap. Bold record is currently effective.
| Line Number | Effective Date | Expiry Date | Rate |
|---|---|---|---|
10 |
01/01/2008 |
09/30/2008 |
$510.00 |
10 |
10/01/2008 |
03/21/2009 |
$530.00 |
10 |
04/01/2009 |
08/31/2009 |
$550.00 |
Copy Tonnage
This button will copy the existing Job Quote record into a new record using all the same values except the 'Effective Date', 'Expiry Date', and 'Rate'. These fields in the new record will default to blank. The user must then set new values before they can save the new record. As noted in the 'Effective Date / Expriy Date' description above, the new period cannot overlap an existing period.
| This option is also available from the Tonnage Rates Detail Grid as a right-click Context Menu option. |
Filter on Today
With this flag selected, only Tonnage Rates that are currently in effect will be displayed.
Record Count
The Record Count field simply displays the number of detail lines present in the Tonnage Rates Grid.
Line View Modes
There are three different ways that the User can view the records in the Tonnage Rates Grid. The user can select one of the following options, or use the <Ctrl><L> hot key combination to cycle through the view modes:
Show All
Displays all Rate records for all Line numbers. The program screen will show current rates using a normal type-face and expired or future rates using a gray type-face.
Show Current Line Number
Shows the currently effective Rate records only for the currently selected line number (default).
Show Current Rates
Shows all Rate records for the selected Line number.
Driver Pay Rules Section
The Driver Pay Rules section consists of the Pay Rules Grid, which allows you to apply Driver Pay Rules to the Job Quote you are working with. Used in conjunction with the User Condition section, you can use the Pay Rules Grid to pay your Drivers differing amounts under different circumstances.
Click the '+' button to add a Driver Rule to the Driver Pay Rules Grid. Double-click in the 'Pay Code' field to select a Driver Pay Rule from those available on your system. Many of the details in the Grid will automatically populate based on the Pay Rule information from the Driver Pay Contracts program; the fields that do not populate should be entered by the User.
Adding a new driver pay rate for an existing line will work the same way as adding a tonnage rate. See the Tonnage Rates section, above, for more information. Users will not be allowed to edit rates which have been used to create driver pay records.
Effective Date / Expiry Date
These values will be used to define a unique period when a specific Driver Pay 'Rate' will be used. Specifically, by adding these values users will be able to create multiple records against the same line number, indicating a series of periods and rates. Within the Job Quoting system driver pay rates are tied to tonnage rate line numbers, so multiple pay records may be created against the same line number for a series of periods and rates. These periods cannot overlap.
See the description of the 'Effective Date / Expiry Date' fields in the Tonnage Rates section for more information.
Show All Rules
Placing a checkmark into this checkbox will enter all the Driver Rules currently setup in your system into the Driver Pay Rules Grid, effectively adding them all to the Job Quote. Driver Pay Rules are setup in the Driver Pay Contracts program > Rules Tab.
| If the text 'A security feature is hiding the Driver Pay Rule section' appears instead of the Driver Pay Rules Grid, you (or your system Administrator) must use the Security Setup program to enable the use of this section. |
Copy Driver Pay Rules
This button will copy the selected Job Quote Driver Pay Rule into a new record using all the same values except the 'Effective Date', 'Expiry Date', and 'Rate'. These fields in the new record will default to blank. The user must then set new values before they can save the new record. As noted in the 'Effective Date / Expriy Date' description above, the new period cannot overlap an existing period.
| This option is also available from the Tonnage Rates Detail Grid as a right-click Context Menu option. |
Record Count
The Record Count field simply displays the number of Driver Pay Rules active for this Job Quote.
Line View Modes
There are three different ways that the User can view the records in the Tonnage Rates Grid. The user can select one of the following options, or use the <Ctrl><L> hot key combination to cycle through the view modes:
Show All
Displays all Rate records for all Line numbers. The program screen will show current rates using a normal type-face and expired or future rates using a gray type-face.
Show Current Rates
Shows all Rate records for the selected Line number.
User Condition Section
The User Condition section consists of a blank text field where you can enter SQL Statements for use with the Job Quote application. If you hover your mouse over the User Condition field, you will notice a pop-up description of some SQL Script. This script reads:
SELECT COUNT (*) FROM TLORDER WHERE DETAIL_LINE_ID = 1 AND
What do I enter in the User Condition field?
Any SQL that is entered into the User Condition field must take into account this SQL Statement- the User must, in effect, finish the 'WHERE' clause that is defined by this SQL Script. Users do not need to enter 'SELECT COUNT () FROM TOLORDER WHERE DETAIL_LINE_ID = 1' *as it is done automatically for them.
For Example:
The User enters: USER1 = 'X'. This will set a condition that states: "If user one is 'X' the pay rule is valid. If user one is not 'X', the pay rule is not valid".
Footer Section
CSA
Place a checkmark in the CSA box if this Freight Bill requires a CSA driver. Placing a checkmark in this box will cause the CSA column in the Dispatch program > Freight Bill Grid to display as 'True', and the 'CSA' column of the Trips Assigned grid of the Driver Call-in program will display as 'True' as well.
Service Level
Use the pull down menu to select a Service Level Code for this Quote. Service Levels tell the person receiving the proposal what kind of shipping times to expect from your Company. Service Level Codes are defined in the Codes Maintenance program.
Industry
Use this field to select an 'Industry Code' for the Quote you are working with. Industry Codes are defined in the Setup window, accessible from the Options Menu. Industry Codes are for informational purposes only, and are not used in other TruckMate applications.
| You may also see the words 'See Note' between the 'CSA' and 'Service Level' fields. This means that the Quote you are currently working with contains some User Notes. Click the flashing text to open the Notes window- see the Toolbar section below for more information on this window, including some of the options you have over how it is displayed. |