Communications Manager configuration details

Whenever a user edits the Communication Manger program’s configuration, it will be saved into the BACKUP_SETTINGS Table. Normally, the Communications Manager saves its settings to the system Registry, but if for any reason the Registry settings (or any of the .INI files for your networks) are unavailable (or corrupted) the user will be prompted to import the configuration from the BACKUP_SETTINGS Table on program startup. This also allows easily spreading a single configuration to multiple workstations.
| For detailed information on the Networks tab, see Networks Tab Details. |
Advanced Tab
The options on the Advanced Tab are only available to users on the Shaw Tracking network.
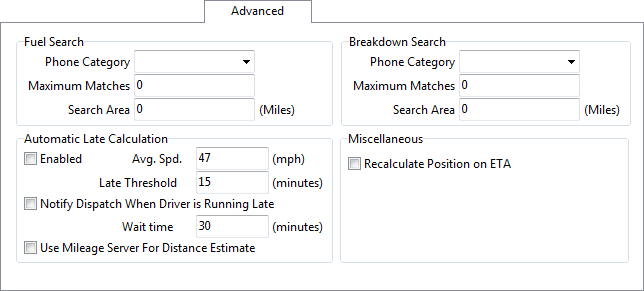
Fuel Search
In the Communications Macro Setup program, you can configure a Return macro that the Driver can use to query the TruckMate database for information about the nearest fueling facility. The pertinent return macro field type is 'Free Form Text', and the return action is 'Request Fuel Search'. When a Driver sends a macro that contains this field, the records from the Contacts and Phone program are searched based on the criteria specified here. Then, a Forward macro is sent to the Driver that contains the information that was requested, based on the criteria below.
Phone Category
In the Contacts and Phone program, you can assign Categories to individual records. For example, you could create records for all your card lock fuel locations, and assign to them the category 'CARDLOCK'. Then, in this field, select the category 'CARDLOCK' to filter the records in the Contacts and Phone program that will be automatically sent to the Driver in response to his return macro.
Maximum Matches
Enter the maximum number of records that you wish to send to the Driver in response to his return macro.
Search Area
In the Contacts and Phone program, you can assign a Latitude and Longitude positions to records. These must be in the format of hours, minutes, seconds, and position, such as '0510215N'. (Note that you can use third-party mileage software, such as PC*Miler, to determine longitude and latitude values.) When a Driver sends a return macro with a request for a fuel search, his current position is compared against the latitude and longitude positions assigned to the records in the Contacts and Phone program. The closest geographical matches will be included in the reply to the Driver.
Breakdown Search
In the Communications Macro Setup program, you can configure a Return macro that the Driver can use to query the TruckMate database for information about the nearest repair facility. The pertinent return macro field type is 'Free Form Text', and the return action is 'Request Breakdown Search'. When a Driver sends a macro that contains this field, the records from the Contacts and Phone program are searched based on the criteria specified here. Then, a Forward macro is sent to the Driver that contains the information that was requested, based on the criteria below.
Phone Category
In the Contacts and Phone program, you can assign Categories to individual records. For example, you could create records for all your repair locations, and assign to them the category 'REPAIR'. Then, in this field, select the category 'REPAIR' to filter the records in the Contacts and Phone program that will be automatically sent to the Driver in response to his return macro.
Maximum Matches
Enter the maximum number of records that you wish to send to the Driver in response to his return macro.
Search Area
In the Contacts and Phone program, you can assign a Latitude and Longitude positions to records. These must be in the format of hours, minutes, seconds, and position, such as '0510215N'. (Note that you can use third-party mileage software, such as PC*Miler, to determine longitude and latitude values.) When a Driver sends a return macro with a request for a breakdown search, his current position is compared against the latitude and longitude positions assigned to the records in the Contacts and Phone program. The closest geographical matches will be included in the reply to the Driver.
Automatic Late Calculation
Enabled
If this box is checked, the Communication Manger program will analyze position updates received from remote units and attempt to determine if the trip to which the Power Unit is assigned (in the Dispatch program) is late. The system will look at the Active Leg to which the Power Unit is currently assigned. Using the Latitude and Longitude value that is configured for the 'Leg To' zone (in the Codes Maintenance program, or using the Latitude and Longitude Update program), the system will calculate the distance between the unit’s current position and the Leg To zone. Then, using the value entered in the Avg. Speed field, the system will calculate the expected time that will be required to reach the Leg To zone. If that time exceeds the leg’s Deliver By time, the trip’s status will be changed to the Default for Category for the 'Late' Code Behavior (as configured in the Codes Maintenance program).
Avg Speed
Enter the average speed that the Power Unit travels. This value is used in the late calculation described above.
Late Threshold
Enter a numerical 'buffer' value in this field. For example, if the value in this field was 30, and the trip was calculated to be 15 minutes late, the trip’s status would not change.
Notify Dispatch when Driver is Running Late
If this box is checked a new message will be created for the users on the Distribution List informing them that the Driver is running late. If this box is not checked, the trip status will be changed by no message will be generated.
Use Mileage Server for Distance Estimate
If this box is not checked, latitude and longitude values are used to calculate distances. If this box is checked, the Mileage Server program will be used to interface with your third party mileage software, and thus determine distances based on available routes rather than simply by latitude and longitude.
Miscellaneous
Recalculate Position on ETA
When this box is checked, the Communications Manager program will update the estimated time of arrival (ETA) in the Dispatch module whenever a position report is received from a remote mobile device. This will lead to much more accurate ETAs in the system. When this box is not checked (standard behavior), ETA calculations are made whenever a trip leg status update is made in Dispatch.
Auto Reply Tab
The Auto Reply Tab allows you to setup and configure the Auto Reply options used in the Communications Manager program.
Feature Enabled
In order to use the Auto-Reply functionality of Communication Manger, you must check this option checkbox.
Rule Enabled
This option controls the 'Enabled' field for the Rule ID detail lines in the Grid near the bottom of this Tab.
Description
Enter an Auto-Reply Rule Description.
Network
Use the pull down menu to select the Software Network that you are currently Using.
Trigger
Use the pull down menu to select the event which will Trigger the creation of an Auto-Reply Message.
Value
Enter a value in the space provided.
Send Freeform Message
Selecting this option will create 'Freeform' text messages to be automatically sent whenever the Trigger event occurs. Type the text you wish the Message to consist of in the space provided directly below this option.
Send Macro Message
If you would like your automatic Messages to be based on a specific Macro, use the pull down menu to select the Macro you wish to use. Macros are set up in the Communications Macro Setup program.
Direction Parsing Rules Tab
The Direction Parsing Rules Tab is used to break down the Mapping directions from third party Mileage software (such as PC*Miler and ProMiles) into tags that can be then interpreted by various Mobile Communications Networks. With this feature, you can interpret (or parse) very complicated directions returned from your software into simpler, shorter messages, saving you money if your Mobile Communications is charged on a per-character basis.
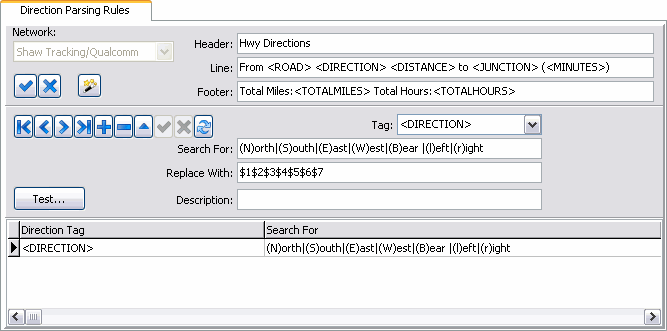
Basically, this Tab has two parts. The first part works behind the scenes and breaks down the map directions from third party mapping software into discrete sections called 'Tags'. Some of these tags are <DIRECTION>, <ROAD>, <JUNCTION> and <DISTANCE>. The second part takes these tags and combines them into a form suitable for a specific network.
-
The first step is to put the Tags in the correct order. This is done by the 'Header', 'Line' and 'Footer' format strings.
-
The next step is to define the rules that govern how each tag is modified. For instance, you could have a rule that says only show the first 10 letters of the tag. Select the 'Test…' button to open the Regular Expression Tester window.
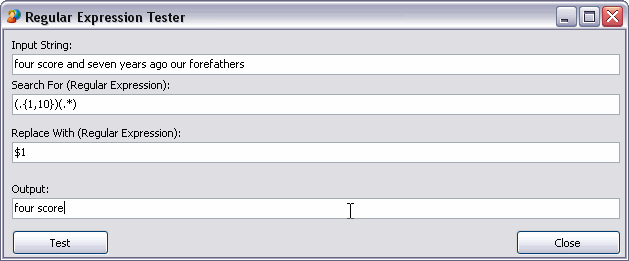
The 'Search For…' and 'Replace With…' functions for each Tag are quite powerful because they use regular expressions. Rather than define exact matches to search for, you can define patterns. You can then use the matched pattern to build the replaced string.
In the above example, the search pattern is (.\{1,10})(.*)
This means, look for two groups. The first group has 10 letters and the second group has the rest. The replace pattern is $1. This simply means "show the first group only".
But simple exact matches will work as well. For instance, there can be a rule that replaces "Coquihalla" with "Coq.".
Each network has one set of header, line and footer strings plus an unlimited number of rules. You can have more than one rule for the same tag as well….they are simply executed in sequence.
Direction Parsing Rule Wizard
Select the Direction Parsing Rules Wizard button to open the Direction Parsing Rules wizard, which will guide the user through the process of creating a Direction Parsing rule.
-
On the first screen, select the Mobile Communications 'Network' that you wish to configure a Direction Parsing rule for. Select 'Next'.
-
Using the information on the left-side help window, enter the 'Header', 'Line' and 'Footer' values. You can use the 'Load Default Values' button to see how these fields should be configured. When done, select 'Next'.
-
Using the information on the left-side help window, configure the rules for each of the tags you wish to use in the Direction Parsing Rule:
-
Select a tag from the 'Rule applies to this tag' drop-down menu.
-
Configure the 'Search For', 'Replace With' and 'Description' values for the rule on the tag.
-
You can use the 'Test Rule?' button to open the Regular Expression Tester window, which will allow you to simulate how the rule will play out when in use.
-
If satisfied with the tag rule, select the 'Save this Rule' button. The 'Rules Saved for this Network' field will automatically update.
-
Select 'Next'.
-
-
The next page allows you to review the rules that have been added to all of the tags for this Network. You can use the 'Move Up' and 'Move Down' buttons to change the order in which a rule occurs, or you can use the 'Delete Selected Rule' button to remove certain rules from the Network.
-
Select the 'Accept Rules' button to apply the Direction Parsing rules and return to the main tab.
Distribution Tab
The Distribution Tab is used to identify the users (as configured in the Security Setup program) who should receive incoming messages. The users selected here will be notified of incoming messages.
| The Application Configurator program > DCALL.EXE section has an option called 'Batch Read Messages' that will disable the new message notification for other users on the Distribution List as soon as one user reads the new message. |
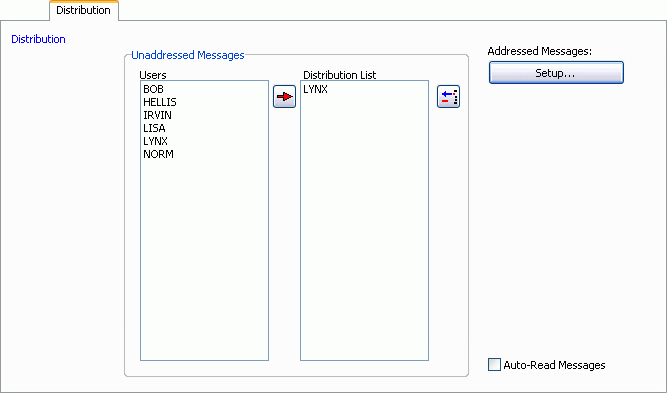
Unaddressed Messages
Choose which Users you would like to give access to the Unaddressed Messages that your system receives. Simply select the User you would like to add to the 'Distribution List' section and click the 'Right' arrow to add them.
Auto-Read Messages
Place a checkmark in the box provided if you wish to mark interpreted incoming messages as 'Read'.
Addressed Messages Setup
Selecting the 'Setup' button will allow users to create group distribution lists.
After selecting the 'Setup' button from the previous screen, you can view the Distribution Group Setup window. Create a new group name, and add users to the group distribution list.
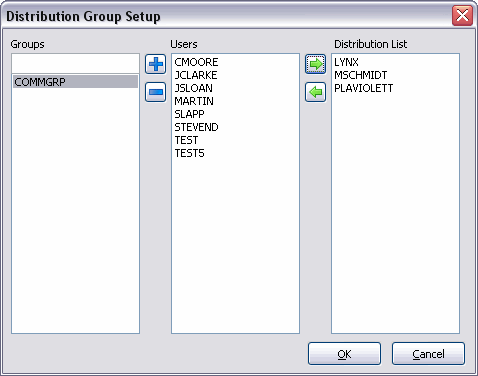
Use the '+' sign to add a new group name, and then highlight a member’s name and use the right facing red arrow (![]() ) to move a user into the distribution list.
) to move a user into the distribution list.
Driver Error Messages Tab
The Driver Error Msgs Tab allows you to configure which Error messages are automatically sent to your Drivers when they are encountered by the Communications Manager. These messages are auto-added to the MESSAGE_FORWARD Table and then are processed in order they occur.
| To enable this functionality, you must enable the 'Echo Interpretation Errors to Drivers' flag on the Config > General Tab. |
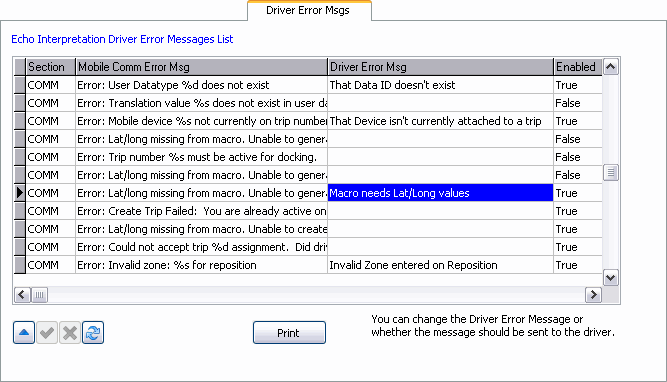
For all of the possible 'Mobile Comm Error Msg' values, you can enter a custom error message that will be sent to your Driver instead by entering text into the 'Driver Error Msg' field (as in the above example). You can then set that error message to 'True' or 'False': if 'True', whenever the Comm error is encountered, the custom Driver error message will be added into the MESSAGE_FORWARD Table for distribution to the Driver. If set to 'False', when a specific Comm message is encountered, the Driver will not be messaged.
| If a detail line is set to 'True' yet does not contain a custom 'Driver Error Msg' field value, the original comm error (the text in the 'Mobile Comm Error Msg' field) will be sent instead. |
By carefully configuring which messages you wish to send your Drivers, you can keep them informed while saving money on unneeded communications.
Selecting the Print button will print a list of all the 'Mobile Comm Error Msgs' and their custom 'Driver Error Msg' equivalents.
Driver Notify Status Tab
The Driver Notify Status Tab allows you to configure which Notify Status messages are automatically sent to your Drivers when they are encountered by the Communications Manager. These messages are auto-added to the MESSAGE_FORWARD Table and then are processed in order they occur.

For all of the possible 'Mobile Comm Notify Msg' values, you can enter a custom notify message that will be sent to your Driver instead by entering text into the 'User Notify Msg' field (as in the above example). You can then set a notify message’s 'Enabled' value to 'True' or 'False':
-
If 'True', whenever the notify message occurs, the custom Driver notify message will be added into the MESSAGE_FORWARD Table for distribution to the Driver.
-
If set to 'False', when a specific notify message is encountered, the Driver will not be messaged.
| If a detail line is set to 'True' yet does not contain a custom 'User Notify Msg' field value, the original comm message (the text in the 'Mobile Comm Notify Msg' field) will be sent instead. |
By carefully configuring which messages you wish to send your Drivers, you can keep them informed while saving money on unneeded communications.
General Tab
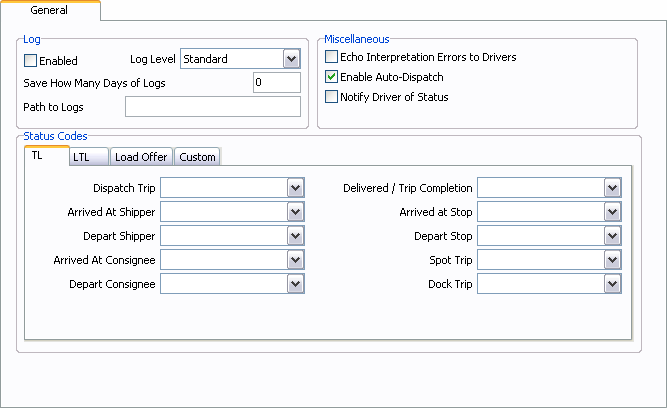
The General Tab is divided into the following areas: 'Logging Options', 'Miscellaneous Options', and 'Status Code Mapping Options'. 'Logging options' control how the program captures the activity scrolling by in the main program screen so that you (or Trimble Transportation Support) can review how the communications manager is performing. 'Miscellaneous' options control some special functions that the communications manager can perform at the same time as it is processing outbound and inbound data. The 'Status Codes' options control how the program interprets return actions embedded in returning macro messages.
Log
Enabled
Check this box if you wish to store the entries that appear in the Activity Log Grid on the main Communications Manager screen in a text file.
Log Level
Select the logging detail level required: 'None' (no logging), 'Error' (log errors only), 'Warning' (log warnings only), 'Standard' (log successes, warnings and errors) or 'Debug' (logs all commands sent by the system).
Save How Many Days of Logs
Old log files will be deleted based on the number of days specified here.
Path to Logs
Enter the path to the location where you want the log files to be stored.
| When saving Communications Manager Log files, it is best to save them on the local hard drive rather than a Network share. This helps maintain logging consistency if the Network share is disconnected. |
Miscellaneous
Echo Interpretation Errors to Drivers
When this option is turned on, the Communications Manager will send out a Forward Message to the Driver detailing any error(s) encountered. Because sending out all Error Messages to Drivers can be very costly, this flag now sends only those error messages set to 'True' on the Driver Error Msgs Tab.
Enable Auto-Dispatch (Automatic Dispatching)
Allows a Driver to accept a load offer while on an existing trip. When enabled, multiple load acceptances will be accepted by the system. When the flag is turned on, a pop-up message will appear to offer the user 2 options:
-
Select 'Enable All' to enable all the mobile devices to have Auto-Dispatch enabled.
-
Select 'Cancel' to leave the settings as they are currently, and manually enable the required mobile devices to have Auto-Dispatch in the Mobile Device Maintenance program.
Additionally, new fields have been added to the Dispatch Trip Grids entitled: 'Load Offer Status' and Load Offer Sequence'. Load offer status options will be offered, read, accepted, declined, active, or completed. The load offer sequence will be system generated when the load offer is generated. For more information, refer to the Dispatch program.
| This setting enables both Auto Dispatch 1.0 (more info) and Auto Dispatch 2.0 (more info), though the latter also requires the Application Configurator program > COMMGR.EXE > 'Use Auto Dispatch 2.0' option to be set to 'True'. |
Notify Driver of Status
Place a checkmark in the box provided if you wish to notify the Driver of any status changes via their mobile communications device.
Status Codes
The Status Codes Tab offers configuration options for the following: 'TL', 'LTL', 'Load Offer', and 'Custom'.
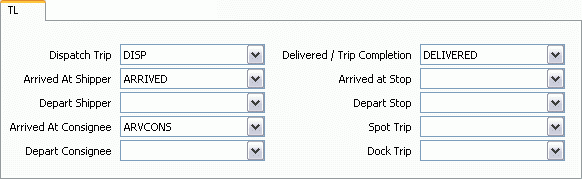
TL Tab
The TL status codes are used to assign status changes to trips. This is the same as manually updating a trip status in the Dispatch program. When you create macros in the Communications Macro Setup program, you can configure return macros to update the status of a trip when the macro is received and processed by the Communication Manager program. The status codes configured on this tab are assigned to the trip.
For example, in the Communications Macro Setup program, you could create a macro with the Return Action of 'Arrived Consignee'. When the Communication Manager program processes a macro that contains this return action, it will assign the status code specified in the Arrived at Consignee field to the trip. You do not have to specify status code equivalencies for all the fields shown; you only need to do so for those fields that you will use in the Communications Macro Setup program. However, it does no harm to specify codes for all the fields. If no macros use those fields, the equivalency will never be used.
Dispatch Trip
Only status codes with the behavior of 'Dispatch' (as configured in the Codes Maintenance program) are available for selection in this field. The status code selected here will be assigned to the trip when a return macro containing the Return Action of 'Dispatch ' is processed.
Arrived at Shipper
Only status codes with the behavior of 'Pick Up' (as configured in the Codes Maintenance program) are available for selection in this field. The status code selected here will be assigned to the trip when a return macro containing the Return Action of 'Arrived Shipper ' is processed.
Depart Shipper
Only status codes with the behavior of 'Dispatch' (as configured in the Codes Maintenance program) are available for selection in this field. The status code selected here will be assigned to the trip when a return macro containing the Return Action of 'Depart Shipper ' is processed.
Arrived at Consignee
Only status codes with the behavior of 'Dispatch' or 'Pick Up' (as configured in the Codes Maintenance program) are available for selection in this field. The status code selected here will be assigned to the trip when a return macro containing the Return Action of 'Arrived Consignee ' is processed.
Depart Consignee
Only status codes with the behavior of 'Dispatch' (as configured in the Codes Maintenance program) are available for selection in this field. The status code selected here will be assigned to the trip when a return macro containing the Return Action of 'Depart Consignee ' is processed.
Delivered / Trip Completion
Only status codes with the behavior of 'Delivery' (as configured in the Codes Maintenance program) are available for selection in this field. The status code selected here will be assigned to the trip when a return macro containing the Return Action of 'Completed Current Trip ' is processed.
Arrived at Stop
Only status codes with the behavior of 'Dispatch' or 'Terminal' (as configured in the Codes Maintenance program) are available for selection in this field. The status code selected here will be assigned to the trip when a return macro containing the Return Action of 'Arrived Stop ' is processed.
Depart Stop
Only status codes with the behavior of 'Dispatch' or 'Terminal' (as configured in the Codes Maintenance program) are available for selection in this field. The status code selected here will be assigned to the trip when a return macro containing the Return Action of 'Depart Stop ' is processed.
Spot Trip
Only status codes with the behavior of 'Spotting' (as configured in the Codes Maintenance program) are available for selection in this field. The status code selected here will be assigned to the trip when a return macro containing the Return Action of 'Spot Trip ' is processed.
| The Communications Manager has the ability to 'Spot Load' to a Zone Code or a Client Code. When a Spotload has been applied at the Client via the Dispatch program. The next load offer to a different Driver will have the current address of the Spotloaded trip- not the pickup location of the previous Freight Bill that has already been picked up. However keep in mind that when Spotloading to a zone, (i.e. to a trailer park or on the side of the road,) that this functionality will not work, as TruckMate cannot know what the address is for those locations. |
Dock Trip
Only status codes with the behavior of 'Docked' (as configured in the Codes Maintenance program) are available for selection in this field. The status code selected here will be assigned to the trip when a return macro containing the Return Action of 'Dock ' is processed.
LTL/Freight Based Tab
The LTL status codes are used to assign status changes to Freight Bills. This is the same as manually updating a Freight Bill’s status in the Drill Down screen of the Dispatch program. When you create macros in the Communications Macro Setup program, you can configure return macros to update the status of a Freight Bill when the macro is received and processed by the Communication Manager program. The status codes configured on this tab are assigned to the Freight Bill.
For example, in the Communications Macro Setup program, you could create a macro with the Return Action of 'LTL Cancel'. When the Communication Manager program processes a macro that contains this return action, it will assign the status code specified in the Cancel field to the Freight Bill. You do not have to specify status code equivalencies for all the fields shown; you only need to do so for those fields that you will use in the Communications Macro Setup program. However, it does no harm to specify codes for all the fields. If no macros use those fields, the equivalency will never be used.
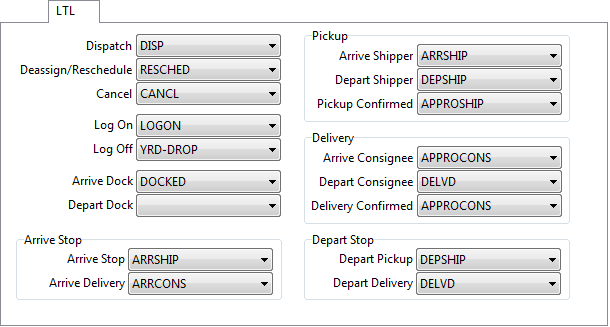
Dispatch
Only status codes with the behavior of 'Docked' (as configured in the Codes Maintenance program) are available for selection in this field. The status code selected here will be assigned to the Freight Bill when a return macro containing the Return Action of 'LTL Dispatch ' is processed.
Deassign / Reschedule
Only status codes with the behavior of 'Availability' (as configured in the Codes Maintenance program) are available for selection in this field. The status code selected here will be assigned to the Freight Bill when a return macro containing the Return Action of 'LTL Deassign ' is processed.
Cancel
Only status codes with the behavior of 'Cancel' (as configured in the Codes Maintenance program) are available for selection in this field. The status code selected here will be assigned to the Freight Bill when a return macro containing the Return Action of 'LTL Cancel ' is processed.
Log On
Only status codes with the behavior of 'Assignment' (as configured in the Codes Maintenance program) are available for selection in this field. The status code selected here will be assigned to the Freight Bill when a return macro containing the Return Action of Log On is processed.
Log Off
Only status codes with the behavior of 'Docked', 'Arrive At Dock' and 'Spotting' (as configured in the Codes Maintenance program) are available for selection in this field. The status code selected here will be assigned to the Freight Bill when a return macro containing the Return Action of Log Off is processed.
Arrive Dock
Only status codes with the behavior of 'Docked' (as configured in the Codes Maintenance program) are available for selection in this field. The status code selected here will be assigned to the Freight Bill when a return macro containing the Return Action of Arrive Dock is processed.
Depart Dock
Currently there are no status codes for selection for this Return Action.
Arrive Stop Section
-
Arrive Stop
Only status codes with the behavior of 'Arrive Shipper' (as configured in the Codes Maintenance program) are available for selection in this field. The status code selected here will be assigned to the Freight Bill when a return macro containing the Return Action of Arrive Stop is processed.
-
Arrive Delivery
Only status codes with the behavior of 'Arrive Consignee' (as configured in the Codes Maintenance program) are available for selection in this field. The status code selected here will be assigned to the Freight Bill when a return macro containing the Return Action of Arrive Delivery is processed.
Pick-up Section
-
Arrive Shipper
Only status codes with the behavior of 'Dispatch' or 'Pick Up' (as configured in the Codes Maintenance program) are available for selection in this field. The status code selected here will be assigned to the Freight Bill when a return macro containing the Return Action of 'LTL Arrive Shipper ' is processed.
-
Depart Shipper
Only status codes with the behavior of 'Dispatch' or 'Pick Up' (as configured in the Codes Maintenance program) are available for selection in this field. The status code selected here will be assigned to the Freight Bill when a return macro containing the Return Action of 'LTL Depart Shipper ' is processed.
-
Pickup Confirmed
Only status codes with the behavior of 'Arrive Shipper', 'Arrive Consignee', and 'Other' (as configured in the Codes Maintenance program) are available for selection in this field. The status code selected here will be assigned to the Freight Bill when a return macro containing the Return Action of 'Pickup Confirmed' is processed.
Delivery Section
-
Arrive Consignee
Only status codes with the behavior of 'Dispatch' or 'Pick Up' (as configured in the Codes Maintenance program) are available for selection in this field. The status code selected here will be assigned to the Freight Bill when a return macro containing the Return Action of 'LTL Arrive Consignee ' is processed.
-
Depart Consignee
Only status codes with the behavior of 'Dispatch' or 'Pick Up' (as configured in the Codes Maintenance program) are available for selection in this field. The status code selected here will be assigned to the Freight Bill when a return macro containing the Return Action of 'LTL Depart Consignee ' is processed.
-
Delivery Confirmed
Only status codes with the behavior of 'Arrive Shipper', 'Arrive Consignee', and 'Other' (as configured in the Codes Maintenance program) are available for selection in this field. The status code selected here will be assigned to the Freight Bill when a return macro containing the Return Action of 'Delivery Confirmed' is processed.
Depart Stop Section
-
Depart Pickup
Only status codes with the behavior of 'Arrive Shipper' (as configured in the Codes Maintenance program) are available for selection in this field. The status code selected here will be assigned to the Freight Bill when a return macro containing the Return Action of Depart Pickup is processed.
-
Depart Delivery
Only status codes with the behavior of 'Depart Consignee' (as configured in the Codes Maintenance program) are available for selection in this field. The status code selected here will be assigned to the Freight Bill when a return macro containing the Return Action of Depart Delivery is processed.
Load Offer Tab
In the Dispatch program, there is a right mouse option in the Trip Grid that is used to send a load offer macro to the Driver assigned to the trip. You can configure status updates that will be automatically assigned to the Freight Bill on the trip based on the load offer macro and on the Driver’s replies. The macro that is used as the default Load Offer forward macro is configured in the Communications Macro Setup program.
| The statuses on this tab will only be applied to Freight Bills, and not to trips. |
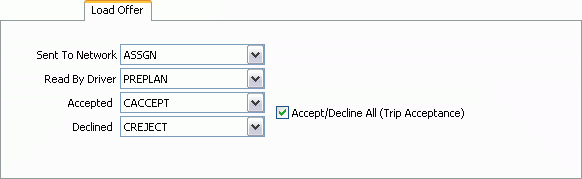
Sent to Network
When the load offer macro is processed by the Communication Manager program, the status code selected in this field will be assigned to the Freight Bill. Only status codes of the 'Assignment' behavior type (as configured in the Codes Maintenance program) are available for selection in this field.
Read by Driver
When the Driver reads the load offer macro, the status code selected in this field will be assigned to the Freight Bill. Note that in order to enable this function, the Return Receipt option must be enabled on the Cancom or AMSC tab (depending on the communication network you are using). This option is not available on the HighwayMaster network. Only status codes of the 'Assignment' behavior type (as configured in the Codes Maintenance program) are available for selection in this field.
Accepted
When the Driver sends a 'load acceptance' macro, the Communication Manager program will update the Freight Bill’s status with the status code specified in this field. Only status codes of the 'Assignment' behavior (as configured in the Codes Maintenance program) are available for selection.
| Trip statuses do not change until the first status code of the 'Dispatch' or 'Pick Up' Code Behavior is assigned to the trip. |
Declined
When the Driver sends a 'load declined' macro, the Communication Manager program will update the Freight Bill with the status code specified in this field. Only status codes of the 'Assignment' behavior (as configured in the Codes Maintenance program) are available for selection.
Accept / Decline All (Trip Acceptance)
If this box is checked, all Freight Bills on the offered trip will be updated to the Accepted or Declined status when the Driver accepts or declines one of the Freight Bills.
Custom Tab
The Custom Status Codes are used to assign status changes to the 'LTL' and 'TL' Custom Defined fields of Freight Bills. This is the same as manually updating a Freight Bill’s Custom Defined Status Codes.
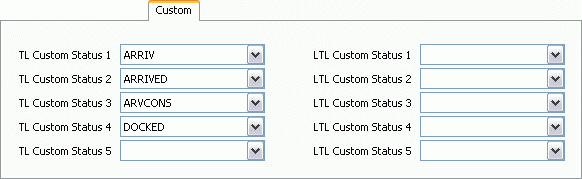
TL Custom Status 1 - TL Custom Status 5
Use the drop down menu to select the Status Code that will be used when Updating the TL Custom Defined Status Code fields.
LTL Custom Status 1 - LTL Custom Status 5
Use the drop down menu to select the Status Code that will be used when Updating the LTL Custom Defined Status Code fields.
Pool Settings Tab
The Pool Settings Tab allows Drivers to request a pickup trace number on-demand by sending a 'Generate Pickup Number' macro. The trace number is assigned to the currently active bill on the Driver’s current trip. A trace number is added to the POOLED_ORDERS table when a bill is added to a pool. The two are not linked to each other until the Driver requests a pickup trace number.
Allow Pickup Number Generation
Check this checkbox to use automatic Pickup Number Generation for Pooled Loads.
Trace Number Type for Pickup Number
Use the pull-down menu to select which Trace Number (from the original Freight Bill) will be used when automatically generating the Pickup Number for the Pooled Load.