Company Profiles

The Company Profiles program allows you to quickly define multiple companies with an easy-to-use graphical interface. This program is where you will define the various Company Entities (and Company organization) used in the Multi-Company functionality.
To access Company Profiles:
| From this location | Go to |
|---|---|
TruckMate Menu and TruckMate Task List |
Profiles > Company Profiles |
Windows Start Menu |
TruckMate 20xx > Company Profiles |
Windows Explorer |
C:\Program Files (x86) > TruckMate 20xx > Company.exe |
Layout of the Company Profiles window
The Company Profiles program allows you to quickly define multiple companies with an easy-to-use graphical interface. This program is where you will define the various Company Entities (and the Company organization and hierarchy) used in the Multi-Company functionality.
Menu and toolbar options
This topic describes menu and toolbar options and functionality that are specific to the Company Profiles window.
For information about common menu and toolbar options (i.e. File menu, Refresh, Multi-Company, etc.), see General menu and toolbar options in TruckMate basics.
Window Menu
GL Chart of Accounts
![]() Selecting this option will open an instance of the GL Chart of Accounts program.
Selecting this option will open an instance of the GL Chart of Accounts program.
Organizational Setup
![]() Selecting this option will open the Organizational Setup window.
Selecting this option will open the Organizational Setup window.
Navigation Bar and Tabs
This navigation bar allows users to display and edit existing company profiles, and create new ones.
Do not show inactive companies
Checking this box will prevent inactive company profiles from being displayed.
Active
If this is flagged, it will set the currently selected company profile to Active status. If this is unflagged, it will set the currently selected company profile to Inactive status. An active Company ID can be used when logging into TruckMate applications, while an 'Inactive' Company (when this flag is not checked) cannot.
The Company Profiles application is divided into several tabs.
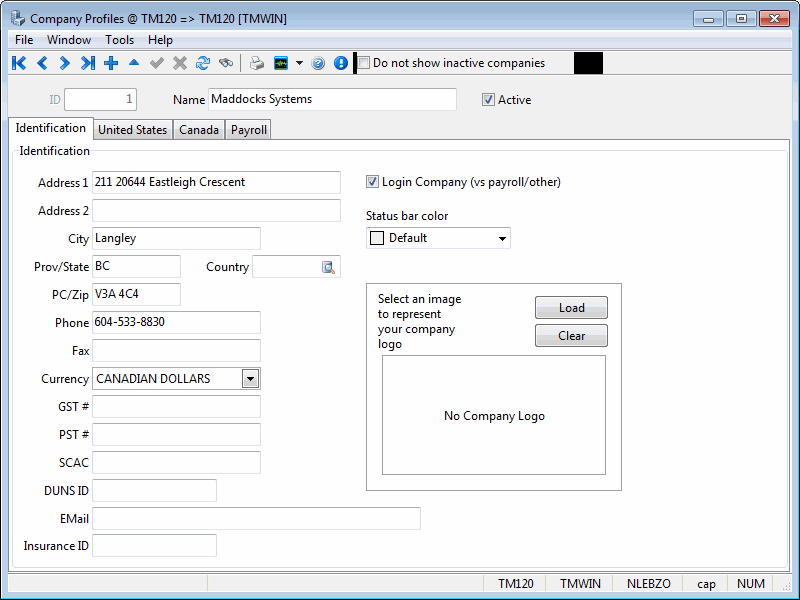
Identification Tab
The Identification tab contains text fields where you may enter all the appropriate information pertaining to your company. Entering this information into Company Profiles is as simple as clicking inside the field and entering the information.
Enter all the relevant information for the Company Code in the fields provided, following is a description of some of the available fields in the form.
Login Company
When the 'Login Company' flag is checked, the selected Company will appear in the 'Company' drop-down when logging in to any TruckMate application. However, in some cases, a Company is created simply for payroll or other purposes (i.e. it is not for a regular Multi-Company Company). In this case, to prevent users from logging into the Company, the 'Login Company' flag can be un-checked.
Note: This flag will default to 'True' when the User creates a new Company record. A user cannot uncheck this flag for all Companies in the database.
Status Bar Color
This drop down list allows the user to select a color which will be used by TruckMate as the default color of the status bar panels of all programs whenever this company is selected. This gives the user continuous awareness of which is the currently selected company, especially when juggling several windows for different companies at the same time.
Load
The load button allows you to select an image to represent your company. Currently the only supported image file formats are .BMP and .JPG/.JPEG formats, and the file size limit is set at 100K (100,000 bytes).
Note: The image field will not resize the bitmap, so a recommended size is (in pixels): 250w x 120h.
Clear
The 'Clear' button removes the image currently associated with the company.
Currency
The Currency code value selected in this drop-down will become the 'base' currency for the Company currently being edited. This value may be unique to each Company, and will affect all functional calculations in TruckMate for that Company. If no value is chosen in this field (blank), the selected Company will use the global 'base' currency value defined in the Codes Maintenance program > Units Tab.
Note: If using a multi-currency setup, you may have to define unique exchange rates for each of your Companies on the GL Chart of Accounts program > Currency Tab.
GST # / PST #
Enter the Goods and Services Tax number and the Provincial Sales Tax number in these two fields.
SCAC / DUNS ID
Enter the SCAC (Standard Carrier Alpha Code) and the D-U-N-S (Data Universal Numbering System) in those two fields.
Insurance ID
This ID is the id used for insurance information web services.
United States Tab
The United States Tab is used to configure 'Federal Business Number (EIN)' as well as 'State ID Numbers' for the States in which your company operates, for use in other TruckMate modules.
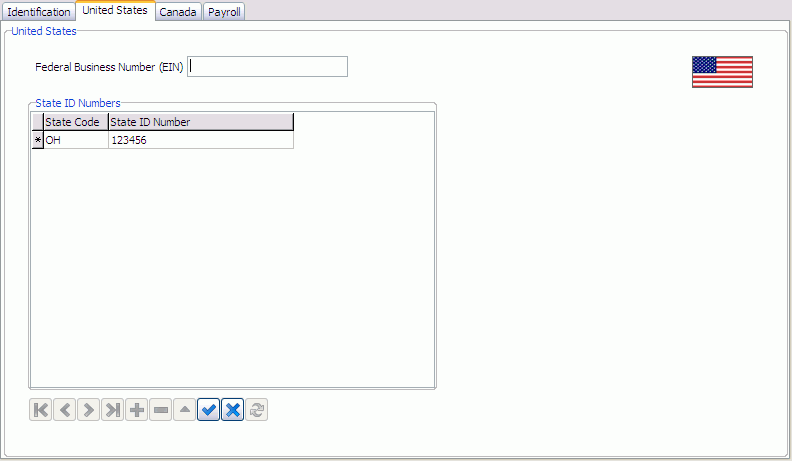
State Code
Here you may manually enter a two letter US State Code, or click the search button for a generated list of States available.
State ID Number
Here you may enter the 'State ID Number' that your company uses for each State.
Note: If your company is registered in both Canada and the United States, you may enter both the 'Federal Business Number (EIN)' in the United States tab as well as the 'Federal Payroll Number' in the Canada tab.
Canada Tab
The Canada Tab is used to enter your company’s 'Federal Payroll Number' and 'Registered Pension Plan (RPP) Number' (or, if your company operates in the province of Quebec, your 'Company HSF Rate').
Note: If your company is registered in both Canada and the United States, you may enter both a 'Federal Business Number (EIN)' in the United States tab as well as a 'Federal Payroll Number' in the Canada tab.
Payroll Tab
The Payroll Tab is divided into three sections.
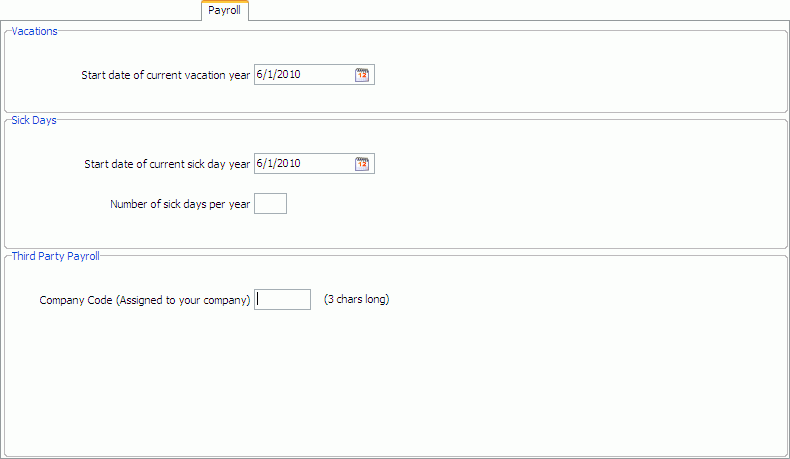
Vacations
This allows you to select the start date of the current vacation year.
Sick Days
This allows you to select the start date of the current sick day year, and indicate how many sick days per year.
Third Party Payroll
This text box allows you to enter your Company’s three-character 'Company Code', which is provided by your Third Party Payroll Vendor.
Intercompany Accounts
The Intercompany Accounts section allows the user to specify the GL Accounts that will be used to enable Intercompany financial transactions in a Multi-Company scenario. Double-click a cell in the 'Due From' or 'Due To' columns to choose two existing GL Accounts to link. Only those GL Accounts that the user has access to and that are associated with the selected Company will be available for selection.
The Accounts available for selection in the 'Due From' and 'Due To' accounts are configured in the GL Chart of Accounts program > Account Info Tab with the 'Type' value of 'Intercompany Due From' or 'Intercompany Due To', respectively.
For example: if your Multi-Company organization consists of two companies ('Company A' and 'Company B') where 'Company A' incurs expenses and 'Company B' pays for them, the system will compare the Company 'segment' value of the two GL Accounts involved. If the GL Account being used has a different Company 'segment' than the Company the user is logged in to- say the User’s company uses GL Accounts starting with a '00-' segment, but he/she is making a credit to a GL Account beginning with '01-'- the system knows that an Intercompany transaction is taking place.
In this situation, the system has stored procedures that will look to the Intercompany Accounts data to determine which Account to use (depending on the 'Due From' and 'Due To' settings). An Intercompany transaction will be automatically created so that 'Company A' will have a debit record against their GL Account, while 'Company B' will have a credit record against theirs.
The respective GL Accounts of the two Companies will not be out of balance, however, because of the 'Due From' and 'Due To' balances, which will be incorporated into the final GL Account balance for the Company they are attached to.
Currency
Set up the type of currency for this account.
Normally, if you have N companies, you would potentially setup a total of N x N-1 entries in Company Profiles' Intercompany Accounts tab (N-1 "other company" grid rows for each company). In every case, the account’s currency would be in the company’s base currency. However, if you use multiple currencies and you plan to use General Ledger Reconciliation on inter-company accounts, it is recommended that you set up twice as many (total of 2 x N x N-1) entries, allowing for both a CAD and a USD inter-company account for each company pair.
Note: Since each grid row has 2 accounts, due from and due to, you previously needed to setup 2 x N x N-1 GL accounts in Chart of Accounts; now, you should setup 6 x N x N-1 accounts (calculated as: N companies x N - 1 "other companies" x 2 types (due from and due to) x 3 currencies (CAD, USD, and F/X)). Although you should create the F/X accounts in Chart of Accounts, you cannot use them in Company Profiles' Intercompany Accounts tab.
Driver Pay
Intercompany Driver Pay transactions require specific revenue and expense accounts in addition to the 'Due-To' and 'Due-From' accounts defined above.
Revenue Account / Expense Account
Enter the two accounts you would like to use for Intercompany Driver Pay within this Company. Once these are setup, the Driver Pay logic will create revenue and expense entries in addition to regular intercompany entries.
Intercompany Transfers
The Intercompany Transfers section is used to configure which Client, Vendor, Site ID and Service Level should be designated for use in inter-company scenarios. In order to understand how intercompany transfers work, it is useful to think of a single company in relation to any number of other companies, not just in a relationship with a single other company: when user enters a 'Client ID' and 'Vendor ID' in these fields for a specific company (i.e. Company1), they are telling the system that if that Client ID/Vendor ID is used by a different company (i.e. Company2 or Company3), it constitutes an inter-company process between the two parties.
If a user is logged into Company3, for example, and assigns the 'Vendor ID' specified on this tab (for Company1) as a carrier on a trip, that carrier movement will be considered an inter-company one. A freight bill will then be automatically created for Company1, using the 'Site ID' and 'Service Level' assigned on this tab.
Similarly, if Company1 used Company3 resources during a trip, Company3 would bill the 'Client ID' entered here for Company1, which would fire the logic for intercompany billing.
Organizational Setup Window
The Organizational Setup window is used to configure how your various Company Entities are structured. After configuring the details of the individual Company Entities using the main Company Profiles program Tabs, you should use this window to setup their organizational relations, using the three available Tabs.
Note: For a more in depth look at the Multi-Company functionality, see the Multi-Company Overview.
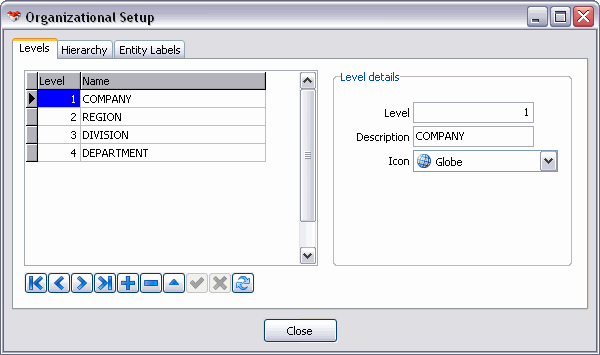
Levels Tab
The Levels Tab displays the four Levels of your Company. A 'Level' is a vertical position in the overall Company hierarchy (i.e. "Company", "Region", "Division", "Department"). By clicking the '+' button on the TruckMate Navigational Bar, you can add up to 4 different Levels in the Levels Grid. The information entered into this grid is stored in the ORG_LEVELS Table.
Please note the following concerning the use of the Levels Tab:
-
You cannot delete a Level if any Company Entities are attached to it, or if any Levels exist below it in the Organizational Structure.
-
Deleting an Entity will also remove any relationships that exist for that Entity, as well as any defined Organizational Structure assignments of Users, Groups and GL Accounts.
Level Details
The Level Details section is used to configure the specific details of each of your Company Levels:
Level
This is the position of the selected Level in the Company hierarchy, with '1' being the highest and '4' the lowest.
Description
Enter a Descriptive Name for the selected Level in this field.
Icon
Use the drop-down menu to choose a graphical icon for the selected Company Level.
Hierarchy Tab
The Hierarchy Tab allows you to configure the relationships between the various Companies and Entities in your Database, creating a corporate organizational structure. At the top of the Hierarchy Tab will be the Company that you are currently a member of (as configured in the Company Access Tab). If you have access to multiple Companies, they will all display on the Hierarchy Tab.
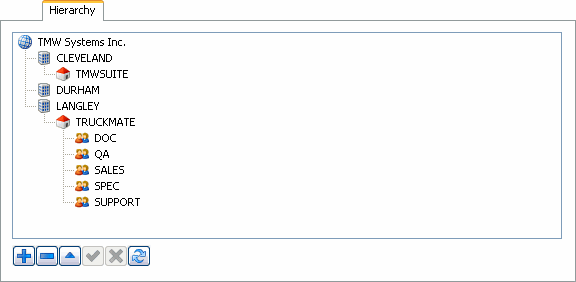
To begin creating the Hierarchy, right-click a top-level Company and select the 'Add' option. A new Level will be added to the hierarchy directly below the global 'Company' entry (with the icon you have chosen for Level 2 on the Levels Tab). Use your keyboard to give the new entry a 'Name', and then select the <Enter> key.
Once a Level is added, you can change its name by selecting the record, right-clicking and choosing the 'Rename' option. By right-clicking your new Level Entity and choosing 'Add' again, you can set up subsequent Level Entities.
Context Menu
Add
This option allows you to add an Entity to the Hierarchy Tab. The Entities available to be added are created on the Levels Tab, above. Once added into the Hierarchy Tab, you can use the 'Set as…' options (see below) to position your various Entities into a hierarchical relationship that mirrors your Corporate Organizational Structure.
Delete
This option allows you to delete the selected Company Entity. There are several things to consider before deleting an Entity:
Deleting an Entity is only allowed if there are no data records (Freight Bills, GL transactions) assigned to the selected Entity.
Deleting an Entity will delete all the Entities below it in the hierarchy tree.
Rename
This option allows you to rename the selected Company Entity.
Entity Labels Tab
The Entity Labels Tab is used to link a GL Account Code 'segment' that has been assigned a 'Level' value (as specified in the GL Chart of Accounts program > Segments Tab) to the various Company Entities at that Level in your corporate organizational structure.

Hierarchy Menu
On the left side of the Entity Labels Tab, you will see your Company hierarchy, as you have constructed it on the Hierarchy Tab. From this menu, you can select which 'Company' (or Company 'Entity' below it) that you wish to setup specific GL Account information for.
GL Labels
This is the most important section of the Entity Labels Tab, and the section where you will be able to differentiate your Company (or Company Entity) records so that they can have specific General Ledger data.
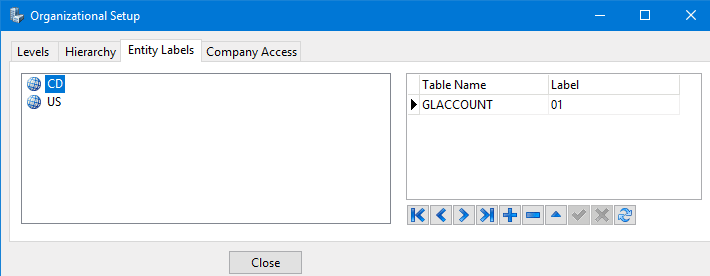
Table Name
Select a Company record from the Hierarchy menu to the left, and then select the '+' button on the TruckMate Navigational Bar to add a record into the right-side grid, and then use your keyboard to enter the text 'GLACCOUNT' in this field. This corresponds to the GLACCOUNT TruckMate Table, which is the only Table currently supported when linking a Company to a specific GL Account.
The user can also double-click the 'Table Name' field while in edit mode in order to search for a specific Table.
Label
The 'Label' field is used to differentiate General Ledger data for each of your Companies (or Company Entities). GL Account data differentiation is dependent on two variables:
-
The 'Label' value in this field, which assigns a unique numerical value to each Company ('00', '01', '02').
-
The 'Level' value assigned to a particular GL Account Code segment on the GL Chart of Accounts program > Segments Tab.
If, for example, you enter '00' in the 'Label' field and '1' in the 'Level' field of the first GL Segment, then all debits/credits to the any GL Account beginning with '00-' will be entered against this Company’s data. A second Company record, with a 'Label' of '01', will have all GL entries for Accounts that begin with '01-' tied to their Company record.
Note: You can validate 'Labels' for Company Entities as well, as long as a GL Account Segment has been assigned their respective 'Level' value (2-4) on the GL Chart of Accounts program > Segments Tab. For setup steps, see the Multi-Company > Setup documentation.
Company Access Tab
The Company Access Tab displays all of the Company records created in the Company Profiles program, and allows you to assign access to them for the selected TruckMate user. A user that is granted access to a Company will be able to view data that has been made specific to that Company, or from any Entity below it in the Company Organizational Structure. Simply flag the Company record that you would like the user to be able to access.
Note: This Tab is not available when Multi-Company is not enabled. Only those Company records that are currently 'Active' will be displayed on this Tab. Inactive Companies cannot have security settings changed.
Allow to change record visibility
If this flag is checked, the selected User will be able to access the 'Change Record Visibility' option under the 'Multi-Company' menu in most TruckMate applications. The 'Change Record Visibility' option allows the User to control the selected record’s visibility within the Company organizational structure.
See the Multi-Company Overview for more information.