General menu and toolbar options
Many menu and toolbar option items are standard and common to many or all the TruckMate programs. Menu items are also often available as buttons on the toolbar and as options available on a right-click shortcut menu.
File menu
| Menu option | Toolbar icon | Keyboard shortcut | Description |
|---|---|---|---|
Print Reports |
|
CTRL+P |
Opens the Report Selection window where you can select a report file from those available in your system. See Printing Reports. |
Exit |
|
Closes the program and releases the user license. |
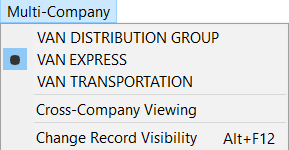
Multi-Company menu
If Multi-Company functionality is enabled, a new menu called Multi-Company will become available in TruckMate applications allowing users to switch from one company data set to another. See Multi-Company for more information about setting up and using Multi-Company features.
Most TruckMate applications will display a Multi-Company menu item with some or all of the menu options as described below. For example, only a few programs will have the ability to support the Cross-Company Viewing feature or the ability to change record visibility as appropriate for that program.
| Menu option | Toolbar icon | Keyboard shortcut | Description |
|---|---|---|---|
<View Company> |
|
Switch from one company to another to view the data associated with the different company. |
|
Cross-Company Viewing |
Allows the user to work with all of his/her allowed Company data under the one (or multiple) instance(s) of the application. Only available within certain programs. |
||
Change Record Visibility |
ALT+F12 |
Allows the user to control the selected record’s visibility within the organizational structure. Only available within certain programs and under certain conditions where appropriate. |
Navigate menu
The Navigate menu and Record Navigation toolbar contain functions used to move between data records, add records, delete records, or put the program into record edit mode where you can edit the selected item.
![]()
| Menu option | Toolbar icon | Keyboard shortcut | Description |
|---|---|---|---|
First |
|
CTRL+PgUp |
Move to the first record in the database. When the first record is displayed, the First Record and Previous Record buttons on the navigator bar are not available. |
Prior |
|
CTRL+Left |
Move to the record prior to the current record. |
Next |
|
CTRL+Right |
Move to the next record. |
Last |
|
CTRL+PgDn |
Moves to the last record in the database. When the last record is displayed, the Last Record and Next Record buttons on the navigator bar are not available. |
Insert |
|
CTRL+Ins |
The fields will be cleared and the cursor will be placed in the first entry field. When you select the Insert button, only the Post and Abandon buttons will be available on the navigator bar. |
Delete |
|
CTRL+Del |
Deletes the selected record In a grid display, the selected record is indicated by a black arrow on the left grid margin. You will be prompted to confirm before the record is deleted. There is no Undo. |
Edit |
|
Goes into edit mode, allowing changes to the currently selected record. When you select the Edit button, only the Post and Cancel buttons will be available on the navigator bar. There is no Undo. |
|
Post |
|
Shift+Enter |
Write the new record (in the case of an Insert) or write the changes made (in the case of an Edit) to the database. |
Cancel |
|
Shift+Escape |
Cancel any changes made and revert the selected record back to its previous values. |
Refresh |
|
CTRL+F5 |
Refresh the data displayed on the page by making a query to the database for the latest version of the currently highlighted record. Any updates made by the current user or other users will then be displayed. There are other refresh buttons that not only refresh the data for the records in the one section of your program you are looking at, but also refresh the data for all records referenced by the program. |
Find |
|
CTRL+F |
Opens a Select item window to help locate or filter a specific record or record groups. Some programs will have their own customized Find function window. |

Tools menu
The standard Tools menu includes the TruckMate Monitor and the Remember Position/Size functions.
| Menu option | Toolbar icon | Keyboard shortcut | Description |
|---|---|---|---|
TruckMate Monitor |
|
Monitors program events to assist with debugging and troubleshooting. Only use when necessary. See TruckMate Monitor. |
|
Remember Position/Size |
|
Select to retain window size and position upon exit. When the program is re-opened, this window will maintain its previous size and appearance. This includes any undocked tab windows. |
Some other functions also commonly available in the Tools menu include:
| Menu option | Toolbar icon | Keyboard shortcut | Description |
|---|---|---|---|
Undocking |
Display selected tabs as separate floating windows. See Tab Undocking. |
||
Screen Design |
Customize the appearance of TruckMate applications. |
Help menu
| Menu option | Toolbar icon | Keyboard shortcut | Description |
|---|---|---|---|
TruckMate Help |
|
F1 |
Opens an instance of the default Internet browser and displays the appropriate TruckMate Online Help file topic based on the currently active window. |
ClientCenter |
|
Opens an instance of the default Internet browser and displays the TMW Technical Support login page. |
|
Enter Support Case |
|
Opens an instance of the default Internet browser and displays a login page for users registered with an account allowing them to log support tickets. |
|
Product Feedback |
|
Opens an instance of the default Internet browser and displays the https://www.tmwcare.com login page. |
|
About |
|
Opens the standard TruckMate About window with program information such as the version number (important for support calls). |