Communications Manager Networks tab details

The 'Networks Tab' is a very simple Tab, in itself. The 'Allow the Following to be Enabled/Configured' field functions as a sort of 'hub' where the User can select the Software that he / she would like to be able to edit Configuration values for. By simply clicking the checkboxes next to the software that you would to edit Configuration values for and clicking the 'Apply' button, new tabs will be added to the Configuration window, detailing all of the specific options related to each Mobile Communications network. See the following sections for information on each specific program.
For more information on Setting Up these Mobile Devices, see the Mobile Communications Module Overview’s Setup Section.
| To see a specific Network option on this Tab, you must setup a supported Mobile Communications device in the Mobile Device Maintenance program. |
Xata ExecNT (Instances 1 & 2) Tabs
For multi-company configurations, we support up to two distinct instances of Xata ExecNT. Company one connects to instance one; company two connects to instance two. They have independent settings, because they connect to different gateways, and have independent form-sets.
Service
Enabled
Check this box to enable the interface between the Communication Manager program and the HighwayMaster software. When a service is enabled, it can be stopped and started on the main Communication Manager screen.
Run Communicator Automatically
If you want to load the communication software every time you start the Communication Manager program, check this box. Otherwise, you will have to manually start the WinHost Comm Handler software before manually starting the Communication Manager interface.
Start Interface Automatically
If you want the interface between communication software and the Communication Manager program to be automatically activated every time you start the Communication Manager program, check this box. If unchecked, you must manually start the interface after loading the Communication Manager program.
Defaults
Return Receipt
If this box is checked, when a message sent from the Dispatch program or Driver Call In program is read by the Driver, an 'AR' status will be sent from the remote unit. This is translated by the Communication Manager program into an 'A' status, which is used to indicate that the message has been read by the Driver. In the Driver Call In program, you can view the status of any Forward (i.e., dispatch office to remote unit) message.
For sites using the Dispatch program’s Drill Down function, this box must be checked in order to use the LTL Read by Driver status change (as configured on the General tab).
Forward Message Priority
Sets the default Xata ExecNT priority value for outgoing messages. 'Default' will use the value specified in the Xata ExecNT software, which is by default 'Normal'.
'Normal' status attempts to send messages up to 9 times over 35 minutes. 'Important' status has the same send frequency, but sends the message immediately, rather than waiting for the next scheduled communication. 'Sleepy' attempts to send the message 7 times over 18.25 hours. 'Important Sleepy' has the same send frequency as 'Sleepy', but initiates an immediate communications dialog. You can also configure the message priority for specific macros in the Communication Macro Setup program. Also, in the Dispatch program or Driver Call In program, you can select the message priority on an individual basis for each forward message.
Use Macro for Freeform
Place a checkmark in this box if you wish to use a macro for freeform. Under ExecNT, there are two types of devices, Pro2000 (older) and MobileMax2 (newer). Each have different screen geometries, and freeform messages will format differently depending on the target. When this is checked, the system will automatically generate a macro definition upon export, and use that macro when sending FF messages, so that the formatting is consistent on both device types.
Replies
Distribute Reply to Sender Only
You can specify that Return messages that are in reply to Forward messages only get distributed to the user who sent the original Forward message. The Login Name (as configured in the Security Setup program) of the user who created the Forward message is used, and the Distribution List configured on the General tab is ignored.
Interface
Interface Path
Specify the location of the communication software on the computer where the Communication Manager program is run.
Gateway Location
Enter the gateway location.
Port
Enter the port number.
Auto Alert Arrival and Departure
Enabled
If you wish to enable the 'Auto Alert' processing available for the Xata network system-wide, select this flag, and then use the 'Event Status Setup' button to configure the Auto Alert factors. Individual Devices can be enabled / disabled in the Mobile Device Maintenance program as well.
Event Status Setup
The Event Status Setup window allows the User to assign specific Status Codes to different Auto Alert events. Once setup and 'Enabled' (using the above flag) the Communication Manager program will process incoming proximity events using the Status Codes defined in this window. If a device has departed the last Geopoint it has been given, the program will then send it the next batch (if there are any).
Select the Status Codes you wish to be applied to Xata Devices for the 'Arriving', 'Arrived' and 'Depart' events for both the Shipper and Consignee locations.
Selecting Use non-standard status will allow you to use 'Non-Standard' Status Codes for your Auto-Alert events. A Non standard status is a Status Code that doesn’t usually get used for that particular event.
For example: for a Depart event, a valid standard Status would be a Depart Shipper behavior or a 'STOPOFF' behavior code. If you enable the 'Use Non-Standard Status' flag, you can use a code that has a Dispatch behavior.
AirIQ Tab
Contact your Trimble Service Representative for assistance in configuring the AirIQ Tab.
Service
Enabled
Check this box to enable the interface between the Communication Manager program and the HighwayMaster software. When a service is enabled, it can be stopped and started on the main Communication Manager screen.
Start Interface Automatically
If you want the interface between communication software and the Communication Manager program to be automatically activated every time you start the Communication Manager program, check this box. If unchecked, you must manually start the interface after loading the Communication Manager program.
Run FTP Interface Automatically
If you want the FTP interface between communication software and the Communication Manager program to be automatically activated every time you start the Communication Manager program, check this box. If unchecked, you must manually start the FTP interface after loading the Communication Manager program.
Utility
Maintain Security/Preferences
Selecting this button opens the AirIQ Setup window, where you can specify your login data and alert/actions handling preferences.
Profile Enabled
Place a checkmark in the field provided to enable this user’s profile.
Profile Name
Enter a profile name for this AirIQ user.
AirIQ User Name
Enter a username for this AirIQ user.
AirIQ Password
Enter a password for this AirIQ user.
Comments
Enter any relevant comments in the field provided.
AirIQ Alerts
Automated Inventory Alerting
Select a notification method from the choices of Log Only, Send Message, and Popup.
Automated Maintenance Reminder Alert
Select a notification method from the choices of Log Only, Send Message, and Popup.
Boundary Crossing Alert
Select a notification method from the choices of Log Only, Send Message, and Popup.
Excessive Speed Alert
Select a notification method from the choices of Log Only, Send Message, and Popup.
Power Management Alert (Low Battery)
Select a notification method from the choices of Log Only, Send Message, and Popup.
Reefer Fault Alert
Select a notification method from the choices of Log Only, Send Message, and Popup.
Security Alert (GPS Antennae Disconnect)
Select a notification method from the choices of Log Only, Send Message, and Popup.
Stationary Status Alert
Not available.
Usage Status Alert
Not available.
All Others
Select a notification method from the choices of Log Only, Send Message, and Popup.
AirIQ Actions
Call Office Light
Select a notification method from the choices of Log Only, Send Message, and Popup. Select either Dispatch and/or R&M programs.
Maintenance Reminder
Select a notification method from the choices of Log Only, Send Message, and Popup. Select either Dispatch and/or R&M programs. Re-set = 0.
Remote Vehicle Disable
Select a notification method from the choices of Log Only, Send Message, and Popup. Select either Dispatch and/or R&M programs.
Remote Vehicle Enable
Select a notification method from the choices of Log Only, Send Message, and Popup. Select either Dispatch and/or R&M programs.
Vehicle Location
Select a notification method from the choices of Log Only, Send Message, and Popup. Select either Dispatch and/or R&M programs.
Remote Door Unlock
Select a notification method from the choices of Log Only, Send Message, and Popup. Select either Dispatch and/or R&M programs.
All Others
Select a notification method from the choices of Log Only, Send Message, and Popup. Select either Dispatch and/or R&M programs.
D2Link
Contact your Trimble Service Representative for assistance in configuring the D2Link Tab.
D2Link offers the following functions:
-
Dispatch-to-Driver (D2) Mobile Link Software by TMW.
-
Works with all major cellular carrier on selected devices (cellular phones, PDAs and WinMobile handsets).
-
Customer-owned/hosted messaging (Customer Hosted) over various cellular networks.
-
Fully compatible with macro messaging, geofencing and signature capture for proof of delivery.
Most of the actual D2Link configuration is done within the individual D2Link Macros that are created in the Communication Macro Setup program.
| The D2Link message process involves reading from the MESAGE_FORWARD Table, parsing messages, then storing in DIAL_D2LINK_MSGQ, then picking up any incoming data from MESSAGE_RETURN_PENDING, parsing the info, executing any macros, and storing in MESSAGE_RETURN. |
Service
-
Enabled
Check this box to enable the interface between the Communications Manager program and the D2Link Host Machine. When a service is enabled, it can be stopped and started on the main Communications Manager screen. -
Run D2Link Communicator
This option has been disabled as it is no longer required by the Windows Service-based Communications Manger. -
Start Interface Automatically
If you the interface between the D2Link Host and the Communication Manager program to be automatically activated every time you start the Communications Manager program, check this box. If unchecked, you must manually start the interface using the Enabled checkbox after loading the Communication Manager program.
Check for Incoming Messages Every _ minutes
Default is set to 5 minutes. Can be increased or decreased to any integer value.
Interface URL
This field is the only important field for setting up D2Link. You must enter the D2Link Server URL that you were given when the setup of the host machine was completed.
Fleetmind Tab
Contact your Trimble Service Representative for assistance in configuring the FleetMind Tab.
Service
Enabled
Check this box to enable the interface between the Communication Manager program and the FleetMind software. When a service is enabled, it can be stopped and started on the main Communication Manager screen.
Run FleetMind Communicator
This option has been disabled as it is no longer required by the Windows Service-based Communications Manger.
Start Interface Automatically
If you want the interface between communication software and the Communication Manager program to be automatically activated every time you start the Communication Manager program, check this box. If unchecked, you must manually start the interface after loading the Communication Manager program.
Interface
Interface Path / Out Path / In Path
These fields tell the Communication Manager program where to process the import and export files from FleetMind. You should create some directories on your local system for this purpose, and then enter these directory paths in these fields (see image above for an example of how to configure this).
Completion Codes.P
This field is used to designate the various completion codes for Pickups that FleetMiind will use when interacting with TruckMate. Enter the Pickup Completion Code(s) you would like to use, separated by a comma.
Completion Codes.D
This field is used to designate the various completion codes for Drops that FleetMiind will use when interacting with TruckMate. Enter the Drop Completion Code(s) you would like to use, separated by a comma.
Terminals
Click the search button to select a Terminal Zone Code from your system, and then click the down 'Finger' button to add that Terminal to the list of available Terminals for use with the FleetMind software.
Statuses
This section designated the TruckMate Status Codes that will apply to various FleetMind Pickup and Drop-off events. Use the drop-down menus to select the appropriate TruckMate Status Code to tie to the FleetMind event.
Codes with the '.P' suffix designate 'Pickup' type events, while Codes with the '.D' suffix designate 'Drop' events.
GeocomTMS Tab
Contact your Trimble Service Representative for assistance in configuring the GeocomTMS Tab.
Service
Enabled
Check this box to enable the interface between the Communication Manager program and the Geocom software. When a service is enabled, it can be stopped and started on the main Communication Manager screen.
Start Interface Automatically
If you want the interface between communication software and the Communication Manager program to be automatically activated every time you start the Communication Manager program, check this box. If unchecked, you must manually start the interface after loading the Communication Manager program.
Distribute Reply to Sender Only
You can specify that Return messages that are in reply to Forward messages only get distributed to the user who sent the original Forward message. The Login Name (as configured in the Security Setup program) of the user who created the Forward message is used, and the Distribution List configured on the General tab is ignored.
Debug Log
Added more debugging information for Geocom. When the Communication Manager imports messages from Geocom, save the XML data to a seperate log file called GeoComImportMsgs.log.
HighwayMaster Tab
The WinHost Comm Handler software must be configured before the Communication Manager program’s HighwayMaster Tab is configured and enabled.
Service
Enabled
Check this box to enable the interface between the Communication Manager program and the HighwayMaster software. When a service is enabled, it can be stopped and started on the main Communication Manager screen.
Run Comm Handler Automatically
This option has been disabled as it is no longer required by the Windows Service-based Communications Manger.
Start Interface Automatically
If you want the interface between WinHost Comm Handler software and the Communication Manager program to be automatically activated every time you start the Communication Manager program, check this box. If unchecked, you must manually start the interface after loading the Communication Manager program.
Interface
Path to HighwayMaster
Specify the location of the WinHost Comm Handler software on the computer where the Communication Manager program is run.
Test
To check that the Communications Manager program is communicating correctly with the WinHost Comm Handler software interface, click the Test button.
Defaults
Immediate Message Transmission
If this box is checked, Forward macros and messages will cause the WinHost Comm Handler software to transmit the message to the remote unit immediately, thus overriding the dial schedule configured in the WinHost Comm Handler software.
Message Acknowledgment Priority
Refers to the remote device’s ability to send an acknowledgment when a Forward macro or message is received. Because the size of the acknowledgment is smaller than the size of a cellular packet, the system has the ability to add the acknowledgment message to another outgoing message from the remote device, thus saving communication costs.
'Hold' will store the acknowledgment message until another outgoing message or data call is generated by the remote device. 'Forward' will send the acknowledgment message immediately, resulting in a communication charge for each acknowledgment message.
'Immediate' uses HighwayMaster’s optional 'callback' feature. In this case, at the same time the HighwayMaster network delivers the message to the remote device, it attempts to pick up and send the acknowledgment message back to the dispatch office.
If the callback option is not enabled by HighwayMaster, the acknowledgment message will be sent with the 'Forward' priority. The 'System Default' priority is 'Hold'.
| The Message Acknowledgment Priorities vary according to the version of HighwayMaster’s software that you are using. Refer to the WinHost Comm Handler software documentation for further information. |
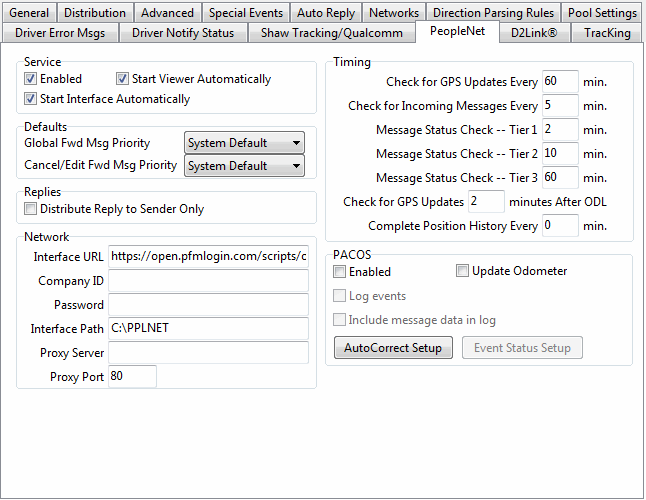
PeopleNet Tab
Contact your Trimble Service Representative for assistance in configuring the PeopleNet Tab.
Service
Enabled
Check this box to enable the interface between the Communication Manager program and the PeopleNet software. When a service is enabled, it can be stopped and started on the main Communication Manager screen.
Run PeopleNET Communicator
This option has been disabled as it is no longer required by the Windows Service-based Communications Manger.
Start Interface Automatically
If you want the interface between communication software and the Communication Manager program to be automatically activated every time you start the Communication Manager program, check this box. If unchecked, you must manually start the interface after loading the Communication Manager program.
Defaults
Forward Message Priority
Sets the default PeopleNet priority value for outgoing messages. 'System Default' will use the value specified in the PeopleNet software.
Replies
Distribute Reply to Sender Only
You can specify that Return messages that are in reply to Forward messages only get distributed to the user who sent the original Forward message. The Login Name (as configured in the Security Setup program) of the user who created the Forward message is used, and the Distribution List configured on the General tab is ignored.
Network
Interface URL
Enter the Internet address required to complete this operation.
Company ID
Enter the Company ID required to complete this operation.
Password
Enter the Password required to complete this operation.
Interface Path
Enter the Interface Path required to complete this operation.
Proxy Server / Proxy Port
If required, enter the URL of the Proxy Server and the Port on which it can be addressed.
Timing
Check for GPS Updates Every XX Minutes
Enter the number of minutes you would like the GPS to check regularly. For example, if you wish to check for GPS updates every hour, enter 60 in the minute field.
Check for Incoming Messages Every
If you’d like to check for incoming messages every 5 minutes, for example, enter the number 5 in the field provided.
Message Status Check - Tier 1
You can set up your message status check with tier 1, 2, or 3 (which would mean certain messages would be labeled priority 1, 2, or 3). Enter the number of minutes you would like these tier message status items regularly checked. For example, if you want priority 1 messages checked every 2 minutes, enter a 2 in the field provided.
Message Status Check - Tier 2
You can set up your message status check with tier 1, 2, or 3 (which would mean certain messages would be labeled priority 1, 2, or 3). Enter the number of minutes you would like these tier message status items regularly checked. For example, if you want priority 1 messages checked every 2 minutes, enter a 2 in the field provided.
Message Status Check - Tier 3
You can set up your message status check with tier 1, 2, or 3 (which would mean certain messages would be labeled priority 1, 2, or 3). Enter the number of minutes you would like these tier message status items regularly checked. For example, if you want priority 1 messages checked every 2 minutes, enter a 2 in the field provided.
Check for GPS Updates xx Minutes After ODL
After the ODL, you might check for GPS updates every few minutes. Enter the minute amount in the field provided.
Complete Position History Every
Enter a time value (in minutes) that you wish to complete the Position History values.
PACOS
Enabled
You must check the 'Enabled' checkbox to use the PACOS features of PeopleNet.
Log Events
If you wish to Log Events from your Cancom / Omnitracs system, check this checkbox.
Include Message Data in Log
If you wish to 'Include Message Data' in your PACOS Logs, check this checkbox.
Check for PACOS Messages Every
Enter a time value (in minutes) that you wish to check for PACOS Messages.
AutoCorrect Setup
Select this button to open the AutoCorrect GPS Coordinates window, which allows the user to configure the new PACOS 'AutoCorrect' feature.
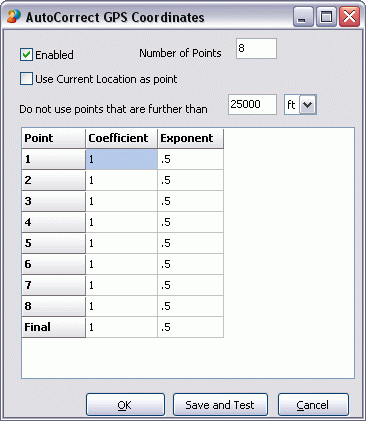
Basically, when a Driver arrives at a stop, the location may or may not match the pre-generated GPS coordinates. The address might be the front office, for instance while the actual warehouse is in the lot across the street. If 'AutoCorrect' is enabled, then the GPS reading of the truck when the driver pushes the 'Arrived' button will be used to adjust the stored GPS reading. In general, the last 'X' readings will be used to average a new GPS coordinate. The method of averaging is user adjustable.
In the example above, a RMS (root mean square) calculation is being used where the new reading is considered to be the square of the mean of the square roots of each reading. For example:
new = (sqrt(old1) + sqrt(old2) + sqrt(old3) …..sqrt(oldn))^2
If you wanted a simple average, then you would simply set all the 'Coefficient' and 'Exponent' values to '1'.
-
Use Current Location as Point
This checkbox will add the current averaged location to the list. This allows you to set its 'Coefficient' differently from the raw readings. -
Do not Use Points that are Further Than
This option functions by simply eliminating 'outliers' (if the driver pushed the arrive button when he was in another city, etc.).
| AutoCorrect functionality only works for a given Client if it is enabled in the above window AND for the given Client in the Customer Profiles > Notes Tab ('AutoCorrect Lat/Lon' option is checked). |
Event Status Setup
Select this button to open the Status Setup window.
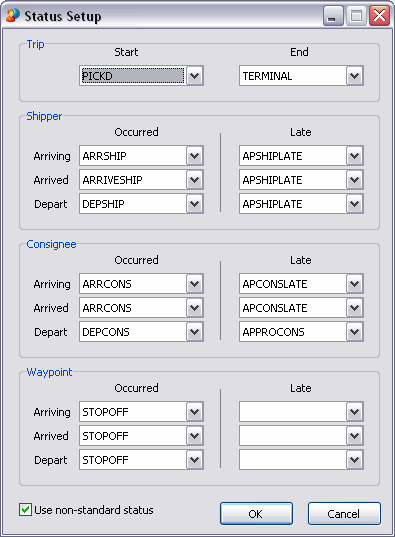
The PeopleNet OBC can detect a number of PACOS events, when a trips starts, when a Driver arrives/departs a stop, whether a Driver is late, when a Driver reaches a waypoint, etc. This Status Setup window allows us to TruckMate status codes (and associated behaviors) to these PACOS events.
When a truck crosses a defined 'Geofence' (the spatial limit for notification from a Mobile Device) and stops at a shipper, the OBC detects this and can automatically place a call back to TruckMate stating that an 'Arrive' event at 'Stop X' has occurred. From the Database, we can see that 'Stop X' is, say, a Shipper, so we look up the associated code ('ARRIVESHIP') and apply it to the Trip and/or Freight Bill.
If the Status has a behavior associated with it, like 'PICKD', then it will do the action (eg. PICKD will move the FB onto the attached trailer).
Normally, the Statuses that appear in the drop down list are limited to what the system thinks makes sense in a Truckload (TL) environment. For instance, it will only allow statuses that have a 'PICKD' behavior to be selected for 'ARRIVED SHIPPER'.
Use non-standard status
But in some cases, this doesn’t work. For instance, a Company may do trailer drops. This company hauls an empty trailer to the Shipper, drops it off and picks up a loaded trailer. They then haul this loaded trailer to the Consignee site where they drop it off and pick up an empty to take back to the Terminal.
If they were limited to the default set of statuses, they would 'ARRIVE' with an empty Trailer. The 'ARRIVE' event would trigger a status with the 'PICKD' behavior, this would cause the Freight Bill to be loaded onto the current Trailer (i.e. the empty one). The Driver would then unhook the Trailer and connect the new Trailer. He would then send a normal macro back to TruckMate to let the Company know the 'Trailer ID' he picked up. He would then drive off with this new Trailer but TruckMate would think that the Freight Bill is still back at the Shipper sitting in the old Trailer. Similarily, when the Driver arrives at the Consignee, he would drop off his Trailer and hook up an empty, again sending a 'Trailer Drop/Hook' Macro back to base. When he leaves, it triggers the 'DEPART' event which will set the 'DEP@CONS' Status. Since this Status has the 'DELV' behavior, the system will attempt to deliver the Freight Bill from the new (empty) Trailer.
By checking the 'Use non-standard status' button, the User can assign a Status with the 'PICKD' behavior to a 'Shipper Depart' event and a Status with the 'DELV' behavior to the 'Consignee Arrived' event. This would load the Freight Bill on to the Trailer when it 'DEPARTS' (i.e. AFTER a new Trailer has been hooked up) and unload the Freight Bill when it 'ARRIVES' (i.e. BEFORE it has been unhooked).
Shaw Tracking/Omnitracs Tab
The QTracs software must be configured before the Communication Manager program’s QTracs interface is configured and enabled. See the Mobile Communications Module Overview’s Setup Section for more information on how to setup the Shaw Tracking Tab.
Service
Enabled
Check this box to enable the interface between the Communication Manager program and Shaw Tracking’s QTracs software. When a service is enabled, it can be stopped and started on the main Communication Manager screen.
Run QTracs Automatically
This option has been disabled as it is no longer required by the Windows Service-based Communications Manger.
Start Interface Automatically
If you want the interface between Shaw Tracking’s QTracs software and the Communication Manager program to be automatically activated every time you start the Communication Manager program, check this box. If unchecked, you must manually start the interface using the Enabled checkbox after loading the Communication Manager program.
Defaults
Return Receipt
If this box is checked, when a message sent from the Dispatch program or Driver Call In program is read by the Driver, an 'AR' status will be sent from the remote unit. This is translated by the Communication Manager program into an 'A' status, which is used to indicate that the message has been read by the Driver. In the Driver Call In program, you can view the status of any Forward (ie, dispatch office to remote unit) message. For sites using the Dispatch program’s Drill Down function, this box must be checked in order to use the LTL Read by Driver status change (as configured on the General tab).
Forward Message Priority
Sets the default QTracs priority value for outgoing messages. 'Default' will use the value specified in the QTracs software, which is by default 'Normal'. 'Normal' status attempts to send messages up to 9 times over 35 minutes. 'Important' status has the same send frequency, but sends the message immediately, rather than waiting for the next scheduled communication. 'Sleepy' attempts to send the message 7 times over 18.25 hours. 'Important Sleepy' has the same send frequency as 'Sleepy', but initiates an immediate communications dialog. You can also configure the message priority for specific macros in the Communication Macro Setup program.
Also, in the Dispatch program or Driver Call In program, you can select the message priority on an individual basis for each forward message.
Interface
Install
After you have installed Shaw Tracking’s QTracs software, click the Install button to create the required ODBC aliases.
Test
You can use the Test Interface button at any time to re-check the configuration of the ODBC aliases. This might be useful for troubleshooting purposes, should your aliases get changed. It will also check the various Import/Export options in QTracs, as follows:
-
ASCII Import
-
ASCII Export
-
DBF Import
-
DBF Export
Replies
Distribute Reply to Sender Only
You can specify that Return messages that are in reply to Forward messages only get distributed to the user who sent the original Forward message. The Login Name (as configured in the Security Setup program) of the user who created the Forward message is used, and the Distribution List configured on the General tab is ignored.
| If you are running Communication Manager in TruckMate 5.0 or later, with Qtracs 3.3.x or later, the regional settings on the host machine must be set to: h:mm:ss tt, where it indicates AM, PM. These settings are case sensitive (i.e., you must set AM, and PM in uppercase letters). There is no leading zero for hours. |
Once you have set these, reboot the host machine and then restart QTracs and the Communication Manager program.
Automated Arrival and Departure
Enabled
In order to use the Automated Arrival and Departure features, you must check this checkbox.
Log Events
If you wish to Log Events from the Shaw Tracking system, check this checkbox.
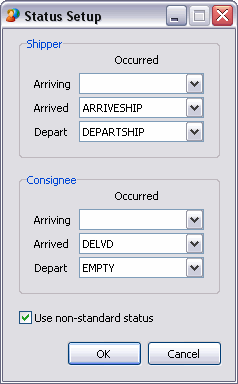
Event Status Setup
Clicking this button will open an Event Status Setup screen where you may use pull down menus to configure the Status Codes for the 'Arrived' and 'Depart' events for your Shipper and Consignee customers. Check the 'Use non-standard Status' option if you are using non-standard Status Codes in your TruckMate system.
Arrival Time Tolerance
Enter a time value (in minutes) for the Automated Arrival system.
End-of-Trip Threshold
Enter a time value (in minutes) for the End-of-Trip Threshold.
Low Confidence Event Offset
Enter a time value (between 5 and 120 minutes) for the Low Confidence Event Offset.
StarTrak Tab
Contact your Trimble Service Representative for assistance in configuring the StarTrak Tab.
Service
Enabled
Check this box to enable the interface between the Communication Manager program and the StarTrak software. When a service is enabled, it can be stopped and started on the main Communication Manager screen.
Start Interface Automatically
This option has been disabled as it is no longer required by the Windows Service-based Communications Manger.
Terion Tab
Contact your Trimble Service Representative for assistance in configuring the Terion Tab.
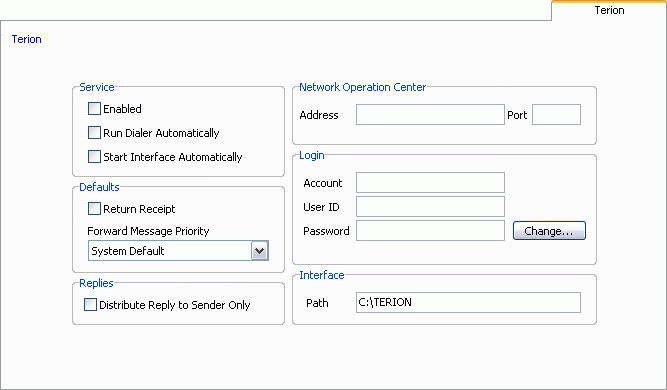
Service
Enabled
Check this box to enable the interface between the Communication Manager program and the Terion software. When a service is enabled, it can be stopped and started on the main Communication Manager screen.
Run Dialer Automatically
This option has been disabled as it is no longer required by the Windows Service-based Communications Manger.
Start Interface Automatically
If you want the interface between Terion software and the Communication Manager program to be automatically activated every time you start the Communication Manager program, check this box. If unchecked, you must manually start the interface using the Enabled checkbox after loading the Communication Manager program.
Defaults
Return Receipt
If you would like to have Return Receipts generated by your Terion software, check this checkbox.
Forward Message Priority
Use the pull down menu to select a Forward Message Priority for your Terion software.
Replies
Distribute Reply to Sender Only
If you would like your Terion Reply Messages to be delivered only to the User who sent the original Message, check this checkbox.
Network Operation Center
Address / Port
Enter the IP Address and Port number for your Terion Network Operation Center.
TracKing
Contact your Trimble Service Representative for assistance in configuring the TracKing Tab.
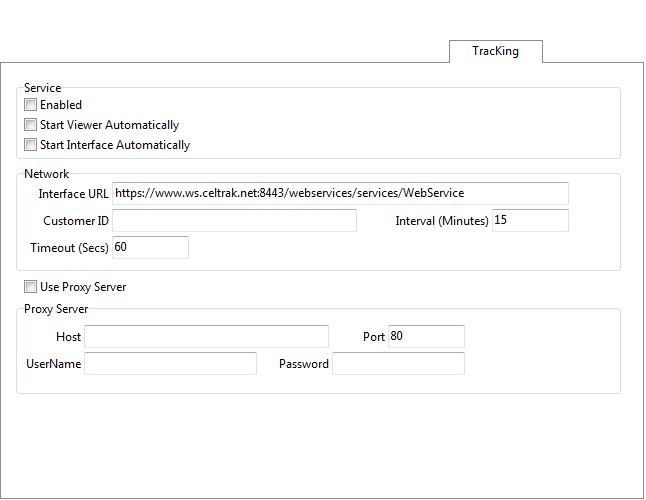
Service
Enabled
Check this box to enable the interface between the Communication Manager program and the TracKing software. When a service is enabled, it can be stopped and started on the main Communication Manager screen.
Start Viewer Automatically
If you want to load the Tracking Viewer software every time you start the Communication Manager program, check this box. Otherwise, you will have to manually start the Tracking Viewer software before manually starting the Communication Manager interface.
Start Interface Automatically
If you want the interface between Tracking software and the Communication Manager program to be automatically activated every time you start the Communication Manager program, check this box. If unchecked, you must manually start the interface after loading the Communication Manager program.
Network
Interface URL
Enter the URL where the Tracking Service can be accessed.
Customer ID
This is the ID of the customer at TracKing.
Interval (Minutes) / Interval (Secs)
Select a proper interval for refreshing position data, and the proper interval (max idle time)
Use Proxy Server
This flag determines if a proxy server will be used or not.
Vistar Tab
Contact your Trimble Service Representative for assistance in configuring the Vistar Tab.
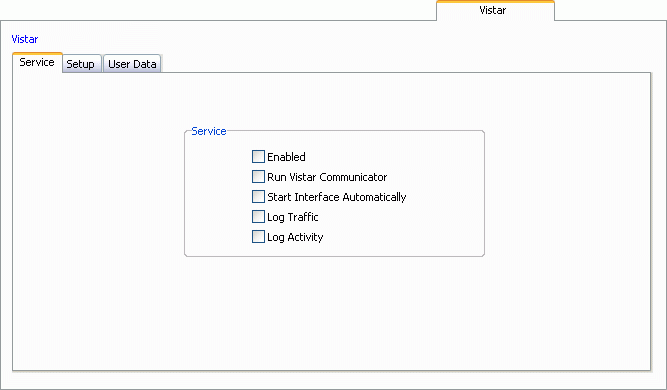
Service Tab
Enabled
Check this box to enable the interface between the Communication Manager program and the Vistar software. When a service is enabled, it can be stopped and started on the main Communication Manager screen.
Run Vistar Communicator
This option has been disabled as it is no longer required by the Windows Service-based Communications Manger.
Start Interface Automatically
If you want the interface between Vistar software and the Communication Manager program to be automatically activated every time you start the Communication Manager program, check this box. If unchecked, you must manually start the interface using the Enabled checkbox after loading the Communication Manager program.
Log Traffic
Place a checkmark in the box provided to enable a log for the Vistar Communicator traffic.
Log Activity
Place a checkmark in the box provided to enable a log for the Vistar Communicator activity.
Setup Tab
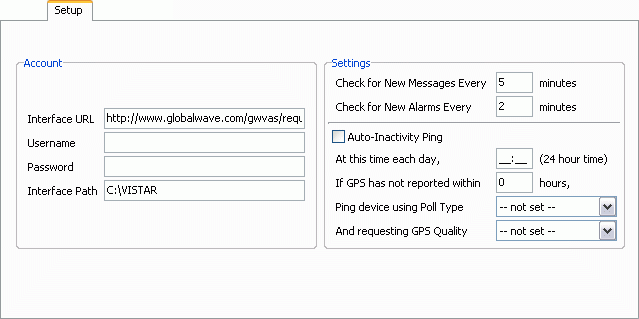
Interface URL
Enter the Internet address required to complete this operation.
Username
Enter the Company ID required to complete this operation.
Password
Enter the Password required to complete this operation.
Interface Path
Enter the Interface Path required to complete this operation.
Check for New Messages Every
If you’d like to check for new messages every 5 minutes, for example, enter the number 5 in the field provided. The default setting is 5.
Check for New Alarms Every
If you’d like to check for incoming alarms every 2 minutes, for example, enter the number 2 in the field provided. The default setting is 2.
Auto-Inactivity Ping
Check this checkbox to Ping the communications devices if the Vistar system has been Inactive.
At This Time Each Day
Used in conjunction with the 'Auto-Inactivity Ping' option. Enter a time value (using 24 hour time values) that you would like to Ping the communication device.
If GPS has not Responded Within
Used in conjunction with the 'Auto-Inactivity Ping' option. Enter a time value (in hours) that you wish to wait for a GPS response from the communications device before Pinging.
Ping Device using Poll Type
Used in conjunction with the 'Auto-Inactivity Ping' option. Select a 'Poll Type' you wish to use when Pinging the communications device.
And Requesting GPS Quality
Used in conjunction with the 'Auto-Inactivity Ping' option. Select the 'GPS Quality' you would like your Automatic Pings to request.