Command Center Integration

Users have the ability to access their custom KPIs in the Command Center program via right-mouse click access from other TruckMate applications. This grants you the ability to quickly check your KPIs from virtually anywhere in the system, as part of your normal work flow. The Command Center Integration tab allows you to set up how Command Center is accessed from other TruckMate applications.
Note: You may hide the Command Center Integration tab from specific users or user groups via the Security Setup program > Security > tabs Settings > Codes tab.
Call Command Center via Right-Click from Fields
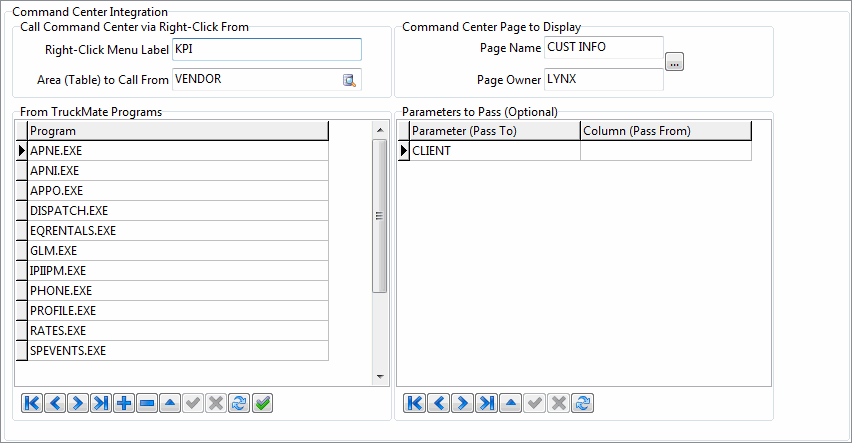
Right-Click Menu Label
This can be any text you like, up to a maximum of 40 characters. You will see this label when you right-click in an applicable TruckMate application and select the 'Call Command Center' menu item.
Area (table) to Call From
Use the edit pick to select a TruckMate system table. The table you select in this field will be used to determine which applications can be added to the 'From TruckMate Programs' grid below. For example, if the VENDOR table is chosen, only those programs with a grid that accesses the VENDOR table can be granted right-mouse click access to a KPI.
Note: The tables that can be used with the right-click Command Center integration can be viewed in Document Imaging >TruckMate Program Integration (all tables that are enabled for third-party document imaging can also be used with the right-click Command Center integration).
From TruckMate Programs Grid
Once you have set the 'Area (table) to Call From' field, you can double-click a new blank row in this grid to display which TruckMate applications support the table/data. You can also use the Auto-Add button (![]() ) beside the navigation bar, which will auto-load all possible TruckMate programs associated with the selected table.
) beside the navigation bar, which will auto-load all possible TruckMate programs associated with the selected table.
Command Center Page to Display Fields
Page Name / Page Owner
These fields identify what page you want to be displayed with Command Center. Because two different users may each have a page with the same name, the ellipse button will allow you to bring up a pick list and populate both fields at once.
Note: This pick list is restricted to pages you are allowed to view in Command Center (that is, your personal private pages, public pages, and pages shared among your user group).
Parameters to Pass Grid (Optional)
This optional section is a very powerful part of Command Center Integration.
If a Command Center page has parameters (or more precisely, if KPI cells on the page are based on SQLs that have parameters), then, in Command Center, the cells will not display any data unless you initialize the parameters. In Command Center, to get the data in the KPI cells to change, you must change the parameter values manually. But in the right-click feature, you may pass context-sensitive data to the parameter.
For example, suppose you have a Command Center page of client-based KPIs. You could set up a CLIENT table (PROFILES.EXE) right-click in the CODES.EXE screen and pass CLIENT_ID (for the client you are currently viewing in profiles) to the Command Center page’s parameter. Or you could set up 3 different right-clicks from CSERV.EXE to the same client-based Command Center page: one for CUSTOMER (caller), one for ORIGIN (shipper), and one for DESTINATION (consignee).
Note that the parameters grid is auto-populated (when you save the header fields) with all the parameter names set up in Command CenterC you can’t manually add or delete rows, and you may only edit the 'Column (Pass From)' column. A pick list is available for this (via double-click). The pick list includes each column’s data-type. (For example, if your Command Centre page parameter expects a TimeStamp, do not pass CLIENT.CLIENT_ID or TLORDER.BILL_NUMBER to it). Note that this grid is only a parameter-value override. If you do not set the column value to pass to the Command Centre parameter, then the parameter value manually set up in Command Center will be used. Hence, if any parameter for a KPI cell was not setup, then the cell will not show any data.
Custom Button Setup
After you have set up a right-click to call Command Center, you can assign it to a custom Screen Design (SD) button. For more information on creating a custom button, see the documentation on custom buttons in TruckMate Basics > Screen Design > Custom Button tab. After you have created the custom button, in SD property editor’s Custom Button tab look for an entry in the Action drop-down list that starts with 'mikpi_', with the rest of the name being the pop-up’s name plus the call ID from the setup outlined above.