How Do I?

How do I Configure Automatic Payments for Drivers?
-
Open the Driver Pay Contracts program (PAYCON.EXE), click: Start > Programs > TruckMate > Accounting & Finance > Driver Payables > Driver Pay Contracts
-
Using the top navigator bar, select the contract(s) for which this rule is to be applied. Press and hold the left mouse button on the rule from the grid at the bottom of the screen and drag it to the grid in the upper right corner of the screen. This will apply this rule to the contract.
-
By double-clicking in the 'Rule Seq' and 'Group' columns, the correct placement of the rule in the contract can be determined:
-
Rule Group: the system will look to the first rule in the group and attempt to apply it to the trip. If the first rule will not work, the system will move to the next rule in the group until one of the rules works. Once it finds a rule that works, it will not look for additional rules in that group.
-
Rule Seq: if there are several rules in each group, this feature tells the system which rule to check first, second, third, etc.
-
Open the Driver Profiles program (DRIVERS.EXE), click: Start > Programs > TruckMate > Profiles > Driver Profiles
-
Click on the 'Search' button and find the driver by entering either his name or his code, high light the driver and then press `Okay'.
-
Press the 'Contracts' tab in the right central part of the screen.
-
Enter the date the contract will become effective in the `Effective from' field.
-
Enter the 'Primary' and 'Secondary' contracts (they can be the same contract) and press the 'Save' (checkmark) button in the Contracts section of the screen and press the 'Save' (checkmark) button at the bottom of the screen.
-
When the driver is dispatched, and the date is subsequent to that entered in the Contracts tab of Driver Profiles, this contract will be used to automatically pay the driver the rates entered.
-
-
How do I Configure the Rules for Driver Pay?
-
Open the Driver Pay Contracts program (PAYCON.EXE), click: Start > Programs > TruckMate > Accounting & Finance > Driver Payables > Driver Pay Contracts
-
Just above the grid on the bottom of the screen are the tabs for the different types of rules. Select the tab for the type of rule to be created.
-
Click the insert button ('+') on the navigator bar at the bottom of the screen. This will insert a new line into the grid and the system will auto-generate a rule number.
-
Enter the pertinent information for the rule in the new line by clicking once in the first available field and then tabbing from one field to the next. Press the 'Enter' key to toggle between 'True/False' on those fields.
-
Once all the information is entered in the line, press the save button on the bottom Navigator Bar and the rule will be saved.
-
Using the top navigator bar, select the contract(s) this rule is to be applied to. Press and hold the left mouse button on the rule and drag it to the grid in the upper right corner of the screen.
-
Now by double clicking in the 'Rule Seq' and 'Group' columns, the correct placement of the rule in the contract can be determined:
-
Rule Group - the system will look to the first rule of the same type of rule (Trip/leg based or Freight Bill based) within the group and attempt to apply it to the trip. If the first rule will not work, the system will move to the next rule in the group until one of the rules works. Once it finds a rule that works, it will not look for additional rules (*of that type) in that group. (*See Note)
-
Rule Seq - if there are several rules in each group, this feature tells the system which rule to check first, second, third, etc.
Note: The first rule of the same type of rule (Trip/leg based or Freight Bill based) in the Group that generates pay is used. Then the system proceeds to the next Group, testing each rule in the order of the Rule Sequence, and creates a pay record based on the first rule of the same type of rule within that group that generates pay. Therefore, it is possible to have more than one pay record generated for the same rule Group. Rules that auto-generate driver pay based on legs must do so for each leg since there may be different drivers associated with each leg.
It is important that the rules within a group be sequenced so that the more particular or specialized criteria are tested first before the more generic rules. Groups cannot be re-sequenced.
-
How do I Convert Currency using the Driver Pay Module?
The Driver Pay Contract program does not do currency conversions, however, it does store the various rates of exchange that can be used for currency conversions that occur in the Driver Pay Audit program.
-
Open the Driver Pay Contracts program (PAYCON.EXE), click: Start > Programs > TruckMate > Accounting & Finance > Driver Payables > Driver Pay Contracts
-
Go to the Exchange Rates tab. Enter the currency you wish to convert. For example, if you want to convert funds from US dollars to Cdn dollars, you’d enter the US dollars in the Exchange Rate tab. Your default currency of Canadian, in this example, doesn’t need to be entered here.
-
Enter the effective date of that rate, whether that rate is to be used for driver Pay items ('P'), Driver Deduction ('D'), or Both ('B').
-
Open the Driver Pay Audit program (PAYAUDIT.EXE), click: Start > Programs > TruckMate > Accounting & Finance > Driver Payables > Driver Pay Audit
-
Go to the Deductions tab, and right-click and select 'Currency Transfers'. Fill in the required information. You are given the option to specify an exchange rate, or have it use the rates that were set up in pay contracts.
-
The Driver Pay Audit program will total the foreign currencies and deductions you’ve specified, and create a new deduction which will appear on the Deduction tab, showing as 'Approved for Payment'.
How do I Create an Automatic Deposit for a Driver not paid through TruckMate payroll?
There are three types of driver setups and instructions for each are shown below:
-
Payroll
The Direct Deposit information is set up in the Employee Data program. After the Driver Pay Statements have been run through in the usual manner, begin the payroll processing. See the Driver Contracts instructions to create an automatic deposit.
-
Driver
-
Set up the Direct Deposit information in the Driver Profiles program. Run the Driver Pay Statements, and if, after verifying, they are acceptable, say "Yes" to update the Driver Pay. All checks, both regular and Direct Deposit will be created. View or process regular checks through the Check Printing program, and view or process Direct Deposit checks through the Direct Deposit program. In the Direct Deposit program, you will see all of the driver checks from the pay run that were to be sent as Direct Deposits.
-
In the Direct Deposit program, click on "Export" and the Export window will open up. Confirm that all of the bank information has been set up correctly and that an export file path and/or name has been entered. Click "Export" again. A confirmation box will appear, select "Yes". The report select box will open and you should print the Direct Deposit Audit Report ('DDAUDIT.RPT').
Note: The Audit number will appear in the top right-hand corner.
-
Print or close this dialog box and a message box will then appear telling you that a Direct Deposit Audit has been created. Click "OK", and your file is now ready to be submitted to your bank. Run the Check Register program to update the checks.
-
-
Vendor
-
Vendor Direct Deposit information is set up in the Customer and Vendor Profiles program, Direct Deposit tab. Run the Driver Pay Statements, and if, after verification, the information appears acceptable, say "Yes" to update Driver Pay information. All checks, both regular and Direct Deposit will be created. View or process regular checks through the Check Printing program, and view or process Direct Deposit checks through the Direct Deposit program. In the Direct Deposit program, you will see all of the driver checks from the pay run that were to be sent as Direct Deposits.
-
In the Direct Deposit program, click on "Export" and the Export window will open up. Confirm that all of the bank information has been set up correctly and that an export file path and/or name has been entered. Click "Export" again. A confirmation box will appear, select "Yes". The report select box will open and you should print the Direct Deposit Audit Report ('DDAUDIT.RPT').
Note: The Audit number will appear in the top right-hand corner.
-
The audit number will appear in the top right-hand corner). Print or close this dialog box and a message box will then appear telling you that a Direct Deposit Audit has been created. Click "Okay", and your file is now ready to be submitted to your bank. Run the Check Register program to update the checks.
-
How do I Setup Driver Rules?
-
Open the Driver Pay Contracts program (PAYCON.EXE), click: Start > Programs > TruckMate > Accounting & Finance > Driver Payables > Driver Pay Contracts
-
There are four types of rules. Choose the rule type that you wish to create (e.g., Pick and Drop, Percentage, Mileage, etc…).
-
Click the '+' button, and this will create the rule. A 'Rule ID' is created automatically. You cannot change the Rule ID.
-
There are a variety of parameters that appear on all rule 'Types', and it is recommended that you familiarize yourself with these. Descriptions of what these fields are and do can be found in the online help.
-
Once you are comfortable with each parameter, you can configure the rule properly. Once you finished setting up the new rule, click the 'P' button to save.
How do I Use the 'Pickup & Drop' function on a Freight Bill, or Trip Basis?
-
Assuming the contract has been created and the appropriate pick drop rules have been applied to it, then, if using a rule that has been set up as 'Trip Based - True', the Dispatch program will automatically apply the pay to the driver when the trip is delivered. For more information go to the online help, Driver Contracts - Pick-up and Drop Rules, and scroll down to the Trip Based information.
-
If using 'Trip Based - False', or 'Freight Bill' based rules, go to the Customer Service program, and, on the Driver Pay tab, enter the pickup and delivery driver. When the record is saved, the pay will be automatically generated.
How do I Setup a Pay Rule that will only be calculated if a trip originates out of a specific region (BC) to any other point?
-
Open the Driver Pay Contracts program (PAYCON.EXE), click: Start > Programs > TruckMate > Accounting & Finance > Driver Payables > Driver Pay Contracts
-
Create the new rule. Look for the 'From Zone', In 'From Zone' columns.
-
In the 'From Zone' column, you will enter the zone you wish to restrict this rule being used 'from'. In other words, the 'Start Zone' of either the freight bill or trip leg must originate from this particular zone, or zone below this zone in the zone tree.
-
In the 'In From Zone' column, you will want this to be 'True'. You would put it to 'False' only if you want to do the opposite, or restrict this rule to be used only when the 'Start Zone' is not originating from this zone.
-
To have a rule calculate only if the 'Freight Bill' or 'Trip Leg' go to a particular zone, you would use the 'To Zone', 'In To Zone' columns. The same principles apply as in steps 2 and 3.
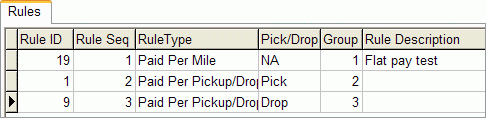
How do I Setup a 'First and Last Drops Free' Pay Rule?
-
If you are paying your Drivers on a Pick/Drop basis, but do not include the first pickup and last drop as payable duties, configure your Pay Rule as so.
-
Open the Driver Pay Contracts program (PAYCON.EXE), click: Start > Programs > TruckMate > Accounting & Finance > Driver Payables > Driver Pay Contracts
-
Create a new rule. Look for the 'Trip Based' field and double click it to set it’s value to 'False'. Find the 'Min Num' field and set it to '2'. Drag this rule from the 'Picks/Drops' grid up to the right into the 'Rules' tab grid.
-
Still working with your new rule, double click the 'Pick/Drop' field (in the Rules tab) and make sure it is set to 'Pick'. Set the 'Group' field value to '2' for this rule.
-
Repeat step '2'.
-
Working with your second rule, double click the 'Pick/Drop' field (in the Rules tab) and make sure it is set to 'Drop'. Set the 'Group' field value to '3' for this rule.
-
If your Rules tab looks similar to this example, you’re done!
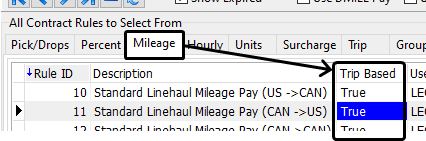
How do I Setup a Mileage-Based Fuel Surcharge?
Most trucking companies today pay their Owner Operators (O/O) a Fuel Surcharge to assist with the high cost of fuel. TruckMate allows flexibility to pay the Driver a Percentage of the fuel surcharge the company collects from the customer, or it can be paid on a per Mileage basis (trip based), and tied to the average fuel costs the company obtains from government or trucking association web sites.
|
The Mileage Rules > Fuel Surcharge only pertains to trip based Mileage rules (i.e. Trip Based = True).
|
To pay the O/O a Mileage Rate based on the average fuel prices the price matrix must be created in the Driver Contracts program. The averages are maintained in the Codes Maintenance program > Accessorial Charges section.
-
Open the Codes Maintenance program (CODES.EXE), click: Start > Programs > TruckMate > Profiles > Codes Maintenance
-
Select the Accessorial Charges tab from the 'View' Menu.
-
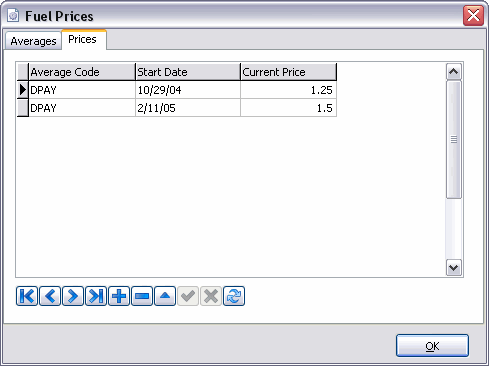
Select the 'Fuel Price' button near the right-side edge of the form.
-
The Fuel Prices window will display, where the Averages can be setup and/or maintained in the future. A new Average Code can be added to the Averages tab for Driver Pay or an existing code can be used (i.e. the National Average).
-
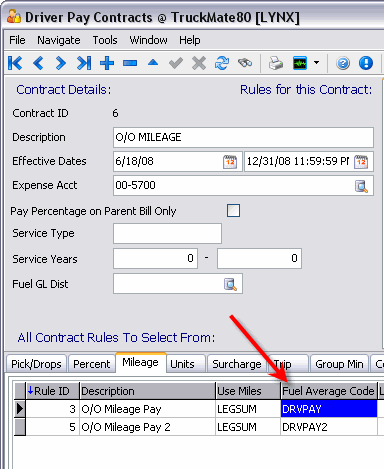
With the Average set, you can now open the Driver Pay Contracts program (PAYCON.EXE), click: Start > Programs > TruckMate > Accounting & Finance > Driver Payables > Driver Pay Contracts
-
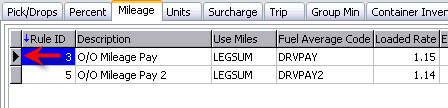
As the mileage rules are being set up in the Driver Pay Contracts program, the fuel average created in Codes Maintenance must be added to the 'Fuel Average Code' field on the Mileage tab (where the mileage rule is configured - see example). The average established for Accessorial charges can be used, if it applies, or new codes can be created if necessary. Each rule is set up with its own fuel average code. These codes can be the same for each rule or be different for each rule, but in the Fuel Surcharge tab, a new grid matrix will have to be created for each rule.
-
The mileage rule can be set up as any other rule using all the same parameters; the only difference is that when the 'Fuel Average Code' field is populated, it will pay the Driver a rate/mile for fuel surcharge.
-
Select the Mileage tab. At the bottom of the screen on the Mileage tab are three more tabs, one of which is the Fuel Surcharge tab. This is where the grid matrix will be created upon which the Driver will be paid.
-
Each Mileage Rule will have its own grid matrix of Fuel Surcharge pay. Select one Mileage Rule detail record by clicking the grey area before the first column field ( see example) from the Mileage tab grid, then select the Fuel Surcharge tab.
-
Now create the grid based on how the O/O will be paid as the cost of fuel changes.
-
Finally, on the Rules tab, in the 'Fuel Surcharge' field, enter the Average Code that will be used to determine the Mileage Rate to be paid to the Driver.
How do I Pay a Driver a Taxable and Non-Taxable amount at the same time?
-
Open the Driver Pay Contracts program (PAYCON.EXE), click: Start > Programs > TruckMate > Accounting & Finance > Driver Payables > Driver Pay Contracts
-
Create rules for in this case, mileage. Go to the Mileage tab in the lower portion of the screen. Use the '+' button to add the first rule, put 'True' in the taxable field and enter the taxable portion of the rate per mile in that rule.
-
Then, create a second rule and put 'False' in the taxable field and enter the taxable portion of the rate per mile in that rule.
-
Drag both rules to the Rules tab (in the upper right-hand portion of the screen), and contract you wish to apply them to.
-
Go to the 'Group' field (far right-hand side of the grid) and double click to edit the group number - ensure that each rule is in it’s own group. (If they were together in one group, the program would find a match at the first rule and then stop looking for another - with two groups it will look for a match in each group and pay both rules.)
How do I Setup a Deduction so that it points to the right GL Account?
-
Open the Driver Pay Contracts program (PAYCON.EXE), click: Start > Programs > TruckMate > Accounting & Finance > Driver Payables > Driver Pay Contracts
-
While creating the new deduction, you will notice that there is a field labeled 'GL Account'. This is where you will specify which GL account to use.
-
Double-click in the 'GL Account' field. This will open a listing of your GL Accounts, as configured in the GL Chart of Accounts program. Search for the GL account you wish to be credited when you run the Driver Deduction Register.
The entries in the deduction register are:
-
Debit: from Driver Payable control account
-
Credit: from account specified on the deduction code
-
How do I Get the system to Credit the Driver Payable control account?
-
Open the Driver Pay Contracts program (PAYCON.EXE), click: Start > Programs > TruckMate > Accounting & Finance > Driver Payables > Driver Pay Contract
-
Make sure that you have one "GL account" designated as 'Type' "Driver Payable". You cannot have multiple driver payable control accounts.
-
Open the GL Chart of Accounts program (GLM.EXE), click: Start > Programs > TruckMate > Accounting & Finance > General Ledger > GL Chart of Accounts
-
Look for the account that should be the Driver Payable control account.
-
Look at the field labeled "Type". It should say "Driver Payable". If it does not, and there is no other account set to this "Type", Driver Pay will not function correctly. To set this account as "Type" Driver Payable, select the down arrow to open the combo-box listing. Now scroll through the listing until you find "Driver Payable". Select it, and save the GL Account record.
-
The system will now be able to find your driver payable control account, and properly post the credit when the Driver Pay Register is run, and it will debit when the Driver Deduction Register is run.
How do I Calculate a Driver bonus?
Calculating a Driver Bonus is completed using the Driver Pay Audit program. But before paying a bonus, the Pay Code must be entered in the Driver Pay Contracts program on a specific contract assigned to that driver. Then the bonus is calculated in the Driver Pay Audit program.
-
Open the Driver Pay Contracts program (PAYCON.EXE), click: Start > Programs > TruckMate > Accounting & Finance > Driver Payables > Driver Pay Contract
-
From the navigator bar at the top of the screen, find the contract on which the bonus is to be paid.
-
In the "Rules for this Contract" section of the screen (upper right portion) be sure there is a code created for the Bonus to be paid. If there is no code created, it must be created before it can be paid in the Driver Pay Audit Program.
-
Once the pay has been approved, it needs to be run through the Driver Pay Register program. To open the Driver Pay Register program (PAYREG.EXE), click: Start > Programs > TruckMate > Accounting & Finance > Driver Payables > Driver Pay Register.
-
Then, open the Driver Pay Audit program (PAYAUDIT.EXE), click: Start > Programs > TruckMate > Accounting & Finance > Driver Payables > Driver Pay Audit
-
Right-click on the "Driver" to receive the bonus and go to the "Calculate Driver Bonus" option.
-
Select whether the bonus is to be calculated on "Empty" or "Loaded miles".
-
Select the cut-off date for the bonus to calculate. The bonus will calculate on all legs completed up to and including that date.
-
Enter the "Rate Per Mile" to be calculated, i.e., 1 cent/mile = .01
-
Select the "Contract" the bonus is to be calculated on.
-
Select the correct "Pay Code" and enter it in the `Pay Code' field.
-
Enter the date the transaction is to occur in the "Transaction Date".
-
Enter a "Description" for the Bonus - this is a MANDATORY field.
-
Press "Okay".
-
If the bonus is to be paid in the current pay period, run the Driver Pay Register again so the bonus will appear on the Driver Statement.
Setting up a Driver Pay Contract based on LTL Mileage
Overview
Refer to LTL Mileage tab for general information about driver pay contracts based on LTL Mileage.
Overview of the basic steps:
-
A) Set the PAYAUDIT.EXE application configuration options to determine how the mileage rates will be calculated. (A setting of True uses much simpler logic and allows you to skip steps B and C.)
-
B) Ensure the power unit’s are associated with an equipment class and that each equipment class is assigned a MPG value.
-
C) Ensure the fuel average prices are set up and maintained using the Profiles > Codes Maintenance program > Accessorial Charge Codes tab > Fuel Price button.
-
D) Create new LTL Mileage pay rules on the Driver Pay Contracts program > Rules tab > LTL Mileage sub-tab.
| The PAYAUDIT.EXE > Calculate LTLMILEAGE by Mileage Rate setting is critical to how payments associated with the LTL Mileage will be calculated and whether the fuel surcharge driver pay expenses will be allocated to individual freight bills. Similarly, the Use Driver Profile Assigned Punit Eqclass is critical to what MPG value will be used in the calculation. |
Utilities > Application Configurator > PAYAUDIT.EXE
| Option | Description |
|---|---|
Calculate LTLMILEAGE by Mileage Rate |
Determines the logic for LTL Mileage based driver pay rules that calculate driver pay contracts based on straight mileage and mileage rates instead of MPG.
This setting also triggers special logic regarding creating driver pay records for cancelled freight bills and distributing the expense allocation for the fuel surcharge driver pay amount across all of the freight bills proportionally. |
Use Driver Profile Assigned Punit Eqclass |
Determines what power unit equipment class MPG value to use when calculating the LTL Mileage driver pay value.
|
-
Enter MPG values for each of the power unit equipment classes using the Profiles > Codes Maintenance program > Equip Class tab.
-
Go to the Profiles > Power Unit Profiles program > Basic Info tab and ensure each power unit is associated with an Equipment Class using the drop-down list.
-
If you set the PAYAUDIT.EXE > Use Driver Profile Assigned Punit Eqclass app. config. to True, go to the Profiles > Driver Profiles program > Address tab and use the Default Power field to associate each driver with a default power unit. In this case, the equipment class for the driver’s default power unit would provide the MPG value to use when calculating the LTL Mileage driver pay value.
-
If you set the PAYAUDIT.EXE > Calculate LTLMILEAGE by Mileage Rate app. config. to False, go to the Profiles > Codes Maintenance program > Accessorial Charge Codes tab and use the Fuel Price button to set the fuel prices to use when calculating the LTL Mileage driver pay value.
See Creating a Fuel Price Average Code and setting fuel prices for more information.
-
Once all the PAYAUDIT.EXE application configuration] options, power unit equipment class MPG values, average fuel prices are set up, go to the Driver Pay Contracts program > Rules tab > LTL Mileage sub-tab and click
 Insert to create a new contract pay rule for each equipment class or required scenario. Examples are provided below.
Refer to LTL Mileage tab for general information about driver pay contracts based on LTL Mileage and a description of each column in the driver pay contract rules grid.
NOTE: Cancelled Freight Bills / PayCode If you enter a valid Pay Code into the LTL Mileage contract rule and a freight bill on this trip is cancelled the system will create a driver pay record associated with the cancelled freight bill.
EXAMPLES
Example: PAYAUDIT.EXE > Calculate LTLMILEAGE by Mileage Rate = TRUE
This LTL Mileage example assumes the average fuel price to be around $3.50 and a $2.00 base deduction so we are using a set rate factor of $0.15 / mile. to use when calculating the driver compensation. A major fuel price change would require this Min value to be changed manually. (The Fuel Avg, Max, Base Ded, Punit Class and Pay Code values are ignored.)
-
Min = $0.15 (Min is used as a factor here and is not the minimum fuel price)

-
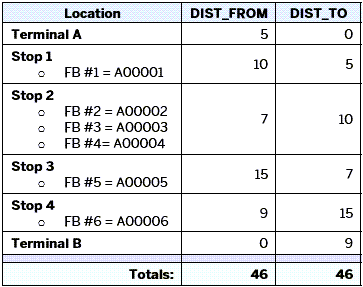
Total Distance = 46 miles
The driver pay calculation is fuel Min factor (f) x trip distance (d).
$0.15 x 46 = $6.90
NOTE: When the miles are calculated for each stop, delivery freight bills use the END_ZONE for the calculation while pickup freight bills use the START_ZONE.
Example: PAYAUDIT.EXE > Calculate LTLMILEAGE by Mileage Rate = FALSE
For this LTL Mileage example,
The average Mile Per Gallon for an equipment class is configured in the Codes Maintenance program > Equipment Class tab and each power unit is assigned an equipment class.

-
MPG for Punit eq. class used on trip = 12 MPG
-
MPG for the default driver’s Punit eq. class = 10 MPG
-
Current fuel price / gallon = $3.50
-
Min = $0.00
-
Max = $9999.00
-
Base deduction = $2.00
-
Total distance = 46 miles
-
Total distance from terminal = 93 miles
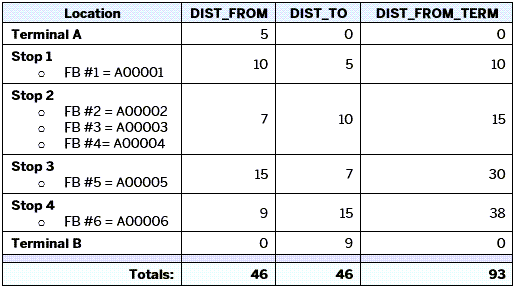
NOTE: There are 6 FBs (freight bills) but since 3 of the FBs have the same destination, only 4 stops. The total DIST_FROM and DIST_TO (46) will also not equal the total LTL miles (60) in this example because 3 FBs have the same stop.
When the miles are calculated for each stop, delivery freight bills use the END_ZONE for the calculation while pickup freight bills use the START_ZONE.
To calculate the driver pay:
-
Determine power unit MPG:
-
Since the PAYAUDIT.EXE > Use Driver Profile Assigned Punit Eqclass app. config. is set to True, use the MPG (10) associated with the equipment class for the power unit linked to the driver’s profile instead of the MPG (12) associated with the actual power unit assigned to the trip.
Power Unit MPG = 10
-
-
Determine distance travelled:
NOTE: There are 6 FBs (freight bills) but since 3 of the FBs have the same destination, only 4 stops. The total DIST_FROM and DIST_TO (46) will also not equal the total LTL miles (60) in this example because 3 FBs have the same stop.
Total Distance = 46 miles
When the miles are calculated for each stop, delivery freight bills use the END_ZONE for the calculation while pickup freight bills use the START_ZONE.
-
Calculate fuel used on trip:
10 MPG x 46 miles = 4.6 gallons
-
Calculate fuel surcharge driver pay factor:
The Fuel Prices > Average Code determines which value to use for the calculations. These values are maintained using the Profiles > Codes Maintenance program > Accessorial Charge Codes tab > Fuel Price button.
Current fuel price $3.50 - Base deduction $2.00 = $1.50 / Gal
-
Calculate driver pay:
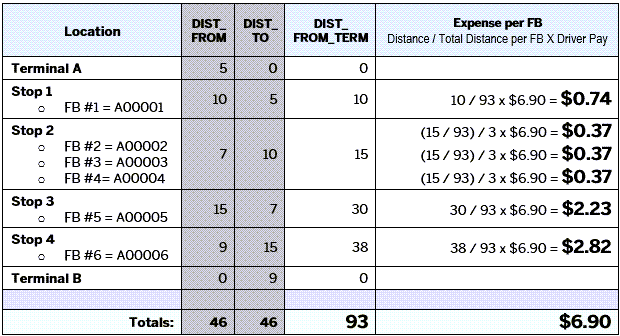
4.6 Gallons x $1.50/ Gal = $6.90
-
Calculate driver pay records expense allocation and distribute to FBs:
This calculation is used to divide and distribute the fuel surcharge driver pay expense to individual freight bills based on the distance from the terminal for each freight bill/stop.
For our example, the calculation for each freight bill is the distance from the terminal for this freight bill divided by the total DIST_FROM_TERM multiplied by the total driver pay.
If there are multiple freight bills associated with the same stop, the expense is divided among them for this stop.
How do I use Zone-to-Zone Flat Pay with DMILE?
-
Open the Mileage Server program (MILESERV.EXE), click: Start > Programs > TruckMate > Utilities > Mileage Server
-
Open the Driver Profiles program (DRIVERS.EXE), click: Start > Programs > TruckMate > Profiles > Driver Profiles
-
Browse to the Driver you wish to configure, and in the 'Mileage Profile' field, make sure 'DEFAULT' (or 'DMILE' depending on your setup) is displayed. Click the 'Mileage Profile' button and make sure that the 'DEFAULT' profile has 'DMILE MANUAL ROUTING' as its 'Available Services' option. Save the Driver’s record once this has been configured by clicking the 'checkmark' button.
-
Next, open the Customer Service Program (CSERV.EXE), click: Start > Programs > TruckMate > Billing > Customer Service
-
You must now ensure that Manual Routes are added to the Mileage tab in the correct format: specifically, you must use the 'Short Description' of the route when adding them to Customer Service. See the Zone Codes tab of Codes Maintenance for the 'Short Description' entries.
Note: Do not enter the Province or State into the 'Orig City' or 'Dest City' fields, as this is assumed from the 'Orig Prov. / State' and 'Dest Prov. / State' values.
-
Right-click on the 'Mileage' button in Customer Service and select 'Interactive Mileage'. A pop-up window will appear from which you may select the 'DMILE Manual Routing'.
-
Click the 'Lookup' button. If you have set up your manual mileage entry correctly, the system should display a 'r;Result' mileage. Click the 'Paste' Button to paste this mileage into the freight bill.
-
Dispatch the trip with the Dispatch program and review resulting driver pay in the Trip Envelope Processing program, where you will be able to see that the system used the DMILE mileage profile.
Using the Driver Pay Contract Review Wizard
The Driver Pay Contract Review Wizard available in the Tools menu of the Driver Pay Contracts program allows users to filter pay contracts/rules in the system for easier adjustment in a procedure very similar to the client rate sheet review.
-
Go to Accounting & Finance > Driver Payables > Driver Pay Contracts program.
-
Go to Tools > Contract Review.
The Driver Pay Contract Review Wizard will open.
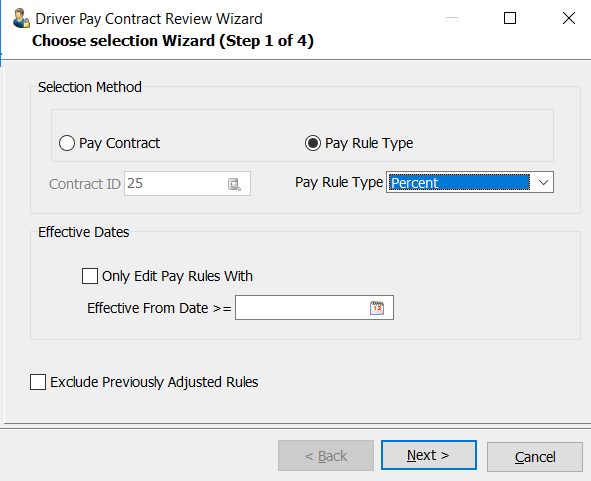
Choose selection wizard (Step 1 of 4)
Indicate which records you want to adjust using the selection criteria.
| Field | Definition |
|---|---|
Selection Method Indicate if you want to review and adjust driver pay records by each pay contract or if you only want to select a subset based on a specific pay rule type. |
|
Pay Contract |
Use the pick-list to indicate which pay contract to adjust. |
Pay Rule Type |
Use the drop-down list to indicate which specific pay rule type to adjust. |
Effective Dates |
|
Only Edit Pay Rules With |
Select this checkbox to restrict the selection to a specific subset of records based on their "effective from" dates. |
Effective From Date |
If an individual pay rule’s "Effective From" date falls before the date chosen in this control, it will not appear in the next steps of the driver pay contract review wizard. |
Exclude Previously Adjusted Rules |
Select this checkbox to filter out those pay rules that have already been adjusted. |
Click Next.
Review and select pay rules (Step 2 of 4)
This window will display all the pay rules matching the criteria selected in the previous window. You will need to review the information and select those pay rules that need to be adjusted.
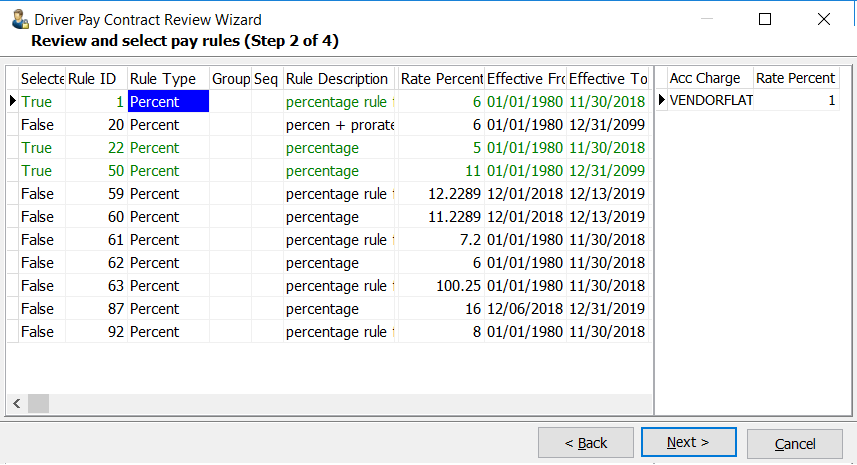
Select the records using one of the following methods:
-
Double click the entry in the Selected column to toggle the True/False value for an individual record.
-
Right-click and use the shortcut meant to Select or De-Select individual record or all the records for this same rule type.
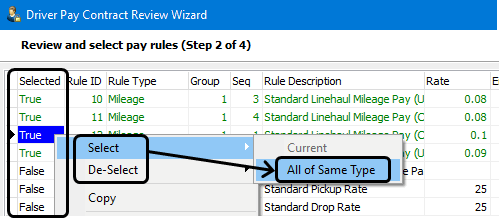
Selected rules will have their row highlighted in green.
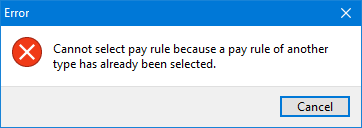
Note: If you are filtering by Pay Contract and the contract contains multiple pay rule types, you will only be able to select one pay rule type to work with at a time.
If you try double-clicking to select a rule of a different pay rule type, an error message will appear.
Click Next.
Enter adjustment criteria (Step 3 of 4)
This step in the wizard is used to adjust the selected pay rules. The window layout and the available adjustment options will differ slightly depending on which pay rule type was selected.
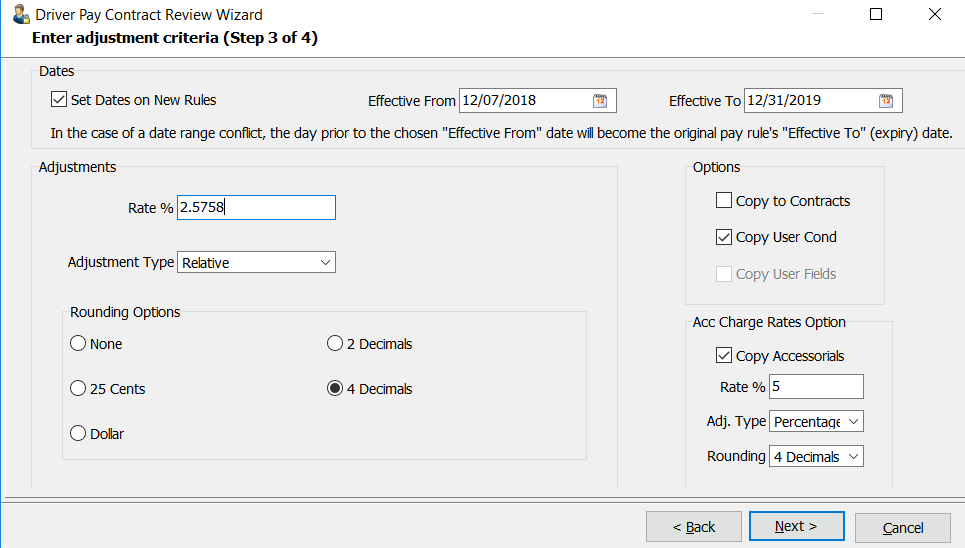
| Field | Definition |
|---|---|
Set Dates on New Rules Effective From / To |
If the selected driver pay rule(s) is being updated/copied for another period, check the "Set Dates on New Rules" flag and provide the "Effective From" and "Effective To" dates for the new rule(s). Note: The "Effective From" date will become the new "Effective To" date (minus one day) of the original driver pay rule that is being adjusted/copied to prevent any overlap/conflict between the old and new pay rules. |
Rate |
Depending on the type of pay rule being adjusted, this field label will appear as one of the following:
All of these rates will accept up to four decimal places. When updating the copied pay rules, the system will use this value in combination with the "Adjustment Type" to determine the new rate value of the new rules. |
Adjustment Type |
There are three available options to determine how the entered rate will be applied to the copied driver pay rules:
|
Rounding Options |
Apply rounding when applying the adjusted rate to the new driver pay rules:
|
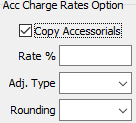
Options |
Copies miscellaneous options to the new driver pay rules:
|
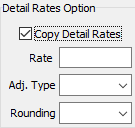
Detail Rates Option |
These options appear dynamically based on the type of driver pay rules being adjusted/copied.
|
Click Next.
Review and finalize adjustments (Step 4 of 4)
The final step in the wizard displays a summary of all the changes proposed for the affected driver pay rules that will be adjusted.
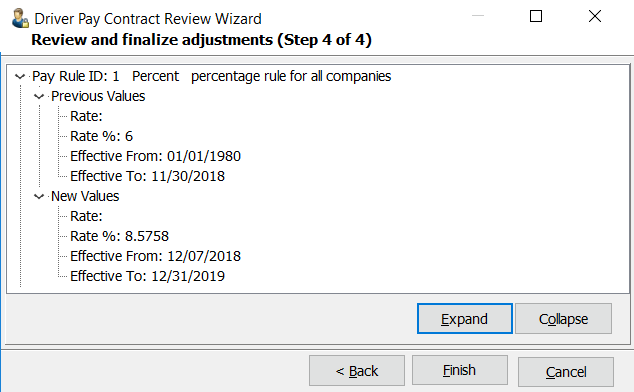
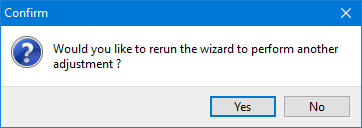
If all the proposed changes are acceptable, click Finish to complete the adjustment process.
A progress bar is displayed while the system copies the driver pay rules and applies the adjustments to the new rule sets.
Completion
When completed, you will have an opportunity to continue directly to the next adjustment.
The new pay rules will be created exactly per the original pay rules, (except with the new rate and new Effective From / To dates if you had selected the "Set Dates on New Rules' checkbox option).
The revised pay rules will have entries in the following columns in the following columns in the grids displaying the contract rules.
CREATED_BY: User who created this pay rule.
BASED_ON: Comment containing the rule id of the copy from pay rule and the rate increase info per the Review and Finalize Adjustments screen. Content will differ depending upon the rule type being adjusted and the adjustment type. For example "Copied from rule 7; Rate % increased by 0.2".
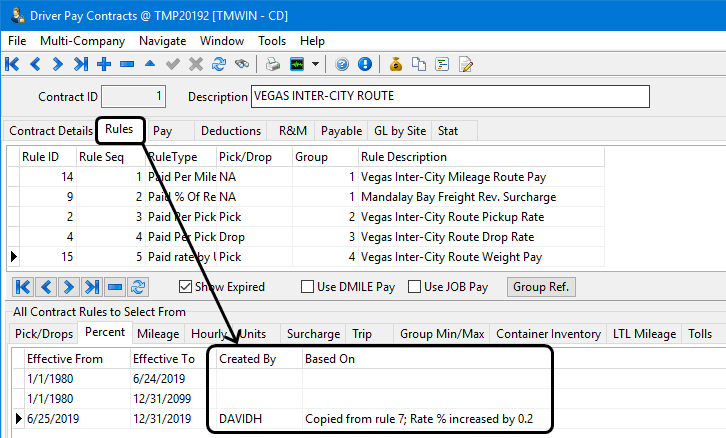
If you had selected the 'Copy to Contracts' option, this newly created rule will automatically be added to all sets of contract rules that were associated with the original rule using the next available Rule Seq. number but the same Group number.
| If have setup any contracts or rules with the rate in the description, these will need to be updated manually to reflect the new rate. For example if you had created a rule called "10% Rule" and you changed the value from 10% to 12%, you will need to manually change the rule description too. |
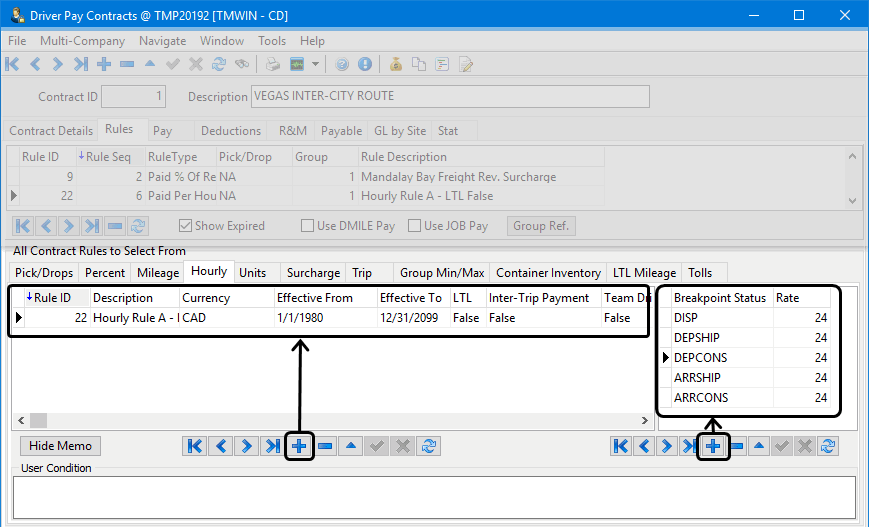
Creating an Hourly Driver Pay Rule
The hourly driver pay contract must be setup to follow your intended dispatching workflow by configuring the "Status Breakpoint" values appropriately.
-
Go to Accounting & Finance > Driver Payables > Driver Pay Contracts program.
-
Go to the Rules tab > Hourly sub-tab.
-
Click
Insert. -
Define the hourly driver pay rule paying particular attention to the following columns:
-
LTL: When "False", only the trip status table (TRIPSTAT) will be consulted when determining hourly driver pay. When "True", both the freight bill (ODRSTAT) and trip (TRIPSTAT) status tables will be consulted.
-
Effective From / Effective To: Defines the date range this rule is in effect.
-
Inter-Trip: This True/False field determines whether the current breakpoint should be bookended against the last timestamp available for the driver’s previous trip/freight bill.
-
-
Define the hourly pay status rates (status breakpoints) as needed by using the grid to the right of the main rule grid:
-
Rate: Sets the hourly rate.
-
Breakpoint Status: Defines the status that will "bookend" a paid portion of time for the driver. For example: choosing "DISP" (i.e. "Dispatch" status code behavior) and "ARRSHIP" (i.e. "Arrive Shipper [Pick Up]" status code behavior) as status breakpoints will pay the driver an hourly wage for driving to the shipper.
-
-
Click
 Post to save your changes.
 -
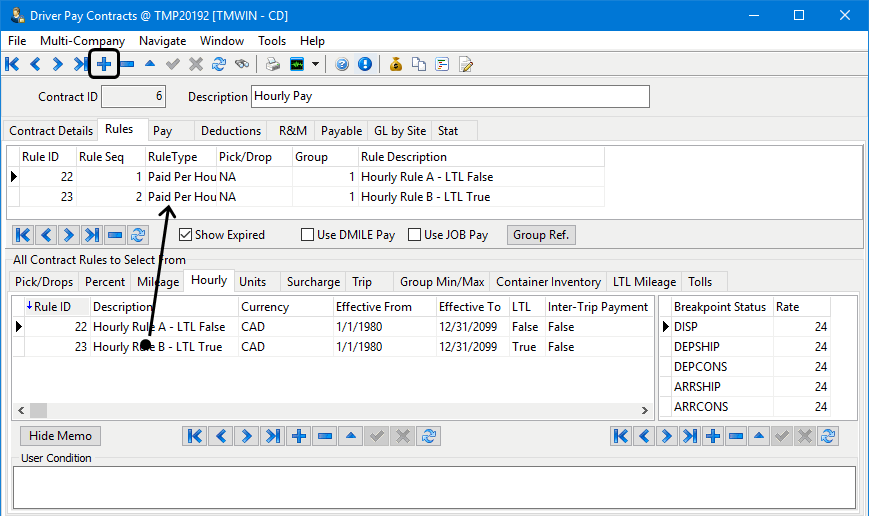
Add all the remaining payable portions of the driver’s dispatch workflow based on the appropriate "Breakpoint Status" values. For example:
-
DISP
-
ARRSHIP (drive time heading to pickup location)
-
DEPSHIP (pickup time)
-
ARRCONS (drive time to delivery location)
-
DEPCONS (delivery time)
Notes:
-
If you require different hourly pay rates when the drivers are being assigned as a team, create a duplicate set of rules but set the "Team Driver" column on each pay rule to "True" for this second set.
-
If you require hourly pay rules to be cutoff once a particular mileage for the leg is exceeded, ensure you enter a value in the "Max Distance" column (i.e. "50").
-
-
Click
Post to save your changes.Once the hourly pay rules and breakpoint statuses have been defined, you can add the hourly pay rules to a pay contract and assign this contract to the drivers. For example:
-
Click
Insert on the upper navigation bar for the Driver Pay Contracts grid to create a new pay contract. (This example uses Hourly Pay for a description.) -
Enter the other required details for the other pay contract header tabs (i.e. Contract Details, Pay, Deductions, etc.) to finish creating the pay contract.
-
Drag and drop the hourly rules you defined from the lower grid up into the top Rules grid.
-
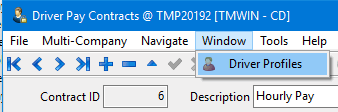
Go to the Window menu and select Driver Profiles to open the Driver Profiles program.
-
Locate the driver and go to the Pay Contracts tab.
-
Click
Insert to create a new pay contract.
-
Enter the Effective From date and double-click the "Primary Contract" column to select the hourly pay contract created in the Driver Pay Contracts program.
-
Choose a Secondary Contract. A Secondary contract refers to a pay contract that will only be in effect for the duration of this assigned trip. In the Dispatch program > Trip Grid, the dispatcher can change the value in the 'Secondary Contract' field to 'True' to force the driver pay calculations to be based on this secondary contract.
-
Click
Post to save your changes.
Showing Driverpay Hourly Pay Drill Down
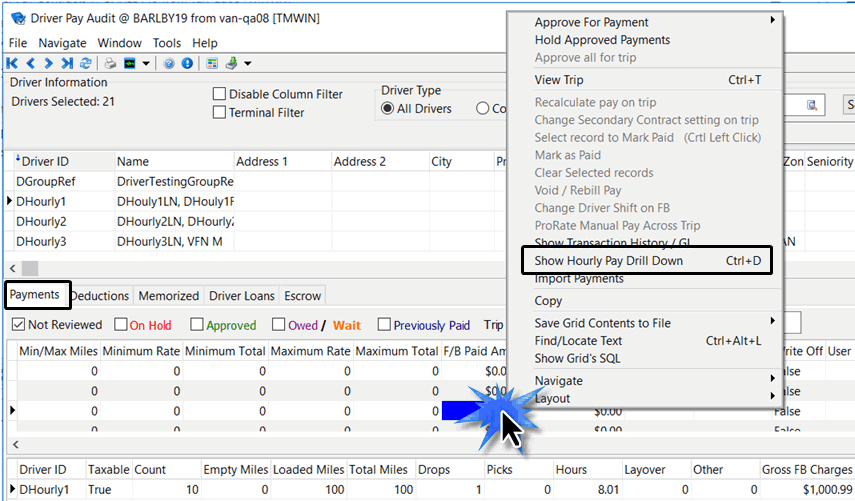
The Show Hourly Pay Drill Down right-click shortcut menu option is available in the Payments tab on the Driver Pay Audit program and to the Driver Pay tab on the Trip Envelope Processing program. See Hourly tab for related information.
This audit trail table details the hourly driver pay logic used to determine the final pay and allows for the entries in certain fields to be edited.
Driver Pay Audit > Payments tab
Trip Envelope Processing > Driver Pay tab
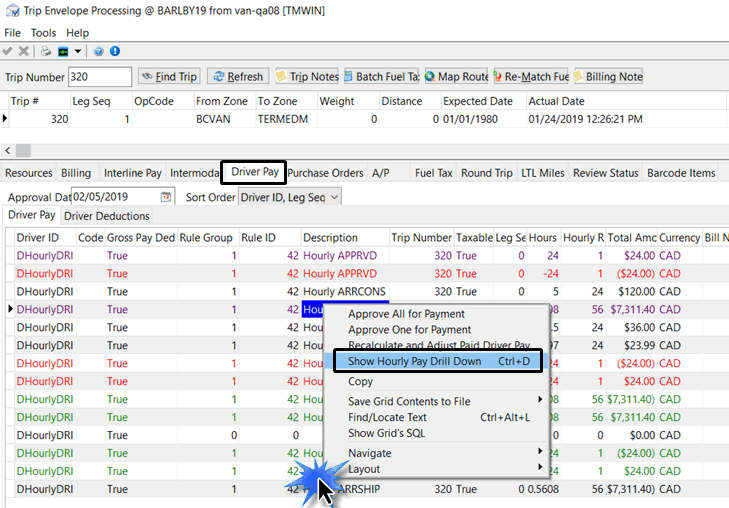
Selecting the Show Hourly Pay Drill Down right-click shortcut menu option will display the details and line items associated with the hourly time entries.
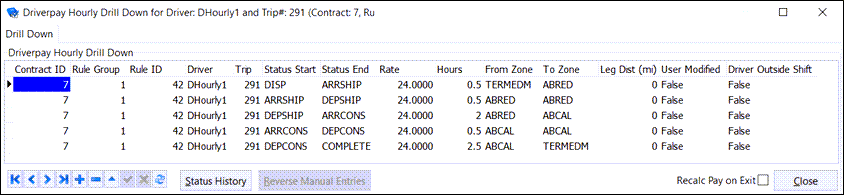
| The results displayed in the drill-down are filtered based on the driver, trip, contract and pay rule ID. |
The Driverpay Hourly Drill Down for Driver window allows you to modify the entries in the following fields. You can either insert new values or change the existent values as long as the hourly driver pay is not being processed (audited/approved/etc.).
-
Status Start
-
Status End
-
Time Start
-
Time End
-
Rate
-
From Zone
-
To Zone
-
Leg Dist (Mi)
There are other functions provided on the Driverpay Hourly Drill Down for Driver window.
If any entries are manually changed, the User Modified field for that row will display as True.
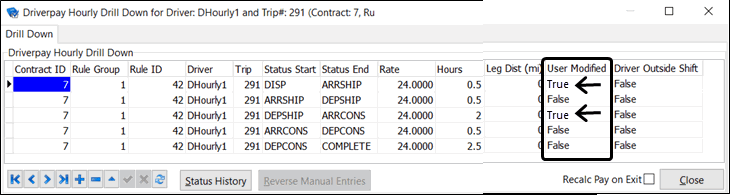
To reverse the changes back to the original auto-calculated values, click the Reverse Manual Entries button.
Status History
Click the Status History button to display the trip status history line item entries.
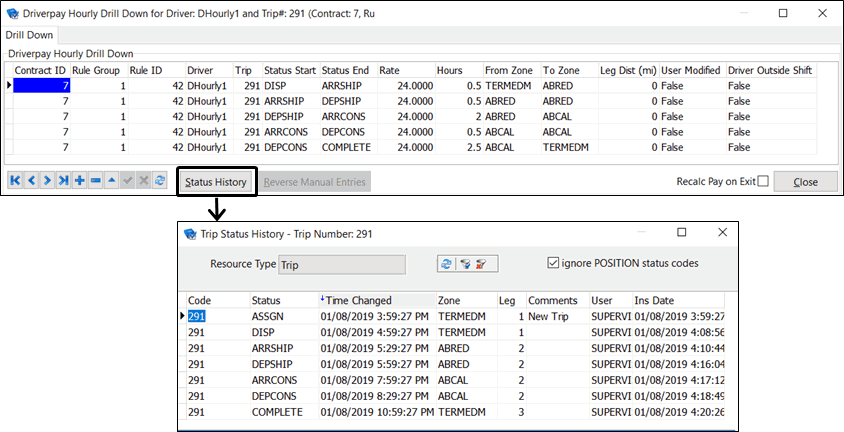
Select the Ignore POSITION status codes checkbox to remove any status history entries where the status is "POSITION" to make it easier to spot the essential status changes.
| When a status update is processed by the TruckMate dispatching system against a freight bill, the system checks the most recent existing status code (ODRSTAT) of the affected freight bill. If the most recent status is the same as the incoming status being processed, the system will update the status code to "POSITION". |
Reverse Manual Entries
The Reverse Manual Entries button is only enabled if manual changes were made to the data in the grid. This function will remove any changes to the calculated hourly pay records and revert the data back to the system-calculated values.
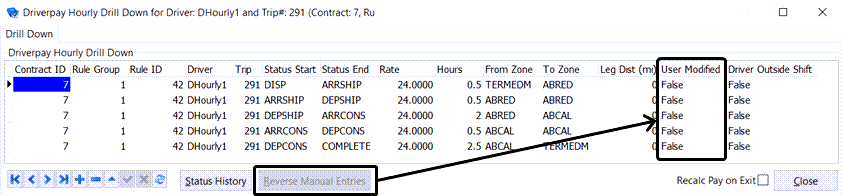
The User Modified field for that row will be reset back to False.
Recalculate Driver Pay on Close
If this checkbox is selected the system will re-generate the hourly pay based on any modifications made in the drill-down form when you click the Close button.
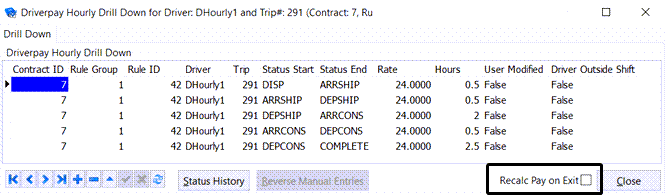
The following fields on the main grid will affect the recalculation of driver pay when this flag is checked and the form is closed:
-
Rate
-
Time Start / Time End
-
Leg Dist (may invalidate a particular row for hourly pay based on the "Min/Max Distance" of the hourly pay rule
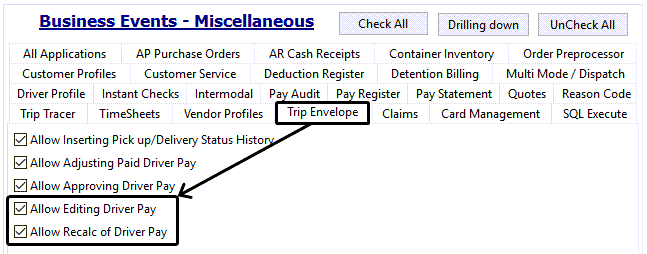
There are two security configuration options that can limit a user’s access to the Hourly Pay Audit screen and its recalculation feature within both the Trip Envelope and Driver Pay Contract programs. (Utilities > Security Configuration > Security > Business Events > Misc > Trip Envelope)
-
Allow Editing Driver Pay
-
Allow Recalc of Driver Pay
Problem Resolution
When paying by Jurisdiction why are my Miles incorrect?
When paying your Drivers by Jurisdiction, the Driver Pay Contract program uses the 'Reporting 1' field in the Mileage Profile to get the Miles.
-
Open the Customer & Vendor Profiles program (PROFILE.EXE). Click: TruckMate > Profiles > Customer & Vendor Profiles
-
On the Customer tab, click the Mileage Profile button. The Mileage Profile Maintenance window will display.
-
Use the TruckMate navigational bar to browse to your 'Default' Mileage Profile. Note the settings in the 'Reporting 1' field near the bottom right of the window. If these settings are not configured properly, set them to values that you would like to use when doing Jurisdiction rating. For more information on the Mileage Profile Maintenance window, click here.