Creating custom grid profiles
The Grid Customizer program can be used to change column header labels, remove columns from the grid, and make changes to the column order. Custom formatting rules provide the ability to highlight specific rows or records if they meet specific criteria. (e.g. missing data, incorrect entry or out of target range.)
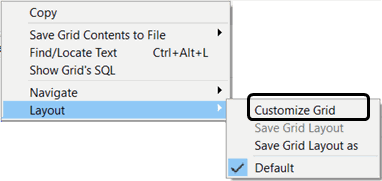
For almost every grid displayed on a program window, the right-mouse Layout > Customize Grid shortcut menu option opens the Grid Customizer window and provides the ability to customize the appearance of the data grids. This is only available to users who have been assigned the grid customization security permissions.
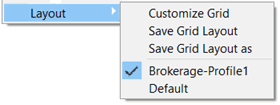
Changes to a grid can be saved as a custom profile and distributed to all users on the TruckMate system, or each user can customize the column display just for their own login name. This can be used to customize a Grid design to meet specific functions and roles within your company. For example, you can create separate designs and grid layout profiles specifically for brokerage use and others for high-priority orders.
| If working on a monitor or workstation that can only display 256 colors, many of the Customize Grid functions are disabled while using TruckMate programs. Displays with such low color depth have problems rendering the various color effects that are applied to TruckMate program grids, making them nearly impossible to see. |
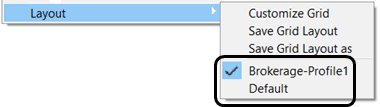
Once you have created your own custom grid layout profiles, they will appear at the bottom of the Layout window. You can also distribute any customized profiles to other specific groups of users.
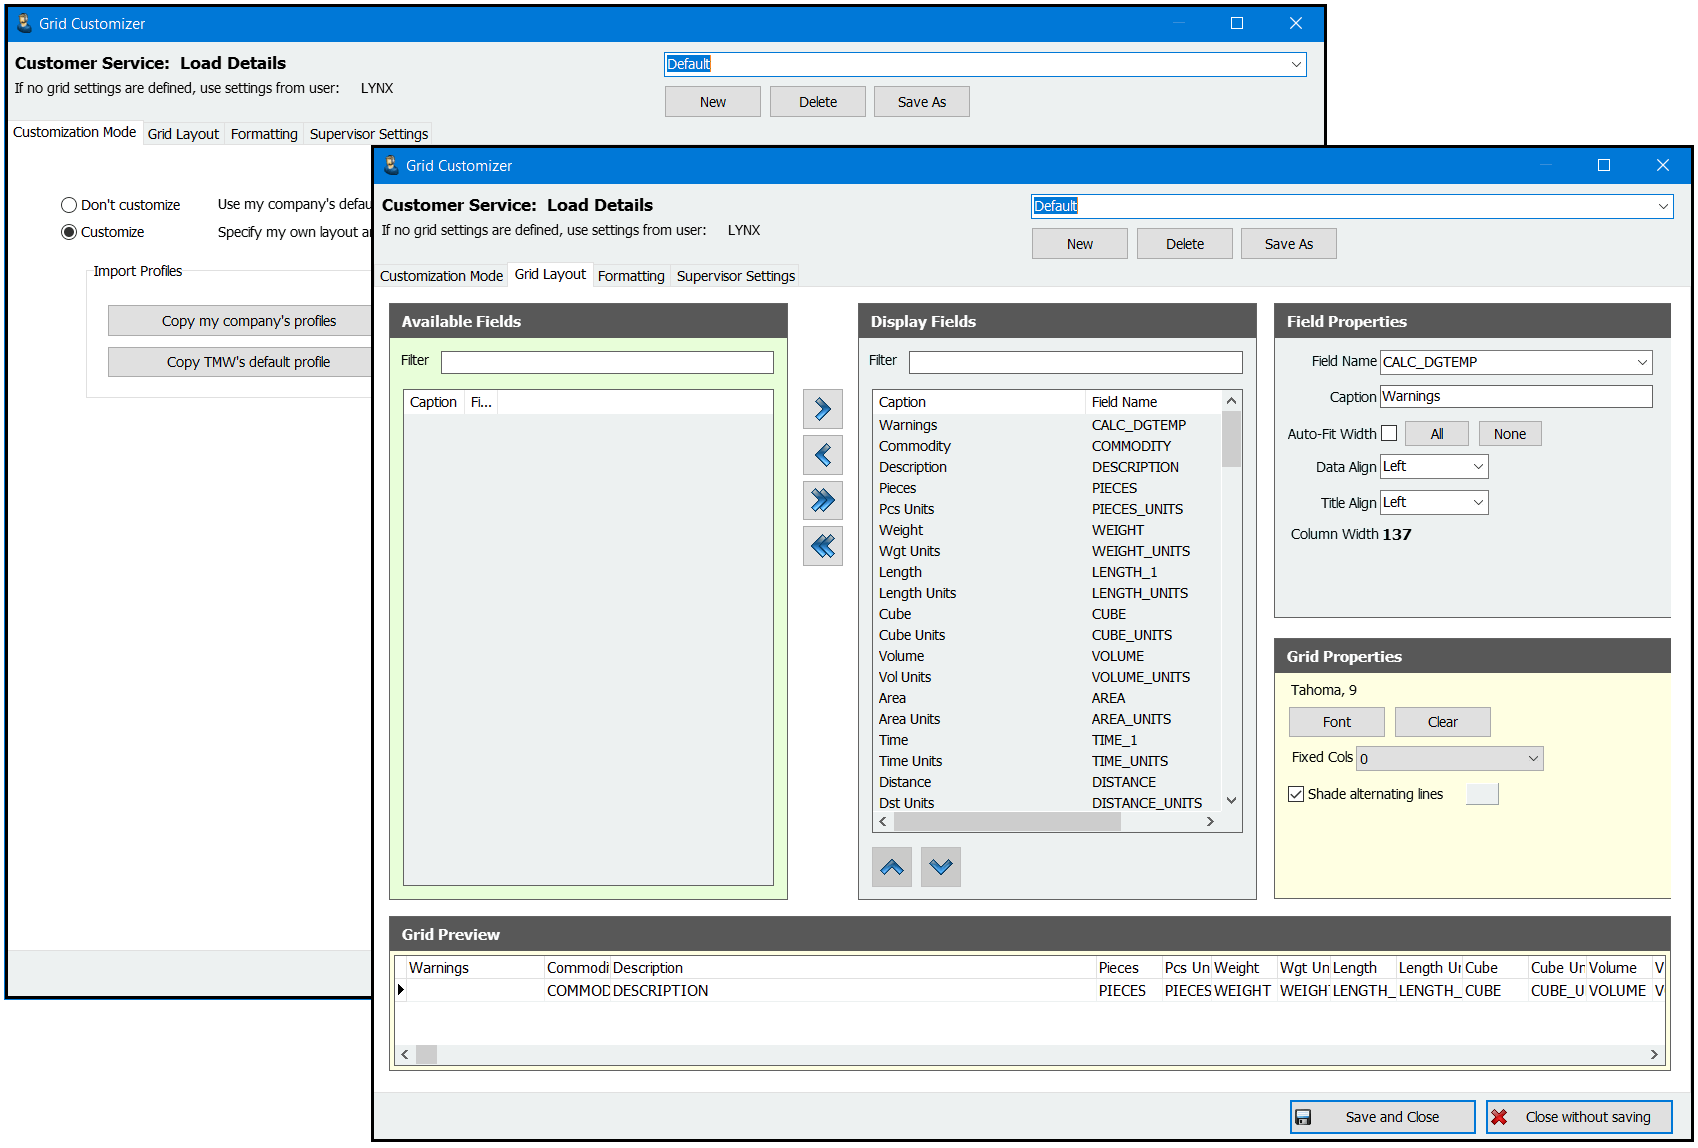
Grid Customizer layout
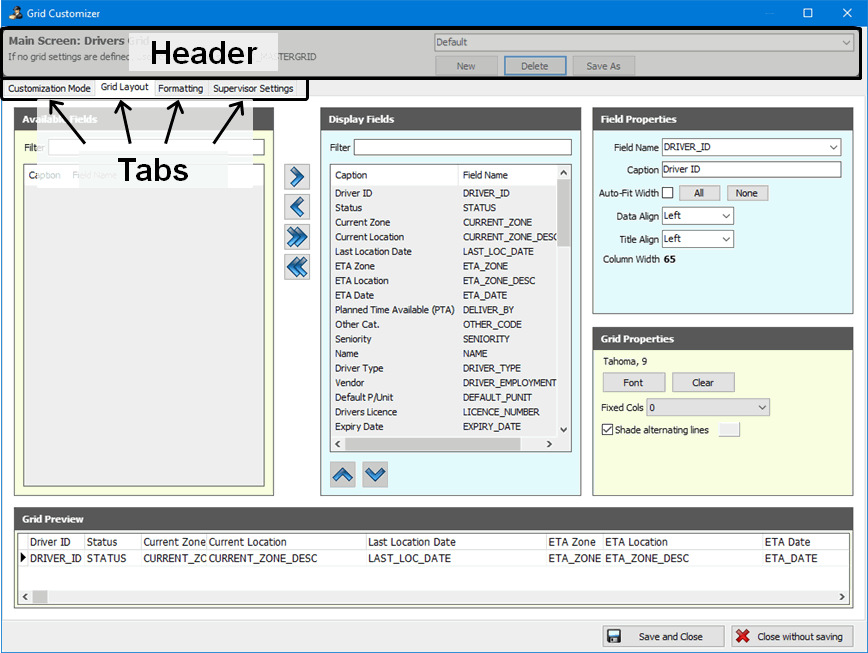
Header
The header section of the Grid Customization window allows you to create, edit and delete custom grid layout profiles.

Use the drop-down menu in the upper right to select a profile to edit and use the other tabs to make the changes.
New |
Opens a small window that prompts you for a name for the custom grid layout profile you are about to create. |
Delete |
Removes the currently displayed custom grid layout profile from the system. You cannot delete a profile if it is the only one available in the system. |
Save As |
Opens the Create profile dialog box and allows you to create a copy of the currently selected grid layout profile with a new name. |
Customization tab
There are two radio button options on the Customization Tab. If you are logged in as the Default Grid User, the Customize option will be enabled by default.
| The Default Grid User refers to the master user whose grid setting profiles are being used as the default. To determine which user is the Default Grid User, open the Application Configurator program and select the GRIDS option. |
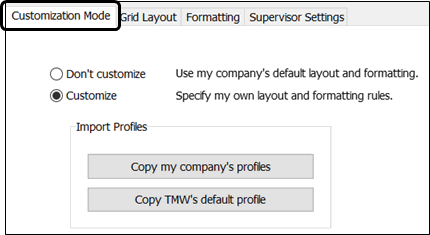
Don’t customize |
Reverts to using the default company layout and formatting |
Customize |
Allows you to create your own custom grid layout profile. |
Copy my company’s profile |
Uses grid layout data that has been previously setup based on a Company ID code to use in the currently selected profile for this grid. You may have several profiles defined for this grid. This only affects the currently selected grid profile. |
Restore TMW default profile |
Clicking this button will set the 'default' profile of the User selected in the Grid Customizer’s top right drop-down menu with values supplied as the TMW Systems' defaults. Use this button if you have made changes to your program Grids that you wish to revert. This button returns the Grids within TruckMate to their factory settings. This only affects the currently selected grid profile. |
Grid Layout tab
The Grid Layout tab controls how your grids look, which fields to include in the grid and the appearance of each field. It even allows you to change the field caption names displayed in the column headers.
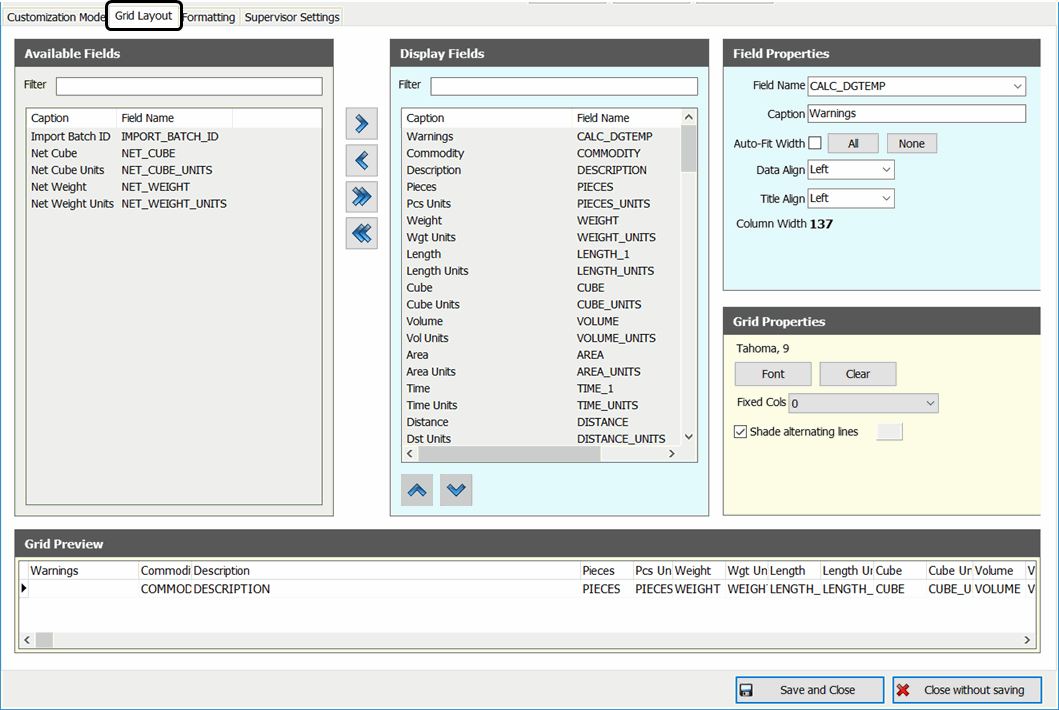
Available fields vs Display fields
Use the middle set of arrow buttons to decide which of the available fields to include in the set of displayed fields. Select the desired fields or group of fields and move them back and forth between the two lists. The typical default is to include all of the fields and move the ones you don’t want to see over to the available fields list.
Use the Filter fields at the top of each list to locate a specific field if the list is lengthy.
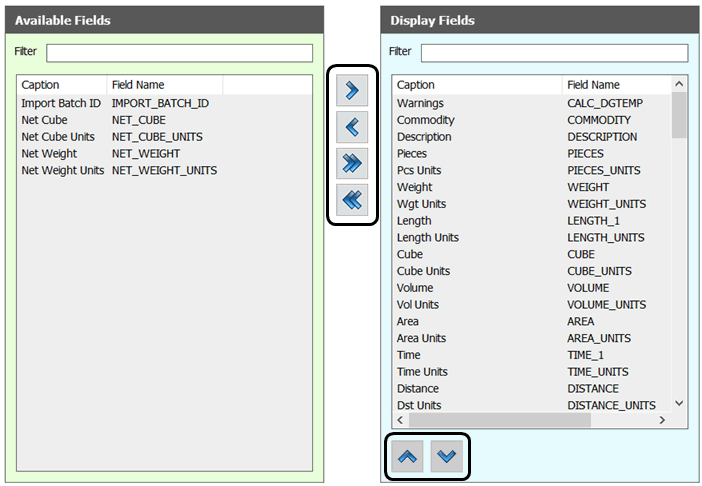
Use the up and down arrows to rearrange the order of the displayed fields.
Field Properties
The properties for each field displayed within the grid can be individually customized.
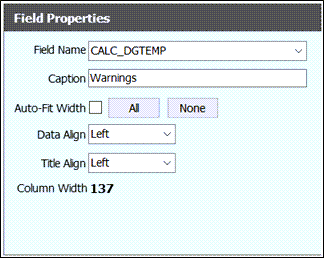
Field Name |
Displays the field currently selected on the Display Fields list. Use the pull down list to select a different field or click the desired field name from the Display Fields list. |
Caption |
You can edit the title of the field in the grid by changing the value of this field. You can use the caption of your choice to appear as the title of the column in the grid. Note: Changing the caption of a field in a grid does NOT change the field name across the entire TruckMate system, not even across the same program. The name you use here only applies to the current grid. |
Auto Fit Width |
Resets the width for some or all fields to the minimum size required to display the data without cropping. Select the checkbox and click the All button to apply this to all the fields. You can manually remove this from a specific field or use the None button to uncheck the Auto Fit Width checkbox for every field. |
Data Align |
Text fields can be displayed as Left, Right or Center aligned. (Number fields are right justified and cannot be changed.) |
Title Align |
The Title displayed in the header for all fields can be displayed as Left, Right or Center aligned. |
Column Width |
Displays the width of the currently selected field expressed in pixels. You can set the width by using the Grid Preview grid at the bottom of the Grid Layout tab to drag the field widths in the title bar manually for each field. Note: The Field Properties > Auto Fit Width checkbox setting will always override any manually set field widths if it is checked for this field. |
Grid Properties
Grid property settings are applied to the entire grid.
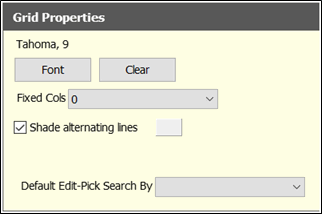
Font |
Allows you to select a different font for the text data displayed within the grid. This includes the column titles as well as the data rows. If you select this button, a character styling window will popup which you can use to select Font, Style, Size , Effect, Color and Script. The selection you make from this window will directly apply to the grid when the OK button is selected. |
Clear |
Clears the selected font options and resets the font and other styling options back to the default. |
Fixed Cols |
Allows you to fix a specified number of columns to be anchored on the left side of the grid. As you use the bottom horizontal scroll bar to scroll through the rest of the columns, the fixed columns will remain anchored on the left. |
Shade alternating lines |
Applies a shade to every second grid detail line, which makes any grids with large amounts of data easier to use. Any formatting rules (as specified on the Formatting Tab) will take precedence over this shading (so if you set late freight bills as red, they will be red regardless of whether this line would normally be shaded). |
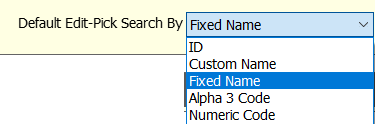
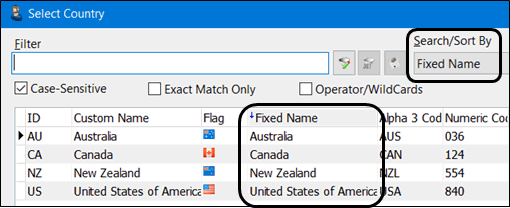
Default Edit-Pick Search By |
This option only appears when relevant to the grid data. For those search windows that have multiple 'Search By' options, you can specify which radio button option is set as the default.
|
Grid Preview grid
The Grid Preview area at the bottom of the Grid Layout tab displays a visual recreation of the Grid being customized so you can see how your changes will look. It can also be used to adjust the field widths by using the mouse to drag the vertical separators in the header field title area.

Be sure to use the Save and Close button to save your changes. .
| The Field Properties > Auto Fit Width checkbox setting will always override any manually set field widths if it is checked for this field. |
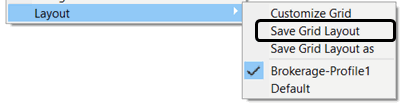
As a shortcut, you can also adjust the field widths while looking at the actual grid. Use the mouse to drag the fields to the desired width and select the Layout > Save Grid Layout option from the right-click shortcut menu. You can also drag and drop the column header titles on the grid to rearrange the display order for the fields and save these changes the same say.
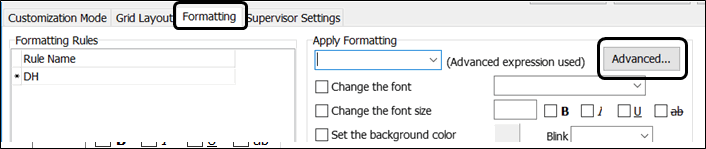
Formatting tab
The Formatting Tab allows you to setup some advanced formatting rules to highlight rows or fields which may indicate an error or something requiring attention. Special formatting will be applied if the conditions of a particular formatting rule are encountered within the grid data. For example, the system could highlight an overweight item or to indicate empty field missing critical information.
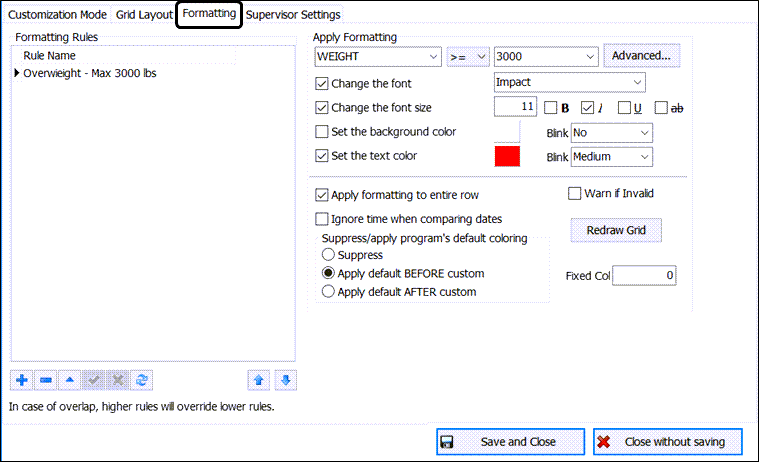
In the case of overlap, higher rules will overlap lower rules so the order in which the formatting rules are listed is important. Use the up and down arrows at the bottom of the Formatting Rules grid to change the order of the list.
Formatting Rules Grid |
Click the '+' button on the navigation bar below this grid and give the new Rule a name. Once a Rule is created, use the settings on the right to set the criteria for when to apply this formatting rule. |
Apply formatting |
The three pull down menus available here allow you to setup a simple expression to determine when to apply the rule.
Use the first pull down menu to select your 'A' value, and use the middle menu to select an expression ('equal to', 'greater than', and so on). Then, choose a final option to become your 'B' value. You now have an expression applied to this Rule that will invoke the rule under certain conditions (whenever 'A' > 'B' for example). The options below the three pull down menus will be invoked when this expression is found to be true. |
Advanced |
Opens the Advanced Expression Editor window used to create more sophisticated compound conditions. Refer to How to use the Advanced Expression Editor. |
Change the font |
To change the font when your expression is found to be true, check this box and use the pull down menu to choose a different font to make this entry easier to spot. |
Change the font size |
If you would like to change the font size when your expression is found to be true, check this box and enter an integer value. Note: The font size may affect display in that the grid row height will not be re-sized to accommodate a large font size. |
(B)old / (I)talic / (U)nderline |
Select the corresponding checkbox to apply any of these additional font format options when the expression is found to be true. |
Set the background color / Set the text color |
This setting will change either of these Grid color values when your expression condition is met, check the corresponding checkbox and then click the small 'color box' next to the text label to choose a new color value from a standard Windows color palate. |
Blink/Blink |
For either the background color or the text color, you can set an additional option to have the selected color blinking when your expression is met. You can use the 'Blink' drop-down list that corresponds to either the background color or the text color to select the speed of the blinking. You can select 'Slow', 'Medium' or 'Fast' blinking speed, or you can set it to 'No' if you don’t want the color blinking. |
Apply formatting to entire row |
Check this checkbox option to apply your formatting changes to the entire Grid detail row. |
Warn if Invalid |
This checkbox causes the system to present a warning message if the formatting rules or expression conditions being applied are somehow problematic or generate an error when the grid tries to evaluate the conditions. |
Ignore time when comparing dates |
This option is for use within your specified expression condition. It will ignore the time value when comparing two dates. |
Suppress program’s default coloring |
Some TruckMate programs contain their own color schemes for data inside the detail Grids, for example the programs within the Mobile Communications module. If you check this checkbox option, those default color values will be ignored, and you may set alternate values using the options available on this Tab. In order to do so, you must create a 'Rule Name' and then set values for that Rule using the options on the right side of the Tab. |
Redraw Grid |
This button functions as a testing tool. Click to apply your changes directly to the current grid, to see how it will appear when your expression conditions are met. |
Fixed Col |
Displays the current value if a fixed column setting as set in the Grid Properties section on the Grid Layout tab. This is a view only field for information only. |
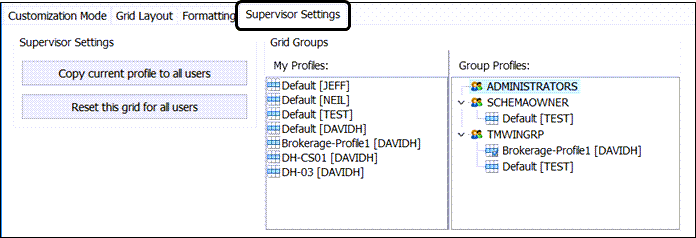
Supervisor Settings tab
The Supervisor Settings tab is used to propagate a customized grid layout profile out to other users or otherwise control the appearance of the grids consistently for a group of users or a specific user.
There are only two options available on the Supervisor Settings tab, which allow you to either apply your custom Profile settings to all users, or reset the Grid settings for all users.
Propagate current profile to all users |
Apply all the grid layout and formatting changes you have made to this one specific grid to all TruckMate Users. All Users who log into TruckMate programs will have your grid layout and formatting changes displayed as their default for this grid. When you click this button, a Shortcut Menu will display: |
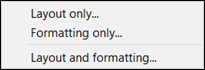
Reset this grid for all users |
When you click this button, a Shortcut Menu will appear.
|
Layout only |
Reset all your Grid Layout changes (position of grid elements, no formatting options) back to the TMW Systems default for the grid you are currently working with. |
Format only |
Reset all your Formatting changes (color and font options) back to the TMW Systems default for the grid you are currently working with. |
Layout and Formatting |
Reset both your Formatting and Layout Profile changes to become the TMW Systems defaults and return the Grid you are working with to the factory settings. |
Grid Groups
The Grid Groups section allows you to propagate customized grid layout Profiles to specific TruckMate User Groups (as defined in the Security Setup program). To propagate a customized grid layout Profile to a specific User Group, select the Profile from the My Profiles list and drag/drop it onto the Group in the Group Profiles section.
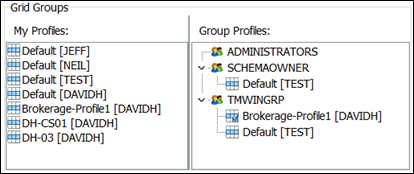
The customized grid layout profile will then appear under the Group Profile name and will become the default grid layout profile for that User Group. These relationships can be edited using options available on a right-click shortcut menu.
Shortcut Menu
A right-click on the customized grid layout profile associated with a User Group Profile displays a shortcut menu with the following options.
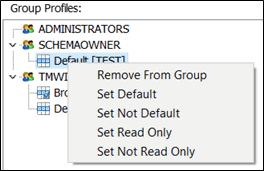
Remove from Group |
Removes a customized grid layout profile from a User Group. |
Set Default / Set Not Default |
This option controls which profiles are used as the default for a user group when the grid is first displayed. The icon for the default will have a small green arrow in the lower right corner.
Users in a user group with more than one grid layout assigned to them will be able to use any of the others, but will have the default grid layout loaded automatically when they first open the program. Note: In the Dispatch program, any grid layouts attached to a Dispatch Filter Template will override the default layout specified by the Supervisor Settings. User groups are only allowed one default, so the Set Not Default option removes the designation as the default grid layout. The system will use the first profile based on an alphabetical sort. |
Set Read Only / Set Not Read Only |
This option allows you to impose a grid level restriction on grid modification as opposed to full restriction on grid modification. Selecting this option will change the grid to a read-only grid that can only be changed by an administrator. This way you can insure that certain grids are not modified by users without depriving those users from the ability to change other grids, had this been done via security setup. |
Creating a Custom Grid Layout Profile using the Grid Customizer
-
Right-mouse click within any data grid and select the Layout > Customize Grid shortcut menu option. The Grid Customizer window will open.
Note: This menu option is only available for users who have been assigned the grid customization security permissions.
If this grid layout has not been customized already the Customization Mode tab will be displayed with the Don’t customize radio button selected.
-
Click the Customize radio button.
The Grid Layout and Formatting tabs will be made available and several buttons will be enabled.
-
Click the New button in the header.
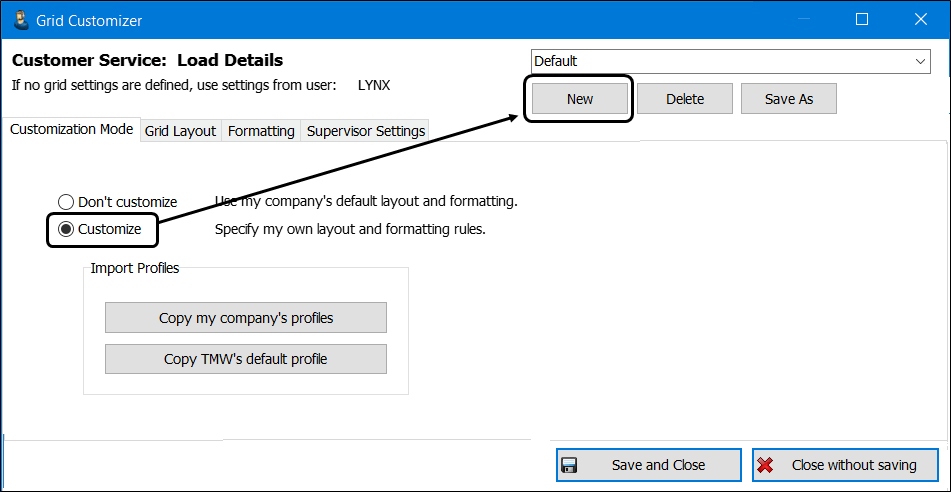
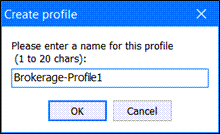
-
Enter a name for this new custom grid layout and click OK.
-
Click the Grid Layout tab.
-
Use the left / right arrow buttons to determine which fields will be included in the Display Fields grid. Move any unwanted fields into the Available Fields grid. You can also use double-clicks to move fields between the two lists. The double arrow icons move all fields with one click.
-
Use the up and down arrows to rearrange the order of the displayed fields.
-
Use the Field Properties options to alter the appearance of a specific field. Refer to the Grid Customizer window > Field Properties section for details about the features and functions.
-
Make any desired changes to the Grid Properties such as whether to apply shading to alternate lines or anchor some columns on the left side of the grid.
-
Use the settings of the Formatting tab to highlight specific fields or rows under certain conditions or criteria. (e.g., Missing data or out of target range.)
-
Click the Save and Close button to save your changes and view the results.
Note: The name of the new profile appears on the bottom of the menu.
-
Select the desired profile name from the Layout sub-menu to automatically apply the configured settings to the grid
-
Select the right-click Layout > Customize Grid shortcut menu option to return to the Grid Customizer window.
-
Use the functions on the Supervisor Settings tab if you need to distribute this custom grid layout profile to other users or if you need to reset the grid profile back to its original factory settings.
Note: The settings you configure for each custom grid layout profile are grid specific, and will only be applied to that grid.
Using the Advanced Expression Editor for a custom grid
The Advanced Expression Editor is used to create a more precise set of criteria to use when applying formatting rules to a custom grid layout profile. It is found on the Formatting tab.
-
Go to the desired grid.
-
Select the Layout > Customize Grid option from the right-click shortcut menu to open the Grid Customizer window.
-
Select an existing profile or create a new one and go to the Formatting tab.
-
See Creating a Custom Grid Layout Profile using the Grid Customizer for information about creating custom grid layout profiles.
-
Click the Advanced button.
The Advanced Expression Editor window opens.
-
Enter the required conditions and expression(s).
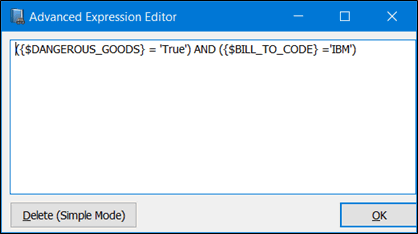
Here is an example of a compound condition created for filtering a grid displaying freight bill data using the Advanced Expression Editor:
(\{$DANGEROUS_GOODS} = 'True') AND (\{$BILL_TO_CODE} ='IBM')
Which means:
"display all freight bills that contain dangerous goods and are billed to IBM".
Its syntax is SQL-like, but not SQL-compliant (because of the requirements of the parser). It will interpret everything logically / mathematically (For example: 1+2=3 will work as a trigger to cause the formatting to apply but 'r;A'='B' would not work.)
The Syntax used by the Advanced Expression Editor window also supports the following symbols:
\{$FIELD_NAME}
Replace symbol with the value of FIELD_NAME in the database (for the record being formatted) It should compare correctly regardless of datatype.
\{@12/20/2004}
Symbol contains a date. This would allow you to do, for instance, \{$PICK_UP_BY}>\{@12/20/2004}. (It is necessary so it doesn’t interpret the date as a mathematical expression.) Will interpret the contents of the symbol according to whatever your system short date format is set to.
{DATE}
The current date.
{NOW}
The current time.
{USER}
The currently logged on user.
Mathematical Operators:
Use these operators to make your grid filtering commands more specific.
= |
Equal To |
<> |
Is not equal to |
< |
Less than |
⇐ |
Less than or equal to |
> |
Greater than |
>= |
Greater than or equal to |
AND |
'AND' operator |
OR |
'OR' operator |
Some other examples of formulae:
\{$DELIVER_BY} > {DATE}-3 (Should have been delivered more than three days ago)
\{$CREATED_BY} = {USER} (Created by the current user)
\{$DELIVER_BY} <> {DATE} (Is not to be delivered today)
| If there is anything in the 'Advanced' portion of the screen, any 'basic' criteria also on that rule will be ignored. |
Grid Formatting also allows you to apply formatting based on complex logical expressions (e.g. with more than one criterion). This mode is flexible, but difficult to master. It will apply the specified formatting if its expression evaluates to true. Its syntax is made up of logical expressions, which exist in five basic forms:
x = y |
Apply formatting if x equals y |
x <> y |
Apply formatting if x is not equal to y |
x ~= y |
Apply formatting if x starts with y |
x < y |
Apply formatting if x is less than y |
x > y |
Apply formatting if x is greater than y |
In the above expressions, 'x' and 'y' can be either fields, constants, or keywords:
\{$LS_DELIVER_BY} |
Evaluates to the value of the LS_DELIVER_BY field |
{NOW} |
Evaluates to the current date-time |
{DATE} |
Evaluates to the current date |
{USER} |
Evaluates to the username of the logged-in user |
\{@mm/dd/yy} |
Evaluates to the date specified- always in mm/dd/yy format |
'True' |
Evaluates to the string 'True' |
45 |
Evaluates to the numeric value 45 |
Logical expressions can be combined in three different ways:
A AND B |
Apply formatting if both A and B are true |
A OR B |
Apply formatting if either A or B is true |
NOT (A) |
Apply formatting if neither A nor B is true |
In the examples above, 'A' and 'B' can themselves be logical expressions:
(C OR D) AND B |
Apply formatting if B is TRUE, and either C or D is true |
This opens up a number of scenarios, such as marking all Freight Bills in a Freight Bill grid that contain dangerous goods and are billed to IBM:
(\{$DANGEROUS_GOODS} = 'True') AND (\{$BILL_TO_CODE}='IBM') |
Of course, basic arithmetic also works, although with less useful results:
1 + 2 = 3 (will always apply formatting) |
Date Arithmetic
The Advanced mode of the Grid Formatting also supports date arithmetic. This is useful in cases where you want to format conditionally by comparing dates. As in Delphi, the Grid Formatting date arithmetic equates one day with the integer 1. This means that yesterday is equivalent to:
{DATE} - 1 |
While 3 hours ago (that is, 3/24 of a day) is equivalent to:
{NOW} - 3/24 |
Here are some useful applications of date arithmetic in the Dispatch program > Trip Grid:
(\{$LS_INTERLINER} <> "") AND (\{$LS_DELIVER_BY} ⇐ ({NOW} + (15/24))) |
Marks trips with an interliner assigned that are to be delivered within 15 hours from now |
(\{$LS_INTERLINER} <> "") AND (\{$LS_DELIVER_BY} ⇐ ({NOW} - (15/24))) |
Marks trips with an interliner assigned that are 15 hours (or more) late. |
Caveats
Logical expression syntax is similar to SQL, but it is not SQL. In particular, you cannot use columns in your expressions that do not already exist in the grid; the grid formatting engine is never allowed to access the database, only the data in the grid. (A common way around this is to write a custom trigger that populates a USER field so that the data is available to the grid.)
If there is anything in the "advanced" portion of the dialog box, any "basic" criteria also on that rule will be ignored. The one exception to this is the Field Name (under "Apply formatting when"): unless "Apply formatting to entire row" is checked, this field will be the column to which formatting will apply if the expression evaluates to True.
Advanced formatting currently suffers from some interface drawbacks: If the formula you enter is invalid, it will ignore it. No warning or syntax error will be shown. This is to prevent thousands of error messages being displayed every time the grid is drawn.
| You will not be able to save an advanced grid formatting rule if it contains an obvious syntax error. Not every possible syntax error is checked, just the obvious ones, such as brackets out of balance (more \{'s than }'s or vice-versa), nested brackets (two \{'s without a } in between or vice-versa) and invalid characters following a left bracket (only valid choices after \{ are: NOW, DATE, USER, $, or @). |