TMI Trippak Online

Overview
First introduced as an integration within TruckMate 2013, Truckload Management Inc. (TMI) is a business partner that provides trucking companies with a document imaging and printing service called Trippak Online (which includes processing/scanning/indexing of drivers' paperwork from TMI’s own network of drop boxes across the continent). Unlike other imaging product partners (Microdea, Pegasus, and PaperWise), TMI provides access to these services only from within their own system and hence the 'interface' is simply a data export program of certain TruckMate data (orders, invoices, clients, drivers) to their system - as per TMI’s specifications.
The first step is to construct the list of data records to be exported. There are three ways to do this: 'Master', 'Automatic' and 'Manual'. Normally, you would start with a master export to initially load TMI with all the existing data in the TruckMate database, then 'turn on' triggers (checkbox on extract tab) to 'automatically' add a record to the export list whenever an item (order, invoice, client or driver) is added or changed in TruckMate. The second step is to periodically review this list of records to be exported, optionally deleting individuals or adding 'Manual' records as desired, and generate the actual text file using the 'Extract' button (the file produced is named by appending the current time: yyyymmddhhmmss to either OR or IN and adding the extension .TXT to the directory specified in the FTP tab). Finally, FTP the file(s) to TMI (there is an option to send only one specified file at a time or all files with .TXT extension in the specified FTP directory). There is also an optional timer to automatically ftp every so many minutes (like EDI).
Note: This TMI integration requires a CUSTTYPE field unique to this integration:
CUSTTYPE: 1=EDI, 2=No Backup Read, 3=Backup Read.
`There is no dedicated field for this in the existing TruckMate tables so use the Application Configurator program 'TMI.EXE' option to specify which user field to export for this.
To open the Export to TMI Trippak Online program double click 'TMI.EXE' in your TruckMate system folder (usually 'C:\Programs (x86)\TruckMate20xx\').
How Do I?
How do I Use Export to TMI Trippak Online?
-
To open the Export to TMI Trippak Online program (TMI.EXE), open 'TMI.EXE' from your TruckMate system folder (usually: 'C:\Program Files (x86)\TruckMate20xx\').
-
The first step is to construct the list of data records to be exported. There are three ways to do this: 'Master', 'Automatic' and 'Manual'. Normally, you would start with a master export to initially load TMI with all the existing data in the TruckMate database, then 'turn on' triggers (checkbox on extract tab) to 'automatically' add a record to the export list whenever an item (order, invoice, client or driver) is added or changed in TruckMate.
-
The second step is to periodically review this list of records to be exported, optionally deleting individuals or adding 'Manual' records as desired, and generate the actual text file using the 'Extract' button (the file produced is named by appending the current time: yyyymmddhhmmss to either OR or IN and adding the extension .TXT to the directory specified in the FTP tab).
-
Finally, FTP the file(s) to TMI (there is an option to send only one specified file at a time or all files with .TXT extension in the specified FTP directory). There is also an optional timer to automatically ftp every so many minutes (like EDI).
Note: One of the client fields TMI requires is: 'CUSTTYPE: 1=EDI, 2=No Backup Read, 3=Backup Read'. There is no dedicated field for this in the existing TruckMate tables so use the Application Configurator program 'TMI.EXE' option to specify which user field to export for this.
Layout
Extract Tab
The first step is to construct the list of data records to be exported using the Extract Tab. There are three ways to do this: 'Master', 'Automatic' and 'Manual'. Normally, you would start with a master export to initially load TMI with all the existing data in the TruckMate database, then 'turn on' triggers (checkbox on extract tab) to 'automatically' add a record to the export list whenever an item (order, invoice, client or driver) is added or changed in TruckMate.
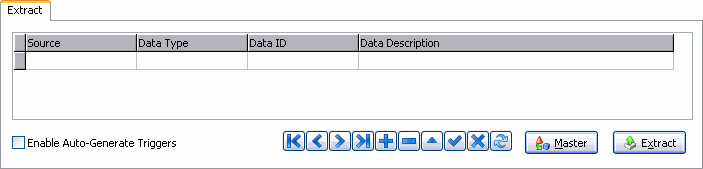
Export Grid |
Select the '+' button on the navigational bar. |
Source |
Read-only information. May pre-populate with your selected choice of one of: Master, Automatic, or Manual. |
Data Type |
One of: Order, Invoice, Client, or Driver. On a manual source entry, use the pull-down arrow to select your data type. |
Data ID |
The key field for the data (for Orders and Invoices—DETAIL_LINE_ID from TLORDER; for Clients—CLIENT_ID, for Drivers—DRIVER_ID). On a manual add, a 'Select Order' dialog box will open allowing you to search by Bill Number, Shipper Name, Consignee, and Trace Number. |
Data Description |
Read-only information. Enter a more meaningful description of the key field for the data (for Orders and Invoices- Bill Number and Bill-To Code, for Clients and Drivers- Name). |
Enable Auto-Generate Triggers |
Select this checkbox to 'turn on' triggers (checkbox on extract tab) to 'automatically' add a record to the export list whenever an item (order, invoice, client or driver) is added or changed in TruckMate. . All items in the export list created by this method will have AUTOMATIC in the source column (unless you edit the export line- in which case the source column changes to MANUAL). |
Master |
Add records to the export list for all clients (or invoices or orders or drivers) in TruckMate. This would normally be done once to initially load TMI with all existing data. All items in the export list created by this method will have MASTER in the source column (unless you edit the export line- in which case the source column changes to MANUAL). |
Extract |
Selecting the 'Extract' button creates a flat (text) file containing data for all the items in the export list (and deletes the items from the export list). The file is created in the directory you specify in the FTP tab. The format of the flat files must meet TMI specifications. They would be able to 'read' such a file and create the data in their system. |
The second step is to periodically review this list of records to be exported, optionally deleting individuals or adding 'Manual' records as desired, and generate the actual text file using the 'Extract' button (the file produced is named by appending the current time: yyyymmddhhmmss to either OR or IN and adding the extension .TXT to the directory specified in the FTP tab). Finally, FTP the file(s) to TMI (there is an option to send only one specified file at a time or all files with .TXT extension in the specified FTP directory). There is also an optional timer to automatically ftp every so many minutes (like EDI).
FTP Tab
A final step is to FTP the file(s) to TMI using the FTP Tab. There is an option to send only one specified file at a time or all files with .TXT extension in the specified FTP directory). There is also an optional timer to automatically ftp every X minutes (like EDI).
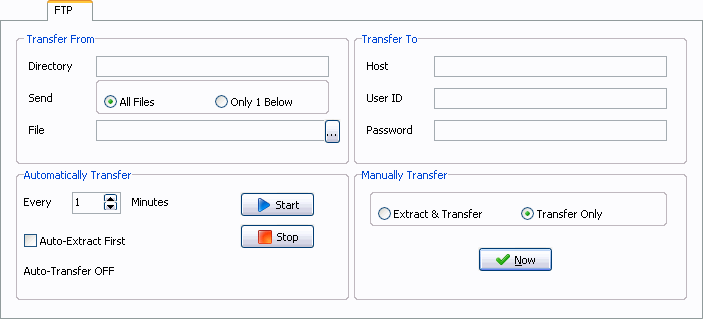
Directory |
Enter the complete path to where you want the export file created. |
Send |
Select either 'All Files' or 'Only 1 Below', which would mean you wish to export all files shown below, or merely the one file showing below. |
File |
Use the search button to go to the file located on your machine |
Host |
Enter the host information in the field provided. |
User ID |
Enter the FTP User ID as given to you by your Database Administrator. |
Password |
Enter the FTP Password as given to you by your Database Administrator. |
Every (value) Minute |
Use the up/down arrows to modify the minute reading until it shows your desired minute number. |
Start |
Press the 'Start' button when you are ready to automatically transfer the data. Once you press the 'Start' button, you will notice text in the lower left-hand corner saying 'Auto-Transfer On- Next Transfer (the appropriate minute amount)'. |
Auto Extract First |
Will automatically extract the data first, and then export it. |
Extract and Transfer |
Select this radio button if you wish to extract the data and then transfer. |
Transfer Only |
Select this radio button if you wish to transfer the data only. |
Now |
Press the 'Now' button to begin the manual transfer of data. |
Log Tab
Every time an extract or FTP process is started or completed, a note is logged in the Log Tab, including an indication of any errors that occurred. It may be useful to review this log periodically, especially if you do automatic transfers.
Save |
Select this button if you wish to save the data transfer/export log to a file. |
Select this button if you wish to print a copy of the data transfer/export log. |
|
Clear |
Select this button if you wish to clear the data transfer/export log. |