Driver Pay Audit window layout

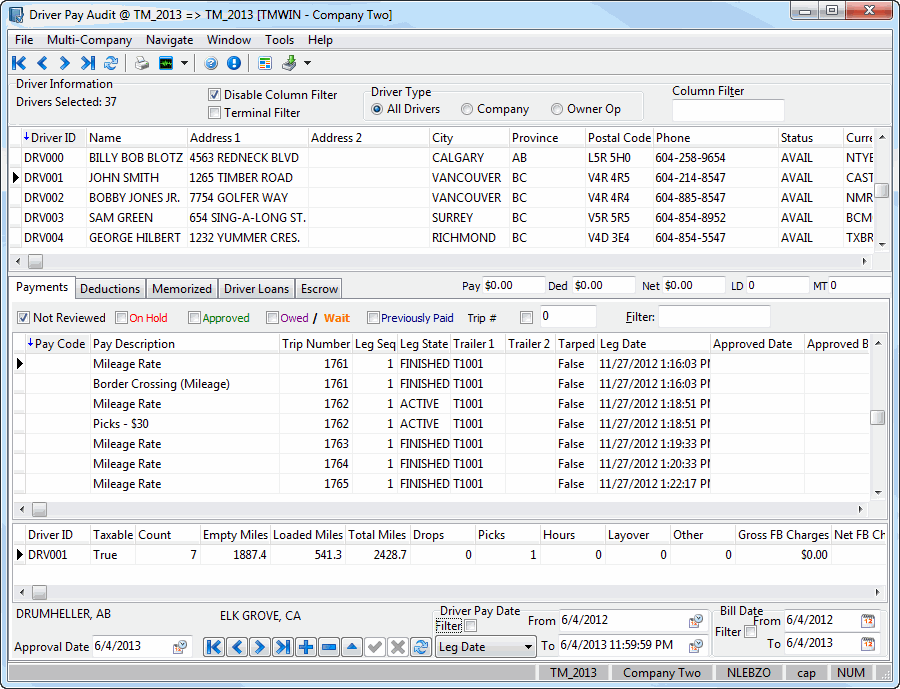
The top portion of the screen lists all the Drivers configured in the Driver Profiles program. Click on a Driver record to display a Driver’s payment and deduction details. You can invoke a menu of functions by clicking the right mouse button anywhere in the grid.
The Payment Details tab displays automatically generated pay entries, which you can view, edit and delete. You can also enter manual pay entries. The Deduction tab is used to enter manual deductions. Memorized deductions are displayed on the Memorized tab.
|
Menu Bar / Toolbar
File Menu
Exit
 Selecting this option will close the Driver Pay Audit program.
Multi-Company Menu
For more information on the Multi-Company options available from the Menu Bar, see the Multi-Company documentation.
Navigate Menu
The Navigate Menu contains the standard TruckMate Navigation Bar, used to browse your Database records.
Tools Menu
TruckMate Monitor
 Click the down arrow next to this button to access the various functions of the new TruckMate Monitor.
Remember Position / Size
Selecting this option will maintain the program window position and size upon close. When the program is re-opened, it will appear the same.
Quick Deductions Entry
![]() Selecting this option will open the Quick Deductions Entry window, which allows the User to enter new Driver Deduction entries against a Driver ID.
Selecting this option will open the Quick Deductions Entry window, which allows the User to enter new Driver Deduction entries against a Driver ID.
Import From A Text File
This drop down list allows the user to import either 'Driver Payments' or 'Driver Deductions' from a text file. The text file to import the data from must be structured according to defined TruckMate structure.
Write Off Driver Pay / Deduction
This option allows you to write off Driver Pay / Deduction. Selecting this option will invoke the Driver Pay / Deduction Write Off window. The header part is a number of filtering options that allow you to select your target write off records. Once your filter retrieves the desired records for write off, you have the option to further select specific records either by single selection or multiple selection. You can also rectify your selection by changing your filtering options and selecting the 'Refresh' button until your satisfied with your selection. If you select the Write Off button, the selected records will be written off.
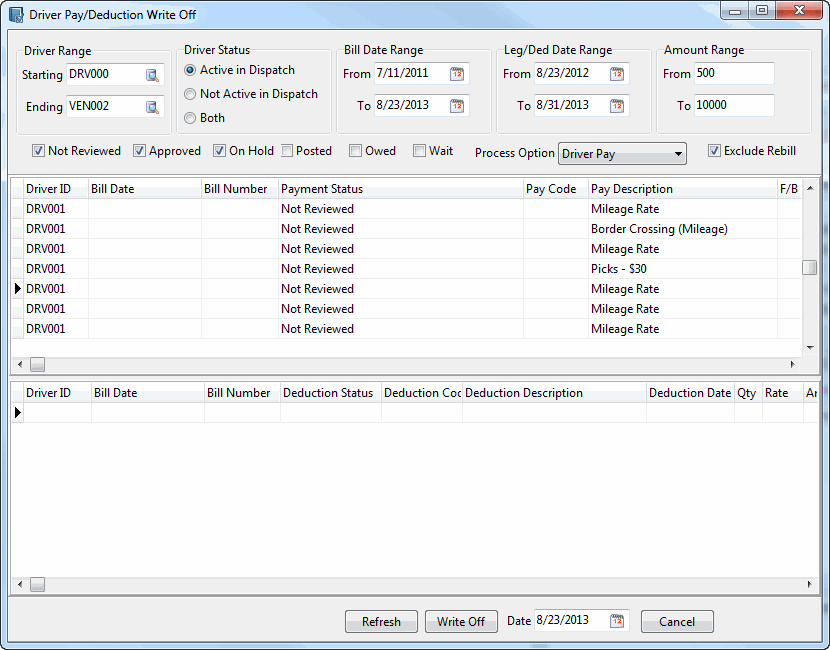
This window consists of three sections. The upper section is where you define your filtering options. The middle grid is where the details of your driver pay filter results are displayed (when you have Driver Pay selected as your Process Option), and the last section is where the details of your driver deduction filter results are displayed (when you have Driver Deduction selected as your Process Option). If you select 'Both' for your Process Option field, both grids may contain records (depending on your filtering options).
| Field | Definition |
|---|---|
Filtering Options Section |
|
Driver Range |
You can specify a Starting driver code and an Ending driver code, and the filter will retrieve records for all drivers between and including those codes. |
Driver Status |
You can select drivers that are active in dispatch, inactive in dispatch or both. |
Bill Date Range |
You can define your retrieved records to be within a range of bill dates. |
Leg / Deduction Date Range |
This filter allows you to specify a date range for legs or deductions, depending on whether your are writing off payments or deductions. |
Amount Range |
You can specify a range of $ amounts of payments or deduction to be retrieved for write off. Not Received, Approved, On Hold V.S. Posted, Owed, Wait These checkboxes allow you to select the statuses of the records you want to retrieve. However, you can only select from one group but not the other. In other words you can either select from Not Received, Approved, On Hold OR from Posted, Owed, Wait but you can’t mix your selection from both groups. If you try to mix your selection from both groups, an error will popup and stop from proceeding. Note: If the status of the selected records for write off are Not Received (U), Approved (A) or On Hold (H), the records will be removed. If on the other hand the status of the selected records for write off are Posted (P), Owed (O) or Wait (W), then the status of the selected records will be set to Paid (X). |
Process Option |
You can use this drop down list to select the records to be retrieved to be Driver Pay, Driver Deduction or Both. |
Exclude Rebill |
This checkbox allows you to exclude records created as a result of a rebill. |
Driver Pay Details Section |
If you select 'Driver Pay' or 'Both' for the Process Option field, this grid will display the details of the retrieved Driver Pay records. |
Driver Deduction Details Section |
If you select 'Driver Deduction' or 'Both' for the Process Option field, this grid will display the details of the retrieved Driver Deduction records. |
Window Menu
Driver Profiles
![]() Select this option to open an instance of the Driver Profiles program.
Select this option to open an instance of the Driver Profiles program.
Driver Pay Contracts
![]() Select this option to open an instance of the Driver Pay Contracts program.
Select this option to open an instance of the Driver Pay Contracts program.
Driver Pay Register
 Select this option to open an instance of the Driver Pay Register program.
Driver Deduction Register
Select this option to open an instance of the Driver Deduction Register program.
Driver Statements
![]() Select this option to open an instance of the Driver Statements program.
Select this option to open an instance of the Driver Statements program.
Help Menu
TruckMate Help
 Selecting this button will open the Driver Pay Audit topic in the TruckMate Online Help file (the page you are currently viewing).
Service Portal
 Selecting this button will open an instance of your default Internet browsing software, with the https://www.tmwcare.com login page displayed.
About
 Selecting this button will open the standard TruckMate About window, which contains important information about the application you are currently using, including its version number (important for support calls).
Driver Information grid filters
These Filter options are found at the top of the Driver Pay Audit window.
Disable Column Filter
By checking this checkbox option, you can choose to apply or disable the Filters that are set up within the 'Driver Type' section.
Terminal Filter
If this flag is checked, the Driver Pay Audit program will read the 'TERMINAL_ID' attached to the current User (from the USERS table) and then get the appropriate Terminal Zone. The program will then filter the Driver grid against the User’s Terminal Zone (DRIVER.TERMINAL_ZONE).
Driver Type
Choose either 'All Drivers', 'Company Drivers' or 'Owner Operators' to filter your Driver records.
Custom Filter
Use the Setup button to create a custom filter. Select the checkbox to indicate you want to user a Custom Filter and enter the field id number into the Custom Filter field to use this custom filter.
The records that appear when using this filter may be affected by a Security Setting- see the Security Setup program > Security > Business Events > Allow Changes tab > PAYAUDIT > 'Allow Unchecking of Terminal Filter' option.
Driver grid
The Driver grid displays only those Drivers entered in the Driver Profiles program that have a contract attached in the contract tab. To sort the items in the grid, click on the column header of the column by which you wish to sort. A blue arrow will appear that indicates that this column is the sort column, and the data will display in the order of the data in this column. Click on a Driver record to display his payment and deduction details. You can open a menu of functions by clicking the right mouse button anywhere in the grid.
Context Menu - Driver grid
Reporting
-
Run Driver Pay Statements
Selecting this option will load the Driver Statements program. Driver statements should only be run after the desired payments and deductions have been updated through the Driver Pay Register and Driver Deduction Register programs. -
Driver Balance Report
Choosing this option will display the Report Selection form. The Crystal Report template supplied with the TruckMate system is called 'TBAL.RPT'. After selecting the desired report template (using the Report Selection form), you will be prompted to enter a cutoff date for the report. This will exclude all pay and deduction entries were dated after this date. The report will display the total owed to each Driver, and will preview to the screen. Only transactions with the status of 'Owed' (i.e., processed through the Driver Pay Register or Driver Deduction Register program) but not included on a statement will be included in the Driver Balance report. Click the printer icon at the top of the screen to send the report to the printer that is configured as the default printer for your workstation.See the Crystal Reports Reference for more information on report functions.
-
Damage Deposit Listing
Will display the Report Selection form. The Crystal Report template supplied with the TruckMate system is called the Damage Deposit Summary Listing, or 'DAMDEPSUMLIST.RPT'
Get Memorized Transactions
Selecting this option will open the Get Memorized Deductions window, which will allow you to recall all memorized transactions (configured on the Memorized tab) and add them as entries on the Deduction tab. You have the option to select from a variety of ways of gathering deductions.
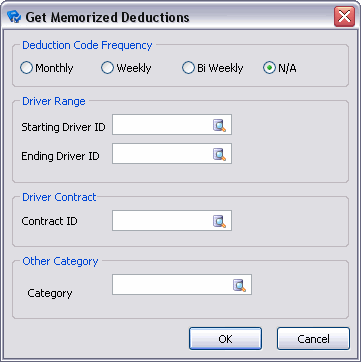
Use one section (or a combination of multiple sections) on this window to configure the filter that will be used to gather Memorized Deductions from your Database.
| Field | Definition |
|---|---|
Deduction Code Frequency |
This section allows you to gather Memorized Transactions by their 'Frequency' value ('Monthly', 'Weekly', 'Bi Weekly' or 'N/A' (one time transactions)). Once selected, the transactions will be populated on the Deduction tab. |
Starting Driver ID / Ending Driver ID |
These two fields will allow you to specify a range of drivers do gather Memorized Transactions from. On the Enter Driver Range window, select a Driver Range and then select 'OK'. All transactions for the selected Drivers will be added to the Deduction tab. |
Contract ID |
This field allows you to select a specific Driver Contract to gather the memorized transactions from. Driver Pay Contracts are configured in the Driver Contracts program. |
Category |
This field allows you to filter Memorized Transactions based on their 'Category' value. A Driver is given a 'Category' on the Driver Profiles program > Pay tab > 'Category' field, which is a simple text-entry field. Once a 'Category' value has been added in the Driver Profiles program, you will be able to select that category by clicking the Database Search button in this field. |
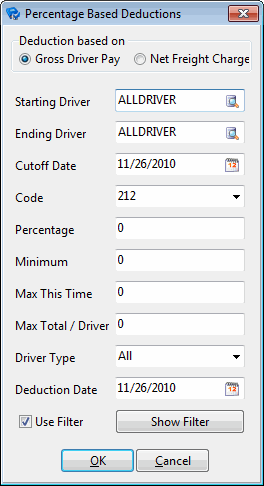
Percentage Based Deductions
This function will generate a deduction (with the status of 'Approved') based on a percentage of the Driver’s pay using several fields on the Percentage Based Deductions window. The Driver’s pay consists of those pay entries that have been updated using the Driver Pay Register program, and thus have the status of 'Owed'. The pay amount can be viewed on the Payment Details tab, in the Owed Balance field in the top right corner. Deductions can be viewed on the Deductions tab.
| Field | Definition |
|---|---|
Deduction Based On |
Select either 'Gross Driver Pay' or 'Net Freight Charges' to configure how the deduction will be calculated. |
Starting Driver |
Enter the code of the first Driver for whom you wish to create a gross pay percentage deduction. Double click for a code selection form. Drivers are configured in the Driver Profiles program. |
Ending Driver |
Enter the code of the last Driver for whom you wish to create a gross pay percentage deduction. Double click for a code selection form. Drivers are configured in the Driver Profiles program. |
Cutoff Date |
Pay entries whose Approved Date (as displayed in the Payment Details grid) is beyond the date specified in this field will not be included in the gross pay amount. Double click for a calendar selection form. |
Code |
Select a deduction code from the drop down list box. Deduction codes are configured in the Driver Pay Contracts program. Note that if the selected deduction code is not part of the contract assigned to the Driver, no deduction will be created. |
Percentage |
Enter the percentage by which the gross pay should be multiplied in order to determine the amount of the deduction. |
Minimum |
Enter the minimum Deduction amount. When the calculated amount is under the 'Minimum' value, a deduction will be created for the minimum amount. |
Max This Time |
If the maximum amount of the deduction. If the gross pay multiplied by the percentage is greater than this amount, this amount will be used instead. |
Max Total / Driver |
If there is a total amount that should be deducted for the selected deduction code, enter the amount here. The system will add up all previous deductions for the Driver that use the deduction code specified above, and will not create a deduction if the amount entered in this field has already been exceeded. If the difference between the sum of all previous deductions for this deduction code and Driver is less than the amount entered in this field, but greater than the amount calculated for the percentage deduction (or Max This Time amount), the difference will be used as the deduction amount. For example, if the calculated percentage deduction is $150, the total of all previous deduction is $900, and the amount in the Max Total / Driver field is $1000, the deduction will be created for the amount of $100, not $150. |
Driver Type |
Select 'All', 'Company' or 'Owner Operators' to filter on the available Drivers in your system. |
Deduction Date |
Enter the Deduction Date for the deduction entry. This can be viewed on the Deduction tab. |
Use Filter / Show Filter |
Checking the 'Use Filter' flag will allow access to the 'Show Filter' button, which will open the SQL Filter Editor window. From this window, the user can specify an SQL query (based on the information available in the DRIVERPAY table), and use it to filter records during the calculation of the percentage deduction. |
Damage Deposit Deductions
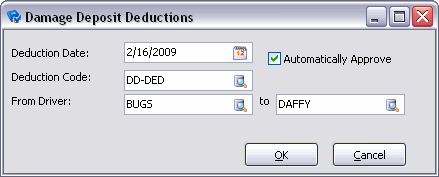
Selecting this option opens the Damage Deposit Deductions window where you can specify the Deduction Date, Deduction Code, From Driver, and To, as well as Automatically Approve the deduction.
| Field | Definition |
|---|---|
Deduction Date |
Double-click the field to bring up a calendar where you can scroll to the desired date. |
Deduction Code |
Double click to select a deduction code. Only deduction codes that are assigned to the Driver’s contract (in the Driver Pay Contracts program) will be available for selection. |
From Driver |
Use the pull-down menu to select the Driver the deduction is coming from. |
To |
Use the pull-down menu to select the Driver the deduction is going to. |
Automatically Approve |
Place a checkmark in the box if you wish to automatically approve the deduction. |
Approve Driver Pay
This option will prompt you to enter a range of Drivers for whom you want to approve pay. Double click in the fields of the selection form for a list of Drivers. For the selected range of Drivers, all pay entries that are currently of the status 'Not Approved' will be changed to the status of 'Approved', and thus available for inclusion on a Driver Pay Register.
Approve Driver Deductions
This option will prompt you to enter a range of Drivers for whom you want to approve deductions. Double click in the fields of the selection form for a list of Drivers. For the selected range of Drivers, all deduction entries that are currently of the status 'Not Approved' will be changed to the status of 'Approved', and thus available for inclusion on a Driver Deduction Register.
Get Loan Payments
Opens the Get Loan Deductions window, where you can select the frequency of loans to process and enter a process date. The Loan Payments generated by this option will then be available on the Driver Loans tab.

This window allows you to gather the Driver Loan data that exists in your system. The options below allow you to filter this process so that only specific kinds of Driver Loan data is returned.
| Field | Definition |
|---|---|
Loans Frequency |
Select a 'Frequency' value ('Weekly', 'Bi-weekly' or 'Monthly') to pull data for the Driver Loans that fall into that category. |
Starting Driver ID / Ending Driver ID |
Use these two fields to configure a Driver ID range that will be used to limit the Driver Loan data that is returned. Only Driver IDs that fall within the range’s purview will have their Loan Deduction data returned. |
Other Category (optional) |
This field allows you to filter Drivers based on their 'Category' value. A Driver is given a 'Category' on the Driver Profiles program > Pay tab > 'Category' field, which is a simple text-entry field. Once a 'Category' value has been added in the Driver Profiles program, you will be able to select that category by clicking the Database Search button in this field. |
Process Date |
Click the pull down arrow to select a Date from a Calendar menu. |
Recalc Driver’s Balance
Choosing this option will update the 'DRIVER_BALANCE' field on the grid based on any changes that have been made to the Driver’s pay history.
Currency Transfers
This option opens the Currency Transfer Type window, where you can choose one of two types of Currency Transfer processes to perform on your Driver Pay records.
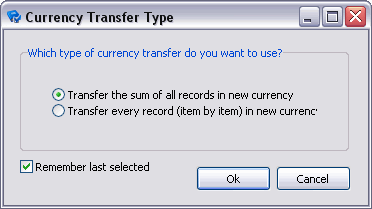
Choose whether you would like to 'Transfer the sum of all records in new currency' or to 'Transfer every record (item by item) in new currency'. If you select the second option, the Currency Transfers (Item by Item) window will open, allowing you to select those records applicable for the currency conversion.
Create Deduction with Date
This field will only be used when you uncheck the 'Use Driver Exchange Rates' checkbox.
This date will be used only for the Converted Entry (the one that has in description field something like "ADJUST FOR CURR EXCHANGE"), not for the Reversed entry.
Remember last selected
Leaving this option checked will save your choice in the above section, and will have the option chosen highlighted whenever you access this window again.
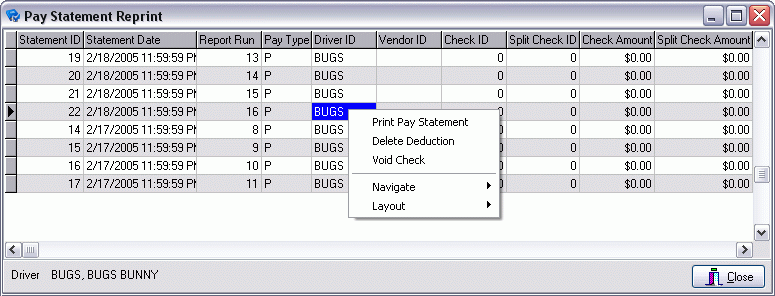
Pay Statement History
This option displays a list of the Pay Statements generated for the selected Driver on the Pay Statement Reprint window.
| Context menu option | Definition |
|---|---|
Print Pay Statement |
Will display the Report Selection form. The Crystal Report template supplied with the TruckMate system is called 'PAYSTMT.RPT'. After selecting the desired report template (using the Report Selection form), the statement will preview to the screen. Click the printer icon at the top of the screen to send the report to the printer that is configured as the default printer for your workstation. See the Crystal Reports Reference for more information on report functions. |
Delete Deduction |
This option allows the Deletion negative charges from within this window. |
Void Check |
This option will allow you to Void a check that has been created for a driver. |
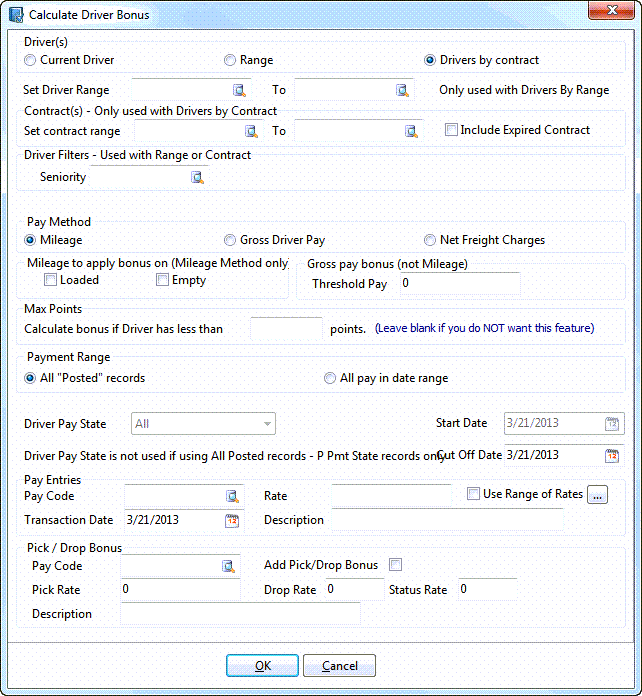
Calculate Driver Bonus
Update your Driver pay information in the Driver Pay Register Program and then return to the Driver Pay Audit Program and calculate a Driver bonus using the Calculate Driver Bonus window.
| Field | Definition |
|---|---|
Driver(s) |
The three options available in the 'Drivers' section allow you to Filter the Drivers you will be calculating a bonus for:
|
Set Driver Range |
This option allows you to define a range of available drivers to include in onus calculation. Use the search buttons to find your starting driver and the ending driver in the range. This option is only usable with Range drivers (Range checkbox is selected in the Drivers section) |
Contract(s) |
If using the 'Drivers by Contract' radio option, then you must use the fields in this section to provide a Driver Contract Range that will be used to gather the Driver records that require Bonus Calculations.
|
Driver Filters |
The filters in this section are used with both Range Drivers and Drivers By Contract. Currently TruckMate provides one filter, Seniority. Selecting one seniority level will include only drivers with that seniority level in the bonus calculation. Seniority is set for drivers in Profiles > Driver Profiles > Pay / Remuneration tab. |
Pay Method |
Choose the Pay Method you would like to use in calculating the Driver Bonus. Available options are Mileage, Gross Driver Pay and Net Freight Charges. |
Mileage to apply bonus on |
Choose either 'Empty' or 'Loaded' miles. Use this section if you selected the Millage radio button in the pay method section above. |
Gross Pay Bonus (not Mileage) |
The following options allow you to pay a percentage of gross pay as a bonus, set a threshold amount for the bonus occurrence, and pay a bonus as a percentage of the freight bill charges. Threshold Pay Enter a threshold amount. That is, if you wish to pay a bonus, based on either the Gross Pay of a Driver, or Gross Freight Bill amount, enter the threshold amount here. For example, if you wish to pay a Driver a bonus if his Gross Pay exceeds $10,000, enter $10,000 in the threshold amount. |
Max Points |
If you would like to calculate a bonus amount for a Driver based on the amount of Compliance Points accrued against the Driver, enter a Point amount in the provided field. Points are attributed to Drivers in the Safety & Compliance program. Leave this field blank to remove it from the Bonus calculation procedures. |
Payment Range |
Choose the option you wish to use for Payment Range Bonuses. Choose either 'All "Posted" records' or 'All pay in date range' for use when calculating the bonus value. |
Driver Pay State |
The fields in this drop-down menu will limit the Bonus Calculations to those Drivers with a specific Payment State value (based on the PMT_STATE field). You can select 'All' to include all Payment States in the filter. |
Start Date / Cutoff date |
Specify a Starting and Ending date by clicking the down arrow and choosing a date from a Calendar menu. Note: The 'Start Date' field will become accessible when the Application Configurator program > PAYAUDIT.EXE > 'Allow Start Date in Bonus Calculation' option is set to 'True'. |
Pay Code |
Enter the Pay Code assigned to this Driver bonus. |
Rate |
Enter the rate per mile. |
Use Range of Rates |
If this checkbox is checked, the system will use a ranged mileage rate in calculating driver bonus. The mileage range rates can be defined in the 'Mileage Range Rate Form' accessible by selecting the adjacent 'Open Mileage Range Rate Form' button. The Open Mileage Range Rate form is used to define rates based on mileage ranges. This field is only useful if the 'Use Range of Rates' checkbox described earlier is checked. If so, driver bonus pay will be calculated based on the ranges and their associated rates entered in this form. Note: When entering the mileage ranges make sure there is NO overlapping between a mileage range and the next one. If a figure is used as a maximum for one range the same figure can’t be used as the minimum for the next. |
Transaction Date |
Enter the date you want the payment to occur. |
Description |
Enter any relevant information. |
Pay Code |
Enter a Pay Code ID or click the search button to select one from those available on your system. |
Add Pick / Drop Bonus |
Check this option if you would like to use a Pick / Drop bonus for this Driver. |
Pick Rate / Drop Rate / Status Rate |
Enter the integer values that will equate to a bonus being given for these various factors. |
Description |
Enter a Description for this Pick / Drop bonus. |
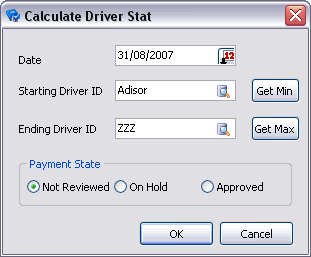
Calculate Driver Stat
This option lets you change the Payment State Status Code of a Range of Drivers on your system using the Calculate Driver Stat window.
| Field | Definition |
|---|---|
Date |
Click the button within this field to select a Date from a Calendar menu. |
Starting Driver ID / Ending Driver ID |
Enter a Driver ID Code or click the search button to select a Starting Driver for the Driver Range, or use the 'Get Min' button. |
Get Min / Get Max |
Clicking these buttons will select the first and last Driver ID codes in your system, respectively. |
Payment State |
Choose the Payment State Code you would like to apply to the Drivers highlighted within your specified Range. Available options are 'Not Reviewed', 'On Hold' and 'Approved'. |
Manage Driver’s Fuel / Credit Cards
Selecting this option will open an instance of the Fuel Card Management program with the selected Driver’s Fuel Card information displayed.
Selecting this option will open the Driver Days Off window, which lets the user define days off for their Drivers, based on two hard-coded day off codes.
The Driver Days Off window allows the user to specify which dates are recorded as days off for a specific TruckMate Driver. This data can then be used with Driver Pay Rules, such as 'Percentage' rules that factor in a Drivers average days worked for a given period.
Driver ID
Double-click in this field to select the Driver ID you wish to configure days off against.
Date
Double-click in this field to select the day off date.
Code
This drop-down menu contains the two hard-coded day off codes: 'Scheduled' and 'Unscheduled'.
Comment
Enter a descriptive comment concerning the day off record, if required.
ID
The 'ID' value is automatically generated by the system when a day off record is created, and will automatically increment by a factor of 1. This value is read-only.
Payments tab
The Payments tab displays a list of payments for the Driver selected in the grid at the top of the screen. You can sort the display by clicking on any of the column headers. A blue arrow will appear, and items will be sorted in the order of the items in that column. Payments are generated by activity in the Dispatch, Customer Service, Quick Bill Entry and Local Dispatch programs, based on each Driver’s assigned contract (configured in the Driver Pay Contracts program). Payments can also be manually added. When you manually add a payment, you do not need to fill in all the fields in the grid. When you add the Extra Pay Code (double click in the Pay Code field for a selection form) the necessary details will default according to the setup of the Extra Pay code in the Driver Pay Contracts program. If the pay entry has values in the Leg From Zone and Leg To Zone fields, the short description (as configured in the Codes Maintenance program) will display under the grid form, above the navigator bar. Another way to control some of the automatically filled fields is though a few App Config options. 'Copy Leg Date in Driver Pay tab' and 'Copy User Fields in Driver Pay tab' are available for that purpose. For more details on what these options are for go to Application Configurator > Driver Pay > PAYAUDIT.EXE.
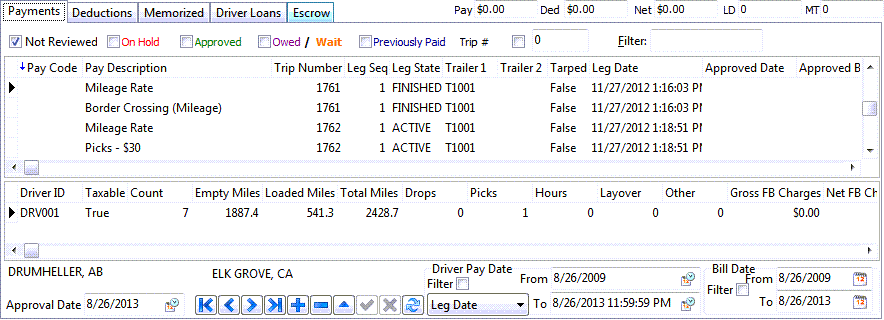
Not Reviewed
Select this checkbox to display transactions that have not been approved or held. These transactions are displayed in black text.
On Hold
Select this checkbox to display transactions that are on hold and transactions that are Not Reviewed. These transactions are displayed in red and black text respectively.
Approved
Select this checkbox to display transactions that have been approved for payment (which means that they can be processed using the Driver Pay Register program). These transactions are displayed in green text.
Owed / Wait
Select this checkbox to display transactions that have been processed through the Driver Pay Register program. Transactions remain at the Owed status until a statement is run and a check is created (in the Driver Statement program) and the check is updated using the A/P Check Register program. These transactions are displayed in purple text. If the item has been included on a statement, the transaction will be displayed in a slightly lighter shade of purple. Also, you can see if the entry has been included on a statement by looking at the 'Paid', 'Paid By' and 'Paid Date' fields in the grid.
Previously Paid
Select this checkbox to display transactions that have been included on a check and posted through the A/P Check Register program. These transactions are displayed in blue text.
Trip #
Select this checkbox to display transactions that have a trip number.
Trip Number Box
Enter the trip number in this field for the grid to display information associated with this trip number.
Owed Balance
Displays the sum of the payments and transactions that have a status of Owed. Transactions remain at the Owed status until a statement is run and a check is created (using the Driver Statements program) and the check is updated using the A/P Check Register program.
From / To Zone Descriptions
The Origin Zone Code and Ending Zone Code will display at the bottom of the screen.
Approval Date
You can change the 'Approval Date' value to filter the Payments grid based on the Approval Date of the Driver Pay records. Only those Drive Pay records that were approved prior to the date chosen in this field will be displayed.
Date Filter
Cut-off Filter
The 'Cut-off Filter' checkbox, when checked, will allow you to select a Date Range for one of three different dates available from a drop down list. The available dates in the list are 'Leg Date', 'Approved Date' and 'Created Date'. Once the desired date is selected, you can then assign a value to the 'From' and 'To' Calendar selection fields- for your Filter Range. Choosing a specific Date Range will improve speed when checking very old records. Note that time is also included in the date range selection, which allows to specify a specific time of the day to include in your date filter range.
Payments grid
F/B Paid Amt / FB Unpaid Balance
These two read-only (informational) columns are useful when the "driver" is actually a brokerage agent and you need to make a decision as to whether the end client has paid enough of their bill to warrant paying out the agent’s commission (driverpay). Note that the existing column 'F/B Total Charges' is pre-tax, so the new columns may exceed it. Of course, the new columns show $0 if there is no FB associated with the pay row or the FB has not yet been run through the billing register.
When entering a new driver pay record, certain fields can be automatically copied to the new pay record. A number of App Config options are available including 'Copy Driver ID in Driver Pay tab', 'Copy Leg Date in Driver Pay tab' and 'Copy User Fields in Driver Pay tab'. For more details on what these options are for go to
| Before you can include transactions in the Driver Pay Register program (and thus include transactions on a statement) you must set their status to 'Approved'. Double click on individual entries to update their status; to update the status of all entries, see the Right Mouse Context Menu section below. If you double click a second time, the item’s status will be set to Hold. Held items will not be included in the Driver Pay Register program. You can approve items of the Hold status by double clicking on them. |
If you edit a transaction that has been generated by activity in the Dispatch or Customer Service programs, you will be asked if you want to set the Pay Overridden value to True. By setting the value to true, you prevent the pay from being recalculated when you post the record. Also, if the trip is still active in the Dispatch program, if changes occur to the leg configuration that affect the entry, the pay entry will not be updated if the Pay Overridden value is set to 'True'.
Context Menu - Payment grid
Approve for Payment
You can approve multiple transactions at once. Select 'All Unaudited' to change the status of all transactions with the current status of 'Not Reviewed' (black text), to 'Approved for Payment' (green text). Select 'All Not Approved' to change the status of all transactions with the status of 'Not Approved' (red text), to 'Approved for Payment' (green text). Or you can approve all transactions with 'On Hold' status to 'Approved For Payment'. The same set of options is also available for the transactions currently selected in the grid. In other words, you can approve 'All Unaudited in the grid', 'All On Hold in The grid' or 'All Not Approved in The grid' to approve all transactions of the selected status provided they are already selected in the grid. With the extended set of options the user can mass-approve transactions with the ability to use filters and refine the selection prior to approval.
Hold Approved Payments
This will change the status of all 'Approved' payments (green text) to 'Held' (red text).
Approve all for trip
You can approve all for a particular trip.
Recalculate pay on trip
Click this option to Recalculate the Pay details for the selected driver on a specific trip. This option is related to a trip, and thus, a trip number must be provided. Therefor, this option is only usable if the 'Trip #' checkbox is selected, and a trip number is entered in the field beside the 'Trip #' on the top of the grid. TruckMate will popup a confirmation window with the entered Trip #.
Change Secondary Contract setting on trip
Click this option to change the Secondary Contract settings on the selected Trip record.
Select record to be Mark Paid (Ctrl Left Click)
Use this option to select multiple detail lines (or hold your '<Ctrl>' key down and left click the records you wish to mark).
Mark as Paid
The Mark as Paid function is used on an entry that has been posted and is a reversing entry of another posted record (the 2 entries summed being a zero value). A User can use the 'Void / Rebill Pay' function below, delete the rebill entry that is created, run it through the register and then 'Select record to be Mark Paid'. If they 'Mark as Paid', it changes status to 'FB - Previously Paid'. Then the 2 records do not get printed on the Drivers pay statement.
Clear Selected records
The option is used to clear records that have been marked paid (shown in italics) without having to put them on a driver statement. This is usually utilized when there are adjustments/credits done regarding driver pay.
Void / Rebill Pay
Selecting this option will create 2 'Approved' records for the Posted entry selected- one a negative (void - reversing) entry, and the other a new Freight Bill (Rebill) entry the User can either delete or edit.
Change Driver Shift on FB
Choose this option to open the Customer Service program, where you may change the Driver Shift details.
ProRate Manual Pay Across Trip
Choosing this option will employ ProRate Manual Payment across the selected Trip. You are then required to enter the Pay Rate details in the grid below.
Show Transaction History / GL
Selecting this option will open the Driver Pay History window, with two tabs: History and GL. The first tab displays the Driver Pay Transactions associated with the record selected in the Payment grid (pulled from the DRIVERPAY_TRANS table), and the second displays the various GL entries made for the record (pulled from the DRIVERPAY_GL table).
Import Payments
This option allows the user to import Driver Payments from a text file. The text file must be structured for TruckMate import purpose.

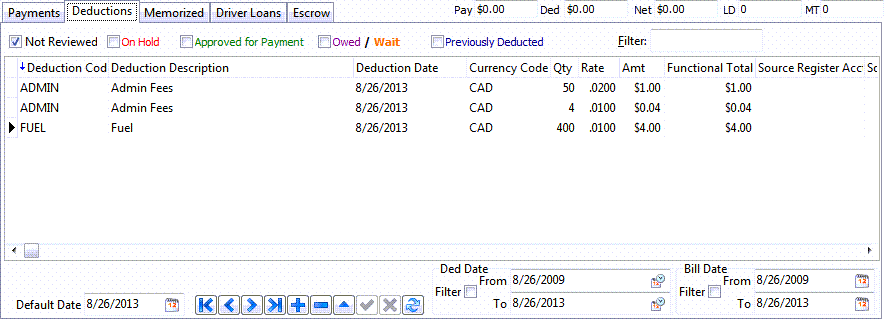
Deduction Details tab
The Deductions tab displays a list of deductions for the Driver selected in the grid at the top of the screen. You can sort the display by clicking on any of the column headers. A blue arrow will appear, and items will be sorted in the order of that column. Deductions can be manually added on this tab, or in the Dispatch, Customer Service, Quick Bill Entry and Local Dispatch programs. When you manually add a deduction, double click in the Deduction Code field for a selection form. Default values will paste according to the setup of the Deduction code in the Driver Pay Contracts program. The four User Defined Fields are for reference purposes only, and can be used to enter any notes that are useful to you.
Filters
Not Reviewed
Select this checkbox to display transactions that have not been approved or held. These transactions are displayed in black text.
On Hold
Select this checkbox to display transactions that are on hold and transactions that are Not Reviewed. These transactions are displayed in red and black text respectively.
Approved for Payment
Select this checkbox to display transactions that have been approved for update (which means that they can be processed using the Driver Deduction Register program). These transactions are displayed in green text.
Owed / Wait
Select this checkbox to display transactions that have been processed through the Driver Deduction Register program. Transactions remain at the Owed status until a statement is run and a check is created (in the Driver Pay Statement program) and the check is updated using the A/P Check Register program.
'Owed' transactions are displayed in Purple text, while 'Wait' transactions are displayed in Orange text.
Previously Deducted
Select this checkbox to display transactions that have been included on a check and posted through the A/P Check Register program. These transactions are displayed in blue text.
Filter
This free text entry field allows the user to filter the results based on entered value that is matched with values of the current sorted field. The current sorted field can be changed by simply clicking on the label of the desired field to be sorted.
Driver Deduction grid
Loan ID
A new field entitled 'Loan ID' has been added to the Driver Deductions table. Deduction codes will be created corresponding to Principle Payment, Interest Payment, and Penalty Payment. These will be set up in Codes Maintenance program. This will create deductions on the Driver pay screen corresponding to the Principle Amount and Interest Amount displayed, or alternatively, the Penalty Amount if it is specified. These will be created as 'Approved for Payment'.
User Defined Field 1 - 3
These three User Defined fields allow you to enter any miscellaneous data you wish against the Driver Deduction record. If you set the Application Configurator program > DEDREG.EXE > 'Print User Fields' option to 'True', the values of these fields will be included on the Driver Deduction Register program’s Quick Report (you can also change the report’s column names for these fields via config options).
Context Menu - Deduction grid
Approve for Deduction
You can approve multiple transactions at once. Select 'All Unaudited' to change the status of all transactions with the current status of 'Not Reviewed' (black text), to 'Approved for Payment' (green text). Select 'All Not Approved' to change the status of all transactions with the status of 'Not Approved' (red text), to 'Approved for Payment' (green text). Or you can approve all transactions with 'On Hold' status to 'Approved For Payment'. The same set of options is also available for the transactions currently selected in the grid. In other words, you can approve 'All Unaudited in the grid', 'All On Hold in The grid' or 'All Not Approved in The grid' to approve all transactions of the selected status provided they are already selected in the grid. With the extended set of options the user can mass-approve transactions with the ability to use filters and refine the selection prior to approval.
Hold Approved Payments
This will change the status of all 'Approved' transactions (green text) to Held (red text).
Memorize this Deduction
Selecting this option will open the Memorized Transactions Form window, which will allow you to create an entry with the details of the current transaction on the Memorized tab. Memorized Transactions can be recalled from the right-mouse menu option in the header, or from the right-mouse menu on the Memorized tab.
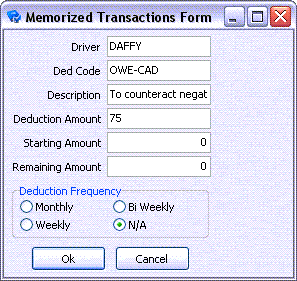
Most of the details on this form will automatically populate based on the Deduction entry that was right-clicked in the Deductions tab grid.
If required, you may modify the 'Deduction Amount' value and/or enter values in the 'Starting Amount' and 'Remaining Amount' fields.
Deduction Frequency
If this deduction is going to be a recurring deduction for this particular Driver, you may select one of the Frequency options from this section. Your choices are 'Monthly', 'Weekly', 'Bi Weekly' or 'N/A' (one-time deduction).
Split this Deduction
This option will split the Deduction total into two separate GL Accounts.
Select Record to Mark Paid (Ctrl Left Click)
Use this option to select multiple detail lines (or hold your <Ctrl> key down and left click the records you wish to mark).
Mark as Paid
Change the Payment Status of the highlighted detail lines to 'Paid'.
Clear Selected Deductions
Deletes the selected detail lines.
Void / Rebill Deduction
Selecting this option will create a Void / Rebill Freight Bill in the Customer Service program, where you may specify additional Deductions for the selected Driver.
Show Transaction History / GL
Selecting this option will open the Driver Deduction History window, with two tabs: History and GL. The first tab displays the Driver Deductions Transactions associated with the record selected in the Deductions grid (pulled from the DRIVERDEDUCTIONS_TRANS table), and the second displays the various GL entries made for the record (pulled from the DRIVERDEDUCTIONS_GL table).
Import Deductions
This option allows the user to import Driver Deductions from a text file. The text file must be structured for TruckMate import purpose.
You can set security parameters in the Security Setup program > Security > tabs Setting section that will set this tab (and all its data) to read-only status.
| Before you can include transactions in the Driver Deduction Register program, (and thus include transactions on a statement), you must set their status to 'Approved'. Double click on individual entries to update their status; to update the status of all entries, see the Right Mouse Context Menu section below. If you double click a second time, the item’s status will be set to Hold. Held items will not be included in the Driver Deduction Register program. You can approve items of the Hold status by double clicking on them. |
Memorized tab
Deductions are added to the Memorized tab by using the Memorize this Deduction menu function on the Deductions tab. Items shown on the Memorized tab can be recalled (and thus displayed on the Deductions tab) by using either the right-mouse menu option available in the Driver grid, or by using the Get Memorized Transactions option shown here.

Context Menu - Memorized grid
Edit Transaction
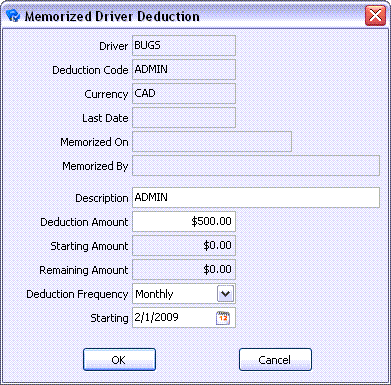
Brings up the Memorized Driver Deduction window, where you can change the parameters of the memorized transaction. You will be able to change the 'Deduction Amount' of each deduction, and the 'Starting Amount' (which is displayed in the Starting Amount grid).
| Field | Definition |
|---|---|
Last Date |
This field normally displays the Date of the last time the Memorized Deduction was applied. When you first memorize a deduction, the 'Last Date' (MEMORIZED_TX.NEXT_DATE) field is now initialized to the date of the original deduction. This prevents confusion over possibly doing the first recall too soon (same period as original deduction). |
Memorized On / Memorized By |
For auditing purposes, the 'Memorized On' (memorized deduction creation date) and 'Memorized By' (user who created the memorized deduction) are recorded and displayed as read-only information this form. |
Description |
This value is the descriptive name of the selected Memorized Driver Deduction. This value is usually copied from the original Driver Deduction, but can be modified by the user (value stored in the MEMORIZED_TX.NAME column). |
Deduction Amount |
This field contains the total monetary amount of the Memorized Driver Deduction. |
Starting Amount / Remaining Amount |
The 'Starting Amount' and 'Remaining Amount' values are used for those deductions where a Driver is making payments over time up to a certain amount. The Remaining amount will be decreased by the 'Deduction Amount' each time a Memorized Deduction is processed through the Driver Deduction Register program. When the Remaining Amount is zero, the 'Last Date' will be assigned to the Memorized Transaction, and a new deduction will no longer be created when the 'Get Memorized Transactions' function is used. The 'Remaining Amount' is is a calculated field (although it can now be overwritten to zero, in order to create a perpetual deduction: for example, a deduction every pay period). Previously, when a transaction was first memorized, the 'Remaining Amount' was set to the 'Starting Amount' entered. Now, the 'Remaining Amount' is set to the 'Starting Amount' you enter, minus the original (copied) 'Deduction Amount'. Thus, for the 'Starting Amount' value, the user should enter the full total amount to be deducted, including the original (memorized) deduction. Also, the 'Starting Amount' is only editable when you first memorize the deduction. When the user is editing a Memorized Deduction, 'Starting Amount' will be a read-only field. |
Deduction Frequency |
This Deduction Frequency drop-down allows the user to select how often the Memorized Driver Deduction should be automatically applied to the selected Driver. |
Starting Date |
This optional field (MEMORIZED_TX.STARTING_DATE)is used to specify when the Memorized Deduction should come into effect. When using the 'Get Memorized Deductions' right-click option, a Memorized Deduction will be ignored (not copied) if the value in this field is a future date. If this field is blank, the deduction can be recalled immediately by the 'Get Memorized Deductions' function. |
Delete Transaction
Use this function to delete a Memorized transaction.
Get Memorized Transaction
This option will recall memorized transactions and add them as entries on the Deduction tab. You have the option to select only the transaction currently highlighted ('This Transaction'), or select all transactions for this Driver ('All for this Driver').
Driver Loans tab
The Driver Loans tab has been added to the Driver Pay Audit program to record deductions and re-calculation of payment schedule / interest. Upon occasion, it becomes necessary to make personal loans to Drivers at a fixed interest rate, with a fixed repayment schedule. The repayments are generally deducted from the Drivers pay each pay period. Each loan will have the following information: principal amount, annual interest rate, payment amount, payment frequency, etc.
Loan ID
Will be created sequentially starting with 1 for the first loan and increasing as successive loans are added. This is system generated and uneditable.
Description
Brief description as to the purpose of the loan.
Date
Will be the date that the loan was created. This is system generated and non-editable.
Interest Rate
The interest rate to be used to calculate interest payable on the loan, and entered as a percentage per year.
Principal
The amount that the Driver was originally loaned.
Payment
The amount that would normally be deducted from the Driver’s pay each payment period as specified in the Payment Frequency field. The Payment amount field can be manually entered to override the default. The Principle Amount and Interest Amount fields will be automatically updated based on the entered Payment Amount.
Penalty Amount
If the Driver does not make enough any given pay period, then the user may enter an amount into the Penalty Amount. If a Penalty Amount is specified, then this will override the Principle and Interest Amount entries and will instead create a deduction for the Penalty Amount on the Deductions tab.
Frequency
Basically a note to indicate how frequently the agreed upon amount should be deducted from the Driver’s pay. It will be used to supply a default for the next scheduled payment date.
Principal To Date
Displays the principal amount paid to date.
Interest To Date
Displays the total amount of the interest collected against this loan to date. This amount is totaled from the Driver Deduction records for the loan payments.
Penalties To Date
Displays the total amount of the late penalties collected against this loan to date. This amount is totaled from the Driver Deduction records for the loan payments.
Last Payment
Shows the amount of the last payment applied against this loan. This is non-editable and is set each time a non-penalty payment is transferred over to the Deductions tab.
Next Payment
Shows the amount of the next payment.
Interest Amount
Calculated from the Outstanding Balance of the loan and the amount of time since the Last Payment Date. The calculation is as follows:
Days = Current Date - Last Payment Date, and Interest Amount = ( Outstanding Balance * ( Interest Rate * ( Days / 364 ))
If the outstanding balance is more than the regular payment amount, then the Payment Amount will default to the Regular Payment Amount and the Principle Amount will be calculated as the Payment Amount less the Interest Payment. If the outstanding balance is less than the regular payment amount, then the Principle Amount will default to the Outstanding Balance and the Payment Amount will be calculated as the Principle Amount entered plus the Interest Payment.
Next Penalty
Displays the next penalty amount, should it occur.
Principal Code
Displays the Principal Code as set up in the Driver Pay Contracts - Deductions tab.
Interest Code
Displays the Interest Code as set up in the Driver Pay Contracts - Deductions tab.
Penalties Code
Displays the Penalties Code as set up in the Driver Pay Contracts - Deductions tab.
Paid
Will display the amount paid to date.
Outstanding
The amount of Principle currently outstanding on the loan. This is a non-editable. This amount is totaled from the Driver Deduction records for the loan payments.
| Users must run the Loan Payments for each Loan Frequency (that is, Weekly, Bi-Weekly, Monthly), using each Loan Frequency as the Process date. The Get Loan Payments feature is designed to get one payment per each loan, with interest calculated according to the Process Date. |
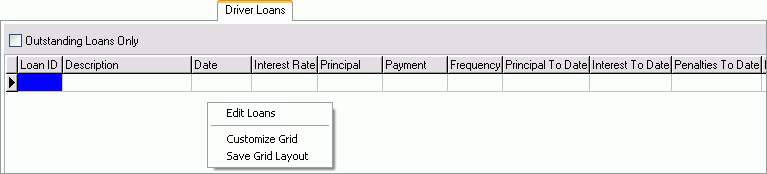
Context Menu - Driver Loans grid
Create/Edit Loans
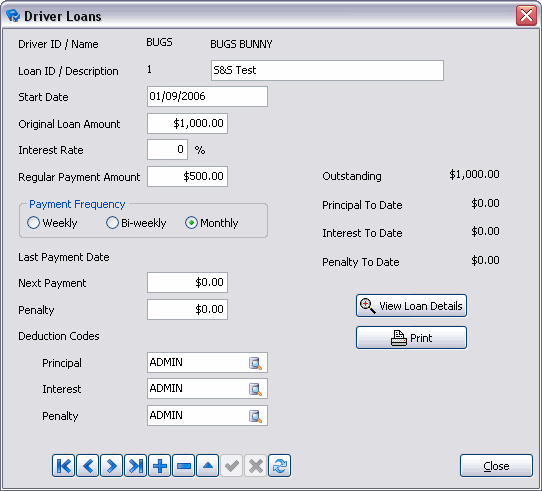
Enabled once you have Driver information in the grid, and allows you to edit the loan information for this Driver using the Driver Loans window.
| Field | Definition |
|---|---|
Loan ID |
Will be created sequentially starting with '1' for the first loan and increasing as successive loans are added. This is system generated and non-editable. |
Start Date |
Will be the date that the loan was created. This is system generated and non-editable. The loan start date can only be edited until the first loan payment has been updated. |
Original Loan Amount |
The amount that the Driver was originally loaned. |
Interest Rate |
The interest rate to be used to calculate interest payable on the loan, and entered as a percentage per year. |
Regular Payment Amount |
The amount that would normally be deducted from the Driver’s pay each payment period as specified in the Payment Frequency field. The Payment amount field can be manually entered to override the default. The Principle Amount and Interest Amount fields will be automatically updated based on the entered Payment Amount. |
Payment Frequency |
Basically a note to indicate how frequently the agreed upon amount should be deducted from the Driver’s pay. It will be used to supply a default for the next scheduled payment date. Select either 'weekly', 'bi-weekly', or 'monthly'. |
Last Payment Date |
Will display the Last date the Driver was paid. |
Next Payment |
Shows the amount of the next payment. |
Penalty |
If the Driver does not make enough any given pay period, then the user may enter an amount into the Penalty Amount. If a Penalty Amount is specified, then this will override the Principle and Interest Amount entries and will instead create a deduction for the Penalty Amount on the Deductions tab. |
Deduction Codes |
As set up in Driver Pay Contract, Deductions tab. It is suggested to create three new Driver Deductions in the Driver Pay Contract for the following titles (you may change the names as you see fit): Interest, Penalties, Loan Payment.
|
View Loan Details |
Brings up a Driver Loan Details form where you can view a Loan Payment grid, a Future Payments grid, and calculate a Payout Amount based on a particular date using the 'Calc Payout' button. |
Brings up the report dialog box where you can select the Driver Pay Loans report ('DRVLOAN.RPT') allowing you to print the Driver Loan information for your paper records. |
Escrow tab
The Escrow tab shows a read only summary of all the Driver Escrow accounts for the currently selected driver. Escrow Accounts are deposit accounts that a Driver may use to save money for required payments in the future. These accounts are setup to receive money from the Driver’s pay automatically, and can be entered into any number of different 'targeted' savings accounts.
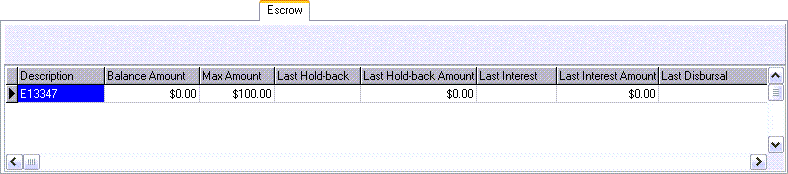
When you first open this tab, no information will be shown in any of the fields. To add Escrow information for the current Driver, you must use the right-click Context Menu. You can also generate Escrow Accruals for a range of Drivers, Pay Contracts or for a specific Escrow account by using the Get Escrow Hold-Backs Wizard.
Context Menu - Escrow grid
Edit Escrow Account
Selecting this option will open the Escrow Driver Accounts window, which will allow you to setup and modify the Escrow account for this driver.
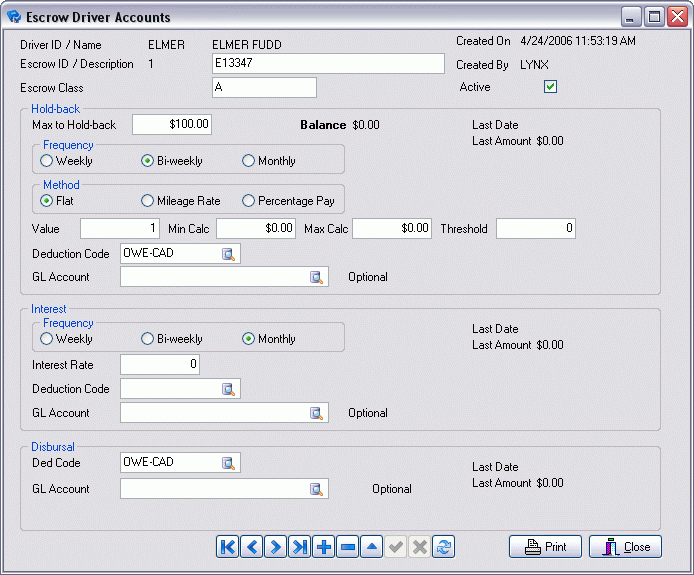
This form is used to create and/or modify existing Escrow accounts.
| Field | Definition |
|---|---|
Driver ID / Driver Name |
These read-only fields will populate automatically based on the selected Driver on the main form of the Driver Pay Audit program window. |
Created On / Created By |
These read-only fields will also populate automatically: the first with the current Date / Time stamp, the second with the User who is currently logged in and is editing the record. |
Escrow ID / Description |
The 'Escrow ID' is a numerical field that will automatically populate with a value when the User clicks the '+' button to enter a new record. The integer value will increment with each subsequent record added. The 'Description' field is a text field, where you are expected to enter a short phrase that outlines the purpose of this Escrow Account. |
Escrow Class |
This is a User-defined, free format text field. Use the 'Escrow Class' field to give this Escrow Account a unique, easily recognisable name, such as 'Insurance' (if the Driver wants to deposit increments from his paycheck toward a future vehicle insurance payment). |
Active |
Check this flag if the currently displayed Escrow Account is active (available for use). |
Select this button to access the standard TruckMate Report Selection window. The report used with this window is called 'DRIVER_ESCROW.RPT', and will print out either a detailed or summary report of your Driver Escrows. |
|
Max to Hold-back |
The value present in the 'Max to Hold-back' field acts as a 'limiter' of the Escrow Account: once this value is reached, the ability to pull money from a Driver’s pay and enter it into the current Escrow Account is disabled. |
Frequency |
Choose from either 'Weekly', 'Bi-weekly' or 'Monthly' in this section. These values control how often the Escrow account payments are made for the selected Driver, and makes filtering records in the Get Escrow Hold-backs Wizard easier. |
Method |
Choose from either 'Flat', 'Mileage Rate' or 'Percentage Pay'.
|
Value / Min Calc / Max Calc / Threshold |
These fields are used in conjunction with the option chosen in the 'Method' field explained above. 'Value' is a simple integer field- enter a flat charge to be used. 'Min Calc' and 'Max Calc' represent the minimum and maximum values/range (either in terms of Mileage or Percentage) that will be used to calculate the deduction when 'Mileage Rate' and 'Percentage Pay' are chosen. The 'Threshold' value acts as a check when using the 'Mileage Rate' and 'Percentage Pay' options- it specifies a value that must be reached before the mileage and percentage deduction calculations take effect. For example: entering '2000' in the 'Threshold' field and using 'Mileage Rate' as your method of deduction will tell the system to only begin calculating deductions after the selected Driver has achieved more than 2000 kilometers (or miles). |
Deduction Code |
Click the search icon in this field to select a Deduction Code from those that exist in your system. It is recommended that you create a new Deduction Code to be used for Escrow Hold-backs in the Driver Pay Contracts program. |
GL Account |
This is an optional field that will overwrite the GL Account attached to the Deduction Code you have selected above. Using this field you may use a Deduction Code other than the custom one you have created for the Escrow Hold-back information, and instead just specify an alternate location for the deposits. |
Frequency |
Choose from either 'Weekly', 'Bi-weekly' or 'Monthly' in this section. These values control how often interest is accrued against unpaid Escrow amounts for the selected Driver, and aids in filtering during the Get Escrow Hold-backs Wizard. |
Interest Rate |
This field contains a value that controls how much interest is calculated against unpaid Escrow amounts. Enter an integer in this field. |
Deduction Code |
Click the search icon in this field to select a Deduction Code from those that exist in your system. It is recommended that you create a new Deduction Code to be used for Escrow Interest payments in the Driver Pay Contracts program. |
GL Account |
This is an optional field that will overwrite the GL Account attached to the Deduction Code you have selected above. Using this field you may use a Deduction Code other than the custom one you have created for the Escrow Interest, and instead just specify an alternate location for the deposits. |
Ded Code |
Click the search icon in this field to select a Deduction Code from those that exist in your system. It is recommended that you create a new Deduction Code to be used for Escrow Deductions in the Driver Pay Contracts program. |
GL Account |
This is an optional field that will overwrite the GL Account attached to the Deduction Code you have selected above. Using this field you may use a Deduction Code other than the custom one you have created for the Escrow Deductions, and instead just specify an alternate location for the deposits. |
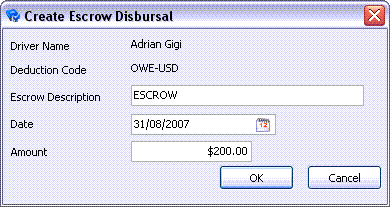
Create Disbursal
Selecting this option will open the Create Escrow Disbursal window, which allows you to enter a Disbursal amount against the Driver’s Escrow Account.
| Field | Definition |
|---|---|
Driver Name |
This field will automatically populate based on the Driver Code selected on the main form of the Driver Pay Audit program. |
Deduction Code |
This field will automatically populate based on the 'Ded Code' value chosen in the 'Deductions' section of the Escrow Driver Accounts window for this Driver. |
Escrow Description |
This description will automatically populate based on the information on the Escrow Driver Accounts window. You may edit this description if you wish. |
Date |
The Disbursal Date field will automatically populate with the current Date. You may change this if required by double-clicking the calendar icon within the field to access a Date Selection window. |
Amount |
Enter the amount of the Disbursal in this field. Click 'OK' to apply the Disbursal against the account. The Disbursal will be applied as a negative Driver Deduction on the Driver’s next pay check. |