Customer and Vendor Profiles

The Customer and Vendor Profiles program is used to create and edit customer and vendor records. This program keeps track of customer and vendor addresses, contact numbers, notes, vendor types, customer rating, billing, and credit information, accounts payable configuration, and miscellaneous information. Customer and Vendor profiles are used throughout the TruckMate system, particularly in the Billing, Accounts Payable and Accounts Receivable modules.
| If you are using TruckMate with the 'CRM' License (Key # 39000), the Customer and Vendor profiles program and all references to it will have the title TruckMate CRM. This should include all the references made to Customer and Vendor Profiles from all TruckMate applications, including 'Security Setup'. In other words, if any setup needs to be done regarding Customer and Vendor profiles, the reference will be TruckMate CRM. |
To access Customer and Vendor Profiles:
| From this location | Go to |
|---|---|
TruckMate Menu and TruckMate Task List |
Profiles > Customer & Vendor Profiles |
Windows Start Menu |
TruckMate 20xx > Customer & Vendor Profiles |
Windows Explorer |
C:\Program Files (x86) > TruckMate 20xx > Profile.exe |
Setting up Application Configurator for use with Customer and Vendor Profiles
Addr Zone Validation |
This option, when set to 'True' will use the Mileage Server Manager's address validation functionality as normal. When set at 'False' the address validation is not invoked if the address' Zone is changed and when it is invoked it does not update the Zone. |
Allow Addition of Non-Existent Commodities |
This option allows the User to add non-existent commodities to a Customer’s profile. If this config option is set to 'True' and a Client’s commodity is inserted with no corresponding master commodity record, a stored procedure ('INSERT_CLIENT_COMMODITY') is called to insert the master record. |
Allow Approvers to Change Status on Client Change Requests Assigned to Others |
This option has 3 choices: 'None', 'All' and 'Direct', default is 'None'. When a request is submitted (set to pending status), the submitter chooses the user, user group, or job title to indicate who should approve the request. These approvers will get warnings when they go to exit the app and have pending requests assigned to them. One TruckMate carrier may decide to only allow the specified user or group to approve/reject/re-assign the request, in such case this option must be set to 'None'. Another TruckMate carrier may decide that the assigned approver is only a guideline and any approver (with security rights) may approve/reject/re-assign the request in this case this option must be set to 'All'. Yet another TruckMate carrier may decide that the assigned approver must approve/reject/re-assign the request in most cases - with an exception that an approver who has security rights to by-pass the vetting process (apply a direct change) may also approve/reject/re-assign the request, in which case this option must be set to 'Direct'. |
Allow Approver to Change Status on Others' Entry Type Client Change Requests |
The available values for this option are 'False', which is the default value, and 'True'. If this option is set to 'True', a user that has 'Approver' privileges (as set in the Security_Configuration program) will be allowed to change the status of Client Change requests that are still in 'Entry' status. The approver can either submit the change request or cancel it. |
Allow Approvers to Change Status on Their Own Client Change Requests |
The value of this option is either 'True' or 'False', default is 'False'. It usually does not make sense for a user to create and submit a request, then approve it him/herself. However, in some business cases, when several people/departments are required to "Approve" a request, the 'Submitter' maybe need to be among those who can "Approve" it. |
Allow Approvers to Edit Other Users' Client Change Requests |
Available values are 'True' and 'False', the default value is 'False'. If set to 'True'; users that are set to be approvers in Security Setup program will be able to edit change requests submitted by other users. If you want only submitters of change requests to edit their own requests you should set this option to 'False'. This option is only applicable if the 'Audit / Vet Client Changes' configuration item is set to 'Both' (B). |
Allow Edit of Past Appt’s |
You can use this option to allow users to update past appointments. The default value is set to 'Notes Only', in which case, the only field that users are allowed to edit is the Notes field. You can set this option to 'Yes', which will allow users to edit all the data of a past appointment. If set to 'No', users will be prevented from editing a past appointment. |
Audit / Vet Client Changes |
This option has three possible values: 'Auditing Only', 'Both Auditing and Vetting' and the default value 'Neither'. If the default value is kept 'Neither' the system will disable all auditing and vetting features on changes of client profiles and all fields and tabs related to auditing and vetting on changes of client profiles will be invisible to users. If set at 'Auditing Only' the system will enable auditing features only so the changes are recorded and tracked. If set at 'Both Auditing and Vetting' the system will enable the auditing features and the vetting features, in other words the system will record every change attempt to client profiles and provide the capability of an authorised user to review and approve other users changes. |
Audit / Vet Client Changes - Acc.Cod Subst |
This option extends the client auditing and vetting features to include accessorial code substitution. This option can only be 'False' which is the default value or 'True'. |
Audit / Vet Client Changes - Detentions |
This option extends the client auditing and vetting features to include detentions. This option can only be 'False' which is the default value or 'True'. |
Audit / Vet Client Changes - Discounts/Minimums |
This option extends the client auditing and vetting features to include discounts / minimums. This option can only be 'False' which is the default value or 'True'. |
Audit / Vet Client Changes - Rate Sheets |
This option extends the client auditing and vetting features to include rate sheets. This option can only be 'False' which is the default value or 'True'. |
Audit / Vet Client Changes - Routing |
This option extends the client auditing and vetting features to include routing. This option can only be 'False' which is the default value or 'True'. |
Audit / Vet Client Changes - Tariff Classes |
This option extends the client auditing and vetting features to include tariff classes. This option can only be 'False' which is the default value or 'True'. |
Auto Gen Client Key |
You can configure the system to automatically generate numerical Customer Codes when you enter a new profile in the Customer and Vendor Profiles program, rather than entering your own codes. Use this option in conjunction with the 'Auto key pad Width' option. The available values for this option are:
|
Auto Gen Vendor Key |
You can configure the system to automatically generate numerical Vendor Codes when you enter a new profile in the Customer and Vendor Profiles program, rather than entering your own codes. Use this option in conjunction with the Auto key pad Width option. |
Auto key Pad Width |
Defines the number of digits that should be used to create the numerical customer or vendor code. This option must be used in conjunction with the 'Auto Gen Client/Vendor Key' options. |
Bill-To By Default |
If set to 'True', when a new client is added, their status is immediately set to 'Bill-to'. Default is set at 'True'. |
Calc Flip Charges |
The default is set at 'False'. Setting this option to 'True' will allow the Flip/Intermodal charges set out on the Intermodal tab of the Customer Profile program, to be calculated. |
Caller By Default |
If set to 'True', when a new client is added, their status is immediately set to 'Caller'. Default is set at 'True'. |
Client Billing Tax |
Default tax setting for new Clients being setup in Profiles. Values: 1, 2, B, N. B=Both. N=Neither. |
Client Commodities |
If this option is set to 'True', the user will have access to the 'Commodities…' option under the Tools Menu in Customer & Vendor Profiles, where he/she can bring up a dialog box and create Commodity Groups for each client profile. Default is set at 'False'. This config option also works in conjunction with the 'Enable Access to All Commodities' check-box found on the Tools Menu > 'Commodities…' window:
When a commodity group is added, all commodities that are part of that group are added as well. |
Client User Field 1 - 10 |
In the Customer and Vendor Profiles program, on the Customer tab, you can access ten free format fields for each customer by using the <CTRL> - <U> key combination. You can change the field labels for those fields here. In the Value field, enter the field label you wish to appear on the User Defined Fields form. |
Client Vetting Approver Type |
This option has four possible values, the default is 'None' which means any user with 'Approver' rights can approve /reject customer profile change requests, but if this option is set to any of the other three values (Job Title, User Group or User) then the request submitter will be forced to select an approver of the type set by this option at the time of submission. |
Code Character Case |
This setting controls how the 'Client' and 'Vendor' fields' text will be displayed. Valid values are: 'Upper' (UPPER CASE), 'Lower' (lower case) and 'Normal' (Mixed Casing). |
Consignee By Default |
If set to 'True', when a new client is added, their status is immediately set to 'Consignee'. Default is set at 'True'. |
Credit Status |
Sets the default customer credit status option. Available values are: NOCREDIT, CREDIT, HOLD, DECLINED, COLLECTION. Default is set at 'CREDIT'. |
Cube to Wgt Conv |
Cube to Weight conversion is used by the rating system (see rating for details). This value is Client and Vendor specific. This is the default number used when a new client or vendor is setup. |
Customer Search By |
This option Changes the default value in the 'Search By' field. Available values are: '0 - Code', '1 - Name', '2 - City', '3 - Province / State', '4 - Phone', '5 - Address1', '6 - Address2'. |
Default Assign Stmts |
Auto-assigns statements to new clients by default. Default is set at 'False'. |
Default Customer rating Effective Date |
This option allows the user to specify a specific date to be used as a default date for Customer Rating Effective Date. |
Default Customer rating Effective Date Logic |
If you don’t wish to specify a specific date to be used as a default for customer rating effective date you can use a specific logic instead, which provides more flexibility and greater time interval to maintain a default date. Available values for this option are: (Now, Week Start, Month Start, Year Start and Cpmfog). The values are self explanatory except maybe for the 'Config', which if selected will tell the system to use whatever date defined in the config item 'Default Customer rating Effective Date' described above. |
Default Customer rating Expiry Date |
This option allows the user to specify a specific date to be used as a default date for Customer Rating Expiry Date. |
Default Customer rating Expiry Date Logic |
If you don’t wish to specify a specific date to be used as a default for 'Customer Rating Expiry Date' you can use a specific logic instead, which provides more flexibility and greater time interval to maintain a default date. Available values for this option are: (Week End, Month End, Year End and Cpmfog). The values are self explanatory except maybe for the 'Config', which if selected will tell the system to use whatever date defined in the config item 'Default Customer rating Effective Date' described above. |
Default Remind Minutes Before |
This option requires the TruckMate CRM license. The default value of this option is '0'. This option can be set to any number. The umber entered for this option will be used as a default value for the 'Remind Minutes Before At' field when adding a new agent (attendee) in Customer and Vendor Profiles > Appointments Window > Details/Attendees section > Agents tab to an appointment. The value of the ' Remind Minutes Before At' field is used as the number of minutes before the appointment at which a reminder e-mail is sent to the Agent (attendee). This option only sets a default value that can be overridden in the application. Leaving the value at the default value of zero means that there will be no reminder e-mail to be sent N minutes before the appointment. |
Default Remind Night Before |
This option requires the TruckMate CRM license. This option sets the default value of the 'Remind Night Before AT' field. The available values for this option are 'True' and 'False' which is the default value. This option is only to set a default value for the field, when adding a new attendee in the Customer and Vendor Profiles > Appointments Window > Details/Attendees section > Agents Tab, it can be overridden in the application by the user. If the actual field 'Remind Night Before At' is set to 'True', a reminder e-mail will be sent to the selected agent (attendee) a night before the appointment date. If on the other hand the field is set to 'False', an e-mail reminder will NOT be sent to the selected agent (attendee). |
Default Stmt Freq |
Sets the default statement frequency for new clients. If you select 'S' you must provide a date within Customer and Vendor Profiles for the statement to occur. Default is set at 'M'.
|
Intelli-Vendor |
Default is set at 'False'. Valid values are 'True' and 'False'. Setting this function to 'True' will allow the user to associate interchange points with areas of service. Setting this option to 'False' disables this functionality. |
Restricted Delete |
This option, when set to 'True', will prevent TruckMate Users from deleting a Client (or Vendor) record that has ever been added to any of the following TLORDER table fields: 'BILL_TO_CODE', 'ORIGIN', 'CUSTOMER' and 'DESTINATION'. Default is set at 'False' (allow delete). |
RM Vendor User 1 - 10 |
On the Vendor side of the Customer and Vendor Profiles program, you can access ten free format fields dedicated to the R&M module by using the <Ctrl><R> key combination. You can change the field labels for those fields here. In the 'Value' field, enter the field label you wish to appear on the R&M Vendor User Defined Fields form. |
Shipper By Default |
If set to 'True', all new added clients will have their status immediately populate as 'Shipper'. Default is set at 'True'. |
Show Unit Fields |
Displays / Hides the 'Unit' field. Default is set at 'False'. |
Vendor is Visible to All Companies |
This option only concerns Truckmate applications that are set to run in multi-company environments. It has three possible values 'Ask' (which is the default), 'True' and 'False'. If set at 'True' a vendor that is created in one company will be visible for all other companies in the group by default, if set at 'False' the created vendor will only be visible by the creating company, finally, if left at 'Ask' the system will popup a visibility option for the user to set regarding the newly created vendor. |
Vendor Search By |
This option Changes the default value in the 'Search By' field. Available values are: '0 - Code', '1 - Name', '2 - City', '3 - Province / State', '4 - Phone', '5 - Address1', '6 - Address2'. |
Vendor User Field 1 - 10 |
In the Customer and Vendor Profiles program, on the Vendor tab, you can access ten free format fields for each vendor by using the <CTRL> - <U> key combination. You can change the field labels for those fields here. In the Value field, enter the field label you wish to appear on the User Defined Fields form. |
Weight to Cube |
This option sets the default 'Cube to Wgt Conv' value for new clients added into the Customer & Vendor Profiles program. |
Setting up Security Configuration for use with Customer and Vendor Profiles
The following settings are available on the Security tab.
Business Events
Allow Changes
AR - Allow Edit of A/R Credit Limit |
Allows a user or user group to change the 'Credit Limit' field (on the Customer Profiles program > Credit Info Tab). |
Cust/Vend_ Appts - Allow add/edit/delete of agents on appointments for which the user is not the organizer |
Selecting this option will allow the selected group/user to (add/edit/delete) agents on appointments even if the selected user is not the 'Organizer' of an 'Appointment' in Customer and Vendor Profiles > Appointments Window > Details/Attendees section > Agents Tab. |
Cust/Vend_ Appts - Allow add/edit/delete of contacts on appointments for which the user is not the organizer |
Selecting this option will allow the selected group/user to (add/edit/delete) 'Contacts' on 'Appointments' even if the selected user is not the 'Organizer' of an 'Appointment' in the Customer and Vendor Profiles > Appointments Window > Details/Attendees section > Contacts Tab. |
Cust/Vend_ Appts - Allow deleting of appointments for which the user is not the organizer |
Selecting this option will allow the selected group/user to delete appointments even if the selected user is not the 'Organizer' of an 'Appointment' in Customer and Vendor Profiles > Appointments Window]_. |
Cust/Vend_ Appts - Allow edit of basic appointment info for which the user is not the organizer |
Selecting this option will allow the selected group/user to edit basic appointment information even if the selected user is not the 'Organizer' of an 'Appointment' in Customer and Vendor Profiles > Appointments Window. |
Cust/Vend_ Appts - Allow edit of 'For' filter to view other appointments |
Selecting this option allows the user to change the appointment selecting filter, to be able to view appointments set for different parties ('Agent', 'Client', 'Agent fora client/vendor', 'Contact of a client/vendor' or 'All') in Customer and Vendor Profiles > Appointments Window. |
Cust/Vend_ Appts - Allow viewing of appointments for which the user is neither the organizer nor an agent |
Selecting this option allows the selected group/user to view appointments event if the selected user is neither the organizer of the appointment nor the agent in Customer and Vendor Profiles > Appointments Window. |
Cust/Vend_ Appts - Allow viewing of detail info (subject/location) on conflict appointments |
This option if selected, will allow the user to view detail information like the 'Subject' and the 'Location' of conflicted appointments, in Customer and Vendor Profiles > Appointments Window > Details/Attendees section > Agent Conflicts/Contact Conflicts Tabs. |
PROFILE - A/R Credit Hold Status |
Allows the selected User the ability to set a Client to 'Credit Hold' status on the Customer Profiles program > Credit Info Tab. |
PROFILE - Client is Bill-To |
Allows the selected User the ability to default a Client record to always be the Bill-To party of a Freight Bill, using the Customer Profiles program > Notes Tab. |
Filter by Status Sub-Tab
This sub-tab can be used to control Group/User access to client records based on client status. All available Client statuses are listed with a drop down list button for each. Select the type of access you want to grant to the selected group/user for each client status. Available access types are 'No' in which case the user/group access is denied, 'Yes - Full Access' in which case full access rights will granted to the selected group/user and 'Read Only' in which case a read only access right will be granted to the selected group/user for the selected client status.
All/None/Read-Only
If you want to grant the same access rights collectively on all statuses to the selected Group/User you can select one of these buttons. 'All' will grant full access on all statuses, 'None' will deny access on all statuses and finally, 'Read-Only' will grant read-only access rights on all statuses to the selected group/user.
Auditing Sub-Tab
Allow Customer Changes (Vet = Changes Must be Reviewed and Approved by a Different User)
This section is for granting basic 'Auditing and Vetting Options' on 'Client Profiles' through three sub groups ('Adds', 'Edits' and 'Deletes'), each consisting of three radio buttons ('No', 'Yes' and 'Vet') and an additional checkbox on each sub group ('Allow Approval of Adds', 'Allow Approval of Edits' and 'Allow Approval of Deletes').
A user or group can be granted or denied the right to 'Add' a new client, 'Edit' an existing client or 'Delete' a client based on the 'Yes' or 'No' radio button selected, If the 'Vet' radio button is selected then the action that is done by the user must be reviewed and approved by another user. The three 'Allow Approval of < action >' checkboxes will allow or deny the user or group to approve other users' actions.
Note: For this entire group to be visible and accessible, the 'Audit/Vet Client Changes' APPS Config option must be set to 'True' in Application Configurator program > PROFILE.EXE.
Misc Sub-Tab
Enable Mileage |
Check this option to enable user access to the Mileage Button within the Customer Profiles program. |
Enable Sales Info Button |
Check this option to enable user access to the Sales Info Button within the Customer Profiles program. |
Allow Enter Client ID in Client Info Mode |
This flag controls the ability of the user to manually override an auto-generated Customer Code when working with the Application Configurator program > PROFILE.EXE > 'Auto Gen Client Key' option set to 'Client Info' (see link for more information on the config). When the user has this flag checked, upon selecting the 'P' button (in CSERV.EXE, LTLBE.EXE or PROFILES.EXE) they will be asked to manually type in the Custom Code required. If this flag is not checked, the system will simply present them with an auto-generated Customer Code and give the user two options: 'Yes' or 'No'. |
Allow Access To Clients For Which User is Not an Agent |
This option, if selected, will allow the selected group/user access to client profiles even if the selected user is not the assigned Agent for the client. |
Allow Edits to Agents Grid |
Selecting this option will grant the user edit rights on the Reps/Agents Grid in Customer and Vendor Profiles. |
Allow Removal of Main Account Links |
Select this option if you want the selected user / group to be allowed to remove records from the Customer and Vendor Profiles > Customer Profiles > Sub-Accounts tab. |
Allow Quick Client Profile Creation |
If you select this option, the selected user / group will be able to use the button to quickly create a client profile via a simplified form for that purpose in Customer and Vendor Profiles > Customer Profiles > Sub-Accounts tab. |
Filter by Status Sub-Tab
This sub-tab can be used to control Group/User access to vendor records based on vendor status. All available Vendor statuses are listed with a drop down list button for each. Select the type of access you want to grant to the selected group/user for each vendor status. Available access types are 'No' in which case the user/group access is denied, 'Yes - Full Access' in which case full access rights will granted to the selected group/user and 'Read Only' in which case a read only access right will be granted to the selected group/user in vendor records of the selected vendor status.
All/None/Read-Only
If you want to grant the same access rights collectively on all statuses to the selected Group/User you can select one of these buttons. 'All' will grant full access on all statuses, 'None' will deny access on all statuses and finally, 'Read-Only' will grant read-only access rights on all statuses to the selected group/user.
Filter By Type Sub-Tab
Allow Access To Vendors of Type
All vendor types are listed with checkboxes. Select all the vendor types you want to grant access rights on to the selected Group/User by selecting (checking) the adjacent checkbox.
All/None
If you want to grant access on all types at once you can use the 'All' button. Or on the other hand, if you want to deny access on all vendor types at once, you can select the 'None' button.
Misc Sub-Tab
Allow Access To Vendors For Which User is Not an Agent |
This option, if selected, will allow the selected group/user access to vendor profiles even if the selected user is not the assigned Agent for the vendor. |
Allow Edits to Agents Grid |
Selecting this option will grant the user edit rights on the Reps/Agents Grid in Customer and Vendor Profiles. |
Security
Notes
The Notes Tab allows the User to restrict 'Write' access to the Note windows in the Customer Service program and the Customer & Vendor Profiles program].
The Notes Tab allows the administrator to set some permissions for the notes sections of various applications. There are three sections on this Tab, which correspond as follows:
-
Customer Service Notes Tab: the options listed in this section apply to the Customer Service program > Notes Window.
-
Client Notes Tab: the options listed in this section apply to the Client Notes (accessed via the Customer & Vendor Profiles > Customer > Tools Menu] > 'Notes' option).
-
Vendor Notes Tab: the options listed in this section apply to the Vendor Notes (accessed via the Customer & Vendor Profiles > Vendor > Tools Menu > 'Notes' option).
There are two flags that can be used to control how the selected user will have access to the various notes sections above:
-
Editable
Checking the 'Editable' option will allow the selected user to edit notes available in the associated program area. If the 'Editable' flag is not checked, the user cannot edit the notes.
-
Visible
If the 'Visible' flag is checked, the selected user will be able to view the notes entered in the associated program area. If this flag is not checked, the corresponding notes tab will be completely hidden from the selected user.
The 'All' and 'None' buttons can be used to quickly populate all the flags on this Tab.
Menu and toolbar options
This topic describes menu and toolbar options and functionality that are specific to the Customer & Vendor Profiles window.
For information about common menu and toolbar options (i.e. File menu, Refresh, Multi-Company, etc.), see General menu and toolbar options in TruckMate basics.
View Menu
The View menu provides another way to access the tabs displayed on the Customer & Vendor Profiles window.
Window Menu
Customer Profiles
![]() Click this button to access the Customer Profiles.
Click this button to access the Customer Profiles.
Vendor Profiles
![]() Click this button to access the Vendor Profiles.
Click this button to access the Vendor Profiles.
AR Inquiry
![]() Select this option to open an instance of the AR Inquiry program.
Select this option to open an instance of the AR Inquiry program.
Tools Menu
TruckMate Monitor
![]() Click the down arrow next to this button to access the various functions of the new TruckMate Monitor.
Click the down arrow next to this button to access the various functions of the new TruckMate Monitor.
Remember Position / Size
This option, when selected, will remember the size and position of the program window upon close. When the program is reopened it will display exactly as it was upon close.
Screen Design
For more information regarding the Screen Design mode, see Screen Design.
UnDock Current Tab / ReDock All Tabs / Remember UnDocked Tabs
For more information regarding the UnDocking features, see Tab Undocking.
Create Daily Hours of Operation
If there are values in the 'Hours of Operation' fields ('From' and 'To') on the Customer Profiles > Address Tab, selecting this option will populate those values into the Hours of Operation Tab for every day of the week for that Client. These values will then used as the default 'Pickup By Start / End' and 'Deliver By Start / End' in the Customer Service program whenever this Client is chosen as a Shipper or Consignee.
If you require different Shipping or Receiving times per day, or require more customization than having only one Hours of Operation time, you must then edit the values that have been created in the Hours of Operation Tab.
Show Daily Hours Calendar
While working on the Hours of Operation Tab, you can select this option to access a graphical calendar that outlines the Daily Hours of Operation, which makes browsing the hours for various days / months quick and easy.
Commodities…
Select this option to open the Client Commodity Groups window, which allows you to configure the Commodity Groups that the selected Client has access to.

Note: There is a configuration option in the Application Configurator program > PROFILES.EXE section named 'Client Commodities' that must be set to 'True' to enable the Commodity Group functionality.
Enable Access to All Commodities |
When this option is flagged, the selected Client will have access to all the other Commodity Codes defined in the system in addition to those outlined as part of the Commodity Groups in this window. If you would like to limit the selected Client ID to only those Commodities added to Commodity Groups on this window, un-check this flag. |
Group |
The integer value in the 'Group' field is used to link two or more Commodities together into a Commodity Group. |
Default Group |
If this field is set to 'True', whenever the selected Client ID is added as the Bill-To Client of a Freight Bill and a detail line (TLDTL record) is added to the Freight Bill, all of the Commodities assigned to the default Commodity Group will automatically populate on the Customer Service program > Details Tab. |
Sequence |
When a Commodity Group with more than one Commodity is automatically inserted into a Freight Bill, the 'Sequence' value for each of the Commodities determines their position on the Customer Service program > Details Tab. In the example above, the detail line for the 'FAK' Commodity will appear before the line for the 'HOTDOGS' Commodity whenever the '100' Commodity Group is added to a Freight Bill. |
Default Unit |
If you wish to change the default Unit of a Commodity Code (as defined in the Codes Maintenance program > Commodity Codes Tab) that is a part of your Commodity Group, you can do so by double-clicking in this field and choosing a Unit Code. |
Copy Group From Other… |
Selecting this button allows the user to Copy a Commodity Group that exists for another Client ID into the Commodity Groups window for the selected Client ID. If you have multiple Clients that ship the same Commodities, this button can be used to more quickly setup their Commodity Groups. |
Copy Address From…
Select this option to open the Copy Address From window, which allows you to configure the Commodity Groups that the selected Client has access to. A Commodity Group is used to link certain Commodities together so that when one is added to a Freight Bill, they all will be.
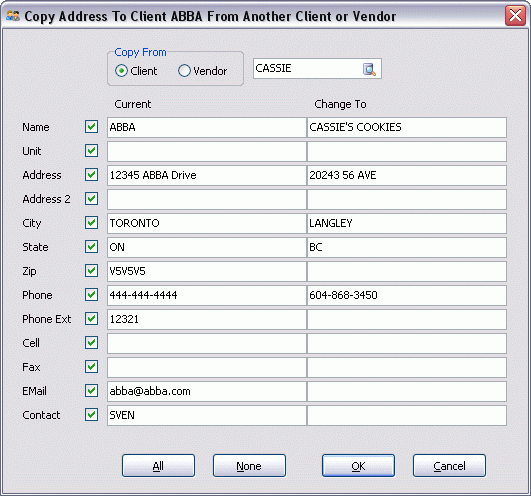
For example, if you need to write a refund check to a client, simply create the new vendor ID, but leave the address fields (including 'Phone', 'Fax', etc.) blank, then use this new feature (the button is disabled when in 'Edit' mode- save your changes first). Select whether you want to copy from a 'Client' or from a 'Vendor' using the radio options, and then select the Client or Vendor ID using the pick menu (or by double-clicking in the blank field). Check or un-check the items (parts of the address) you want to copy (use the 'All' and 'None' buttons for quick checking / un-checking). The 'Current' and 'New' sections are shown on-screen so you can visually confirm what you are about to overwrite. Finally, click 'OK' and the address will get copied over to your currently selected Client or Vendor.
For example: 'XYZ Corp' ships computers for their Client, 'ABC'. XYZ Corp could thus create a Commodity group entitled 'Computer'. That Commodity group would include all necessary pieces of hardware to build these particular computers. When 'XYZ Corp' needs to ship this computer (or a number of them), they could select the 'Computer' Commodity group, and all the necessary computer components would appear on the Freight Bill.
Directions
Select this option to display a form where you can enter free format directions to the Customer site. These directions can be included in macros (as configured in the Communication Macro Setup program), and can also be viewed in the Drill Down form in the Dispatch program. Also, in the Local Dispatch program, Customers who have directions entered in this field will display in bold, green text. There is a context menu option in the Local Dispatch program that is used to view these directions.
Mileage Profile
Select this option to open the Mileage Profile window. The Mileage Profile selected here will determine the method by which Freight Bill distances are calculated in the Customer Service program. Select a pre-configured Mileage Profile by clicking the search button inside the text field.
Notes
This option has different behavior depending on which section of the Customer & Vendor Profiles program is displayed:
-
Customer Side
Selecting this option will open the Customer Service Notes window, which can be used to enter notes regarding this client as a 'Caller', 'Shipper' or 'Consignee', and will be viewable from the Customer Service program when the Client is selected as such. -
Vendor Side
The Vendor Notes window can be used to enter Notes about the selected Vendor. The Vendor Notes window is similar to that found in the Customer Service program, as it has several Tabs which the user can select to enter specific types of notes regarding the Vendor.
The Tab labels can be configured via the Application Configurator program > NOTES options, while access to the Tabs can be configured in the Security Setup program > Security > Notes Tab.
Sales Information
![]() Select this button to open a small window detailing some general sales data for the selected Client (as of the current date).
Select this button to open a small window detailing some general sales data for the selected Client (as of the current date).
Note: Calculation is based on calendar year, not fiscal year.
Special Events
Select this option to display the Special Events form. Existing Special Events that have been assigned to this Customer are displayed in the grid, where you can also add a Special Event by using the TruckMate Navigation Bar.
Special Events are configured in the Special Events program. See the Container Profiles program > Special Events window for more information on this window.
Stop Profiles
For information on working with stop profiles, see Stop Profiles.
View Notes Tool Bar Button
This tool bar button opens the 'Notes for Client' window which has different tabs, each tab has its own security setup in the Security Setup program in terms of whether the tab is visible, and if so, whether it’s editable by the specified user. The tabs are: 'Caller', 'Shipper', 'Consignee', 'Sales', 'Collection', 'Credit' and 'CRM' ('Collection' and 'Credit' tabs are also accessible from the Credit Info tab and AR Inquiry program). The 'CRM' Tab (Customer Relationship Management) is only visible if the TruckMate CRM license is installed.
Main Window
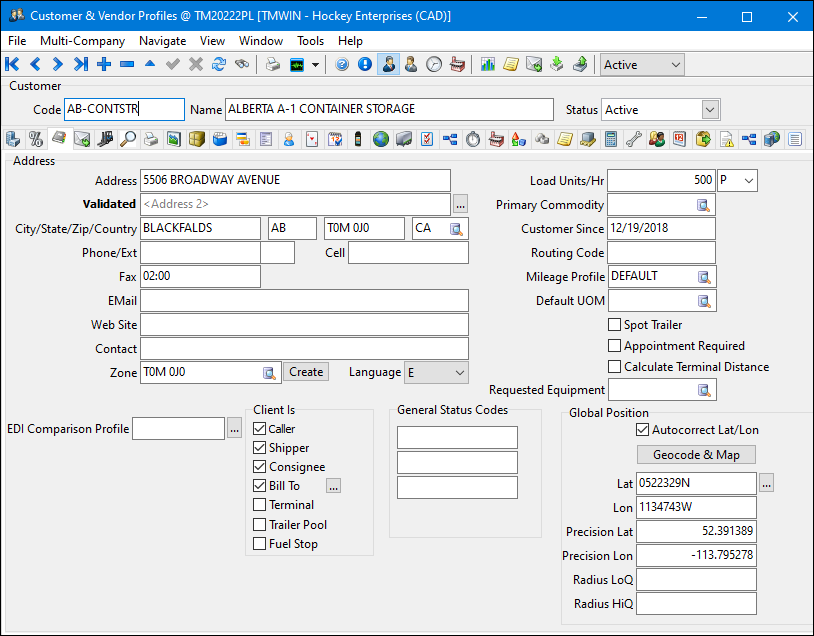
Enter General information (such as the company name, address, etc.) on the left side of the screen. Click on the Tabs on the right side of the screen to enter or view information regarding Billing, Notes, Accounts Payable postings, etc.
Note: If an administrator has removed your security rights to view clients or vendors for which you are not an assigned rep/agent, then you will not be able to find / view any such client or vendor (in neither the main form nor the Client / Vendor Search form).
Phone Number Lookup
At any position in the Customer & Vendor Profiles program, the User can type the <F4> key to bring up the Phone Number Lookup window, which lists the contact information for the selected Client ID, and allows calling them via an external TAPI Dialer application.
Customer/Vendor Search
*Warning:* The Customer/Vendor Search in TruckMate is part of the CRM (Customer Relationship Management) and thus requires the CRM license (Key 39000). For details on TMW Systems Products and Licenses please contact a TMW Systems representative.
This feature provides TruckMate users with a powerful tool to help them search for and find Customers/Vendors and their contacts and contact information in an easy and fast way. The idea is based on storing as many search criterion as required, and then use any of them when needed. As an extended feature, TruckMte will remember the last filter you were using. So when you use this feature again, the system will default (open) the last filter you were using before exiting this feature last time.
To activate, go to:
Start > Programs > TruckMate > Customer and Vendor Profiles > Tool Bar > Search Button ![]() .
.
Menu Bar/Tool Bar
Navigate
This menu includes all standard TruckMate navigation controls. For details, see the Record Navigation Bar description.
Tools
The tools menu provide several tools to help you build, edit, refine and apply your filter.
![]() Clear Filter
Clear Filter
![]() Edit SQL
Edit SQL
![]() View SQL
View SQL
![]() Run Trace
Run Trace
![]() View Customer or Vendor
View Customer or Vendor
![]() Send e-mail
Send e-mail
This option allows the user to send an e-mail to the selected Customer/Vendor. It opens the standard TruckMate e-mail creation window. The user will be prompted with a list of e-mail addresses and fax numbers. (based on the rows shown in the 'Results' grid). The user then can select non, one or many of the available e-mail addresses. Unlike the standard TruckMate e-mail functionality, the selected recipients will be added to the 'BCC' not the 'To'. The reason for that is, whatever you are sending to your customers or vendors or a combination of both, you don’t want a visible list of recipients to be received by every Customer/Vendor receiving the e-mail. However, if there is a business need to show the recipients in the 'To' box or the 'CC' box, you can select nothing in the initial address book listing and then click either the 'To' or the 'CC' to bring up the address book again, this time the list of recipients will appear in the selected box not the 'BCC'.
Filter
ID
Assign an Identification Number (ID) for the filter you want to create. This ID will be used for storage and retrieval purposes.
Description
Enter a meaningful description of the filter you create. This will make it easier to select the most suitable filter for a specific business need.
Public
If you want to set the selected filter as 'Public' select (check) this checkbox. 'Public' means the saved filter will be available for selection by other TruckMate users on your system.
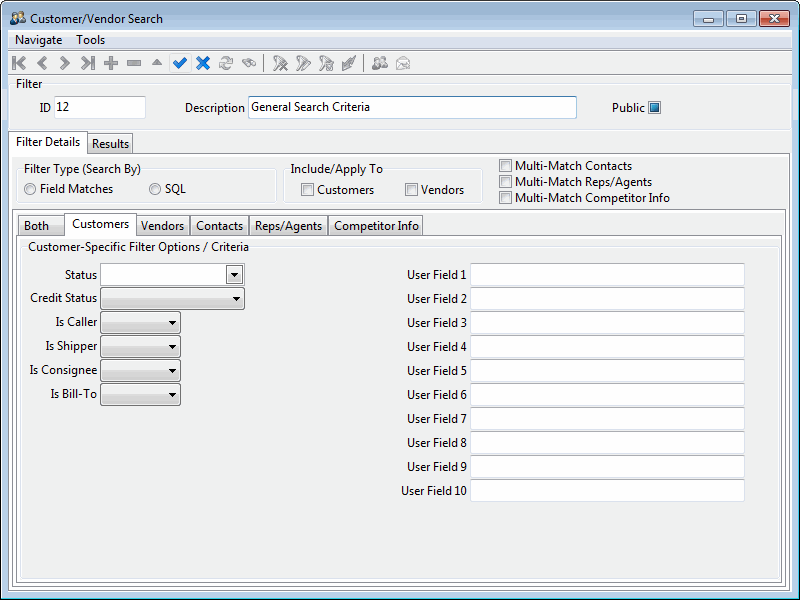
Filter Details Tab
The Filter Details Tab is where the filter/search criteria is defined and stored. With multiple sub-tabs for different types of Customers and Vendors, and many filtering columns to select from in each sub-tab, the 'Filter Details tab provides a comprehensive approach of defining compound search and filtering criteria.
Filter Type (Search By)
This radio button option group allows the user to select the type of filter to be used.
Field Matches
Selecting this radio button will allow the user to user a field matching filter, the entered values in the fields will be matched to similar values of the same fields in the database. Wild cards and comparison operators can also be used in the values of fields. For example, you can use '%' to substitute characters.
SQL
Selecting this radio button will allow the user to use SQL Queries for record search. To add/edit the SQL on any tab, either use the toolbar/menu "Edit SQL" or simply double-click the memo. The standard SQL Filter editor form will allow you to type in your WHERE clause for the given table (per the selected tab). The SQL Filter editor:
-
Error-checks your SQL for both syntax and speed/performance.
-
Allows you to quickly inject table column-names (from an edit-pick accessed via double-click or the Tools menu).
Include/Apply to
This checkbox option group allows the user to select whether to apply the filter to Customers, Vendors or both. Chose the desired checkbox, or both to decide where you want to apply the filter.
Multi-Match Contacts
This checkbox, if selected, allows the filter to fetch multiple contact records for the same Customer/Vendor. If the Customer/Vendor has more than one phone contact stored in the database, a row for each contact will be displayed in the results grid if this checkbox is selected. If NOT selected, only one record will appear for each Customer/Vendor regardless of the number of phone contacts stored.
Multi-Match Reps/Agents
This checkbox, if selected, allows the filter to fetch multiple Representatives/Agents records for the same Customer/Vendor. If the Customer/Vendor has more than one Representative/Agent stored in the database, a row for each Representative/Agent will be displayed in the results grid if this checkbox is selected. If NOT selected, only one record will appear for each Customer/Vendor regardless of the number of Representatives/Agents stored.
Note: It is not recommended to check both 'Multi-Match Reps/Agents' and 'Multi-Match Contacts' as the results could list a client or vendor many many times (N x M times where N = number of matching contacts and M = number of matching reps/agents - i.e. every combination pair of contact and rep/agent).
Multi-Match Competitor Info
This checkbox, if selected, allows the filter to fetch multiple Competitor Info records for the same Customer (this only applies to customers). If the Customer has more than one Competitor Info records stored in the database, a row for each Competitor Info record will be displayed in the results grid if this checkbox is selected. If NOT selected, only one record will appear for each Customer regardless of the number of Competitor Info records stored.
Note: Following is a description of the different sub-tabs available in the 'Filter Details' Tab. There will be no detailed description of the fields on each sub-tab, as these fields are the same fields described in their respective sections in Customer and Vendor profiles. A useful feature was added to be used with the available fields in those sub-tabs is the ability to use wild cards and operators. The user can use the '%' wild card to substitute characters, use the '%' to substitute any number of characters. For example, if you use 'A%' this is equivalent to saying (Any value that starts with 'A'). The user can also use the following operators: '<','>', '⇐', '>=', or '<>'. Just enter the operator (the operator must be at the start of the field) and then the value you want to compare against. No operator means '=', an exact match will be required to fetch a record. One important note though is that you cannot use wild cards with comparison operators in the same field.
| Both Sub-Tab | This sub tab contains fields that are common for both Customers and Vendors. The user can enter values in any/all of the available fields to build a search criteria. Any entered value in any of the available fields in this tab will limit the result set. |
|---|---|
Customers Sub-Tab |
This sub-tab contains filter options that are specific to the customer. To include columns from this sub-tab in the results grid, the columns must be included in the filter by selecting or entering values (whatever is applicable). |
Vendors Sub-Tab |
The 'Vendors' sub-tab contains filter options that are specific to the Vendor. To include columns from this sub-tab in the results grid, the columns must be included in the filter by selecting or entering values (whatever is applicable). |
Contacts Sub-Tab |
This sub-tab is for including the Phone Contacts in the filter criteria. Entering a value for one column will include it in the filter criteria, and thus, in the results grid. |
Reps/Agents Sub-Tab |
This sub-tab is to include the information about Representatives/Agents in the search criteria. Any column that gets filled will be included in the filter and in the results grid. |
Competitor Info Sub-Tab |
This sub-tab allows the user to include competitor information columns in the search criteria. Any column that gets filled will be part of the search criteria and will be added to the results grid. |
Results Tab
Records that satisfy the search criteria as created in the selected filter will be displayed in the Results Tab. It’s a grid consisting of columns that describe the retrieved records. The Results Grid can include columns from all sub-tabs in the 'Filter Details' Tab. To include columns from one sub-tab, at least one filter option must be selected from the sub-tab. Furthermore, for columns from the 'Contacts' tab and the 'Competitor Info' tab to show on this grid, the 'Multi-Match Phone Contacts' checkbox and the 'Multi-Match Competitor Info' checkbox must be selected respectively.
Note: A Client or a Vendor may have many phone contacts rows and a Client may have many competitor info rows, but only if the 'Multi-Match Phone Contacts' checkbox and the 'Multi-Match Competitor Info' checkbox are selected respectively. If, for example, the 'Multi-Match Phone Contacts' checkbox is NOT selected, only one record will show in the grid, with Phone Contact information. If the 'Multi-Match Phone Contacts' checkbox is selected, and a filter option is selected from the 'Contacts' sub tab, then a record for each stored phone contact will show for each client or vendor.
Context Menu
Schedule Appointment
This option allows the user to schedule an appointment with the selected Customer/Vendor. Selecting this option will open the appointments window, with the current Customer/Vendor already selected. You can select multiple rows and schedule the appointment for all in one step.
Note: This option is applicable only when the 'Multi-Match Phone Contacts' checkbox IS selected. Appointments are scheduled for individual contacts not an entire company.
Add Check List Item
This option allows the user to add a checklist item in one step. A window with two identical sets of fields will appear, one set for vendor checklists and the other for client checklists. If only vendors are selected from the results grid, the fields for clients will be disabled, and vice versa. You can highlight multiple rows and add the same checklist item for all selected Customers/vendors at once.
Note: This option is applicable only when the 'Multi-Match Phone Contacts' checkbox is NOT selected. Checklist items are added on the company level not the individual contact level.
Calendar Scheduling
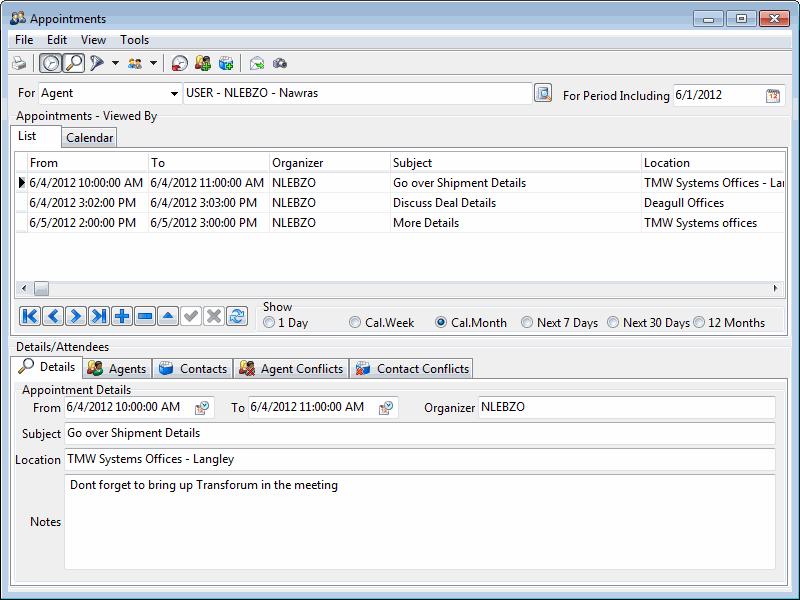
The Calendar Scheduling component is part of TruckMate CRM. This component helps Sales Persons and other involved employees to schedule, manage and keep track of business appointments with Customers/Vendors.
The Appointments window is the main window in the 'Calendar Scheduling' component. It’s used to view, schedule, manage and track business appointments with Customers/Vendors. It’s accessible from:
Start > Programs > TruckMate > Customer and Vendor Profiles > Menu Bar > Tools > Appointments.
This component is also accessible by other methods in 'Customer and Vendor Profiles' program, a Tool bar Button (will show appointments for the logged in user), Button in the 'Reps/Agent' tab, Button in the 'Contacts Tab' and from Right-Mouse Click (RMC) in 'Customer and Vendor Search' form.
Menu Bar/Tool Bar
File
The only option in 'File' menu is 'Print'. Selecting the print option opens the standard TruckMate Report Selection Window.
Edit
The edit menu contains options to edit created appointments.
Re-Schedule
This option will open the 'Re-Schedule an Appointment' popup, to allow the user to enter new dates and times for the selected appointment.
Add Attendee
This option allows the user to add additional attendees to the selected appointment. A popup will appear allowing the user to select either an 'Agent' attendee or a 'Contact' attendee. Selecting either option will open a list of possible attendees of the selected type. The user can then select the attendee to add.
View
Options available for this menu are:
Show Header
This option will toggle between showing the header section of the 'Appointments' window and hiding it.
Show Details
This option will toggle between showing the details section of the 'Appointments' window and hiding it.
View Appointments
This option allows the user to view 'Appointments' with filtering options. The filtering options available are:
-
For current 'Agent':* Displays all appointments for the currently selected agent.
-
For current 'Contact':* Displays all appointments for the currently selected contact.
-
For current 'Agent Conflict':* Displays all agent appointments that are in conflict with the currently selected appointment. Conflicted appointments are appointments that have overlapping time schedules for a common attendee for both appointments.
-
For current 'Contact Conflict':* Displays all contact appointments that are in conflict with the currently selected appointment. Conflicted appointments are appointments that have overlapping time schedules for a common attendee for both appointments.
Tools
The 'Tools' Menu options are:
You may e-mail (or fax) the appointment (optionally using a template) to any subset of the listed attendees (agents and contacts) - who have an e-mail address or fax number assigned to them. By default, the appointment’s subject and attached files are copied to the e-mail (which you may remove or change before clicking send).
Attach/Open Related Files
You can "attach" files to the appointment (accessible via tool bar button or top menu). As in other TruckMate applications, all that is actually stored in the database is the directory path and filename, so it is only useful for "static" files (ones that are not likely to be deleted or moved). As in other TruckMate applications, you may open/view the attachments (via the application you have associated with the file’s extension); picture type files also show a preview. Any files listed in this feature will by default be attached to e-mails sent for the appointment.
Appointments - Viewed By
List Tab
This tab is a grid to display appointments based on filter options.
From/To
These two fields determine the timing of the meeting.
Organizer
This field as a read-only field, populated by the system with the user who created the appointment.
Subject
This is the subject of the appointment as was originally entered.
Location
This field is the physical location where the appointment is scheduled to take place.
Agent Conflicts/Contact Conflicts
Conflicted appointments are appointments that have overlapping time schedules for a common attendee for both appointments. So, if conflicts exist either for the 'Agent' or the 'Contact', a numeric number will display in either/or both of these fields indicating the number of conflicts available. If there is a conflict, the user can then either adjust the timing of the new appointment or re-schedule the older appointment. Another way of resolving conflicts would be by removing attendees from either of the conflicting appointments.
Show
This group of radio button fields controls the amount of time in the future to show scheduled meetings within. Available options are:
-
1Day
This option shows scheduled meeting for the selected date only. -
Cal. Week
This option displays scheduled meetings within a week from the selected calendar date, -
Cal. Month
This option displays scheduled meetings within a month from the selected calendar date, -
Next 7 Days
This option displays scheduled meetings within the next week, based on the current date not the selected calendar date. -
Next 30 Days
This option displays scheduled meetings within the next30 days, based on the current date not the selected calendar date. -
12 Months
This option displays scheduled meetings within the next 12 months, based on the current date not the selected calendar date.
Details/Attendees
Details Tab
This tab displays the details of the appointment selected in the 'List Tab' under the 'Appointments - Viewed By' section described earlier. As the user transfers the selection from one record to the next, the record shown in this tab change accordingly. You can also use this tab for data entry as well, it’s another way of viewing and recording appointments' data.
Agents Tab
This tab allows the user to view/enter information about the 'Agent' attendees (people from with in the user’s company) involved in the selected appointment. The information displayed in this tab include basic information and contact information about attendees. Selecting the 'Add New Record' button (Plus Sign button) will open a list of available Agents (users, employees, drivers, agent type vendors, etc) that are not added yet as attendees to the selected appointment. In addition, it also includes the following columns that are used to setup an automatic e-mail reminder to be sent using THE DAWG(r) program:
Reminder Night Before At
This field is a boolean with values of 'True' of 'False'. You can toggle between the values by double-clicking the field. A value of 'True' means an e-mail reminder will be sent to the attendee (provided there is an e-mail address stored for the selected attendee in the proper TruckMate application). There is a per-defined Dawg, that will send an e-mail to the selected attendee a night before the appointment date. There is a configuration option to default this field value when a new attendee is added to the appointment. Application Configurator program > PROFILE.EXE > Default Remind Night Before.
Reminder Minutes Before At
This field can fire another pre-defined Dawg. This Dawg sends an e-mail to the selected attendee at a specified number of minutes before the appointment time. Enter a number greater than zero in this field. This number will be the number of minutes before the appointment time at which the reminder e-mail will be sent to the selected attendee. For periods longer than an hour, users may find it easier to pick the figure (number of minutes) via a RMC on the field (bringing up several options in hours, which are converted to minutes when written into the grid). There is a configuration option to default this field value when a new attendee is added to the appointment. Application Configurator program > PROFILE.EXE > Default Remind Minutes Before.
Note: Neither of the e-mail scheduling fields will be accessible if the selected attendee doesn’t have a defined e-mail address in the proper TruckMate application.
Contacts Tab
This tab allows the user to view/enter information about the 'Contact' attendees (people from outside the user’s company) involved in the selected appointment. The information displayed in this tab include basic information and contact information about attendees. Selecting the 'Add New Record' button (Plus Sign button) will open a list of available 'Contacts' (Clients and Client Contacts) that are not added yet as attendees to the selected appointment.
Note: Pressing 'F4' on your keyboard while you are on the contacts tab will invoke the Phone Lookup screen, which allows you to utilise the 'TAPI' (Telephony Application Programming Interface). This interface from Windows is integrated into TruckMate and allows you to use Telephony basic functionality from your computer. If the currently selected contact has a saved phone number, the number and additional information will be passed to 'TAPI', if the contact has no saved phone number the client or vendor in the main form gets passed (even if you are in the Appointments form or the Client / Vendor Search form etc).
Agent Conflicts Tab/Contact Conflicts Tab
These read-only grids list the agent/appointment (or contact/appointment) combinations that conflict (overlap) the current appointment. This allows someone to resolve conflicts by either a) Changing the 'From/To' time of either the current or conflicted appointment, or b) Removing an attendee either the current or conflicted appointment. For privacy reasons, there is a security setting (by user) to show or hide the Subject and Location columns on the conflicted appointments, Security Setup program > Security > Business Events > Allow Changes (under Cust/vend_Appts).
Filtering Controls
Note: If an administrator has removed your security rights in Security Setup Program > Security > Business Events > Misc to view clients for which you are not an assigned rep/agent, then you will not be able to find/view any such client.
For better data visibility and ease of use TruckMate provides two filtering controls to filter the data being displayed at one point in time, those controls are two drop down lists located on the tool bar. The first has three values in its list ('All', 'Active' and 'Terminated'). The user can select to view only active clients or only terminated clients or both. The second drop down list is only visible if the configuration item 'Audit /Vet Client Changes' is set to either 'Audit Only' or 'Both Auditing and Vetting'. The values in the second drop down list are ('Actual Live Clients', 'Pending Change Requests', Past Change Requests' and 'All Change Requests'). The user can select to view information on live clients, pending change requests of clients, past change requests or finally he can view all change requests. Again the second control is only visible if the configuration item 'Audit /Vet Client Changes' is set to either 'Audit Only' or 'Both Auditing and Vetting'