Safety and Compliance

Every day across North America, millions of commercial traffic movements are scheduled, set into motion, and completed. Of those millions of movements, the large majority are completed without incident or note. However, a small percentage of movements do result in an accident, a traffic ticket detailing a violation, or a call from a customer who just wanted the company to know their driver did something deserving praise.
For Commercial Carriers, incidents like these must be tracked; follow up procedures involving many parties must be managed; and all resolutions to the incident must be recorded and if necessary, made available for auditing.
To prevent (negative) incidents from occurring, carriers must also comply with different regulations and regulatory bodies that require periodic testing of both drivers and equipment. All of these tests, chemical or written, follow-up remedies, and/or interviews must be tracked and auditable.
Finally, Carriers themselves can also institute their own certification standards, testing programs, and incentive programs to hold drivers to a performance standard. These programs and standards, any awards or demerits, must all be stored in the system and available for reports to be generated.
The Safety and Compliance application now makes the management and control of all of this data possible.
Licensing
This new module requires a new license key to be added to your existing set. If you have received your revised license set, be sure to enter it into the License Registration program (KEYSAVE.EXE) before proceeding.
To access Safety and Compliance:
| From this location | Go to |
|---|---|
TruckMate Menu and TruckMate Task List |
Safety & Compliance > Safety & Compliance |
Windows Start Menu |
TruckMate 20xx > Safety & Compliance |
Windows Explorer |
C:\Program Files (x86) > TruckMate 20xx > Safety.exe |
Menu and toolbar options
This topic describes menu and toolbar options and functionality that are specific to the System Integrity Checker window.
For information about common menu and toolbar options (i.e. File menu, Refresh, Multi-Company, etc.), see General menu and toolbar options.
Edit Menu
The Edit Menu offers the standard text editing options available in most Windows software: 'Cut', 'Copy' and 'Paste'.
Tools Menu
Notes
![]() Selecting this option will open a Notes window, where you can enter Notes regarding the Incident on 5 available tabs. These Notes are stored in the SVC_INCIDENT_INFO Table. You can edit the labels of the 5 Notes tabs using the Application Configurator program > NOTES.EXE > SVC_INCIDENT_INFOt1 -t5 options.
Selecting this option will open a Notes window, where you can enter Notes regarding the Incident on 5 available tabs. These Notes are stored in the SVC_INCIDENT_INFO Table. You can edit the labels of the 5 Notes tabs using the Application Configurator program > NOTES.EXE > SVC_INCIDENT_INFOt1 -t5 options.
Copy Training Info
Opens the 'Select Driver ID' window where you can select an existing driver and copy their training information.
Incident Tracking Section
This section contains all of the tabs, grids, and forms required to create, manage, and report on an Incident record. Incidents are more than just accidents. A positive or negative phone call from a customer can be entered as an Incident against a Driver that will positively or negatively affect their performance history.
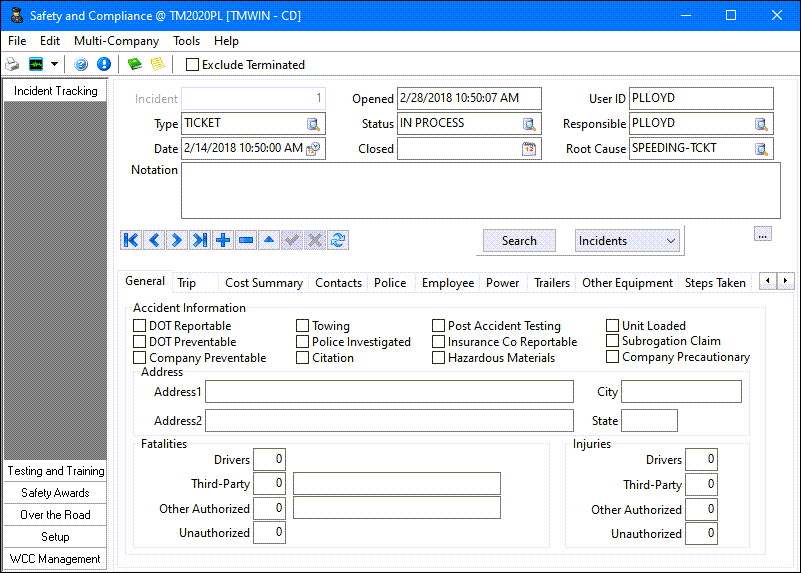
General Header Information
This is where the incident record is created, statuses applied, and other header information which applies to all of thetsections is displayed.
Incident
Automatically populates with a system-generated Incident Number when a new Incident is created.
Type
Click the search button to select an Incident Type from a list of those available on your system.
Date
Double click the Date field to select a Incident Date/Time value from a Calendar menu.
Notation
Enter Free Format Notes relating to the Incident in this field.
Opened
This field automatically populates with the current Date and Time when a new record is created.
Status
Click the search button to select a current Status Code for the Incident.
Closed
Double click the Closed Date field to select a Date from a Calendar menu.
User ID
This field automatically populates with the User ID who is creating the Incident record.
Responsible
Click the search button to select the User ID who will be Responsible for the data in this Incident.
Root Cause
Use the search button to define a Root Cause for the incident record. Root Cause codes are setup on the Setup > Code Types tab.
General tab
General trip information and key summaries like the number of fatalities or injuries will be displayed on the General tab.
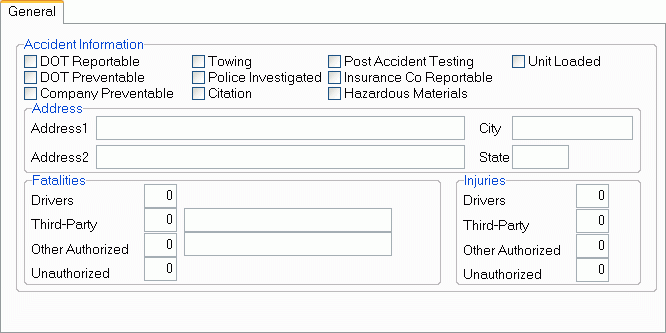
Accident Information
Select the options that apply to the Accident by clicking the applicable options.
Trip tab
General Trip information is summarized on the Trip tab.
Trip Information
The fields in this section are used to record the general area and road conditions of the site of the accident, as well as miscellaneous details involving the trailer cargo.
Trip Number
Click the search button within this field (or double-click the field itself) to open a search form where you can choose a Trip Number from those that exist on your system.
Zone Code
Click the search button within this field (or double-click the field itself) to open a search form where you can choose a Zone Code from those that exist on your system. Zone Codes are maintained in the Codes Maintenance program.
Est Speed
Manually enter a value that represents the Estimated Speed of the truck at the time of the accident.
Cargo Weight / Gross Weight / Length / Width
Manually enter these miscellaneous Trailer details.
Road Type / Conditions / Config / Unit Type / District / Weather
Click the search button within these fields (or double-click the field itself) to open a search form where you can choose values for these Road details from those that exist on your system. These codes are all maintained on the Setup > Code Types tab of the Safety & Compliance program.
Cost Summary tab
The Cost Summary tab displays summary information totalled from the costs and charges data collected on the subsequent tabs. It is assumed this exists as a separate tab to allow for security to hide it from general users.
Contacts tab
The Contacts tab displays a grid where users are to enter information about everyone involved in the Incident and scene. A key field in this Grid is the relationship field which holds values like: driver, passenger, witness, relative, flag person, etc.
Third Party
Enter the name of the Third Party Contact involved in the Incident.
Relationship
Double click this field to select a Relationship Code from those available in your system.
Report Number
Enter the Report Number manually in this field.
Phone / Fax / E-mail
Enter the Third Party’s contact information manually in the spaces provided.
Claim Number
Enter the Claim Number manually in this field.
Incident Notes
Enter any Free Format Notes pertaining to the Incident in this field.
Police tab
Similar to the previous tab, the Policetgrid stores information specific to any Police officials related to the Incident file.
Officer Name / Jurisdiction
Enter the Officer’s Name manually in the space provided. To select a Jurisdiction for the Officer, double click within the field to see a list of Jurisdictions available in your system.
Badge Number
Enter the Officer’s Badge Number in the space provided.
Phone / Fax / E-mail
Enter the Officer’s contact information manually in the spaces provided.
Report Ordered / Report Received
Double click within these two fields to select the dates for when a Report was Ordered / Received from the Officer involved in the Incident.
Incident Notes
Enter any Free Format Notes pertaining to the Incident in this field.
Department Address1 / Department Address2 / Department City / Department Provence
Enter the full address (Address, City and Province each in its respective field) of the police department in charge.
Employee tab
The Employee tab deals with maintaining a list of Company Staff related to the Incident in any way. In addition, this is where flags that relate to company safety programs and award systems are set. (There have been positive customer comments on this function because these programs are hard to manage because these pieces of information are otherwise not collected into one place).
Employee Type / Employee ID
The Employee Type field will automatically populate based on the Employee ID selected. To select an Employee ID, double click within the field to see a list of Employee ID’s within your system.
Notes
Enter any Free Format Notes relating to the Employee.
Towed / Driver At Time / Party To Event / Used Seat Belt
Enter 'True' or 'False' depending on if the information known about the Incident. To change the value from 'True' to 'False' for any of these sections, simply double click within the space provided.
Released From Scene
Double click this field to select the date that the Employee was released from the scene of the Incident.
Points / Points Valid Until
Enter the Insurance Points amount accrued against the Driver for this Incident, and the date they are Valid Until. To select a date in the second option, simply double click within the field provided.
Citation
Double click this field to select the Citation the Driver was given, if applicable.
Probation Start / Probation Note
If the Driver was given Probation time for this Incident, double click the field to select a date from a Calendar menu. Enter any Free Format Notes regarding the Probation in the space provided.
Restricted Start / Restricted End / Restricted Note
If the Driver has received any Driver Restrictions because of the Incident, select their Start and End dates by double clicking within the field and selecting a date from the Calendar menu. Enter any Free Format Notes regarding the Restrictions in the field provided.
Not Qualified Start / Not Qualified End / Not Qualified Note
If the Driver has been deemed 'Not Qualified' because of the Incident, select the Start and End dates of the status by double clicking within the field and selecting a date from the Calendar menu. Enter any Free Format Notes regarding the Not Qualified status in the field provided.
Last Medical / Drivers License Expiry
Double click within these fields to select a date from a Calendar menu.
Drivers License Number
Manually enter the Driver’s Drivers License Number in the space provided.
Intra State Authority / Inter State Authority
If the Incident occurred within the Unites States of America, select 'True' or 'False' depending on which State Authority was involved. Double click within these fields to change the value from 'True' to 'False', as required.
DOT Alcohol Test Collected / DOT Alcohol Test Confirmed / DOT Alcohol Test Results / DOT Drug Test Results
Double click within these fields to select a date, Result Code, or set the 'Confirmed' field to 'True' or 'False', as required.
Work Days Lost
Manually enter the number of Work Days Lost for this Driver.
Cost Employee Compensation / Cost Medical
Manually enter a dollar value for these two fields.
Personal Property Lost / Cost Personal Property / Personal Property Notes
Double click to select either 'True' or 'False' for the first field; manually enter a dollar value for the second field, and enter any Free Format Notes regarding Lost Personal Property in the 'Notes' field.
Liability Loss / Liability Cost / Liability Notes
Double click to select either 'True' or 'False' for the first field; manually enter a dollar value for the second field, and enter any Free Format Notes regarding Lost Personal Property in the 'Notes' field.
Fatality / Injury
Double click within these fields to set their value to either 'True' or 'False', depending on the Incident.
Hours On-Duty Actual / Hours On-Duty Estimate
Enter the hour number for these two fields, depending on the Incident information.
Affect Safety
Select either 'True' or 'False' depending on the Incident.
Terminal
Double click to select the Terminal that the Driver is based out of.
Power tab
The Power tab lists all Power Unit information of the Power Unit(s) that may have been involved in the Incident.
Note: Depending on value of the 'Allow Multiple Records for the Same Power Unit in Power Tab' config option, the user may be able to enter multiple records for a single Power Unit on this Tab.
Lookup ID
Displays the Lookup ID of the Power Unit. Double click within this field to select a Power Unit ID Code.
Notes
Enter any Free Format Notes regarding the selected Power Unit
Vehicle Action
Displays the selected Power Unit’s current Action Code. Double click within this field to select an Action Code from those available in your system.
Primary Unit / Towed From Scene / Has Seat Belts / Mechanical Defects / Chains On Tires
Double click within these fields to change the value from 'True' to 'False' depending on the Power Unit’s information.
Repair Costs / Towing Costs / Down Time Costs
Enter numeric dollar values in these fields to define the Costs against this Power Unit.
Owner Type / Owner Name
Double click the Owner Type field to select an Owner Code, and manually enter the Owner Name in the space provided.
Trailers tab
The Trailers tab lists all Trailer information of the Trailer(s) that may have been involved in the Incident.
Note: Depending on value of the 'Allow Multiple Records for the Same Trailer in Trailers tab' config option, the user may be able to enter multiple records for a single Trailer on this tab.
Code
Displays the Code ID of the Trailer. Double click within this field to select a Trailer ID Code.
Notes
Enter any Free Format Notes regarding the selected Power Unit
Action
Displays the selected Trailer’s current Action Code. Double click within this field to select an Action Code from those available in your system.
Primary Unit / Towed From Scene / Mechanical Defects
Double click within these fields to change the value from 'True' to 'False' depending on the Trailer’s information.
Costs Repair / Costs Towing / Costs Downtime
Enter numeric dollar values in these fields to define the Costs against this Power Unit.
Owner Type / Owner Name
Double click the Owner Type field to select an Owner Code, and manually enter the Owner Name in the space provided.
Load Securement Type / Load Securement Notes
Double click the first field to select a Load Securement Type from those setup in your system, and enter any Free Format Notes regarding the Load Securement in the space provided.
Other Equipment tab
The Other Equipment tab lists all information of any pieces of Other Equipment that may have been involved in the Incident.
Type / Code
Displays the Type and Code ID of the Miscellaneous Equipment involved. Double click the Code field to select a Misc. Equipment Code, and the 'Type' field will automatically populated based on your selection.
Relationship
Displays the selected Misc. Equipment’s Relationship Code. Double click within this field to select a Relationship Code from those available in your system.
License Plate / Unit Number / Vehicle VIN /
Enter the numeric values for these fields in the spaces provided.
Vehicle Type
Displays the selected Misc. Equipment’s Vehicle Type. Double click within this field to select a Vehicle Type from those available in your system, if applicable.
Make/Model / Year
Manually enter the Make/Model and Year information in the spaces provided.
Previous Damage
This field functions similarly to a 'Notes' field. Enter any Free Format Notes regarding the Misc. Equipment’s previous damage.
Costs Repair / Towed From Scene / Towing Costs
Enter the numeric values for these fields in the spaces provided.
Owner Type / Owner Name
Double click the Owner Type field to select an Owner Code, and manually enter the Owner Name in the space provided.
Steps Taken tab
The Steps Taken tab offers an important function specific to our system. Users are encouraged to create Incident types and for each type, to create a template of steps that are to be taken when an Incident of that type is created. When an Incident is first created and the type is set, this tab is then populated with a list of steps based on the predefined template.
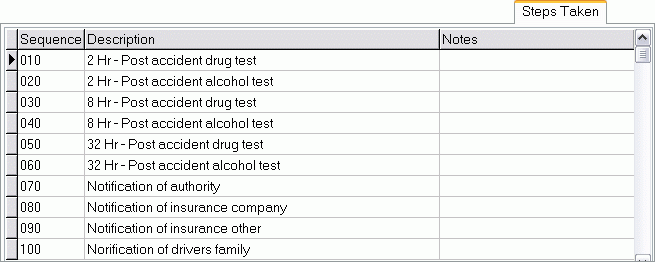
This is important when Incidents like an accident takes place and a blood-alcohol test is required in the 2 hours following the accident taking place. There is also some discussion about certain Incident types or certain action types on this list generating a notification e-mail to a safety officer (or list of safety officers).
Work Orders tab
The Work Orders tab allows the user to append specific Repair & Maintenance Work Order numbers to incidents entered in the Safety & Compliance program, which improves visibility of the repair process required for the safety event.
The Work Orders tab grid will list all of the R&M Work Orders attached to the selected Safety & Compliance 'Incident Number'. The user may double-click on the 'Work Order #' field to open an instance of the R&M Work Orders program with that Work Order’s details displayed (which are also listed in the many grid fields on this tab).
Add New Work Order
Selecting this button will open an instance of the R&M Work Orders program, with the selected 'Incident Number' automatically populated into the appropriate field on the work order.
Cost & Recovery tab
The Cost & Recovery tab is used to add records pertaining to any costs incurred for the recovery of resources involved in an incident. For each item entered into this tab grid, a deduction is automatically created in the DRIVERDEDUCTIONS table in 'PMT_STATE' = 'U' (Unapproved).
Note: Editing and/or deleting records in this grid is allowed only if the deduction created is still in 'Unapproved' status.
Category
This field is an edit pick that allows the user to select one of the headings from the Cost Summary tab (such as 'Employee', 'Company', 'Cargo', 'Cleanup', etc.). Based on the option selected here, the CATEGORY_ITEM edit pick is loaded with correct header items (i.e. for 'Company', CATEGORY_ITEM will be a choice between: 'Repairs', 'Towing', or 'Downtime').
One of the headings that can be picked is 'Third-Party'. This could be of use if the user wants to record the total cost of an incident if, for example, the driver is only being charged a portion of the total. When 'Third-Party' is selected, the following occurs:
-
The Contact ID field will become Read Only, since the Third-Party contact would not exist in the system and thus have no ID.
-
The Deduction Code will also become Read Only, as there cannot be a deduction for a contact that doesn’t exist in the system.
-
The Contact Name may be changed. Users can double-click on it and select one of the (Third-Party) contacts listed in the Contacts grid.
Claim Type Code
This field allows the user to select a 'Claim Type' code, as created on the Setup > Code Types tab using the 'Claim Type Code' radio button.
Total Amount
The Total Amount field is calculated as follows: 'TOTAL_AMOUNT' = 'AMOUNT' - 'ADJUSTED_AMOUNT' - 'SALVAGE'
Custom Defined Fields tab
This tab can contain a number of Custom Defined fields, which can pertain to any data that is required by a client for their incident records. Use the Codes Maintenance program > Custom Defined Fieldstto create Custom Defined fields (of various types) that point to the SC_INCIDENT_INFO table, and they will show up in this tab.
User Defined Fields tab
The User Defined Fieldstcontains 20 fields that can be used to record any additional information the user desires. The field labels for these 20 fields can be configured using the Application Configurator program > SAFETY.EXE > 'Incident User Field 1' to 'Incident User Field 20' options.
Vehicle Inv tab
The Vehicle Inv grid is used to record further information about the vehicle involved in the Incident Record, including the injury details for any passengers, etc.
Most of the fields on the Vehicle Inv grid are simple text-entry fields. Any fields with specific setup instructions are listed below:
Occupant Type
Select the edit-pick button to choose an Occupant Type from those available on your system (as defined on the Setup > Code Types tab). 'Driver' and 'Passenger' are provided default Occupant Types.
Sub Type
Select the edit-pick button to choose an Occupant Sub-Type from those available on your system (as defined on the Setup > Code Types tab). 'Male' and 'Female' are provided default Occupant Sub-Types.
Testing & Training Section
This section has two pages in it: Drug & Alcohol Testing and Driver Certifications / Testing / Accessories. Both pages are very similar. The drivers / employees are listed in a grid in the top half of the screen. The selected row is highlighted and controls the list of tests, certificates, or accessories listed in the bottom half of the screen.
Drug & Alcohol Section
This page has 2 tabs: Reasonable Suspicion and Testing/Results. Reasonable Suspicion is under review as this is difficult information to define or use. Testing Results shows a Grid which stores testing results data like: test date, substance type, etc.
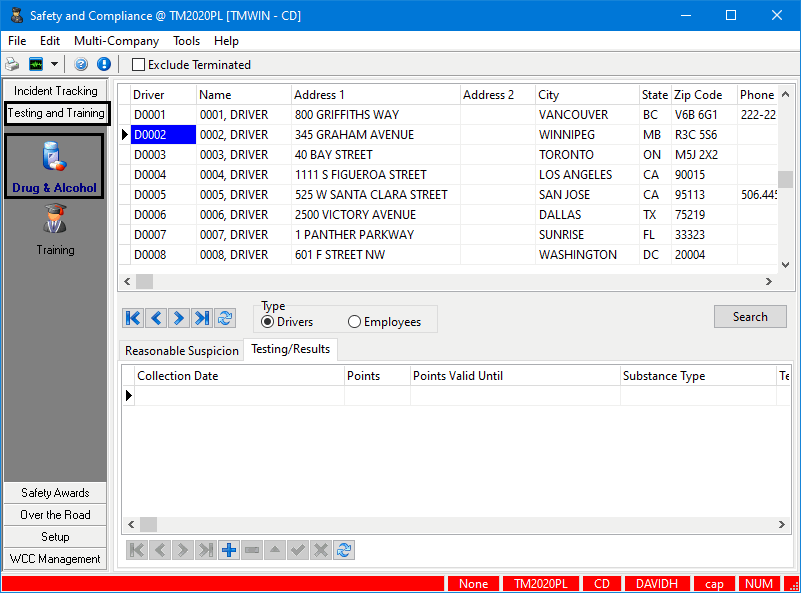
As with the Employee tab in the Incident area, there are flags here too that affect Awards and safety program tracking for the Employee.
Type Section
The two options (Drivers / Employees), within the Type section filter the available data displayed in the Top Header section. Choosing 'Drivers' will display all Drivers available, choosing 'Employees' will Filter on Employee ID Codes.
Reasonable Suspicion tab
Date of Incident
Double click this field to select a date from a Calendar menu.
Observed By
Manually enter the name or designation of the person who conducted the test.
Testing Notes
Enter any Free Format Notes regarding the test.
Physical Checks / Behavior Checks / Speech Checks / Performance Checks
Enter any Free Format Notes regarding these various checks.
Testing / Results tab
Collection Date
Double click this field to select a date from a Calendar menu.
Points / Points Valid Until
Enter the number of Test Points gained, and their Valid Until Date.
Substance Type
Double click this field to select a Substance Type from those available in your system.
Test CCF Number
Manually enter the Test CCF Number in the space provided.
Test Type / Sample Type
Double click within these fields to select a Test Type and Sample Type from those available in your system.
Collection Site / Collected By
Double click within the Collection Site field to select where the sample was taken (INTERNAL or OFFSITE) and manually enter the name of the person who collected the sample.
Lab ID
Double click this field to select a Lab ID from those available in your system.
Substance Name
Manually enter the name of the sample Substance in the space provided.
MRO
Double click this field to select the Medical Review Officer from those available in your system, or manually enter the MRO’s name in the space provided.
Test Results
Double click this field to select the Test Result Code from those available in your system.
Disposition
Double click this field to select the Disposition Code determined by the Test Results from those available in your system.
Notes
Enter any Free Format Notes regarding the Test in the space provided.
Training (Driver Testing & Training)
The Training page has 4 tabs as follows: Pre-Qualification, On-going Training, Maintenance, and Accessories. ThesetGrids also contain flags that affect the Safety Awards section. As an example: if a Driver lost their dock keys (tracked in the Accessories Grid), they could lose points in the safety program.
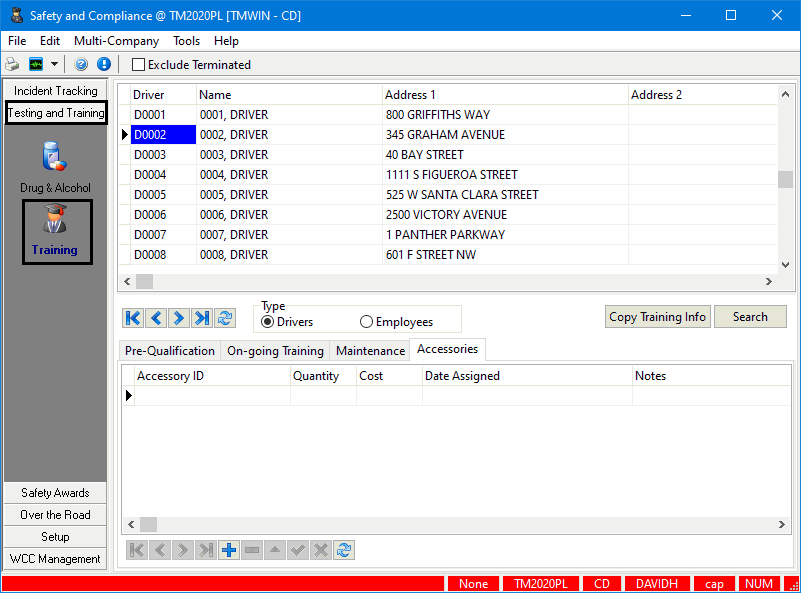
Copy Training Information
This button (which is also an option listed under Tools) will copy the training information from one driver to another, as long as the receiving driver has no training information. If the receiving driver already has training information, the copy will not occur.
Type Section
The two options within the Type section Filter the available data that will be displayed in the Top Header section. Choosing 'Drivers' will display all Drivers available, choosing 'Employees' will Filter on Employee ID Codes.
Pre-Qualification tab
Prequalification ID / Prequalification NA
Double click these fields to select an ID Code, or to change the value of the 'NA' field to either 'True' or 'False', depending on the information.
Date
Double click this field to select a date from a Calendar menu.
Notes
Enter any Free Format Notes space provided.
Points / Points Valid Until
Enter the number of Test Points gained, and their Valid Until Date.
Description
Enter a description into the space provided.
On-going Training tab
Training ID / Training NA
Double click these fields to select an ID Code, or to change the value of the 'NA' field to either 'True' or 'False', depending on the information.
Initial Date / Last Completed Date / Retraining Date
Double click these fields to select dates from a Calendar menu.
Grade
Manually enter the selected Driver’s Training Grade in the space provided.
Notes
Enter any Free Format Notes space provided.
Points / Points Valid Until
Enter the number of Test Points gained, and their Valid Until Date.
Description
Enter a description into the space provided.
Maintenance tab
Maintenance ID / Maintenance NA
Double click these fields to select an ID Code, or to change the value of the 'NA' field to either 'True' or 'False', depending on the information.
Last Completed Date / Date Due
Double click these fields to select dates from a Calendar menu.
Notes
Enter any Free Format Notes space provided.
Points / Points Valid Until
Enter the number of Test Points gained, and their Valid Until Date.
Description
Enter a description into the space provided.
Accessories tab
Accessory ID
Displays the Code ID of the Accessory. Double click within this field to select an Accessory Code.
Quantity / Cost
Manually enter numeric values for the Quantity and Cost of the Accessories.
Date Assigned
Double click this field to select a date from a Calendar menu.
Notes
Enter any Free Format Notes space provided.
Employee Charged Back / Charge Back Amount
Double click within the first field to select either 'True' or 'False'
Date Returned
Double click this field to select a date from a Calendar menu.
Description
Enter a description into the space provided.
Safety Awards Section
The Driver/Employee Header Grid in this section is similar in appearance to those in the above sections. The Awards related to a Driver/ Employee are listed in the bottom half of the screen. This section also contains thetwhere Awards programs are defined - by date, mileage, or a points system. This is also where a function exists to calculate Awards based on date range and range of drivers.
Type
The three options within the Type section Filter the available data that will be displayed in the Top Header section. Choosing 'Drivers' will display all Drivers available, choosing 'Employees' will Filter on Employee ID Codes and choosing 'Clients' will display all Customer ID’s.
Assignment tab
The Assignment tab displays any Awards currently assigned to the selected Driver.
Award Type
Double click this field to select an Award Type.
Award Date
Double click this field to select a date from a Calendar menu.
Previous Awards tab
The Previous Awards tab displays any Awards previously given to the selected Driver.
Date Earned
Double click this field to select a date from a Calendar menu.
Type
Double click this field to select an Award Type.
Award Level / Award Description
Double click this field to select an Award Level, and enter a Description for the Award in the next field.
Calculate Awards tab
The Calculate Awards tab is used to quickly tally all of the Awards given to a specific Employee or Range of Employees.
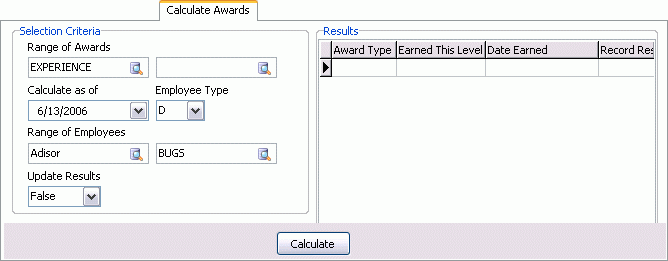
Selection Criteria
Range of Awards
Use the search buttons in the first two fields to create an Awards Range. Upon using the 'Calculate' button, the Awards within the range will be displayed in the Grid to the right.
Calculate as of
Use the pull down menu to select a date from a Calendar menu. All Awards awarded before the date selected will be included in the 'Calculate' process.
Employee Type
Use the pull down menu to choose an Employee Type. Available options are 'Driver' (D), 'Employees' (E) or 'Clients' ©.
Range of Employees
Use these two search buttons in the create an Awards Range between two Employee ID’s. Upon using the 'Calculate' button, the Awards within the range will be displayed in the Grid to the right.
Update Results
Use the pull down menu to select either 'True' or 'False'. Selecting 'True' will add any calculated awards to the Previous Awards tab.
Calculate
This button will display any Awards for the specified Driver in the Grid in the right section of this tab, based on the Selection Criteria defined.
Calculate Awards Results grid
The Results grid will display the results of your Selection Criteria chosen on the left side of the window. If any awards fall within your Selection Criteria, their information will be displayed in the fields of this Grid after you click the 'Calculate' button.
Results will be shown if 'Update Results' is 'True' or 'False'. The 'Calculate' function may calculate awards for multiple drivers, but the Results Grid only displays results for the current driver. Select other drivers to view their results.
Over the Road Section
This section includes three different tabs, the first is the 'DOT' tab, which is where U.S. Department of Transportation (DOT) inspections are tracked on a per Driver/ Employee basis. The second tab is the 'Log Books' tab, this is a link that will take users to the Driver Logs program. The lasttis the 'CSA' tab, which is where the Compliance Safety & Accountability inspection reports are logged and tracked both for drivers and transportation companies.
DOT Inspections tab
The DOT Inspections tab is used to record and track the US Department of Transportation inspection reports. It has two grids, the header grid which displays drivers' information and the second one is the inspection reports grid. When a driver is selected in the header grid, all inspection reports on the selected driver will display in the inspection reports grid.
The detail grid displays all Dot inspection reports for the driver selected in the header section. To add a new inspection for a driver simply select the Add button and fill the required information.
Date of Inspection
Enter the date when the inspection took place. Double click this field to use the calendar.
State/Province
Double click this field to select a State or a Province at where the inspection took place.
City or Mile Marker
Enter the city or the mile marker were the inspection happened.
Dot Level
Enter the Dot inspection level, there are six different Dot inspection levels.
Report Number
Enter the report number.
Violation Code 1 - Violation Code 8
Enter up to 8 violations for each report. Enter the violation code for each violation is stated on the Dot inspection report.
Citation Issued
This is a True/False value field, that indicates whether a citation was issued as a cause of the Dot inspection report or not. Double click in the field to toggle between True and False.
Reason For Stop
Enter the reason for stopping the driver.
Points
Enter the number of points as indicated by the report.
Points Valid Until
Enter the validity of the points, double-click to use calendar.
Affect Safety
This is a True/False field to indicate whether the result of the report affect safety or not. Double-Click the field to toggle between the two values.
Out Of Service
This is another True/False field to indicate if the inspected equipment is our of service or still in service.
Notes
Add notes to the Dot inspection report. This is a free format field.
Context Menu > Change Security
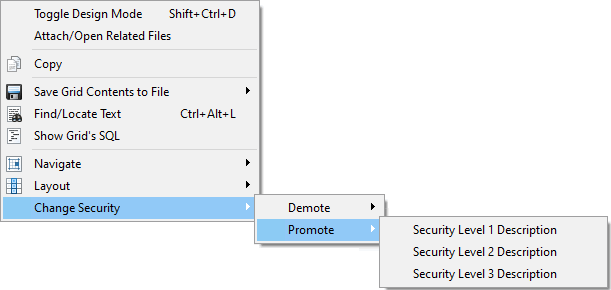
Promote / Demote
Use the Promote option to raise the Security Level of the current Employee Profile. Employee Profiles default to the 'Security Level 0', which means that anyone using the system can access their information. The higher the Security Level, the harder it is for a User to access the information:
-
Security Level 0 - No security, General Comment
-
Security Level 1 - Safety Department Only
-
Security Level 2 - Senior Executives Only
-
Security Level 3 - For Your Eyes Only' (meaning the User who creates the record)
Note: These Security Levels are defined within the Security Setup program of TruckMate, and their descriptions are fully editable. See the Security Setup documentation for more information.
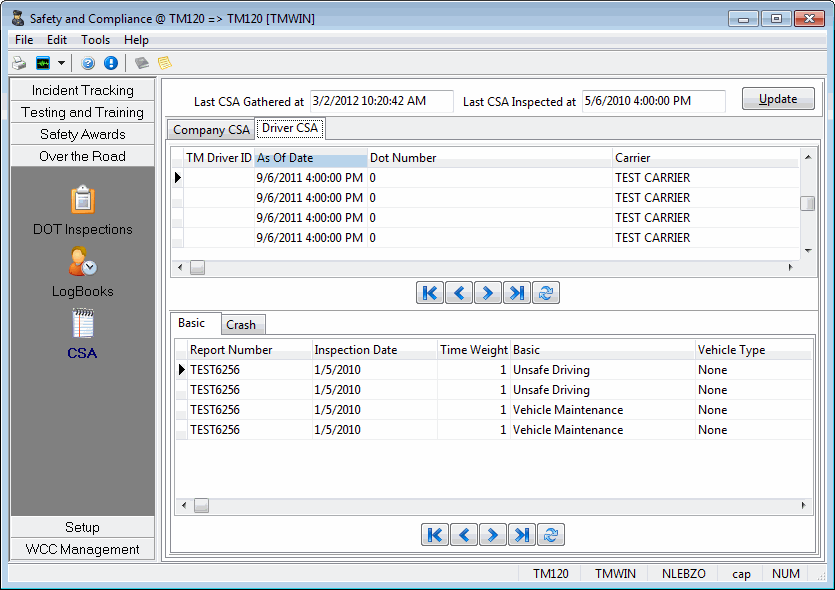
CSA Section
The CSA tab is used for viewing and tracking the Compliance Safety & Accountability inspection reports. The inspections involve drivers and transportation companies, there is a subc tab for Company CSA and another for Driver CSA. All the information in this tab are obtained from CSA and are only for viewing, users cannot edit any field, all fields are read-only fields.
Note: TruckMate can use driver CSA scores when a driver is assigned to a trip. Based on defined thresholds, the system can allow, warn or deny driver assignment to a trip. For each CSA factor a warning threshold and an error (Deny) threshold can be set. To find out more on the CSA threshold setting go to Application Configurator > Safety & Compliance > SAFETY.EXE > CSA Thresholds Options.
Last CSA Gathered at
This field displays the time of the latest CSA reports import. Selecting the 'Update' button (described later in this section) will import the CSA report to truckMate. This field records the time and date of the latest successful update. This field will give an indication on how up-to-date your imported CSA data are in TruckMate.
Last CSA Inspected at
This field displays the time and date of when the last CSA inspection took place. Note that this field reflects the time of the last CSA inspection based on the latest imported data available in TruckMate. So, to make sure you have the latest CSA inspection results, make sure that the date in the 'Last CSA Gathered' field is current. If not, use the 'Update' button described next.
Update
This button will import the latest CSA inspection reports into TruckMate. for authentication, A 'DOT' (Department Of Transportation) number will be requested as well as a 'PIN' (Personal Identification Number) before the import can be completed.
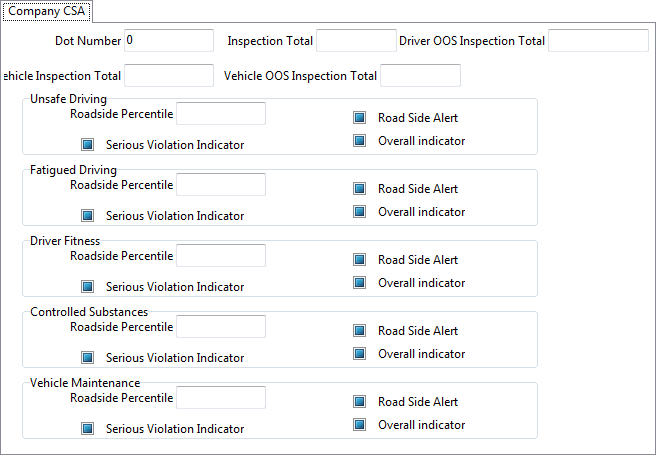
Company CSA Sub-Tab
The Company CSA Sub-Tab displays a single record about the latest company CSA. This information is a CSA about your own company.
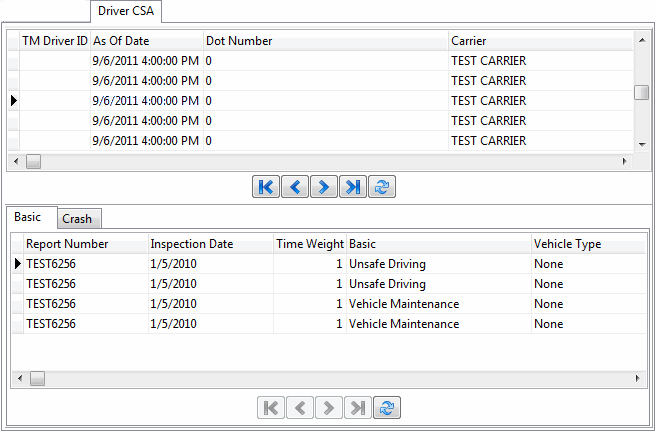
Driver CSA Sub-Tab
The Driver CSA Sub-Tab consists of two grids. The upper grid contains information about drivers, their basic information and the safety classification information. The lower grid includes two tabs, 'Basic' which displays basic CSA inspections conducted on the selected driver in the drivers grid. And the 'Crash’twhich displays information about inspection reports conducted on the selected driver in the drivers grid at time of crash accidents. This tab will not show any information in the grid if the selected driver hasn’t been involved in any accidents.
Setup Section
This final section is where users configure all the 'behind the scenes' Codes and lists used throughout the Safety Module. This section has four tabs.
Incident Lists tab
The Incident Lists tab allows the setup of the Incident Types used throughout the Safety & Compliance module.
Incident Type / Incident Seq / Incident Description
Enter the Incident Type manually in the first field, give it a Sequence value in the second, and add a short text Description in the third field.
Incident within Months / Incident within Days / Incident within Hours
Enter numerical values in these fields if the Incident falls within a set period of Months, Days or Hours.
Incident Status tab
The Incident Status tab allows the setup of the Incident Status values used throughout the Safety & Compliance module.
Incident Status
Enter the Incident Status name in this field, for use throughout the Safety & Compliance module.
Active
Double click this field to set the 'Active' Status to 'True' or 'False' for the current Incident Status Code. A 'False' Active value tells the User that when the Status is set to 'Complete' (as in the above example) the Incident is over.
Description
Enter a short text description of the Incident Status Code you are creating.
Awards tab
The Awards used in the Safety & Compliance program are setup on the Awards tab.
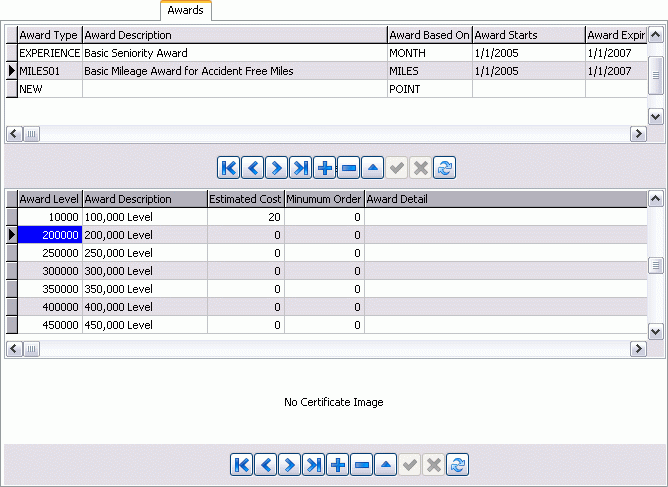
Top Section
Click the '+' button to begin creating a new Award.
Award Type / Award Description
Manually enter the Award Type name in the first field, and give it a short text Description in the adjacent field.
Award Based On
Enter the text 'MONTH' (for Awards based on Time data), 'MILES' (for Awards based on Driver’s data) or 'POINT' (for Awards based on accrued Test Points).
Award Starts / Award Expires
Double click within these fields to select a Starting and Expiring date for the Award from a Calendar menu.
Bottom Section
This section is used to more specifically detail the Award highlighted in the Top Section.
Award Level / Award Description
Manually create an Award Level by typing a numeric value into the first field, and give the Award Level a Description by entering a short text Description in the adjacent field.
Estimated Cost / Minimum Order
Manually enter an Estimated Cost for the Award, and a Minimum Ordering quantity for the Award.
Award Detail
Enter Free Format Notes regarding the Award itself.
Context Menu
Add / Change Image
Selecting this option will bring up a window that allows you to browse your system for a '.JPEG' image file that will represent the Award in the Safety & Compliance module. The Image will appear in the section below once selected.
Remove Image
Will remove your chosen Award Image.
Code Types tab
The Codes for use in the Safety & Compliance program are setup on the Code Types tab.
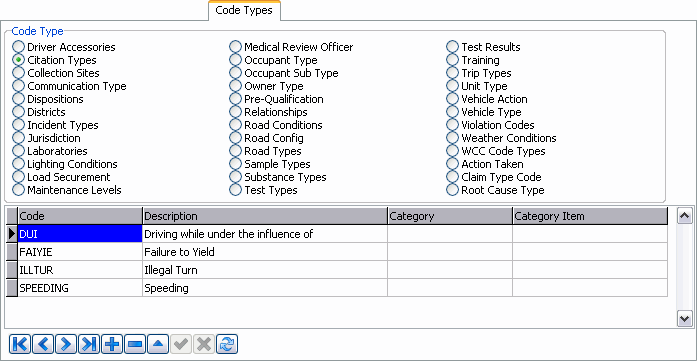
Select a radio option to view the available Code Types and / or create new Codes for that Code Type.
Code Grid
Code
Click the '+' button on the TruckMate Navigation bar and manually enter a Code name in the space provided.
Description
Manually enter a short Description for the associated Code in the space provided.
Category / Category Item
The 'Category' field is an edit pick that allows the user to select one of the headings from the Cost Summaryt(such as 'Employee', 'Company', 'Cargo', 'Cleanup', etc). Based on what the user selects in the 'Category' field, the 'Category Item' edit pick will allow the selection of items related to that Category (i.e. for 'Company', the 'Category Item' field will allow the selection of 'Repairs', 'Towing', or 'Downtime').
Note: The 'Category' column is available when working with 'Claim Type Code', 'Root Cause Type', and 'Violation Codes'. The 'Category Item' field is available with 'Claim Type Code' and 'Violation Codes'. When working with 'Violation Codes', users can enter whatever values they want in these two fields.
WCC Status tab
The WCC Statustis used to enter into the Database the Status Codes that will be applied to WCB Claims in the WCC Management Section > Header. Select the '+' button on the TruckMate Navigation Bar and enter a 'WCC Status' value (the name of the Status Code) and a short 'Description'. The 'Active' field ('True' or 'False') determines if the WCC Status code will be available for use in the WCC Management Section.
WCC Questions tab
The WCC Questionstis used to create the Question Codes that will be used by the User entering the WCB Claim information, and will be answered on the WCC Management Section > Questions tab. Records entered here are saved to the SC_WCC_QUESTION Table
Select the '+' button on the TruckMate Navigation Bar and provide the following values: 'Question Code', 'Question Text', 'Question Order' and 'Answer Type'. These values will control the question will be phrased, and what order it will appear, in the WCC Management Section > Questions tab.
Answer Type
The 'Answer Type' dictates the way that the User will be able to answer the selected Question when using the WCC Management Section > Questions tab. You can select one 'Answer Type' value for each Question Code. The answer types will include:
-
(Y/N) True/False
-
DATE: ability to select from calendar (use calendar option with time component)
-
NUMBER: allow two decimals
-
LIST: allow user to create lists to select answers from (for example Cause of Injury codes are numbered 1 through 99 and user should be able to select one)
-
SHORT ANSW: up to 256 characters
-
LONG ANSW: Very long answers: unlimited memo fields
WCC Management Section
The Workers Compensation Claim Management section of the Safety & Compliance program allows you to enter and track information regarding WCB Claims for your employees. The information entered in the various tabs of the WCC Management Section can be used for reporting purposes (both internal and external). In the Security Setup program > Security >tAccess section, you will find Security options that can limit the use of the various tabs available in the WCC Management section and/or disable the section in its entirety for your users.
Header Section
The Header Section contains fields that allow you to enter general details regarding the WCB Claim you are entering (as well as the Employee that the Claim is for).
System Claim #
This field will automatically populate with a unique number when the WCB Claim is saved.
Claim #
The User must manually enter the WCB Claim number in this field.
Claimant ID / Claimant Name
This field is used to enter the Employee ID that the Claim is for. Select the Database Search button in this field to access a window that displays all the Driver ID codes in your system. When you select a specific Driver ID for the Claim, the 'Claimant Name' field will be automatically populated, as will many of the fields on the Personal Info tab.
Notes:
-
When a Driver ID is selected, the Driver’s picture will be displayed to the right (if available). The User can initially supply a Driver’s image file by selecting the 'Load' button to the right of the Header section.
-
The details automatically generated in the Personal Infotare pulled from the Driver’s record in the Driver Profiles program.
Claim Type
This field is used to select the Claim Type for the displayed WCB Claim. Select the Database Search button to choose one of the Claim Types in your system, as configured on the Setup > Code Types tab.
Claim Status
This field is used to select the Claim Status for the displayed WCB Claim. Select the Database Search button to choose one of the Claim Status codes in your system, as configured on the Setup > WCC Status tab.
Date of Injury
Use this field to select a Date value that represents when the incident occurred.
Reported On
Use this field to select a Date value that represents when the incident was reported to the supervisor or manager.
Closed On
Use this field to select a Date value that represents when the WCB Claim was filed.
Brief Description
Enter a brief text description of the incident that led to the WCB Claim (limited to 256 characters).
Search
The Search button allows the User to search for previously entered WCB Claims for either Drivers or Employees. Select either 'Drivers' or 'Employees' from the drop-down menu to filter the search by Driver ID and Employee ID, respectively. When you select the 'Search' button, any existing Claims will be displayed.
Print WCC Report Button
This button will open the Report Selection window, where you can select the WCC Report from those Crystal Reports available on your system.
Note: Some users may not have the Security rights to access this button. Your system administrator may have to enable its use by changing certain Security Settings, available on the Security Setup program > Security > Tabs Setting section.
Driver Picture (Load / Clear)
The User entering the WCB Claim has the option of providing a photograph of the Driver who was injured by selecting the 'Load' button on the right side of the Header section. Select any .JPG image file for this purpose, though the file size must be under 100Kb.
Select the 'Clear' button to remove any attached picture.
Note: When a Driver’s record is displayed in the header, if there is an associated Driver picture, it will automatically display.
Personal Info tab
The Personal Info tab will automatically populate with details when the User selects a value for the 'Claimant ID' field in the Header Section (see above). If the selected Claimant is a Driver, the information will be pulled from the Driver Profiles program (DRIVER Table). If the Claimant is not a Driver, the information will be pulled from the Employee Profiles program (PR_EMPLOYEE Table).
While most of the fields on this tab will automatically populate, the User can override any of the values that automatically default. Some fields, however, require the User to input values:
Contact Info
SIN/SSN
Displays the Driver’s Social Insurance Number (Canadian Drivers) or Social Security Number (American Drivers).
Birth Date / Hire Date / Other Date
These various Date values should populate from the Driver Profiles program data. If they do not, or if the data is not properly configured, you may manually update the dates be selecting the Calendar icon.
The 'Other Date' field is used in custom code situations. It can be used to populate a different date into the WCC section when required.
Other Info
Job Title
Displays the Employee’s Job Title, as pulled from the Employee Profiles program. If this data is not configured for your Drivers, you can enter it manually into the field.
Marital Status
Choose a marital status code for the Driver or Employee mentioned in the Claim.
Default Power Unit
If the selected Employee is a Driver, their Default Power Unit (as configured in the Driver Profiles program) will appear in this field. If the Employee is not a Driver, this field will not populate. In this case, you can manually enter a Power Unit, as required.
Wages
Enter the Driver or Employee’s Wage value in this field.
Number of Dependants
Enter an integer value representative of the number of dependants the Driver or Employee is responsible for.
Previous Claim Info Grid
This Grid outlines the details of any previous Claims entered for the selected Claimant. You can double-click any of the records in this Grid to populate the previous Claim’s details into the WCC Management Section.
Questions tab
The Questions tab contains the User-defined questions sorted in the order the user has requested when setting up the questions on the Setup > WCC Questions tab. All available questions will display in the left grid. Select a question, then enter an answer using whatever fields appear on the right side of the Questions tab. The type of answer that you are required to enter is determined by the 'Answer Type' value selected on the Setup > WCC Questions tab. Finally, select the 'Save' button to save the answer.
Costs tab
The Costs tab contains a Grid that allows the User to enter dollar values for all funds going out or coming in regarding the displayed WCB Claim. Columns include 'Date', 'Description', 'Medical Paid', 'Indemnity Paid', 'Other Paid', 'Total Pay' (combines all other dollar values), etc. Records on the Costs tab display in the grid in reverse date order (most current on top). Data entered into the grid is saved in the SC_WCC_COST Table.
Additional Notes tab
The Additional Notes tab contains similar information to the Driver Notes shown in Driver Profiles program > Notes tab. When you enter a Note record, the Date/Time of the entry will be remembered by the system. The Header Section will display the 3 most recent Note entries. Notes display in reverse order in the Additional Notes grid; most recent will be at the top.
Note: The 'Note' field itself is limited to 255 characters in length.
Contacts tab
The Contacts tab is used to list any Contacts that the Driver or Employee provides at the time the incident is recorded. Data entered into this Grid will be saved in the SC_WCC_CONTACT Table.