CrossDock grids
| As of TruckMate 2022.4, CrossDock is no longer available. Trimble still provides support for older versions. |

Freight Bills at Door Grid
Toolbar
Map Route
![]() Clicking this button (a globe with superimposed 'R') will open an instance of the Mapview program with all your Routing information displayed.
Clicking this button (a globe with superimposed 'R') will open an instance of the Mapview program with all your Routing information displayed.
| If you do not have Mapping software installed on your machine, this option will not function. |
Toggle Summary Information
![]() Select this option to toggle the Bills at Door Grid Summary information section.
Select this option to toggle the Bills at Door Grid Summary information section.
Refresh
![]() Select this option to refresh only the Bills at Door Grid.
Select this option to refresh only the Bills at Door Grid.
View Directions to Location
Selecting this option will display the 'Local Direction' data from the Customer & Vendor Profiles program > Tools Menu > 'Directions' window for the Delivery Client of the selected Trip leg.
Load Offer
![]() The Load Offer function is used to send a 'Load Offer' message to the Driver for review/acceptance. The message is sent though the Mobile Dispatch system to the mobile device installed on the power unit that is assigned to the trip. You can also send a different macro than the Load Offer macro, or a free form message. The Load Offer macro is configured in the Communication Macro Setup program with the specific information required for your Load Offer communication and displayed on the Load Offer window. Need to know how?
The Load Offer function is used to send a 'Load Offer' message to the Driver for review/acceptance. The message is sent though the Mobile Dispatch system to the mobile device installed on the power unit that is assigned to the trip. You can also send a different macro than the Load Offer macro, or a free form message. The Load Offer macro is configured in the Communication Macro Setup program with the specific information required for your Load Offer communication and displayed on the Load Offer window. Need to know how?
View Message History
Selecting this option will open a window detailing any Messages associated with the selected Freight Bill.
Optimize Trip
This option is the same function as is offered in the Dispatch program. The Trip Optimizer window offers you the ability to edit the trip legs and assign Freight Bills to be picked or dropped in whatever order required.
View Freight Bill Notes
This option allows the user to view any notes associated with this freight bill.
View Shipping Instructions
This option allows the user to view any shipping instructions for this freight bill.
Bills at Door Grid
The Bills at Door Grid displays all the Freight Bills currently attached to the selected Trip in the Trips / Doors section of the CrossDock program. This Grid will only be displayed if the User clicks the 'Show Bills At Door Grid' button from the Menu Bar or the Toolbar functions at the top of the CrossDock program window. You may edit the details of these Freight Bills by accessing the Context Menu from within the Bills at Door Grid.
Context Menu
Select All
Will highlight all the Freight Bills in the grid.
Clear Selection
You can select multiple Freight Bills in the Freight Bill Grid, either for the purpose of calculating the dimension summary (see above for a description of this function) or for assigning multiple Freight Bills to trips. To manually select Freight Bills, hold down the '<CTRL>' key, and click the desired Freight Bills with your mouse. Use this menu option to clear the selection, and return the Freight Bill display to its normal state.
Full Screen
Selecting this option will make enlarge the Freight Bill Grid to a full screen view size. Select this option again to shrink it back to its original state.
Unmatch Bill / Unmatch Selected Bills
Selecting this option will update the Status of the Freight Bill selected (or multiple Bills if the User has used the '<Ctrl>' key to highlight more than one Bill) to 'DELIVERED', and will remove the Freight Bill detail line from the Bills at Door Grid. Unloading performs a 'dock' status change.
Directions to Location
Selecting this option will display the 'Local Direction' data from the Customer & Vendor Profiles program > Tools Menu > 'Directions' window for the Delivery Client of the selected Trip leg.
Change Status
This option allows you to change the Freight Bill’s Status value. The only status change option available with this Context option is to change the Freight Bill status to: 'ARRIVED AT CUSTOMER (ARRIV)', 'FREIGHT PICKED UP (PICKEDUP)', 'DROP AT DOCK (DOC)', 'FREIGHT DELIVERED (DELIVERED)', 'SALES NEEDS TO CALL (SALES)', 'DEASSIGN FREIGHT FROM DRIVER (RESCHED)' and 'CANCEL PICKUP AND FREIGHT BILL (CANCELLED)'.
View Freight Bill Notes
This option allows the user to view any notes associated with this freight bill.
View Shipping Instructions
This option allows the user to view any shipping instructions for this freight bill.
Change Next Terminal Zone
Will open a small window that will allow you to alter the Freight Bill’s next Terminal Zone.
Change Delivery Terminal
Will open a small window that will allow you to alter the Freight Bill’s Ending Zone.
Set Direct
When working with 'Pick' Door Bills, you can select this option to set the shipment to 'Direct' status.
View Freight Bill Terminal Plan
This option will display the Freight Bill Terminal Plan window, which details the scheduled Terminal Plan for the selected Freight Bill.
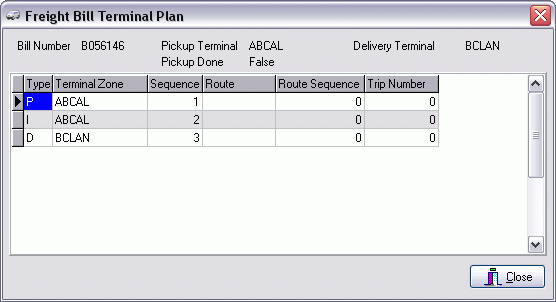
The following options are available on the context menu:
-
Change Pickup Terminal
Selecting this option will open a search window where you can select a different Terminal from those available in your system. This option is only available for Terminals labelled 'Pickup (P)' in this window. -
Change Delivery Terminal
Selecting this option will open a search window where you can select a different Terminal from those available in your system. This option is only available for Terminals labelled 'Delivery (D)' in this window. -
Transfer To
This option is only available for 'Intermediate (I)' Terminals (those not set as 'Pickup (P)' or 'Delivery (D)' Terminals), and setup a Terminal Split for the selected Terminal. -
Set Trip Number
Select this option to open a window that will allow you to enter the Trip Number for this Terminal Leg. -
Set Trip to Zero
Select this option to reset any custom defined Trip Number back to zero. -
Copy
Select this option to copy the selected detail line.
Set Via Zone…
Selecting this option will bring up a selection window where you can specify an additional Zone to add to the current Trip.
Optimize Trip
This option is the same function as is offered in the Dispatch program. The Trip Optimizer window offers you the ability to edit the trip legs and assign Freight Bills to be picked or dropped in whatever order required.
Load Offer (all) / Load Offer (selected)
Depending on the option selected, the Load Offer message that is created will contain details for 'ALL' of the items in the Grid, or only those 'SELECTED' by the User.
The Load Offer function is used to send a 'Load Offer' message to the Driver for review/acceptance. The message is sent though the Mobile Dispatch system to the mobile device installed on the power unit that is assigned to the trip. You can also send a different macro than the Load Offer macro, or a free form message. The Load Offer macro is configured in the Communication Macro Setup program with the specific information required for your Load Offer communication and displayed on the Load Offer window. Need to know how?
View Message History
Selecting this option will open a window detailing any Messages associated with the selected Freight Bill.
Use Microsoft MapPoint
Select this option if you are using Microsoft MapPoint Mapping software in concert with TruckMate.
Use PC*Miler Map
Select this option if you are using PC*MIler Mapping software in concert with TruckMate.
Use ProMiles Map
Select this option if you are using ProMiles Mapping software in concert with TruckMate.
Mapping Settings
Opens a window that details Mapping settings, based on the Mapping software you have selected above.
Copy
Selecting this option will copy the information in the currently selected Grid field.
Navigate
The Navigate option contains the standard TruckMate Navigation Bar functionality.
Available Freight Bill Grid
Toolbar
Refresh Bills
![]() Select this option to refresh only the Freigth Bill Grid. This refresh will re-fetch the latest records filtered on the selected terminal (the refresh option will NOT change or reset the currently selected terminal.
Select this option to refresh only the Freigth Bill Grid. This refresh will re-fetch the latest records filtered on the selected terminal (the refresh option will NOT change or reset the currently selected terminal.
Refresh Summary
![]() Click this button to update the displayed totals in the Summary section to reflect any changes that have been made to the currently selected Freight Bill outside of the CrossDock program.
Click this button to update the displayed totals in the Summary section to reflect any changes that have been made to the currently selected Freight Bill outside of the CrossDock program.
Clear Selection
![]() Removes the currently selected Freight Bill(s) from the Freight Bill Grid.
Removes the currently selected Freight Bill(s) from the Freight Bill Grid.
Select / Unselect this Bill
![]() Selects / Unselects the currently highlighted Bill in the Freight Bill Grid.
Selects / Unselects the currently highlighted Bill in the Freight Bill Grid.
Select All
![]() Selects all Bills currently displayed in the Freight Bill Grid.
Selects all Bills currently displayed in the Freight Bill Grid.
Filter
![]() Selecting this option will open a window where you can specify Advanced Filters for the Grid information. See the Additional Features window documentation below for more information.
Selecting this option will open a window where you can specify Advanced Filters for the Grid information. See the Additional Features window documentation below for more information.
Show Summary
![]() Select this option to toggle the Freight Bill Grid Summary information.
Select this option to toggle the Freight Bill Grid Summary information.
Add Route Filter
![]() Before selecting this option, if you click on a cell in the Route column that contains the route by which you wish to filter Freight Bills, the route will default. Otherwise, enter the route designation by which you want to filter Freight Bills. After selecting this menu option, only Freight Bills with the same value in their Route Designation field will be displayed.
Before selecting this option, if you click on a cell in the Route column that contains the route by which you wish to filter Freight Bills, the route will default. Otherwise, enter the route designation by which you want to filter Freight Bills. After selecting this menu option, only Freight Bills with the same value in their Route Designation field will be displayed.
Clear Route Filter
![]() Will remove the filter on the Route field, and display all Freight Bills in the Grid.
Will remove the filter on the Route field, and display all Freight Bills in the Grid.
View Shipping instructions
![]() This option will display the standard shipping instructions form. The user can edit the shipping instructions by selecting or de-selecting the desired options.
This option will display the standard shipping instructions form. The user can edit the shipping instructions by selecting or de-selecting the desired options.
Change Current Terminal
![]() This option changes the current grid filter to filter on another terminal. The 'Select Terminal' window will popup. The user can user the filtering functionality to select the new desired terminal. Once selected, the grid will refresh to fetch records filtered on the newly selected terminal.
This option changes the current grid filter to filter on another terminal. The 'Select Terminal' window will popup. The user can user the filtering functionality to select the new desired terminal. Once selected, the grid will refresh to fetch records filtered on the newly selected terminal.
Show Dock Bills ONLY
If this box is checked, only Freight Bills with a current status of the behavior category of 'Dock' will be displayed in the Freight Bill Grid. If the box is not checked, all non-completed Freight Bills will be displayed.
Show Through Bills ONLY
If this box is checked, only Freight Bills with a current status of the behavior category of 'Through' will be displayed in the Freight Bill Grid. If the box is not checked, all non-completed Freight Bills will be displayed.
Search
The Search field works in conjunction with the Sort column, indicated by a blue arrow in the column header. To find a specific Freight Bill, click on the column header of the column you wish to search, and then enter the starting characters in the Search field. The Grid display will reposition to display the first items that match the data entered in the Search field.
Filter
The Filter field works in conjunction with the Sort column, indicated by a blue arrow in the column header. To limit the display of Freight Bills, click on the column header of the column you wish to filter, and then enter the starting characters of the filter criteria in the Filter field. The Grid display will display only Freight Bills that match the data entered in the Filter field.
Freight Bill Grid
The Freight Bill Grid displays all non-completed Freight Bills whose Terminal Zone matches the Terminal Zone specified in the Terminal Setup. The Terminal Zone is assigned to a Freight Bill when it is created, depending on the Site from which the entry is made. Also, Freight Bills can be assigned a Terminal Zone when they are docked using the Dispatch program. Freight Bills of a status other than 'Available' or 'Docked' will show with a strike-though. To assign a Freight Bill to a door, click and drag the Freight Bill from the Freight Bill Grid to the desired door. To de-assign a Freight Bill from a door, use the Show Door Summary menu option in the Door section.
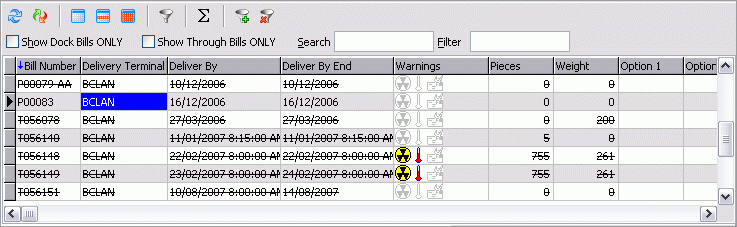
The Freight Bill Grid displays summary information about the Freight Bill. If Freight Bill records are shown underlined and in bold font, the system is indicating that the Freight Bill has notes attached to it.
Special Grid Fields
Bill Number
Double click on any Freight Bill number to load the Customer Service program (if not already loaded) and display the selected Freight Bill.
Freight Bill Warnings
Depending on the Commodity and Shipping/Consignee Client of the Freight Bill, one (or more) of several Warning Icons will display on each detail line on the Freight Bill Grid.
| Icon | Description |
|---|---|
|
Similar to the Customer Service program, this designates that the Freight Bill’s Commodity is temperature controlled (TLDTL.TEMP_CONTROLLED = 'True'). |
|
Similar to the Customer Service program, this designates that the Freight Bill’s Commodity is classified as a Dangerous Good (TLDTL.DANGEROUS_GOODS = 'True'). |
|
Specifies that the Freight Bill has a Service Level of Hot Rush type (TLORDER.SERVICE_LEVEL = a Service Level flagged as 'Hot Rush'). |
|
Specifies that the Shipper site is accessible by Stairs. |
|
Specifies that the Shipper site is accessible via Elevator. |
|
Specifies that the Shipper site has a Dock. |
|
Specifies that the Shipper site requires a survey. |
|
Specifies that the Shipper site has vehicle accessibility restrictions. |


| Those Warning icons without a field name description above are specified on a per-Client basis on the Customer Profiles program > Accessibility Options Tab. |
Route Sequence
Can be used to enter a numerical value that indicates the delivery sequence of each Freight Bill. The sequence will display in the Door Summary, accessed from the context menu in the Door section. Numbers and letters can be entered in this field. Remember that, in alphanumeric ordering, the digits 0 to 9 precede the letters A to Z. This value can also be viewed and edited in the Manifest Maintenance program.
Route Designation
A route designation is used as a planning tool to group freight bills. Assigning the same route designation to number of freight bills puts those freight bills in one group. Route designations are defined for terminals in the Terminal Setup window (View menu > Select Terminal > Terminal Setup). The groups are sorted base on Route Designation value. Freight Bills will be displayed in order of the value entered in this field. Numbers and letters can be entered in this field. Remember that, in alphanumeric ordering, the digits '0' to '9' precede the letters 'A' to 'Z'. If the selected terminal has more than one route designation, this field becomes a drop down list, to allow the user to select from available Route Designations.
Door #
By selecting this field you can edit the Door number assigned to the Freight Bill record.
Context Menu
Clear Selection
You can select multiple Freight Bills in the Freight Bill Grid, either for the purpose of calculating the dimension summary (see above for a description of this function) or for assigning multiple Freight Bills to trips. To manually select Freight Bills, hold down the '<Ctrl>' key, and click the desired Freight Bills with your mouse. Use this menu option to clear the selection, and return the Freight Bill display to its normal state.
Select / Unselect This Bill
Choosing this option will select or de-select the Freight Bill that the mouse was positioned over when the right-click menu was accessed.
Select All
To select all Freight Bills currently displayed in the Freight Bill Grid, use this option. This is the same as manually selecting a group of Freight Bills. Use the 'Clear Selection' menu function to undo the selection and return the Freight Bill display to its normal state.
Add Route Filter
Before selecting this option, if you click on a cell in the Route column that contains the route by which you wish to filter Freight Bills, the route will default. Otherwise, enter the route designation by which you want to filter Freight Bills. After selecting this menu option, only Freight Bills with the same value in their Route Designation field will be displayed.
Clear Route Filter
Will remove the filter on the Route field, and display all Freight Bills in the Grid.
Routing
-
Set Delivery Terminal
Select this option to change the Delivery Terminal of the selected Freight Bill (altering the 'D' record of its Terminal Plan, not the 'End Zone' of the Freight Bill). -
Direct
Selecting this option will set the Freight Bill Terminal Plan to be delivered directly from this Terminal, not routed to another Terminal for delivery. For example, if a Freight Bill was originally planned to go to another Terminal (and thus there is an 'I' record for the current Terminal), setting that Freight Bill to 'Direct' will make the current Terminal the 'D' record and remove the 'I' record in the Terminal Plan.
Set Intermediate Terminal
Select this option to enter/change the 'Intermediate' Terminal of the selected Freight Bill (altering the 'I' record of the Freight Bill Terminal Plan).
Multi Route Update
After selecting multiple Freight Bill records while holding the <Ctrl> key, you can use this option to tie them together into a Route batch. The system will prompt the user for a new Route value once this is done.
Multi Route Clear
Once multiple Freight Bills have been selected, choosing this option will clear their currently entered Route value.
Set Care-Of Drop Point
This option will allow you to specify a Zone Code for the terminal that will be used as a 'Care-Of Drop Point'. Setting this option will also populate the 'Care-of Drop Point' field on the Customer Service program > Contacts Tab. This option is used when a Freight Bill includes a final destination (Consignee Site) but the current hauler will only be taking the Freight to a specific Drop point, where another Carrier will continue the delivery.
Freight Bill Terminal Plan
This option will display the Freight Bill Terminal Plan window, which details the scheduled Terminal Plan for the selected Freight Bill.
The following options are available on the context menu:
-
Change Pickup Terminal
Selecting this option will open a search window where you can select a different Terminal from those available in your system. This option is only available for Terminals labelled 'Pickup (P)' in this window. -
Change Delivery Terminal
Selecting this option will open a search window where you can select a different Terminal from those available in your system. This option is only available for Terminals labelled 'Delivery (D)' in this window. -
Transfer To
This option is only available for 'Intermediate (I)' Terminals (those not set as 'Pickup (P)' or 'Delivery (D)' Terminals), and setup a Terminal Split for the selected Terminal. -
Set Trip Number
Select this option to open a window that will allow you to enter the Trip Number for this Terminal Leg. -
Set Trip to Zero
Select this option to reset any custom defined Trip Number back to zero. -
Copy
Select this option to copy the selected detail line.
Move Bills to Door
Choosing this option when one (or multiple) Freight Bills are selected will open a small dialog asking which door on the Doors/Trips List you would like to move the selected Bills to. Enter the integer number of the door you would like to position the Bills at. There must be a Trip created at the Door you select for this option to work.
Full Screen
Selecting this option will expand the Freight Bill Grid into a full screen view.
Copy
Selecting this option will copy the information in the currently selected Grid field.
Navigate
The Navigate option contains the standard TruckMate Navigation Bar functionality.
Layout
Customize Grid
Select this option to open the Grid Customization Tool, standard to all TruckMate applications.
Save Grid Layout
Once you have customized the Grid using the above option, select this option to save it for future use.
| The Freight Bill Grid display can be re-sized according to your needs. Move your mouse pointer over the right or bottom edge of the Freight Bill Grid, and, when the pointer changes to a double pointer, click and drag the edge to the desired position. The order of Freight Bills displayed in the Grid is determined by the sort column, which is indicated by a blue arrow in the above the column header. |
Summary Area
The Summary Area offers totals based on information from the available Freight Bills Grid. Current record shows the total weight, length, and cube on the currently highlighted Freight Bill. Selection indicates a summary calculation of the same values if multiple bills are selected. Route Designation and Current Filter offer totals for all bills which fit the currently selected route designation and lane filter.