Customer Profiles tabs D-U

Divisions Tab
The Divisions Tab allows users to setup multiple divisions against each of the customers defined in the system. Once you have various Divisions added to a Client, Freight Bills can be validated against them in the Customer Service program > Details Tab so that if a Freight Bill does not have a valid 'Division' value, it will not be posted. You can restrict access to this Tab in the Security Setup program > Security > Tabs Setting section.
Note: In order to have the 'Division' validated against a Client when working with their record in the Customer Service program, the Application Configurator program > CSERV.EXE > 'Division Validated Against' option must be set accordingly.
Name
Enter a Division name/number for the specific Division within the Client company.
Notes
Enter any descriptive notes you require regarding the Division.
EDI Reason Codes Tab
The EDI Reason Codes Tab allows you to match your system’s 'Reason Codes' to 'EDI Reason Codes' also within your system.
Reason Code
Double click within this field to select a 'Reason Code' from your system.
EDI Reason Code
Double click within this field to select an 'EDI Reason Code' from your system.
Description
This field will automatically populate following the selection of an 'EDI Reason Code'.
Freight Bill Check List Tab
The Freight Bill Check List Tab is used to add 'Check List' tasks to a particular Customer Code. When a Customer Code that has 'Check List' items entered against it is used as the 'Bill To' Code on a Freight Bill in the Customer Service program, the User must make sure that the 'Check List' items (be they 'Tasks' or required 'Documents') are fulfilled before Approving the Freight Bill and moving it onto the Dispatch process.
Select the '+' button at the bottom of the Tab window to add a new Check List item to the Tab Grid.
Description
Double click this field to select a 'Check List' item Code from the Codes Maintenance program > Check List Tab, where they are configured and added to your Database.
Required Mandatory
Double-click this field to toggle the 'Check List' item’s 'Required' status to 'False' or 'True'. If set to 'True', the Freight Bill that has the current Customer Code attached as 'Bill To' will not be able to be set to 'Approved' Status until the 'Check List' item has been supplied.
Enable Auto-Approve on Freight Bill
This option, when checked ('True'), will enable the Application Configurator program > CSERV > 'CheckList AutoApprvd' option. If both of these options are set to 'True', then the Freight Bill will be automatically approved once an item is Checked In. If they are not both set to 'True' no automatic approval will occur.
Allow check list items involving this client to be auto-approved
Select this flag to allow Check List items required for this Client to be auto-approved. When this flag is checked, the Application Configurator program > CSERV.EXE > 'CheckList AutoApprvd' option will be enabled. If you then set this config option to 'True', then a Freight Bill will be automatically approved in the Customer Service program once all of its associated Check List items have been set to 'Complete' on the Customer Service program > Check List Tab.
Groupings Tab
Customers can be grouped for reporting purposes on the Groupings Tab.
Customer Grouping Codes are used for reporting purposes, as well as for determining Shipper / Consignee Detention Rates per Group in the Rates Maintenance program > Detention Tab.
Enter a Customer Grouping Code in the field at the top. After posting the change on the main navigator bar, you will see the current Customer and any other Customers who have been assigned to the same grouping Code, in the grid. The grid lists all customers belonging to a specific group with some read only descriptive information such as customer code, customer name and address information. Double-clicking on any customer on the grid will take to that customer’s profile.
For example, if all B.C. Customers were grouped together, then you could create a new group called 'BC'. (Only 10 characters are allowed in this descriptive field).
Hours of Operation Tab
The Hours of Operation Tab allows you to configure a variety of different Hours of Operation for the selected Client record, including different operation times for Shipping and Receiving of Freight.
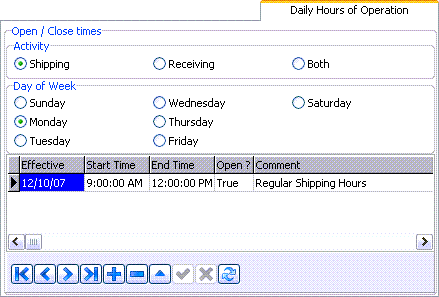
You can use this Tab to configure multiple different Hours of Operation, per day, by the type of 'Activity' your Company provides. The times entered in this Tab will override the 'Global' Daily Hours of Operation value as set on the fields accessed from the Tools Menu > 'Create Daily Hours of Operation' option.
Note: You can enable the 'Show Daily Hours Calendar' option from the Tools Menu to view a graphical calendar on this Tab, which makes browsing the Hours of Operation for various days / months quick and easy.
Activity
Select the '+' button to add a new record, and then select the appropriate 'Activity' value. The available values are as follows:
-
Shipping*: the selected Customer will be Shipping Freight when this radio option is selected and a valid 'Day of Week' and 'Start Time' / 'End Time' values are provided.
The 'Pickup By Start / Pickup By End' fields in the Customer Service program > Shipper section will default to the values set here whenever the selected Client ID is chosen as a Shipper, and the matching 'Day of Week' is chosen.
-
Receiving*: the selected Customer will be Receiving Freight when this radio option is selected and a valid 'Day of Week' and 'Start Time' / 'End Time' values are provided.
The 'Deliver By Start / Deliver By End' fields in the Customer Service program > Consignee section will default to the values set here whenever the selected Client ID is chosen as a Shipper, and the matching 'Day of Week' is chosen.
-
Both*: the selected Customer allows both Shipping and Receiving during the specified time. In the Customer Service program, the 'Pickup By Start / Pickup By End' and 'Deliver By Start / Deliver By End' fields will default to the set time for the 'Day of Week' chosen when this Client ID is chosen as a Shipper or Consignee.
Day of Week
Once you have chosen a specific 'Activity' for the selected Client, you must select from this section the day you wish to enter the Hours of Operation for. Choose one of the available radio options from this section, then enter a 'Start Time' / 'End Time' range using the below Grid (you can only enter 24-hour time values in these fields- any other data will return an error).
You can configure the 'Open?' field to 'True' or 'False', so that you can configure when the Client is open / closed for the selected 'Activity', and you can add a specific 'Comment' in the field provided, if you require.
Intermodal Tab
The Intermodal Tab controls Intermodal details for the selected Customer, such as 'Flip Charges' and other information.
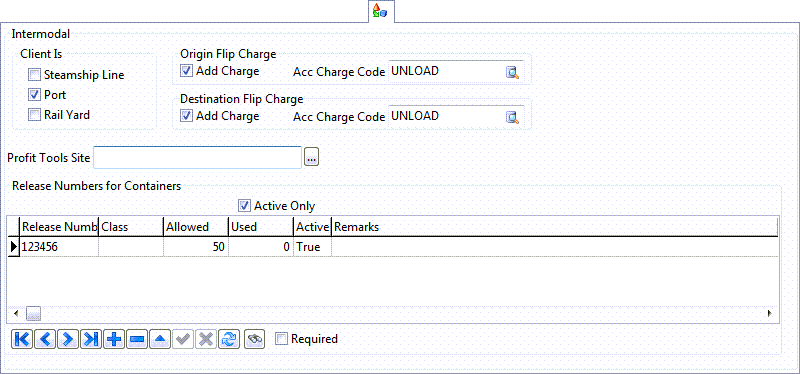
In general, any time a load is picked up or delivered to the specific Customer, the accessorial charge indicated in Customer Profiles will be automatically generated.
Client Is
Steamship Line
Place a checkmark in the box if this client is a steamship line.
Rail Yard
Place a checkmark in the box if this client is a rail yard.
Port Profit Tools Site
Place a checkmark in the box if this client is a port.
Profit Tools Site
When either 'Steamship Line', 'Rail Yard' or 'Port' is selected, the 'Profit Tools Site' field becomes available. The Profit Tools Sites available for selection will be blank unless the Status Changer program has successfully connected (at least once) to Profit Tools. When Status Changer first connects, it gets the list of sites from profit tools, and these will then be available for selection here.
Note: If you add a new container to a client that is a port and is set to be a Profit Tools Site, TruckMate will automatically upload the container details to Profit Tools so that it is tracked.
Origin Flip Charge
Add Charge
Place a checkmark in the box provided if this is a charge to be added.
Acc. Charge Code
Use the search button to bring up the 'Select Acc Charge Code' dialog box. Select the Accessorial Charge Code from those shown.
Note: The Application Configurator program > PROFILE.EXE > 'Calc Flip Charges' option will automatically calculate origin and destination flip charges.
Destination Flip Charge
Add Charge
Place a checkmark in the box provided if this is a charge to be added.
Acc. Charge Code
Use the search button to bring up the 'Select Acc Charge Code' dialog box. Select the Accessorial Charge Code from those shown.
Note: The Application Configurator program > PROFILE.EXE > 'Calc Flip Charges' option will automatically calculate origin and destination flip charges.
Release Numbers for Containers Grid
Release Number
Manually enter a Release Number for the Container in this field.
Class
Double click this field to select a Container Class.
Allowed
Manually enter a number of Allowed Containers for this Customer in this field.
Used
Will default to '0' upon insertion of a new detail line.
Active
Double click this field to set it’s value to either 'True' or 'False' depending on if the Container is Active or not.
Remarks
Enter any Free Format text in this field.
Direction
This value specifies the direction Intermodal Trips for this Customer can move. Double click this field to access the drop down menu used to configure its value. Select from either 'I' (Inbound), 'O' (Outbound) or 'B' (Both).
Miscellaneous Information Tab
The Misc Info Tab contains options for recording miscellaneous information about the selected Customer.
Sales Rep / Agent
If a specific sales representative is responsible for this Customer, double-click this field to add them. The select statement used by this field is dependant upon the Application Configurator program > CSERV.EXE > 'Sales Agent' option, which allows you to specify if you wish to use 'V' (Vendor), 'D' (Driver) or 'E' (Employee) codes as your Sales Agents. Depending on the config setting, only specific codes will appear on the lookup form when double-clicking on this field.
The value in this field will automatically populate in the Customer Service program > Summary Tab > 'Sales Rep/Agent' field.
Call Back Date
Can be used to record a call-back date for your next collection call.
Collector
If a specific person is responsible for collecting this Customer’s account, select their User login name from the drop down list box. User names are configured in the Security Setup program. In the AR Inquiry program, you can specify a User name in the Filter on Collector field, an only Customers who have the same User name in this field will be displayed.
CSA #
The CSA (Customs Self Assessment) program provides CSA importers with the benefits of a streamlined accounting and payment process for all imported goods. The CSA program also provides CSA importers, CSA carriers, and registered drivers with the benefits of a streamlined clearance option for CSA eligible goods. The streamlined clearance option eliminates the requirement for any transactional transmissions of data related to eligible goods, allowing for the clearance of goods based on their identification as CSA goods and the presentation of the CSA importer’s Business Number, the CSA carrier Code, and registered driver identification at the border (called 'Commercial Driver Registration Program (CDRP)'). The signed delivery receipt will be proof of Canada Customs release for a CSA shipment.
Enter the CSA # as given to you by the Canada Customs and Revenue Agency. If you attempt to match a Driver (without a CDRP #) with a shipment requiring a CSA Driver, the system will display a warning message. Two Application Configurator program > CSERV.EXE options are available to assist you in this function: 'Auto Set CSA Flag', and 'Warn Non CSA Driver'. 'Warn Non CSA Driver' is also an Application Configurator option available from DISPATCH.EXE.
This information taken from the CCRA website located at:
EDI #
When billing by EDI using the eManifest program, you need to specify the Customer’s EDI account. Enter that Code in this field.
Driver Pay Type
Use the pull-down arrow to view any Driver Pay Types. Driver Pay Types are entered in the Driver Pay Contract program, on the appropriate tab of Pickups and Drops, Percentage, and Units.
Carrier Rate Consolidated
This field will be hidden when the Application Configurator program > DISPATCH.EXE > 'Carrier Rate Consolidation' option is set to anything but 'CLIENT'. This checkbox indicates whether or not you want to have the 'Consolidated' field checked automatically in the Dispatch > Carrier Assignment window whenever the selected Client is used as the 'Bill To' Client. If this flag is not checked, when this Client is used as the 'Bill To' Client, the 'Consolidated' field will not be checked.
EDI Customer
If you electronically transfer billing data to this Customer using the eManifest program check this box.
Trace Popup
In the Quick Bill Entry program, you can configure the Trace window to pop up automatically during entry of a Freight Bill if this box is checked. If the profile for either the Shipper or Consignee has this box checked, the Trace form will display after the User presses the <Tab> key in the Delivery Trailer field.
Appian Direct Route
This section is related to Appian Integration. The needed fields are filled for the integration to be used by Appian, TruckMate does not utilise these fields for any other purpose.
SPEQ Code
This is a free format field to specify a special equipment that Appian will consider in its routing process, if the selected customer is involved.
Fixed Mins
This field is an integer number that represents a number of minutes to be added to the routing time for each stop at the selected customer.
Size Restriction
This is a numeric value that represents the maximum capacity of vehicles that can serve the selected customer. The unit of measure is determined by the first size filed found in Appian.
Early Buffer / Late Buffer
These are time buffers to adjust the pickup / delivery time windows. The early buffer would be subtracted from the opening of the available time window, and Late buffer would added the closing of the available time window for the selected customer. A time window for a freight bill is based on:
-
An appointment time (pick and / or delivery appointments) if such appointments are set.
-
If no appointment is set, then the customer’s hours of operation will be used to define the two ends of the available time window.
-
If neither an appointment nor hours of operation is set then the window options in Application Configurator > Xtras > APPIAN - 'Default Window Open' and 'Default Window Close' will be used.
AM Start / End / Adjust
These fields define the morning rush hours. Start and End define the start time and end time of the morning rush hours, and the Adjust defines the impact of the rush hours. Adjust is a percentage value of the normal time (outside rush hours) to adjust for the morning rush hours. The default is '100', which means the adjusted time for morning rush hours is 100% of the normal time (no impact). If you want to reflect a 20% increase in traffic time as a result of morning rush hours, set this value to '120'.
PM Start / End / Adjust
These fields define the afternoon rush hours. Start and End define the start time and end time of the afternoon rush hours, and the Adjust defines the impact of the rush hours. Adjust is a percentage value of the normal time (outside rush hours) to adjust for the afternoon rush hours. The default is '100', which means the adjusted time for afternoon rush hours is 100% of the normal time (no impact). If you want to reflect a 20% increase in traffic time as a result of afternoon rush hours, set this value to '120'.
Carrier Agent
Name
If desired, enter a Vendor Code in this field. This is for reference and reporting purposes only.
Percentage
If desired, enter the percentage paid to the agent. This is for reference and reporting purposes only.
Maximum
If desired, entered the maximum value the agent should be paid. This is for reference and reporting purposes only.
Customs Broker
Inbound Customs Broker
You can specify a customs broker for inbound shipments. This field is for reference purposes only and is not used elsewhere in the system.
Outbound Customs Broker
You can specify a customs broker for outbound shipments. This field is for reference purposes only and is not used elsewhere in the system.
Vendor Customs Broker
If you have created Vendors with the Type 'Customs Broker', you can define a default Customs Broker Vendor for the selected Client. When the Freight Bill crosses the border the default Customs Broker for the Shipper is entered into the Freight Bill
Email Confirmation Tab
The Email Confirmation Tab displays any automatic Email Confirmation notifications that have been applied to this Client, and allows the user to add and remove Email notifications from the grid. Email Confirmation Profiles are configured using THE DAWG(r) > Tools Menu, and can then be added into this grid.
All detail fields will populate automatically based on information configured in THE DAWG(r) .
Detention Tab
No Warning
If you do not want to issue a Warning Fax or Email concerning a Detention order, check this box.
Option
Use the pull down arrow to select your method of Detention notification / warning, 'Fax' or 'Email'.
Alt Fax # / Alt EMail
If you would like the Detention Warnings to be sent to a Fax number or Email address other than the default configured for the selected Customer, enter the Alternate address or number here.
Notes Tab
The Notes Tab lets you record Notes on this Customer, as well as some other important details.
Notes / Specifications
Is a free-format field that can be used to enter general information about this Customer. It is for informational purposes only, and is not used elsewhere in the TruckMate system.
A new keyboard hotkey, <CTRL><T> has been added to the 'Specifications' field, and will add the current date/time and User ID at the beginning of the field.
Pop Up Specification In Customer Service
Select this box if you would like a pop-up message to appear whenever this Customer is entered on a new Freight Bill in the Customer Service program. Freight Bills created using the 'Copy' function will not display the Customer Info pop-up.
The pop-up window shows important information about the Customer that the person entering bills (often a dispatcher) must know when they are adding bills in the Customer Service program (for example: they only accept deliveries on Tuesdays). Then, when a User is in the Customer Service program and a new Freight Bill is added and this Customer name is entered, a window appears with several important pieces of information
The text in the 'Specifications' field also displays in a hint box when the User hovers the mouse over the arrow 'Customer Code' field in the Caller / Shipper / Consignee entry sections of the Customer Service program.
Rating
These fields control how Rating is applied for the selected Customer/Client.
Rate by Client
Enter a Client ID, or select the search button to view all the clients entered on your system.
Rate by Disc
Enter a Client ID, or select the search button to view all the clients entered on your system.
Rate by Pre Min / Rate by Post Min
Enter a Client ID, or select the search button to view all the clients entered on your system.
Rate by Acc Ch
Enter a Client ID, or select the search button to view all the clients entered on your system.
Cube to Wgt Conversion
The factor used by auto-rating to convert cube measurements to weight.
Aggregate Rating
Check this option if you would like to apply Aggregate Rating to the selected Customer.
Force Manual Rate
Selecting this box requires the User to enter manual rates for this Customer. This will override the automatic calculation. Usually, used only when cube rating is being applied.
Cube-to-Weight Break Point
You can use the 'Cube-to-Weight Break Point' to enter a custom weight value to limit your break weight, or you can select the 'Use 640 Rule' flag to the right to apply the cube-to-weight conversion rules up to 640 cubic feet only with the 640 rule becoming active at 640 cubic feet rather than 641 cubic feet.
This provides more flex by having the break weight in the Customer Profile as opposed to having the 640 rule hard-coded.
Use 640 Rule
Placing a checkmark in this box will cause the following calculations to occur: if the rate cube (cube value in base units) is greater than 640 then the cube weight will be equal to the (rate cube divided by 64) multiplied by 1000. If the rate cube is less than 640 then the cube weight would be calculated as the rate cube multiplied by the 'cube to weight' number. For example, cube rating compares the weight of a load to the number of cubes times a given amount, and then will rate at the higher of these two numbers. At some point, it is no longer appropriate to rate by cube but to go back to weight. This is where the 640 Rule comes in.
Rating Tab
The Rating Tab gathers much of its data from the Rates Maintenance program.
*Warning:* Although most of the functions listed in the menus and context menus in the Rating Tab and all its sub-tabs are available for all TruckMate users, the following functions are restricted to users with a CRM license (key 39000).
-
Approve/unapprove a rate sheet attached to a client.
-
Attach/unattach a rate sheet to/from a client.
-
Copy a rate sheet attachment from one client to another.
-
Edit a rate sheet’s notes.
To take full advantage of all CRM functions and features you can purchase the proper license. Contact a TMW Systems representative for detailed information on products and licenses.
Rate Sheets Sub-Tab
The Rate Sheets Sub-Tab is where you can obtain detailed information about rate sheets. You can view proposals, confirmations and history of rating. It has four additional sub-tabs which are all read-only grids except for the 'Confirmations' grid which is editable.
Confirmations Tab
The Confirmations Tab displays all approved Rate Sheets for the selected client. Rate Sheets are attached to clients on the Rate Sheet Tab, in the Attachments section. When a Rate Sheet is attached to a client, it becomes a Proposal, and can be viewed on the Proposals Tab. To convert a Proposed Rate Sheet to a Confirmed Rate Sheet, use the context menu option on the Proposals tab. Only Confirmed Rate Sheets will be used by the automatic rating functions in the Customer Service program and the Quick Bill Entry program.
Working Date
You can set the date by which the Rate Sheets are sorted between the Confirmations tab and the History tab. The History tab displays Rate Sheets that have exceeded their expiry date. By changing the Working Date, you can view current and expired Rate Sheets. Click on the down arrow for a calendar selection form.
Terms
This field allows you to set a Rate Precedence for the selected Rate Sheet for this Client. For more information on Rate Precedence, see the Rate Sheet Tab > Misc Tab.
Double click on any grid row to switch to the Rate Sheet Tab and view the Rate Sheet. If you double-click on a Client that has a 'Rate Group' assigned to them (rather than specific Rate Sheets), you will be taken to the Rate Sheets Tab with the first Rate Sheet in that Group displayed.
Note: You can sort the records in the Confirmations grid by clicking on any column name / title (excluding the 'Description' column, which is a calculated field).
Context Menu
Not Approved
This option sets the currently selected Rate Sheet to un-approved. This will remove the Rate Sheet from the Confirmations tab, and re-display it on the Proposals tab.
Print Confirmation
Selecting this option opens the Report Selection form. The Crystal Report template supplied with the TruckMate system is called 'RATEPRO.RPT'. The report will preview to the screen. Click the printer icon at the top of the screen to send the report to the printer that is configured as the default printer for your workstation.
See the Crystal Reports Reference for more information on report functions.
Copy from another Client
This option allows you to copy an existing rate profile from another customer. Usually this is done to set up a new customer with your standard Rate Sheets.
View Notes
Selecting this option will open a small window that will display any notes that have been entered for this specific Client, in regards to the Rate Sheets that have been approved for use.
Find Confirmation
Selecting this option will open a window that allows the user to search for a confirmed Rate Sheet for the selected Client via a number of criteria (i.e. 'Rate Sheet ID', 'Description', 'Effective Date', 'Expiry Date', etc.).
Proposals Tab
The Proposals Tab displays all Rate Sheets for the selected client that have been 'proposed' - that is, attached but not yet approved. Rate Sheets are attached to clients on the Rate Sheet Tab, in the Attachments section. When a Rate Sheet is attached to a client, it becomes a Proposal, and can be viewed on the Proposals Tab in the Client Info section. To convert a Proposed Rate Sheet to a Confirmed Rate Sheet, use the context menu option on the Proposals tab. Only Confirmed Rate Sheets will be used by the automatic rating functions in the Customer Service program and the Quick Bill Entry program. Double click on any grid row to switch to the Rate Sheet Tab and view the Rate Sheet.
Note: You can sort the records in the Proposals grid by clicking on any column name / title (excluding the 'Description' column, which is a calculated field).
This grid is a read-only grid, if you choose to use the 'Plus' button (Add) from the navigation bar you will be forced to pickup a rate sheet via the editpick tool, however, the editpick tool will only allow you to select sheets that are neither duplicate (already assigned to the given client under any of the 3 rate sheet sub tabs) nor outdated (expired prior to your working date).
Context Menu
Approve
This option is used to approve a Rate Sheet that has been assigned to a Client in the Rate Sheet Tab > Attachments section. This will remove the Rate Sheet from the Proposals Tab, and display it on the Confirmations Tab.
Note: Base Rates do not need to be approved on a per-Client basis, as they are approved globally using the 'Approved' flag on the Rate Sheet Tab > Date Tab.
Print Proposal
Will display the Report Selection form. The Crystal Report template supplied with the TruckMate system is called 'RATEPRO.RPT'. The report will preview to the screen. Click the printer icon at the top of the screen to send the report to the printer that is configured as the default printer for your workstation.
See the Crystal Reports Reference for more information on report functions.
History Tab
The History Tab displays Rate Sheets where the 'Expiry Date' exceeds the 'Working Date'. The Approved column will tell you whether the entry was a Proposal or a Confirmation. If the value in the Approved column is 'True', then the entry was a confirmation. If the value in the Approved column is 'False', it was an unconfirmed proposal, or was 'un-confirmed' on the Confirmations tab. Double click on any grid row to switch to the Rate Sheet Tab and view the Rate Sheet.
Note: You can sort the records in the History grid by clicking on any column name / title (excluding the 'Description' column, which is a calculated field).
All Tab
Sequence
Specifies the order that assigned Rate Sheets will be queried. For example, if two Rate Sheets have been assigned to a Customer in the Rates Maintenance program, when you enter Detail lines in the Customer Service program and the Quick Bill Entry program, the Rate Sheet with the lowest sequence value will be tested first to see if a rate can be determined. If no rate is applicable from that sheet, the sheet with the next highest sequence value will be tested. The sequence can also be configured in the Rates Maintenance program.
Description
Displays the description of the Rate Sheet as entered in the Rates Maintenance program. You cannot change the assigned Rate Sheets here. Rate Sheets can only be assigned to Customers in the Rates Maintenance program.
Effective Date / Expiry Date
Displays the starting and ending Dates of the Rate Sheet as entered in the Rates Maintenance program.
Approved
Displays the 'Approved' value of 'True' or 'False' depending on the Customer.
Discount
Displays the Discount value for the specific Customer.
Client Rating Sub-Tab
The Client Rating Sub-Tab allows you to specify Rate Clients for specific properties of this Client’s Rate Sheets.
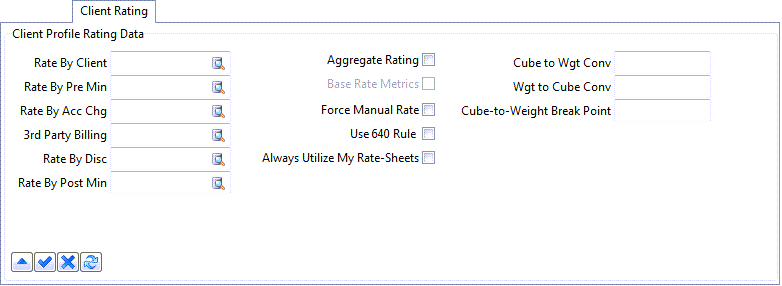
The various 'Rate By' fields on this Tab are optional, and are used to change the Client ID that is used to lookup the rating information. When blank the 'Bill To' code of the Freight Bill is used.
These fields are useful in the case when you have many customers that use the same Rating Profile. When the Rating Profile changes (i.e. in the New Year), you’ll need to change the Profile for each customer. If you created a Client ID just for rating and assigned the rate setup to that Client, you could then assign that Client ID to each of the other Client’s 'Rate By' fields. When changes are required, you change the one Client’s rate setup and all Clients are changed. It is also easier to add new Clients: create the new Client ID and then point to the Rate Client.
% Discount
If this Customer always gets a discount on the calculated rate, enter the percentage of the discount here. This discount will be handled in a reduction in the rate value (as displayed in the Rate field of the Customer Service program, Quick Bill Entry program and Rates Maintenance program). Because the Rate amount is reduced, rather than the Subtotal being discounted, the Discount fields in the above programs do not display the discount amount.
To configure discounts that apply to the subtotal, use the Discounts Tab in the Rates Maintenance program.
Rate by Client
Enter a Client ID, or select the search button to view all the clients entered on your system.
Rate by Pre Min / Rate by Post Min
Enter a Client ID, or select the search button to view all the clients entered on your system.
Rate by Acc Ch
Enter a Client ID, or select the search button to view all the clients entered on your system.
Rate by Disc
Enter a Client ID, or select the search button to view all the clients entered on your system.
Cube to Wgt Conversion
The factor used by auto-rating to convert cube measurements to weight.
Wgt to Cube Conversion
This factor used by auto-rating to convert weight to cube measurements. The default weight-to-cube conversion can be set using the Application Configurator program > PROFILE.EXE > 'Weight To Cube' option.
Always Utilize My Rate-Sheets
If this flag is checked for a client, then any freight bill that the client is associated with (i.e. is the 'Bill-to', 'Shipper', 'Consignee', 'Caller', or 'Other' contact), will have rate-to set to that client (and hence the freight bill will be rated using that client’s rate-sheets).
If more than one client involved on the freight bill has the option checked, then standard precedence logic applies (i.e. if both the shipper and consignee are 'Always Utilize…' clients, then on prepaid bills, the shipper gets priority, and on collect bills, the consignee gets priority).
Aggregate Rating
Check this option if you would like to apply Aggregate Rating to the selected Customer.
Force Manual Rate
Selecting this box requires the User to enter manual rates for this Customer. This will override the automatic calculation. Usually, used only when cube rating is being applied.
Use 640 Rule
Placing a checkmark in this box will cause the following calculations to occur: if the rate cube (cube value in base units) is greater than 640 then the cube weight will be equal to the (rate cube divided by 64) multiplied by 1000. If the rate cube is less than 640 then the cube weight would be calculated as the rate cube multiplied by the 'cube to weight' number. For example, cube rating compares the weight of a load to the number of cubes times a given amount, and then will rate at the higher of these two numbers. At some point, it is no longer appropriate to rate by cube but to go back to weight. This is where the 640 Rule comes in.
Note: This grid is a read-only grid, if you choose to use the 'Plus' button (Add) from the navigation bar you will be forced to pickup a rate sheet via the editpick tool, however, the editpick tool will only allow you to select sheets that are neither duplicate (already assigned to the given client under any of the 3 rate sheet sub tabs) nor outdated (expired prior to your working date).
Aggregate Rating
The Aggregate Rating flag is used to determine if a Freight Bill is rated by aggregate rating or standard rating. This only applies with the 'Aggregate Rating' option in the Application Configurator program > RATES.EXE is set to 'Client'. It is based on the Client who is the 'Bill To' code for the Freight Bill.
Base Rate Metrics
Not available
Force Manual Rate
Selecting this box requires the User to enter manual rates for this Customer. This will override the automatic calculation. Usually, used only when cube rating is being applied.
Use 640 Rule
Placing a checkmark in this box will cause the following calculations to occur: if the rate cube (cube value in base units) is greater than 640 then the cube weight will be equal to the (rate cube divided by 64) multiplied by 1000. If the rate cube is less than 640 then the cube weight would be calculated as the rate cube multiplied by the 'cube to weight' number. For example, cube rating compares the weight of a load to the number of cubes times a given amount, and then will rate at the higher of these two numbers. At some point, it is no longer appropriate to rate by cube but to go back to weight. This is where the 640 Rule comes in.
Note: This grid is a read-only grid, if you choose to use the 'Plus' button (Add) from the navigation bar you will be forced to pickup a rate sheet via the editpick tool, however, the editpick tool will only allow you to select sheets that are neither duplicate (already assigned to the given client under any of the 3 rate sheet sub tabs) nor outdated (expired prior to your working date).
Always Utilize My Rate Sheets
If this flag is checked for a client, then any freight bill that the client is associated with (i.e. is the 'Bill-to', 'Shipper', 'Consignee', 'Caller', or 'Other' contact), will have rate-to set to that client (and hence the freight bill will be rated using that client’s rate-sheets).
If more than one client involved on the freight bill has the option checked, then standard precedence logic applies (i.e. if both the shipper and consignee are 'Always Utilize…' clients, then on prepaid bills, the shipper gets priority, and on collect bills, the consignee gets priority).
Cube to Wgt Conv
The factor used by auto-rating to convert cube measurements to weight.
Wgt to Cube Conv
This factor used by auto-rating to convert weight to cube measurements. The default weight-to-cube conversion can be set using the Application Configurator program > PROFILE.EXE > 'Weight To Cube' option.
Cube-To-Weight Break Point
Note: Users have the ability to enable Rating by Client Groups (and Metrics) via the Application Configurator program > RATES.EXE > 'Rate-By Metric/Client' option. If this option is set to 'True', The title of the 'Client Rating' Sub-Tab changes to 'Profile Data' and the majority of the 'Rate By' fields on the Sub-Tab will be disabled, and the Rating will be determined by the new Client / Metric Tabs in the Rates Maintenance program > Client Tab.
Extra Charges Sub-Tab
The Extra Charges Sub-Tab is used to configure Accessorial Charges (configured in the Codes Maintenance program) for individual customers. Accessorial Charges are added to Freight Bills in the Customer Service program and the Quick Bill Entry program.
Filter By Status
Select one of the radio options to Filter the displayed Accessorial Charge records. Choose one of the following:
-
All*: shows both Assigned and Unassigned Accessorials.
-
Assigned:* will only show Assigned Accessorials.
-
Unassigned:* will only show Unassigned Accessorials.
Filter On Auto Code
Enter some text in this field and select your <Enter> key to filter the Auto Code records based on the text you have entered (as well as the 'Filter By Status' radio option selected). Select the 'Clear Filter Value' button to the right of this field to remove any applied Auto Code filter.
Code Setup
This button allows you to view the code in Codes Maintenance program.
Substitution Grid
All Accessorial Charges created in the Codes Maintenance program > Accessorial Charges Tab, except those codes that were flagged as 'Custom Code Only', are shown here on this grid. The grid is read-only except for the 'Auto-Assign' and 'Substitution Code' columns that may be changed via either double-click (on the particular cell) or right-mouse-click (anywhere on the row). You may switch to codes maintenance (and go to the current base accessorial code) by either right-mouse-click or by clicking the button above the grid.
Auto Assigned
A value of 'False' indicates that this accessorial was not automatically assigned as opposed to a value of 'True' which means the charge was in fact automatically assigned. This field can be updated from this grid to indicate that the charge was changed (wasn’t auto assigned).
Base Code
This field shows the original code of the accessorial charge when it was originally assigned.
Base Code Description
This field shows the original description of the accessorial charge when it was originally assigned.
Substitution Code
You can setup substitutions for your Auto-Code Accessorial Charges. That is, every time the original code is manually assigned (or assigned automatically if it is an 'Auto Assign by Default' Code Type), the code specified in this field 'Substitution Code' will be used instead. Only 'Custom Code Only' type codes are available for substitution, and they must be of the same Charge Behavior as the original code. The 'Custom Code Only' and 'Auto-Assign by Default' parameters, as well as the 'Charge Behavior', are configured in the Codes Maintenance program > Accessorial Charges Tab.
If you Disallow a code for a specific customer, it will not be automatically assigned (in the case of Auto Assign by Default type codes) and will not be available for selection when manually entering Accessorial Charges in the Customer Service program and the Quick Bill Entry program.
Note: The Substitution column will have red font if set to 'Disallowed' (when substituted to blank).
Substitution Description
This is the description of the charge you want to substitute the original charge with, once you enter a code in the 'Substitution Code' field this field will change accordingly.
Auto-Assign Over Ridden
This field shows whether a substitution has been used for this charge of not ('True' / 'False'), a red font will be used if the value of this field is 'True' to give a better alert to users that the original charge has actually been changed.
Quotes Sub-Tab
Quotes created in the Customer Service program and on the Simulation Tab of the Rates Maintenance program will be displayed on the Quotes Sub-Tab. Each of the quotes shown is also a 'quote bill' in the Customer Service program, with a bill number prefix of 'Q'.
All of the fields on this Tab are of a read-only nature. All changes to Quote information are accomplished in the Customer Service program.
Filter
You can reduce the number of quotes displayed in the grid by applying a filter on one of: Quote Number, Shipper, Consignee, or Commodity. Click on the column header for one of these four options and then enter a valid value for that field in the Filter box.
Context Menu
View Quote
This option opens the Customer Service program (if not already opened) and display the selected quote.
Print Quote
Will display the Report Selection form. The Crystal Report template supplied with the TruckMate system is called 'QUOTE.RPT'. The report will preview to the screen. Click the printer icon at the top of the screen to send the report to the printer that is configured as the default printer for your workstation.
See the Crystal Reports Reference for more information on report functions.
Discounts / Minimums Sub-Tab
In the Customer & Vendor Profiles program, you can set a blanket discount for all rates calculated for the selected customer. This results in a reduction of the rate displayed in the 'Rate' field on the Details tab of the Customer Service program and the Quick Bill Entry program.
However, in some cases (especially with tariff-based rating) you may need to configure discounts according to specific criteria. This can be done on the Discounts / Minimums Sub-Tab. When a discount configured on this Tab is applied to an item on the Details Tab in the Customer Service or Quick Bill Entry program, the Rate field will display the original rate (from the Rate Sheet Tab), and the Discount field will display the calculated discount amount configured on this Tab.
Filtering Options
Using the 'Min Pre Disc', 'Intra State', 'Hide Expired' and 'By Date' fields, you can filter the Discounts/Minimums Rate Sheets that appear on this Tab. Simply flag the option you wish to Filter by (and in the case of the Date value, supply a specific date).
Description
Enter a free format description for this discount. This is for reporting and references purposes only, and is not used elsewhere in the system.
Start Date
Enter the date when this discount becomes applicable. The date will default to today’s date.
Expiry Date
Enter the date when this discount expires. The date will default to december 31st of the current year.
Sequence
If multiple discounts can apply to the same customer depending on the circumstances of the order, enter a numerical value that represents the order in which the discount should be tested ('1' first, '2' second, etc.) the first entry (according to the sequence value) that returns a discount will be used.
Rate Sheet ID
If this discount only applies to a specific Rate Sheet, enter the id number of the sheet in this field. Double click for a selection form.
Start Zone
If this discount only applies between specific Zones (as configured in the Codes Maintenance program), enter the start Zone in this field. Double click for a selection form.
End Zone
If this discount only applies between specific Zones (as configured in the Codes Maintenance program), enter the end Zone in this field. Double click for a selection form.
Between Zones
If this discount applies when the start and end Zones are reversed (ie, when the Freight Bill’s start Zone is the same as the discount’s end Zone, and the end Zone the same as the start Zone), enter 'true' in this field. If the discount only applies when the start and end Zones match, enter 'false'.
Note: The way the program looks for the Zones, when they are between Zones, is to ask if the start and end Zones are valid (because they are between Zones - True, there is no real start or end, just one end and the other end).
In an example situation MN to MT, the valid combinations could be MN and MT, MT and MN, MN and MN, MT and MT. The program goes through these in the order of the sequence field. (When you are in the Discounts/Minimums tab, and they are not in sequence order, refresh and they will be). What you should want, is for the program to look at the MN and MT (or MT and MN) combination first, because they will only hold true if both Zones are present. In the MN and MN and MT and MT combinations, as long as each of the Zones is either MN or MT, the program will use that rate. So, if you would move all your same state combinations to the very end of the list, then the only time they would be used is if none of the earlier combinations were met and they were in fact intrastate moves.
Min Weight
If this rate only applies when the weight on the Freight Bill’s detail line is greater than a certain value, enter the value in this field.
Max Weight
If this rate only applies when the weight on the Freight Bill’s detail line is less than a certain value, enter the value in this field.
Commodity
If this rate only applies when a specific Commodity Code (as configured in the Codes Maintenance program) has been entered on the Freight Bill’s detail line, enter the Commodity Code in this field. Double click for a selection form.
Lane ID
If this discount only applies when the Freight Bill’s end Zone is included in a specified lane (as configured in the CrossDock Traffic Lanes program), enter the lane number in this field. Double click for a selection form.
Discount
Enter the amount of the discount in this field. This value is stored in a percentage format; for example, for a 2.5% discount, enter '2.5'. This value will be displayed in the discount rate field on the detail line. This value is multiplied against the amount in the subtotal field to determine the amount of the discount, which is displayed in the discount field on the detail line.
Minimum Charge
If the total charges on a detail line should not be less than a certain value, enter that value in this field. If this minimum charge is calculated, the value in the subtotal field (which would otherwise be the rate multiplied by the number of rating units) will display this minimum charge. The discount rate and discount fields will be zero.
Rate ID Name
If you selected a value in the 'Rate Sheet ID' field, the Rate Sheet’s description (as configured on the Rate Sheets Tab) will display in this field.
Lane ID Name
If you selected a value in the lane id field, the lane id’s description (as configured in the CrossDock Traffic Lanes program) will display in this field.
Maximum Charge
If the total charges on a detail line should not be more than a certain value, enter that value in this field. If this Maximum charge is calculated, the value in the subtotal field (which would otherwise be the rate multiplied by the number of rating units) will display this Maximum charge. The 'Discount Rate' and 'Discount' fields will be zero.
Flat Rate
Enter a Flat Rate charge for this detail line.
Base Rates Only
Default value is set at false. To change to 'true', double-click in the column, and type in 'true'. If the value in this field is 'true', then the discount will only apply to the Rate Sheet if the Rate Sheet is marked as 'Base Rate'.
Shipper
Double click to select the Shipper’s Customer Code.
Consignee
Double click to select a Customer Code for the Consignee.
Requested Equipment
Enter any Equipment you would like to Request in the space provided.
Temp Controlled / Dangerous Goods
Double click to set these fields to 'True' or 'False', depending on the nature of the Discount being applied.
Intra State
If this Discount applies only within a certain State, double click this field to set it’s value to 'True'.
Min Pre Disc
This field is a 'True'/'False' field, and determines when the discount percentage is applied to the calculation of Freight Bill charges when they exceed a Client’s 'Min' or 'Max' charges.
Note: In order to set this field to 'True', the user may have to toggle the Application Configurator program > RATES.EXE > 'Use Pre Disc Min' option to 'True'.
With Minimums…
= True
-
If the item’s 'Total Cost' from the Rate sheet (no discount % applied yet) is greater than Discount’s 'Minimum charge', then the Discount % from the Discount record will be applied to the item’s Total Cost (even if the 'Total cost' * 'Discount %' calculates to LESS than the 'Minimum Charge' requirement).
For example: Discount record’s % equals '10%' and 'Minimum Charge' = '$2300'. Rate a Detail line (2500 LB @ $1.00 LB): $2500 is greater than $2300, so 10% discount is applied. Yet after applying the 10% discount to $2500, the Freight Bill is at $2250 (and not $2300).
-
If the Item’s 'Total Cost' is less than the 'Minimum Charge' (no discounts applied at this point), the 'Minimum Charge' will be applied to the Freight Bill (i.e. if FB equals $2200 and 'Minimum' is still $2300). In this case a $2300 charge is applied, and the Discount is applied to the $2300 charge (i.e. FB 'Total Cost' is $2300 minus 10%).
= False
-
The item’s 'Total Cost' * 'Discount' will be used in the Customer Service program (and Rates Maintenance > Simulation Tab) if it exceeds the Discount record’s 'Minimum Charge' value. If not, Customer Service detail line will default to the 'Minimum' charge (i.e. if 'Cost' * 'Discount' ⇐ 'Minimum Charge' value).
For example: Discount record’s % equals '10%' and 'Minimum Charge' = '$2300'. Rate a Detail line (2500 LB @ $1.00 LB), then get the Discount % of 10% and apply it: dollar amount is now '$2250'. Compare '$2250' with the 'Minimum Charge' of '$2300'. The Freight Bill’s overall charge (on per line item basis) doesn’t exceed the 'Minimum Charge' of '$2300', so the Freight Bill is now charged at the minimum '$2300' dollars.
With Maximums…
= True
-
If the 'Maximum Charge' is '$2499' and the Freight Bill charges equal '$2500' (with no discount applied), then the Freight Bill defaults to '$2499' and a Discount is applied.
= False
-
If the Freight Bills 'Cost' * 'Discount' < 'Maximum Charge' value, then use the FB’s 'Cost' * 'Discount'. If it is greater than the 'Maximum Charge' value, then only the Maximum value will be applied (no further discounts will be added).
Distance Min / Distance Max
Enter the Minimum and Maximum Distance values for this detail line by typing an integer value into the spaces provided.
Service Level
If you wish to apply Discounts based on a specific Service Level Code, double click this field to select a Service Level Code for the detail line.
Start Zip Min / Start Zip Max
These fields allow you to calculate discounts for your Clients using by Zip Codes. Use the 'Start Zip Min' and 'Start Zip Max' fields to configure a Zip code range. If a Freight Bill for an applicable Client contains a starting Zip code that falls within this range, the program logic will then use the Rate Sheet associated with the Client / Zip range when calculating Discounts and/or Minimum Charges.
End Zip Min / End Zip Min
These fields allow you to calculate discounts for your Clients using by Zip Codes. Use the 'End Zip Min' and 'End Zip Max' fields to configure a Zip code range. If a Freight Bill for an applicable Client terminates at a Zip code that falls within this range, the program logic will then use the Rate Sheet associated with the Client / Zip range when calculating Discounts and/or Minimum Charges.
Zip Allow Between
This option functions similarly to the 'Between Zones' option described above, but supplements Zip codes in the logic, instead of Zone codes.
Rate Type
This field allows determines the rating precedence of the selected Rate Sheet for this Client, used when working with Freight Bills of 'Prepaid' or 'Collect' type. For more information on this new feature, see the Rate Sheet Tab > Misc Tab > Rate Precedence section.
Currency
This field controls which minimum charge currency code will be used. This field will default to be base rate.
Use Minimum Charge Currency
When set to 'True', the value supplied in the 'Currency' field will be used. Default is set at 'False'. When MINCHARGE_CURRENCY_CODE is false, the minimum charge for multiple currency will be calculated as before which assumes that minimums are provided in system’s base currency. If it’s true, if the currency code does not match, then the minimum charge will not be applied at all.
Is Tariff Mincharge Discount Only
When this field is set to 'True', it will be used only as the discount for tariff minimum charge. To make it effective, the sequence no of this discount should be less than general discount. Default is set to 'False'.
Terms
This field allows you to set a Rate Precedence for the selected Rate Sheet for this Client. For more information on Rate Precedence, see the Rate Sheet Tab > Misc Tab.
Start Rate Base / End Rate Base / Rate Base Allow Between
These three columns work just like the 'Start Zone', 'End Zone' and 'Between Zones' columns (see above) except that they get their information from the RATE_BASE Table rather than the TruckMate Zone Tree. These fields effect Client Discounts and Min charges. Use the Rate Base Number Maintenance program to setup the Zones when testing.
Rate Mode
This column displays the selected Rate Mode, and works both with and without multi point rating.
Tariff Class Sub-Tab
The Tariff Class Sub-Tab is only applicable to sites using the CzarLite Tariff Rating system. When you import the CzarLite Tariff tables, Commodity Classes are created (in the Codes Maintenance program) to describe each tariff level. These commodity classes must be associated with Commodity Codes. Then, when a user creates a Freight Bill in the Customer Service program OR the Quick Bill Entry program, the Commodity Code associates the detail line with a given rating table. However, on the Tariff Class tab, you can configure table 'equivalencies'. Enter the 'base' tariff class in the Tariff Class field, and the tariff table by which you wish to rate in the Rate Class field.
When a user creates a Freight Bill for a customer, the tariff class that is associated with the detail line’s Commodity Code will be checked against entries on this tab. If an entry is found for the tariff class, the rate will be calculated based on the tariff contained in the Rate Class field.
Tariff Class
Double click to view Commodity Codes available and select the one of your choice.
Rate Class
Double click to view the Rate Class IDs available and select the one of your choice.
Tariff Class To
This field allows Tariff Ranges to be specified. The range is inclusive, so a 100-200 range includes 100 and 200. To determine if a Tariff is within range, the program will:
-
Compare the Tariff values.
-
If values are 0 or null, try to convert tariff code to numeric and compare.
-
If Tariff code is not numeric, compare code as a string.
Codes are first converted to numeric values in step 2 so that '100' is not considered smaller than '20', as it would be if they were just compared as strings.
Note: The 'All Greater' field (below) takes precedence (i.e., if it is set, the 'Tariff Class To' field has no effect).
From Zone / To Zone
Double click to select a Zone Code for these two fields.
Between Zones
If this Tariff applies when the Start and End Zones are reversed (ie, when the Freight Bill’s start Zone is the same as the Tariff’s End Zone, and the End Zone the same as the Start Zone), enter 'True' in this field. If the Tariff only applies when the Start and End Zones match, enter 'False'.
Rate Mode
Double click to select a rate mode for multi point rating.
Sequence
If multiple Tariffs can apply to the same customer depending on the circumstances of the order, enter a numerical value that represents the order in which the Tariff should be tested ('1' first, '2' second, etc.) the first entry (according to the sequence value) that returns a Tariff will be used.
Intra State
If this Tariff applies only within a certain State, double click this field to set it’s value to 'True'.
All Greater
Double click this field to select a Rate Class. The Rate Class selected here will be used to determine the Range of Rate Classes that will be applied with the same Rate as the one chosen in the 'Rate Class' field of this Grid.
Example: if the 'Rate Class' value is '200' and the User enters '200' in the 'All Greater' field, all Tariff Based Rating for the chosen Commodity is given a manual Rate Class of over '200_'_ will be given the Rate Class value of '200'.
Terms
The 'Terms' field influences which Tariff Classes will be used based on the Freight Bill’s Rating Terms. The sequencing is affected by rating terms in the same way as Freight Bill discount sequencing. For more information on Rate Precedence, see the Rate Sheet Tab > Misc Tab.
Commodity Code
This is an optional field, if a commodity code is entered for this field, this row will only be used based on an exact 'Commodity Code' match.
Note: You can set the values designated on the Tariff Class Tab to apply to any Rate Sheet flagged as a 'Commodity Class Enabled' Rate Sheet by using an Application Configurator option. See the Application Configurator program > RATES.EXE > 'TruckMate Tariff Class' option for more details.
Detention Sub-Tab
The Detention Sub-Tab allows you to view any Detention Rate Sheets that have been applied to the selected Client. Detention Rate Sheets are created in the main Detention Tab of the Rates Maintenance program.
Detention Sheet ID
Displays the Detention Rate Sheet ID Code.
Calc Order
The Calc Order sets the order in which the Detention Rate is used (specific to the Client). If your Client has multiple Detention rates, you will want to change the 'Calc Order' for each of them (this functionality is also available from the Detention Tab > Client Window).
Note: Detention Rating is determined in the following manner: the Client Information > Detention Tab is checked to see if there are existing Detention Rates attached to the Client. If so, they will be used, depending on their 'Calc Order' value. If not, the logic will check the 'Calculation Seq' field on the Detention Tab in order to determine which Base Rate should be applied.
Approved
Displays 'True' or 'False', depending on the 'Approved' Status of the Detention Rate Sheet.
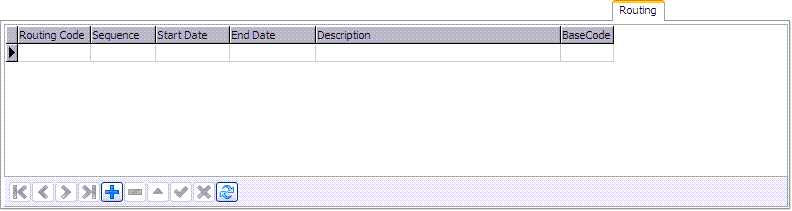
Routing Sub-Tab
The Routing Sub-Tab allows users to select routing codes in order to pair them with a specific client.
Competitor Info Sub-Tab
The Competitor Info Sub-tab allows various staff (e.g. sales reps) to gather info that may be helpful to staff setting rates for a given client. In this grid 'Competitor' is a required field and must already exist as a vendor of type ('I' or 'M') in Vendor Profiles.
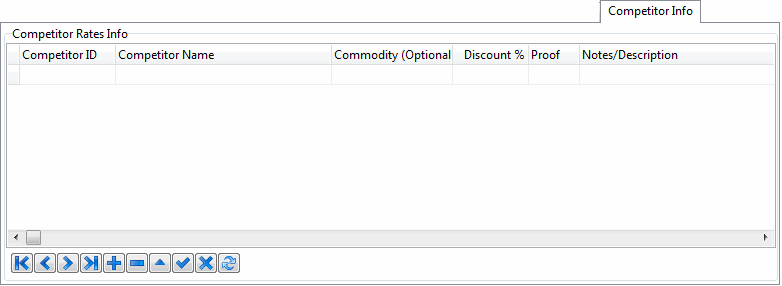
Note: The Competitor Info Sub-Tab in TruckMate is part of the CRM (Customer Relationship Management) and thus requires the CRM license (Key 39000). For details on TMW Systems Products and Licenses please contact a TMW Systems representative. To avoid error messages related to unavailability of license every time the application is started, have the 'Competitor Info Sub-Tab' in Security Setup > Security > Tab Settings unchecked.
Repairs & Maintenance Tab
The R&M Tab controls some additional Repairs and Maintenance options for the selected Customer.
Is R&M Client
Place a checkmark in this box will cause this Customer information to appear in the Customer Code list in the R&M Work Orders program if the Customer type is set at Customer.
Parts Markup
Rates are usually set up in the R&M Configuration program but if specific Customers have different rates, they can be manually added here.
Labor Markup
Rates are usually set up in the R&M Configuration program > Mechanic Tab, but if specific Customers have different rates, they can be manually added here.
Tax 1 Exempt / Tax 2 Exempt
Tax exemptions are usually set up in the R&M Configuration program > Miscellaneous Tab, but if specific Customers have different exemptions, they can be manually added here.
Parts Markup Category / Labor Markup Category
Use the Database Search button to select a Parts or Labor Markup Category to attach to the selected Client, which will then be used when this Client is selected as the 'Customer' on a R&M Work Order and either Parts or Labor are added.
Markup Categories are created on the R&M Configuration program > Markup Matrix Tab.
Notes:
-
. If, for a given customer, the Parts Markup Category field is left blank, then when creating a new R&M Work Order program record for this customer, the system will use the default parts markup rates defined inside the R&M Configuration program > Misc Tab. The same process will be used if the labour markup category field was left blank.
-
. Prior to running any recommended patches or upgrading your R&M information, update all R&M registers.
Reps/Agents Tab
Note: If an administrator has removed your security rights to edit the client reps/agents grid, you will get an error when you try to edit, delete, or insert.
The Reps/Agents tab is for recording and keeping track of Client representatives and Agents.
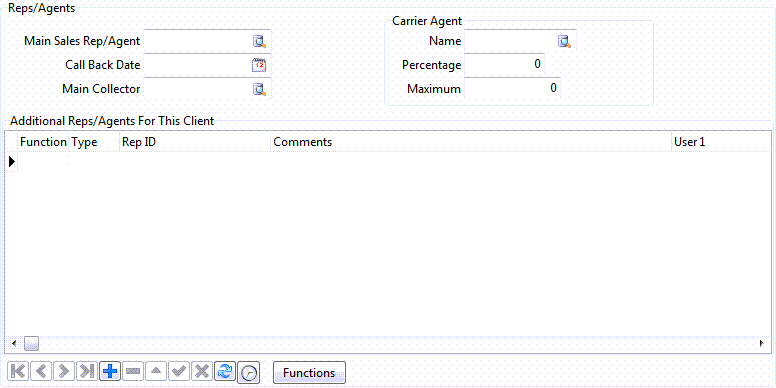
The header section of this window is to record information about the main representative or agent for the selected client
Main Sales Rep/Agent
Select the main Sales Rep/Agent to deal with the selected customer. Use the edit pick to display all available users in the system, use the filter to pinpoint your desired selection.
Call Back Date
Use the calendar button to select the date of the next call back for the selected customer. This could be useful for both potential customers you want to convert them to customers and you want to keep the communication channels opened and at an acceptable pace, or for existing customer you want to keep them well informed and show them customer care. In addition it could be for reminding the customer of outstanding payments.
Main Collector'
If you want to assign a main collector who is different from the main sales agent, select a user using the edit pick to be the main collector for the selected user.
Carrier Agent
This section allows the user to select an agent if the agent is a carrier.
Name
Use the edit pick to select the desired carrier as an agent for the selected client. You use the filter to pinpoint your desired carrier.
Percentage
Enter a numeric value that represents the percentage that the carrier agent will charge when you provide services to the selected customer.
Maximum
Enter a dollar figure value that represents the maximum amount that this carrier agent can charge you on services you conduct to the selected client. If the percentage on one transaction with the selected customer exceeds the maximum value, only the maximum value will be incurred by the carrier agent.
Additional Reps/Agents For This Client
This section is only available for TruckMate systems with TruckMate CRM license. This section allows the user to define additional representatives/agents for the selected customer. A customer might have more than one representative or agent of different roles or even the same role.
Function
Double clicking this field will allow the user to select the function the additional agent will play dealing with the selected customer. The user can define additional functions and update existing functions using the 'Functions' button described later in this section.
Type
Double click this field to select the type of the additional rep/agent. A window will popup with filtering features. Select the desired type from the list of available types. Available values include: Driver, Employee, User Group, Sales Rep (User or Vendor), User and Vendor (Type A).
Rep ID
This is the ID of the rep/agent, whether it’s a user or a vendor.
Comments
Enter any comments you wish to associate with this additional Rep/Agent.
User1,…, User3
Those are user defined fields that can be utilized for any information storage purposes.
Functions
Selecting this button opens the 'Function Edit' window. The user can add, edit or delete functions according to business needs. The functions edited using this button become available for selection when entering the 'Function' field described earlier. Double clicking the function field (as described earlier), will bring up the latest list of available functions.
Service Calendar Tab
The Service Calendar Tab is used to determine the Weekends and Holidays for your Vendor.
Weekends
Choose the days that will constitute the 'Weekends' for your Vendor Company.
Holidays
Click the '+' button to insert a detail line and double click within the 'Holiday Date' field to select a Holiday Date from a Calendar menu. Enter a name in the 'Holiday Details' field manually in the space provided, and the 'Day of Week' field will automatically populate based on the 'Date' field.
Exclude Closed Days in Detention
If this flag is enabled, Trailer Detention calculations will not include Closed days and Holiday as Detention days.
Exclude Closed Days in Free Time
If this flag is enabled, Trailer Detention calculations will not include Closed days and Holiday as 'Free' days.
Ship-To (Consignee) By Site Tab
The Ship To Tab controls the selected client’s default Consignee when working in particular Sites in Customer Service.
Site
Double click this field to select a Ship To Site.
Consignee
Double click this field to select a Client code that will be defaulted as the Consignee when the user is working in the specified Site.
Sequence
Enter a numerical Sequence value. The Sequence value specifies the order that this Consignee will appear on the window accessed by the <F11> key in Customer Service when the user is searching for a Consignee.
Shipping Instructions Tab
The Shipping Instructions Tab allows you to configure default Shipping Instruction information for the selected Client.
This Tab is used to create default Shipping Instructions for the selected Customer, and can be tied to whether the customer is a Shipper or Consignee (receiver) of Freight. Whenever this Customer is used in a Freight Bill, the chosen Shipping Instructions for the selected customer will populate in the Customer Service program. The instructions can be chosen by selecting the checkbox adjacent to each individual instruction option. The instruction options can be defined and edited in Codes Maintenance program > Shipping Instructions tab.
Sub-Accounts Tab
The Sub-Accounts Tab lets you link several clients together. You add/delete a sub-account only from the main account. A client may only be added to one main account. On an add, you are forced to pick a sub-account client ID. Once added, you cannot edit the sub-account field - you can only delete the row (this does not actually delete the client - it just deletes the linkage between the sub-account and the main account). You can allow or disallow a user from deleting rows from the Sub Accounts grid via the 'a security setup option.
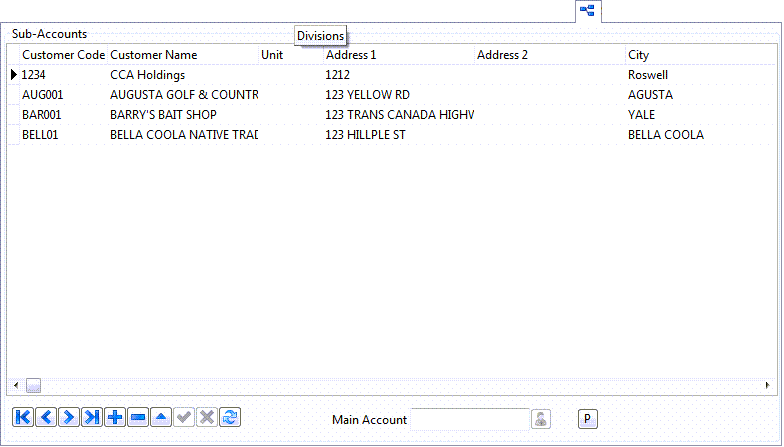
From this tab you can add sub-accounts to the selected customer. Once added, there are read-only fields displaying the sub-account’s address fields. The idea is that you may need to add many chain store locations (needed for use as shippers or consignees) under a single head office or "main account" client ID. Usually, all the sub-accounts need the same billing and rating codes - this allows you to quickly set them in one place.
Deleting a sub-account (not actually deleting the client, but deleting the linkage to the main account) may be disabled for certain users via Security Setup program. Similarly, quick client creation (via the "P" button) may be disabled for certain users via Security Setup program. In addition, the entire new tab may be hidden from certain users via Security Setup.
All the fields on this grid are read-only except two fields:
3ed Party Billing
This field allows you to select a 3ed party to be billed other than the selected client when a service is provided to the client. Double click the field to select the client to be billed.
Rate by Client
This field allows you to rate the selected client based on another client’s rating rules. Double click the field to select a client.
Traffic Description Tab
The Traffic Description Tab is informational only, and is meant for sales representatives to communicate information about prospects and new clients to other people in the company.
*Warning:* The Traffic Description Tab in TruckMate is part of the CRM (Customer Relationship Management) and thus requires the CRM license (Key 39000). For details on TMW Systems Products and Licenses please contact a TMW Systems representative. To avoid error messages related to unavailability of license every time the application is started, either purchase the required license and take full advantage of all the CRM features or, If you don’t wish to purchase the license, have the 'Traffic Description Tab' in Security Setup > Security > Tab Settings unchecked.
Outbound Collect %
Enter the percent of the clients outbound orders that were collected.
3rd Party Billing %
Enter the percentage of the clients orders that were billed to a third party.
Note: There is no validation check on those two fields, they don’t need to add up to 100%.
Detailed Percentage Breakdown
You can optionally enter a detailed breakdown on either commodity / weight percentages and / or lane percentages using the relevant tab.
Note: If you decide to enter values for either breakdown, you have to enter values that total to 100%, a validity check is in place for that purpose, however, the system will only throw a warning, you can still save what you entered.
User-Defined Fields Tab
The User-Defined Fields Tab allows you to enter data into any one of the 10 User-Defined fields available to the Customer & Vendor Profiles program. The labels of these fields can be changed using the 'User Field 1 - User Field 10' options from the Application Configurator program > PROFILE.EXE section. You may use the <Ctrl><U> hot key combination to access this Tab.