Carrier Information Window

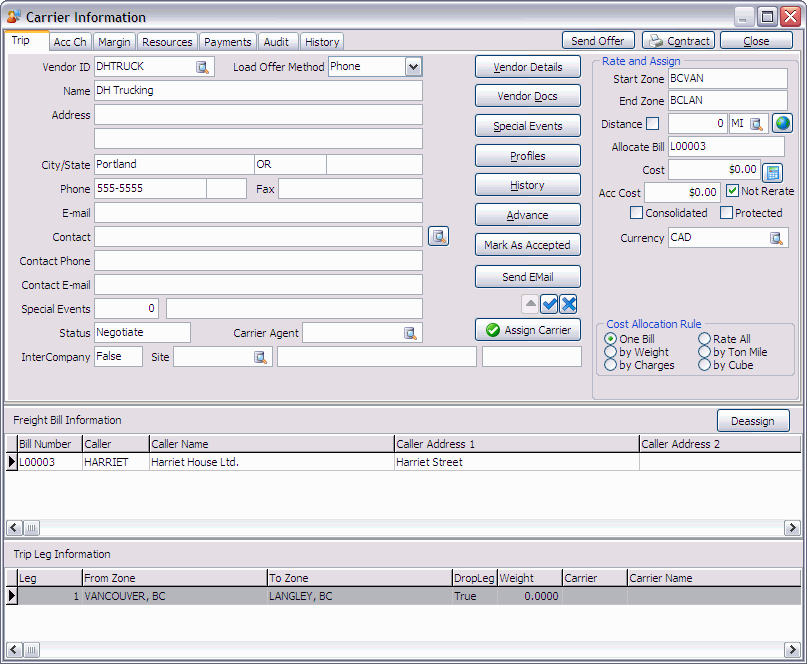
The Carrier Information window is used to quickly attach an Interliner Carrier to a Trip displayed in the Trips List. To access the Carrier Information window you must choose the 'Carrier' Context Menu option from the Trips List. The Carrier Information window is divided into four sections: the Toolbar, Header section, Freight Bill Information Grid and Trip Leg Information Grid.
The Dispatch program will check for several conditions before a Carrier is added to a Trip (check for Insurance, etc.). These conditions are controlled by three options in the Application Configurator program > DISPATCH.EXE section ('Carrier-Cargo', 'Carrier-Liability' and 'Carrier-WorkComp'). You can add a Carrier to a Trip that does not have a Freight Bill present on the Trip.
If you have Carrier411 information setup for your Carriers in the Carrier411 Information program, and have the appropriate configuration options set in the Application Configurator program > CARRIER411.WINSERVICE.EXE section, certain Carriers may be disallowed from assignment based on their safety ratings. However, if there is a business need to exempt some users from this constraint, and allow them to assign carriers even if they exceed the safety thresholds, their security setup must be set for that. This can be done through tow options, Security Setup > Security > Business Events > Allow Changes > Dispatch - Allow Carrier Assignment when Safety Rating Red Limit Exceeded/Allow Carrier Assignment when Safety Rating Yellow Limit Exceeded.
| For information on how to use this window to Assign a Carrier to the selected Trip, see the Carrier Tab. |
Access to the Carrier Information screen is based on the availability of the #46000 License. If you do not have this license, you must obtain a copy of a new License file and enter it into the License Key Entry program.
Toolbar
Send 204 to Vendor
Select this checkbox to send an EDI 204 message to the Carrier.
Send Offer
Selecting this button will open the Send Email/Fax window, where you can send a variety of Crystal Reports and other information regarding the shipment to the Carrier. This window allows the user to generate Pickup/Delivery instructions (i.e. tender) for the request/order and to send these details to the Carrier via email.
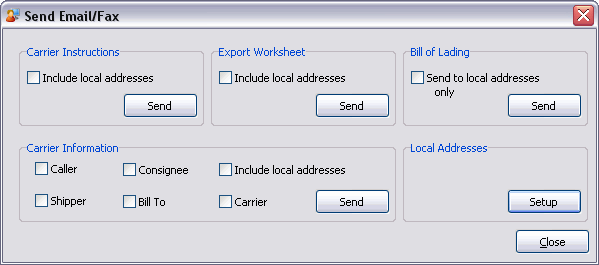
This window allows you to send a variety of details to the Carrier selected in the 'Vendor ID' field of the Carrier Assignment window, as well as to specific local email addresses, as configured using the 'Setup' button (see below in the 'Local Addresses' section).
Depending on which 'Send' button you select, various Crystal Reports will be sent to the Carrier (and local email addresses). The Carrier’s default email (as configured in the Customer & Vendor Profiles program > Vendor Tab) will be used when sending information. See the below sections for more information on the documents that are sent.
|
If you receive an Error message when you select the 'Send' button, you must change the 'CI Carrier Notify' option in the Application Configurator program > DISPATCH.EXE section. If this option is set to 'None', you will get the Error message. If set to 'Email' or 'Fax' you will be able to use the 'Send' button to send the Carrier information in Email or Fax form. The authentication for the 'Username' and 'Password' that is used to send the e-mail offers is based on that entered into the Customer Service program > Freight Bill Confirmation window. |
| Carrier Instructions The 'Carrier Instructions' section is used to send the Interline Payables Contract instructions to the Carrier. | |
|---|---|
Include Local Addresses |
Select this checkbox option if you would like to send a copy of the report to the email address(es) configured in the Local Addresses Setup window. |
Send |
Selecting this button will open the standard Crystal Report selection window common to many TruckMate applications, where you will choose the custom report designed for this task. After you select the Report, it will be generated and emailed to the Carrier (as well as the local email addresses, if the above flag is selected). For more information on report functions in TruckMate see the Crystal Reports Reference. |
Export Worksheet |
|
Include Local Addresses |
Select this checkbox option if you would like to send a copy of the report to the email address(es) configured in the Local Addresses Setup window. |
Send |
Selecting this button will open the standard Crystal Report selection window common to many TruckMate applications, where you will choose the report designed for this task. For more information on report functions in TruckMate see the Crystal Reports Reference. |
Bill of Lading The 'Bill of Lading' section is used to send a Bill of Lading document to the Carrier or to your local email addresses (not both). The Bill of lading function depends on the presences of a Bill of Lading template file in .PDF form, whose filename is specified by the Application Configurator program > DISPATCH.EXE > 'CI PDF Template' option. The 'Shipper' Client attached to the Trip must have a default email address configured in the Customer & Vendor Profiles program as well. Note: The user needs to configure all of the various 'CI…' Application Configurator program options that are relevant to the Bill of Lading email in order for this function to work. |
|
Send to Local Addresses Only |
Select this option if you would like to send a copy of the report to the email address(es) configured in the Local Addresses Setup window, and NOT to the Carrier selected in the 'Vendor ID' field of the Carrier Assignment window. |
Send |
Selecting this button will generate the Bill of Lading email based on the various 'CI…' options in the Application Configurator program > DISPATCH.EXE section, and will send it to the default email address of the 'Shipper' on the Freight Bill. |
Carrier Information The 'Carrier Information' section is used to notify the various parties involved in a shipment the details of the Carrier that will be completing the Pickup and Delivery. The information found in this Report is gathered from the Customer & Vendor Profiles program > Vendor Tab for the Carrier selected in the 'Vendor ID' field of the main Carrier Assignment window. |
|
Caller / Shipper / Consignee / Bill To / Carrier |
These options control which of the Freight Bill parties will receive the email outlining the Carrier information. You may select any combination of these options. The 'Caller', 'Shipper', 'Consignee' and 'Bill To' will receive details pertaining only to their order, while the 'Carrier' will receive all details pertaining to the Load, which may include several orders. The email addresses of the various Clients will be pulled from their unique setup in the Customer & Vendor Profiles program > Customer Tab. Only one email address is used per Client. Note: Unlike the other sections on this window, you must select the 'Carrier' flag if you want the Carrier to be copied on these details (all other sections have the Carrier defaulted when you select the 'Send' button). |
Include Local Addresses |
Select this checkbox option if you would like to send a copy of the report to the email address(es) configured in the Local Addresses Setup window. |
Send |
Selecting this button will open the standard Crystal Report selection window common to many TruckMate applications, where you will choose the report designed for this task. For more information on report functions in TruckMate see the Crystal Reports Reference. |
Local Addresses |
Clicking the 'Setup' button will open the Local Email Address Setup window (described below). |
Contract |
Selecting this option opens the standard Report Selection window common to most TruckMate applications, where you may select a Crystal Report to be used with the Carrier Information window. The default report included for such a this purpose is called 'IPCONTRACT.RPT', which will format the details of the Interline Contract to be sent to the Carrier Vendor. For more information on report functionality in TruckMate, see the Crystal Reports Reference. By clicking the Email/Fax button on the Report Selection screen, you can use the TruckMate E-mail System to generate e-mail copies of the Carrier Contract and send them to the Carrier you are assigning, as a notification of the negotiation record. |
Close |
Closes the Carrier Information window, returning you to the main Dispatch window. |
The Local Email Address Setup window allows you to enter in your default Local Email Addresses on a number of Tabs.
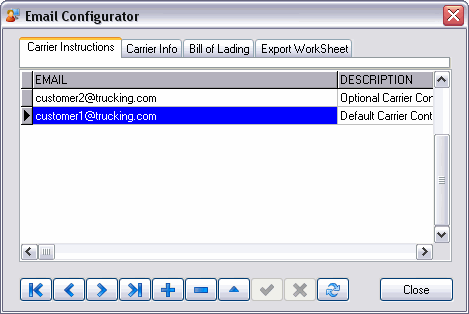
The Email Configurator window allows access to four Tabs, which define the local email addresses that will receive data when the User selects the 'Include Local Addresses' flag in either the 'Carrier Instructions', 'Carrier Information', 'Bill of Lading' or 'Export Worksheet' sections of the Send Email/Fax window.
Select the Tab you wish to configure email addresses for, and then select the '+' button from the TruckMate Navigation bar to enter the email details in the 'Email' and 'Description' fields.
When you select the 'Send' button on the Send Email/Fax window, these email addresses will receive the appropriate data.
The functionality of this window depends heavily on several configuration options, as set in the Application Configurator program > DISPATCH.EXE section.
Header Section
This section is used to select the values that will be used in the Carrier Information action.
Trip Information Tab
The Trip Information Tab is used to assign the new Interliner Carrier to the selected Trip Leg in the Doors Grid, view details about the Interliner Carriers setup in your system, and specify some basic Rate information for the scheduled Trip Leg.
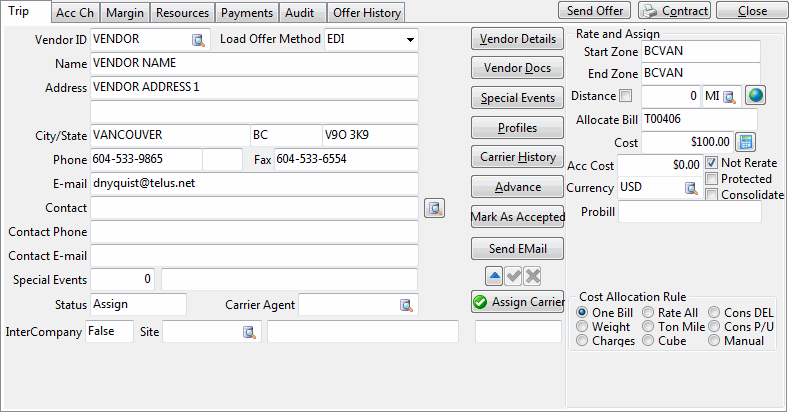
Vendor ID
Double-click (or click the 'Edit Pick' button) to select an Interliner Vendor from your database. Once you select a Vendor, most of the fields on the Trip Information Tab will automatically populate based on the information provided for the Vendor ID code. Vendor information is maintained by the Customer & Vendor Profiles program > Vendor Section. To be used in the Carrier Assignment window, a Vendor ID Code must be flagged as an 'Interliner' Vendor on the Types Tab.
| When working with the 'Select Interliner' window that is opened when the user selects the edit pick in this field, there are several options that can be used for filtering to a specific Interliner. Users of TruckMate 2022.3 and earlier have access to Carrier411 options- 'Driver Score', 'Vehicle Score', 'Safety Score' and 'Safety Rating'- that enable searching for an Interliner based on their Carrier411 performance scores. When searching by Carrier411 data, the User can enter an integer (or decimal) value to filter out those Carriers with a lower score. |
Load Offer Method
The default method of delivering a load offer for this carrier is visible, but it can be changed using the drop down menu.
Contact
Usually, the 'Contact' information will automatically populate based on the Customer & Vendor Profiles program data. If it does not, you may click the 'Find' button to try and select an alternative 'Contact' code from those available in your database.
Status
The Assignment Status can be 'New', 'Negotiate', 'Assign' and 'Rejected' depending on the current state of the negotiation.
Carrier Agent
To define a 'Carrier Agent' for the trip, click the search button and select the Vendor/Employee on the search/select window. Depending on your configuration this option provides a list of Vendors or Employees.
Intercompany / Site / Intercompany Freight Bill
If, in a Multi-Company implementation, the Carrier chosen for the movement is attached to a different Company, this field will default to 'True'. Upon assignment of the Carrier, a separate Freight Bill will be created for the Company to which the Carrier belongs, which will outline the Carrier charges.
When this field is 'True', the 'Site' and 'Intercompany Freight Bill' fields will populate to the right based on the second Company’s default settings.
Two options in the Application Configurator program > DISPATCH.EXE section govern what elements are copied over to the intercompany freight bill:
-
'IC Copy Trace', which can copy trace numbers contained in the original to the new intercompany transfer freight bill. (In addition, when trace numbers are copied from one company to the other, inside the description column of the TRACE table, the following string will be added: '(IC FB#)' where 'FB#' is the freight bill number belonging to the original freight bill that contained the trace number being copied.)
-
'IC Copy Detail Lines', which can copy all the detail lines that the original freight bill contained; this will allow for easier referencing and acknowledgement of different freight bills and their contents.
Buttons
Vendor Details
Selecting this button will open the Vendor Information window, which gives all the detailed information on the selected Vendor, as entered in the Customer & Vendor Profiles program. The 'Interliner' Tab has been added so that you can view an Interliner Vendor’s Insurance details prior to adding them as the Carrier on a Trip.
Vendor Docs
Selecting this button will open the Attach / Open Related Files window for the Vendor specified in the 'Vendor' field.
Special Events
Displays the Carrier’s Special Events in the Special Events window common to the Dispatch module programs. The ability to add new events is also available.
Profiles
Selecting this button will open an instance of the Customer & Vendor Profiles program.
History
This button provides the ability to view historical Vendor information by specifying search criteria on the Interliner History window.
Advance
Selecting this button opens the E-Checks window, which allows you to create advance payments for the Carrier Vendor prior to the trip being completed.
Mark as Accepted
Selecting this button will update the 'Status' field (VENDOR_LOAD_SUMMARY.STATUS) from 'Negotiate' to 'Accepted'.
Send EMail
Selecting this button allows you to send an e-mail to the selected Carrier Vendor that will notify them of the Carrier assignment and of any other relevant details. See the section on the TruckMate E-mail System for more information.
Rate and Assign
Start Zone
Displays the Start Zone for the trip leg that is currently selected in the Trip Leg Information grid.
End Zone
Displays the End Zone for the trip leg that is currently selected in the Trip Leg Information grid. This value works in conjunction with the Mark End Leg menu option in the Trip Leg Information grid. For example, if you are assigning an Interliner to the last leg of a trip, you must use the Mark End Leg function to indicate that the last leg is the leg on which the Interliner will be active.
Distance / Distance Unit / Interactive Mileage
The 'Distance' field will display the leg distance, if it has ben provided by your Mileage Software automatically. The 'Distance' field displays the Leg distance, provided by your mileage software. To determine the actual Leg distance, select the Database search button and choose a Distance Unit (as configured in the Codes Maintenance program > Units Tab). Then, select the 'Get Mileage' button to determine the Leg Distance, which will populate into the 'Distance' field. You must have the Mileage Server program running for this functionality to be available.
| The Interactive Mileage button updates/inserts/checks both the DMILE and VENDOR_DMILE Tables. |
Distance Override
The checkbox next to the text 'Distance' provides the ability to Override the distance value from the Trip Leg(s).
Allocate Bill
Displays the Freight Bill number of the Freight Bill that will have the Interliner Cost assigned to it when using a 'One Bill' Cost Allocation Rule. If you are not using the 'One Bill' Cost Allocation Rule, the Allocate Bill field does not apply, as only one Freight Bill number can be displayed.
| You can change the Freight Bill that is entered as the 'Allocate Bill' by selecting the 'Pick Freight Bill to Allocate Cost' right-mouse option from the Freight Bill Information Grid. |
Cost
Displays the Interliner’s charge, as calculated from the rate sheet attached to the Interliner in the Rates Maintenance program or from the Margins tab when the Use Cost button is selected. If the Interliner has no rated charge, you can manually enter a charge in this field before clicking the Assign Carrier button.
If the 'Cost' field contains a value (e.g. $150), that value will translate directly to the Carrier Info/Assignment window on the created trip. The 'Not Rerate' flag will be checked, because the entered value is essentially a manual rate, and the 'Not Rerate' flag will ensure that it stays that way.
If the 'Cost' field contains a '0', the user is telling the system that automatic Carrier Rating (i.e. Rate Sheets tied to the Vendor) should apply. Because of this, 'Not Rerate' will be un-checked, so that when SP_CALC_LINEHAUL_COST runs, the rate sheets will be applied.
If the user does not want a rate in the cost field but wants 'Not Rerate' to be flagged, it should be left blank (not with a zero, but completely blank). In this case, however, when SP_CALC_LINEHAUL_COST runs, there will be no cost at all on the Carrier Assignment unless the user enters the Carrier Info/Assignment window and assigns one.
Acc Cost
Displays the total amount of all related Accessorial Charges associated with the Interliner ID, calculated across all included Freight Bills on the Trip.
Consolidated
Select this checkbox to consolidate the rating across all Freight Bills for the selected leg. Once selected, define one or more of the following values to be used in the consolidated rating, as follows:
Service Level
Enter the Service Level you wish to be used for Rating purposes.
Equipment
Enter the Equipment Class to be used for Rating purposes.
Commodity
Enter the Commodity to be used for Rating purposes.
Protected
Select the 'Protected' checkbox to include the Interliner charges in the Freight Bill’s total charges (as displayed on the Customer Service > Billing Tab, in the 'Total Charges' field). If a Freight Bill’s Interliner charges are protected, you will bill your customer for amounts from Detail lines, Accessorial Charges and the Interliner charges. If the Interliner charges are not protected, they will not be added to the Freight Bill’s total charges, and your customer will only be billed for the amounts from Detail lines and Accessorial Charges (as applicable). This box can be checked by default by setting the Enable IP Protected option in the Application Configurator program.
Do Not Rerate
Select this flag if you do not want the dollar amounts entered on this window to be re-rated if the Zones (or Mileage, etc.) of the Trip is changed following the assignment of the Carrier.
Currency
Defaults according to the Interliner’s default currency in the Customer & Vendor Profiles program. You can select a different currency from the drop down list box. If you change the currency here, the currency of the attached IP record will change to match. However, once an IP record has been approved (in status S, U, A, or I), no changes are allowed. So, the currency will NOT change on the IP records. If the IP is approved but not yet accrued, you may unapprove it, change the currency, and re-approve it. If it has been accrued, you may want to do a 'Reverse & Recreate' in IP Audit > Interline Details grid > Context Menu > Status Change option group.
| When you change the default currency, and the attached IP record is not in 'N' status, TruckMate will issue a warning when you try to save your changes. TruckMate will allow you to abort your changes. |
Cost Allocation Rule
Select a Cost Allocation Rule from the available options in the drop-down menu:
-
To assign the charges to a single Freight Bill, select 'One Bill' from the option list. Alternatively, you can distribute the Interliner charge across all the Freight Bills displayed in the grid.
-
Choose the 'Weight' option from the drop down list to determine the Interliner charge assigned to each Freight Bill according to the Freight Bill’s Total Weight.
-
Choose the 'Charges' option from the drop down list to determine the Interliner charge assigned to each Freight Bill according to the Freight Bill’s Total Charges.
-
Choosing the 'Rate All' option will create an ORDER_INTERLINER record (payable) for each Freight Bill on the leg and then use the Vendor rating to auto rate the record. If a cost was entered it will not be used.
-
Choosing the 'Ton Mile' option will prorate Line Haul Carrier costs by the Ton-Mile. You can select this option for Line Haul Trips over multiple legs, and the system will set the different Freight Bills to 'B' Status as they are completed.
See the Interline Payables Audit program > Probill Info Tab > 'Status' field for more information.
-
Choosing the 'Cube' option will prorate the Interliner costs by the cube values of the attached freight bills.
-
If you choose the 'Manual' option, IP records will not be updated or created as a result of an automatic process. After Carrier Assignment, Cost Allocation Rule will be set to Manual.
When you click the 'Assign Carrier' button, multiple Interliner payment records will be created, one for each Freight Bill in the Freight Bill Information grid. View the payments on the Payments Tab. Set the default value for the 'Cost Allocation Rule' field using the Application Configurator program ('Interline Cost Rule' option).
Assign Carrier
Select this button to assign the displayed Vendor to the Trip. The Dispatch program will check for several conditions before a Carrier is added to a Trip (check for Insurance, etc.). These conditions are controlled by three options in the Application Configurator program > DISPATCH.EXE section ('Carrier-Cargo', 'Carrier-Liability' and 'Carrier-WorkComp').
If the charges entered for the Carrier Assignment ('Cost' + ' Acc Cost') exceed the 'Max Carrier Cost' (on the Freight Bill Information Tab ; entered on the FB itself on the Customer Service program > Billing Tab > Brokerage section > 'Max' field), you will be either warned before you can assign the carrier, or will be completely forbidden from assigning (depending on the users security settings).
See the Customer Service documentation for more information on the 'Max' field and limiting Carrier Assignment charges.
If you have Carrier411 information setup for your Carriers in the Carrier411 Information program, and have the appropriate configuration options set in the Application Configurator program > CARRIER411.WINSERVICE.EXE section, certain Carriers may be disallowed from assignment based on their safety ratings.
Deassign
If an Interliner has been previously assigned to the trip leg, you can use this button to remove the assignment and delete the Interliner payments.
If the displayed Carrier Assignment is an Intercompany transaction, selecting this button will prompt the user to cancel the Freight Bills created in the other Company related to this movement. The user must select 'OK' in order to deassign the Carrier. If the Freight Bills in the second Company have been added to Trips, the user will not be able to cancel the Intercompany Carrier Assignment.
| The User can also deassign a Carrier by using the 'Deassign' option on the Trip Grid’s right-click Context Menu, or by selecting the 'Carrier ID' in the Trip Grid and hitting the <Delete> key. |
Context Menu
View Images
Clients using a 3rd-party imaging vendor can use this option to access Document Imaging functionality from within the Carrier Assignment > Trip Information screen for the selected Carrier. To be able to access Document Imaging, however, you must correctly setup the functionality in the Codes Maintenance program > Imaging Tab ('Program' = DISPATCH.EXE, 'Table' = VENDOR_LOAD_SUMMARY).
Assigning Carrier Charges
Beginning in TruckMate 2009, Carrier Charges should be assigned using the 'Cost' field and by specifying a 'Cost Allocation Rule'. See the above drop-down for information on Pro-Rating and the Cost Allocation Rules.
| If the carrier rate changes before the trip is complete, the 'Cost' field needs to be updated via the Carrier Assignment screen again. |
If the carrier rate changes after the trip is complete but before the invoice has been run through the Billing Register, you can edit the value using the Customer Service program > I/P Tab.
This process changed in 2009 to be more flexible for LTL carriers. We recalculate IP charges automatically now (using the 'Cost Allocation Rule' selected when the carrier was assigned). This is useful for LTL companies who have many freight bills on one or more legs. In the past these users would add and remove freight bills from legs and forget to go back into the carrier assignment screen to manually recalculate the newly pro-rated amounts. Maintaining these values as bills are added/removed is handled in the CALC_LINEHAUL_COST procedure, and is run whenever a trip status change occurs.
| If you wish to re-enable a non-automatic pro-rating styled carrier assignment/charges system, you can set the Application Configurator program > DISPATCH.EXE > 'Recalculate IP charges on trip status change' option to 'False'. |
Informing the Carrier of the assignment
Once the user has setup the Carrier Assignment details, he/she can click the new 'Send EMail' button on the Trip Information Tab to generate an e-mail that will be sent directly to the Carrier Vendor with information concerning the requested movement.
Upon clicking the 'Send EMail' button, the Send Email window will open.
Type your drop-down text here.
Accessorial Charges Tab
The Acc Ch Tab is used to assign Accessorial Charges to an Interliner Trip, either manually or automatically. In the case of automatically assigned Accessorials, this Tab can be used to review which have been added before selecting the 'Assign Carrier' button and committing the charges.
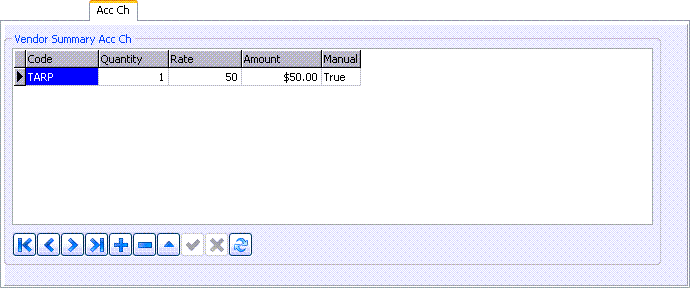
When the User selects the 'Assign Carrier' button, the Accessorial Charges listed on this Tab will be added to the I/P record based on the 'Cost Allocation Rule' selected on the Trip Information Tab. The Accessorial Charges listed on this Tab can be manually added (using the available TruckMate Navigation Bar on the Tab), or automatically created (when the user selects the 'Calculator' button near the 'Cost' and 'Acc Cost' fields of the Trip Information Tab).
| An Accessorial Charge Code can be set to automatically Prorate (meaning that the 'Cost Allocation Rule' will be taken into account when an Accessorial is added) based on the 'Vendor Trip Prorate' flag on the Codes Maintenance program > Accessorial Charge Tab. So, if the user enables this flag and has a 'Flat Rate' Accessorial Charge rate and 5 Freight Bills on a Trip Leg, they can have the Accessorial applied 5 times or once (based on the Cost Allocation Rule selected). |
Manual
The 'Manual' field (ORDER_INTERLINER.MANUAL_RATE_ACC) denotes that the Accessorial Charge record was manually entered by a User on the Carrier Information window > Acc Ch Tab (or on the Customer Service program > I/P Tab). When this field is set to 'True', the associated Accessorial Charge record will not be re-created/re-calculated when the SAVE_TLORDER procedure is run in the Customer Service program (i.e. when an Interliner Freight Bill is updated).
| The Application Configurator program > CSERV.EXE > 'IP Manual Acc Ch' option is used to set the default value of the 'Manual' column for records added into this Grid by the user. When set to 'True', all records added here will have the 'Manual' field set to 'True' as well. |
Margin Tab
The Margin Tab provides the ability to calculate Costs and Margins during negotiations by providing 'Revenue amounts', 'Expense entry', 'Cost per Mile' and 'Cost % Revenue' on one Tab.
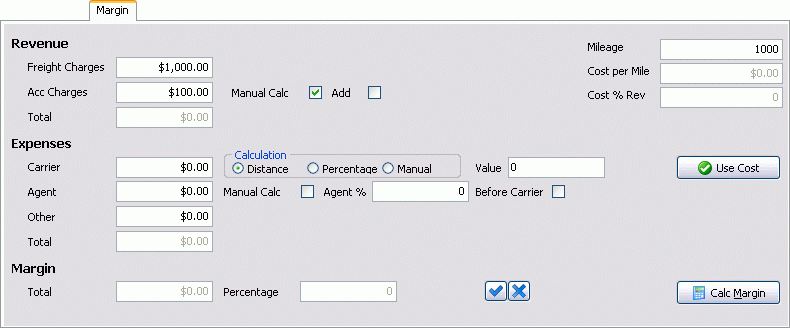
| The Acc Charges appear only if the FB Acc Charge is set to 'Interliner Charges' type during setup of the Accessorial Charge Code (Codes Maintenance program > Accessorial Charges Tab). Expenses will populate based on the Calculation Method and value entered after clicking the 'Calc Margin' button. |
Other Tabs
The Resources Tab allows you to enter the names and some additional details of the Resources you would like to attach to the Interliner movement.
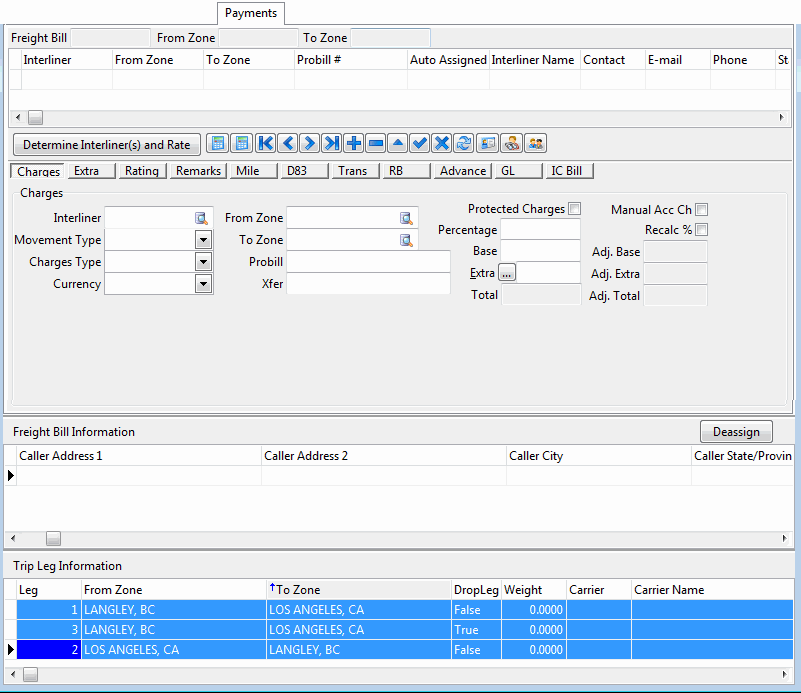
The Payments Tab appears exactly like the Customer Service program > Interline Payables Tab, and contains the same information from the Interline Freight Bill, in addition to Freight Bill information grid and Trip Log information grid.
The Audit Tab gives the User an easy way to see how all the various charges will be applied to the ORDER_INTERLINER record that is created when assigning an Interliner to a Trip. The 'Recalc' button allows the User to update the displayed totals for any changes that occur throughout the billing cycle.
The History Tab lists previous events (including Accepted, Rejected, Completed, and Cancelled statuses) and correspondence pertaining to this record. You can manually add records here, but you cannot delete or alter existing records.
In the Application Configuration program > DISPATCH.EXE, there are two options: 'Carrier Accept Comment' and 'Carrier Deassign Comment'. These options force the user to include a comment upon assigning and/or de-assigning a carrier.
Freight Bill Information Grid
The Freight Bill Information Grid displays pertinent details for all Freight Bills assigned to the trip leg.
Context Menu
Pick Freight Bill to Allocate Cost
Will update the 'Allocate Bill' field on the Trip Information Tab at the top of the form with the Freight Bill number that this option is selected for. This will assign the Interliner charges to the selected Freight Bill when working with a 'One Bill' Cost Allocation Rule.
View Freight Bill
Selecting this option will open an instance of the Customer Service program with the details of the selected Freight Bill displayed.
View Freight Bill Notes
Selecting this option will display any 'Notes' entered against this Freight Bill from the Customer Service program.
Dock with Carrier for Delivery
Selecting this will dock this shipment with carrier in preparation for delivery.
Remove Carrier Dock
Selecting this will remove the docking information attached to this shipment.
Select Freight Bills dropped on this leg
As long as you have the appropriate Interliner and legs attached, this option is available.
Clear Selected Freight Bill(s)
Selecting this will clear or remove any selected Freight Bills.
Trip Leg Information Grid
The Trip Leg Information Grid displays pertinent details about each Trip Leg. If the Trip has multiple Legs, the Leg from which the Carrier option was invoked and all subsequent legs will be displayed.
Context Menu
Mark End Leg
Will change the Drop Leg field value from True to False. Changing the End Leg will update the Start Zone and End Zone values on the Trip Information form at the top of the screen. (Use the Refresh button on the Rated Vendors tab to change the Start Zone when you do not want to include the Start Zone from the first leg.) This function is used to configure the legs on which the Interliner will carry the freight.
Deassign Carrier
If an Interliner has been previously assigned to the trip leg, you can use this menu option to remove the assignment and delete the Interliner payments.
Change Start Leg
Selecting this will allow you to modify the 'Start Leg' information.