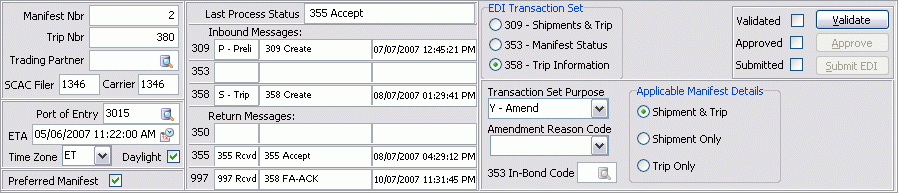
eManifest header

The Header Section allows you to create new Manifest records while working in the eManifest program, and to view the status of the Manifest record as it is processed, including a quick summary of any EDI messages received during its generation / approval process.
Manifest Number
This field will automatically populate when the User selects the '+' button on the TruckMate Navigation Bar to create a new Manifest record.
Trip Number
When creating a new Manifest record, the User will first be asked if they would like to create a new Manifest record from an existing Dispatch Trip.
If the User selects 'Yes' to this question, this field will populate with the Trip number from the Dispatch program. Other fields throughout the eManifest program will automatically populate based on the Trip information from Dispatch.
If the User selects 'No' in response to this question, another window will appear prompting to generate a new Trip number for the Manifest. Selecting 'Yes' at this window will create a new Trip number in this field and create a blank Manifest record. Selecting 'No' at this point will cancel the creation of the Manifest.
Trading Partner
Use the Database search button to choose a Trading Partner code from those available on your system. Trading Partner codes are created using the EDI Communication Manager program.
| If you have entered eManifest program Defaults for the selected Trading Partner on the Defaults A Tab or Defaults B Tab, those defaults will apply when the User creates entries in the various eManifest program Tabs. |
SCAC Filer
Enter the Standard Carrier Alpha Code (SCAC) of the Company generating the Manifest. This field has been added to support Third Party Manifest filing. Most typical Manifests will have the same value in both this field and the 'SCAC Carrier' field, but those companies who have their Manifests created by a Third Party can enter that Third Party’s SCAC code here, as this field is mandatory for proper Manifest Validation.
SCAC Carrier
Enter the Standard Carrier Alpha Code (SCAC) of the Carrier who will be crossing the border with the shipment detailed in the Manifest.
Port of Entry
If the Manifest details an international shipment, use the Database search button to select the Port of Entry from the Port codes available in your system.
ETA
Double click this field to open the Calendar Menu. Select the expected time of arrival for the shipment at the selected Port.
Time Zone
Use the drop-down menu to select the Time Zone related to the Port that will be receiving the shipment.
Daylight
If Daylight Savings Time is applicable for the selected Port/ETA/Time Zone, select this flag.
Preferred Manifest
This flag will set the current Manifest record as a 'Customs Preferred' Manifest.
EDI Messages
The EDI Messages section will populate with data when you begins sending EDI Messages to the Canadian Border Protection Agency via the EDI Communications Manager program.
Last Process Status
This field displays the latest Status of the currently displayed Manifest record. This field will update automatically as the Manifest record is taken through the various steps toward completion. This field cannot be edited.
Inbound Messages
These messages are sent to the CBP by the EDI Communications Manager program.
-
309 - Customs Manifest: used if sending information on Driver, PUnit, Trailer and Freight Bill (Shipment and Trip).
-
353 - Customs Events Advisory Details: used if needing to complete the transaction to CBP.
-
358 - Customs Consist Information: used if sending information just on Driver, PUnit or Trailer (Trip).
Return Messages
These messages are received by the Client from CBP.
-
350 - Customs Status Information: states a notification from CBP (can be many different types of notifications: maybe Driver detained, or your Customs Broker has not filed their paper-work yet, etc.).
-
355 - U.S. Customs Acceptance/Rejection: states whether or not CBP accepted or rejected whatever transaction set was sent to them.
-
997 - Functional Acknowledgment: states that CBP received whatever transaction set was sent to them.
EDI Transaction Set
Select the radio option that corresponds to the selected Manifest’s message type. The EDI Transaction Set choose will determine the available options in the 'Transaction Set Purpose' drop-down menu, as follows:
-
309 - Shipment & Trip
-
353 - Manifest Status
-
358 - Trip Information
Transaction Set Purpose
Select the Transaction Set Purpose code that you wish to use for the selected EDI Transaction Set. Only certain options will be available depending on the EDI Transaction Set radio option you have selected:
-
309 - Shipments & Trip:
-
P - Prelim: means you might be adding another Freight Bill to the Shipment.
-
W - Origin: means you are submitting everything (Trip and/or Shipment).
-
Y - Amend: means you might be amending a Freight Bill you already sent (perhaps because you sent the wrong quantity or something on the Freight Bill was incorrect and thus needs amendment).
-
3 - Delete: means you want to delete the Shipment and/or Trip.
-
-
353 - Manifest Status:
-
Z - End:
-
H - Notify:
-
-
358 - Trip Information:
-
b: means you are just sending the Trip information for the first time.
-
Y - Amend: means you want to amend a Driver/Punit/Trailer information (perhaps because you sent the wrong Driver or wrong plate number and you need to amend the trip information).
-
3 - Delete: means you want to delete the Trip information.
-
Amendment Reason Code
This drop-down menu will allow you to select an Manifest Amendment Reason Code.
| This field is only available if you have selected either '309 - Shipments & Trip' or '358 - Trip Information' as your EDI Transaction Set and have specified the 'Y - Amend' option from the 'Transaction Set Purpose' drop-down menu. |
353 In-Bond Code
Use the Database search button to select a353 Notification Code from those available in your system.
| This field is only available if you have selected the '353 - Manifest Status' as your EDI Transaction Set and have chosen the 'H - Notify' option from the 'Transaction Set Purpose' drop-down menu. |
Applicable Manifest Details
Select the radio option that best describes the details of the Manifest being sent.
Processing Buttons
Validate
Select this button to Validate the currently displayed Manifest. The Manifest record will be changed from 'ENTRY' status to 'VALIDATED' and the 'Validated' flag next to this button will be checked.
When you select the Validate button, the eManifest program will attempt to Validate the Manifest as entered, and will output a Validation Log to the Validation Notes Tab. If you are having trouble Validating your Manifests, consult the generated log for any warning messages.
Approve
Select this button to Approve the currently displayed Manifest. The approve button is only available when working with Manifests with 'VALIDATED' status.
Submit EDI
Select this button to Submit the currently displayed Manifest. The Submit EDI button is only available when working with Manifests with 'APPROVED' status.