Quick Bill Entry
| As of TruckMate 2022.4, Quick Bill Entry is no longer available. For more information, see the 2022.4 release notes. |

The Quick Bill Entry program is a fast order entry program - a stripped-down version of the Customer Service program. Freight bills entered in the Quick Bill Entry program are added to the same table (TLORDER) as freight bills entered in the Customer Service program. Therefore, freight bills from either source can be viewed and edited in either program. The primary differences between the two programs is that the Quick Bill Entry program has fewer fields and forms that require entry (or require display), and that the Quick Bill Entry program has less data entry validity checking and less overall functionality. It is designed for use by high-volume data entry sites entering freight bills from bills of lading. However, depending on your company’s requirements, it could also be used by staff taking orders over the phone.
Freight bills created in the Quick Bill Entry program follow the same data entry process as freight bills entered in the Customer Service program. Freight Bills become available as soon as the bill number is assigned, which occurs when you post the record using the navigator bar (instead of using a separate 'Post' button, as in the Customer Service program). If you wish to assign 'Approved' status to a Freight Bill, you can use the Customer Service program > Filters Tab, or individually approve Freight Bills on the Customer Service Program > Billing Tab. The Billing Register program is used to update the freight bills to the Accounts Receivable, Interliner and COD modules.
| There are some new Security Settings added specifically for the Quick Bill Entry program. You can now limit access to individual Tabs for any or all of your database Users. For more information see the Security Setup program > Security > Tabs Setting section. |
To access Quick Bill Entry in TruckMate 2022.3 and earlier:
| From this location | Go to |
|---|---|
TruckMate Menu and TruckMate Task List |
Billing > Quick Bill Entry |
Windows Start Menu |
TruckMate 20xx > Quick Bill Entry |
Windows Explorer |
C:\Program Files (x86) > TruckMate 20xx > LTLBe.exe |
How Do I?
How do I enter orders quickly, without using the Customer Service program?
The Quick Bill Entry program is a fast order entry program, a stripped-down version of the Customer Service program. Freight bills entered in the Quick Bill Entry program are added to the same table (TLORDER) as Freight Bills entered in the Customer Service program. Therefore, Freight Bills from either source can be viewed and edited in either program. The primary differences between the two programs is that the Quick Bill Entry program has fewer fields and forms that require entry (or require display), and that the Quick Bill Entry program has less data entry, validity checking and less overall functionality. It is designed for use by high-volume data entry sites entering Freight Bills from bills of lading. However, depending on your company’s requirements, it could also be used by staff taking orders over the phone.
-
Open the Quick Bill Entry program (LTLBE.EXE), click: Start > Programs > TruckMate > Billing > Quick Bill Entry.
-
Scroll through to locate your desired site. In this example, I’m using the 'LTL Style'.
-
Familiarize yourself with the keyboard shortcuts available in this program:
Shortcut Description <CTRL>+<LEFT ARROW>
Displays the previous record.
<CTRL>+<RIGHT ARROW>
Displays the next record.
<CTRL>+<INSERT>
Adds a new record (the bill number will be generated by the system).
<CTRL>+<M>
Adds a new record for which the user can manually enter a Freight Bill number.
<CTRL>+<N>
Displays the Notes form.
<CTRL>+<R>
Displays the Trace Numbers form.
<CTRL>+<O>
Clears the contents of the Shipper, Consignee, or Bill To name and address fields. Note, the cursor must be positioned in the customer code field to use this function.
<CTRL>+<U>
Displays a form with ten free format user defined fields. These fields also display in the Freight Bills grid of the Dispatch program, and in the User Defined Fields form in the Local Dispatch program. You can modify the field labels for the user defined fields using the Application Configurator program.
<CTRL>+<P>
The Print hot key combination will display the Report Selection form. The Crystal Report template supplied with the TruckMate system is called CSERV.RPT. Using the Application Configurator program (the CSERV.EXE - Preview Report option), you can specify whether or not the report will be previewed to the screen. If you have configured a report preview, click the printer icon at the top of the screen to send the report to the printer that is configured as the default printer for your workstation. See the Basics documentation for more information on report functions.
<CTRL>+<ENTER>
Posts the Add or Edit (from the main navigator bar and Trace Number form navigator bar only).
<DOWN ARROW>
In the Details grid, posts the current line and creates a new line.
<UP ARROW>
In the Details grid, aborts the current line.
<RIGHT ARROW>
In the Details grid, moves focus to the field to the right.
<LEFT ARROW>
In the Details grid, moves focus to the field to the left.
<F11>
Duplicates the data entered in the same field in the last Freight Bill (only functions in the Shipper, Consignee, Bill-To, Pickup Driver, Pickup Trailer, Delivery Driver, and Delivery Trailer fields).
<F12>
When partial data is entered in the Shipper, Consignee or Bill-To Name or Address fields (except the Zip / Postal Code field), the <F12> key will display the Search form showing all codes that match the data that was entered.
<ESC>
Closes the Trace Number and Notes forms.
-
Select the '+' sign or use the shortcut key to add a new record. Complete the information as you would in the Customer Service program.
|
Menu Bar / Toolbar
File Menu
Print Reports
![]() Selecting the Print Reports button will bring up the report selection window, common to many TruckMate applications. Here, you will select a report file from those available in your system and a Crystal Report will be generated.
Selecting the Print Reports button will bring up the report selection window, common to many TruckMate applications. Here, you will select a report file from those available in your system and a Crystal Report will be generated.
For more information on Report functionality in TruckMate, see the Crystal Reports Reference.
Exit
![]() Closes the Quick Bill Entry program.
Closes the Quick Bill Entry program.
Multi-Company Menu
For more information on the Multi-Company options available from the Menu Bar, see the Multi-Company documentation.
Navigate Menu
The Navigate Menu contains the standard TruckMate Navigation Bar that is used to browse the records in your Database, as well as the following options.
Refresh
![]() Select this option (or use the '<CTRL><F5>' hot key combination) to refresh all sections/grids of the Quick Bill Entry program.
Select this option (or use the '<CTRL><F5>' hot key combination) to refresh all sections/grids of the Quick Bill Entry program.
This option is also available on the Toolbar.
Find
![]() Selecting this option opens the Select Bill window, which you can use to quickly locate a specific Freight Bill in your Database by a number of criteria.
Selecting this option opens the Select Bill window, which you can use to quickly locate a specific Freight Bill in your Database by a number of criteria.
This option is also available on the Toolbar.
Tools Menu
TruckMate Monitor
![]() Click the down arrow next to this button to access the various functions of the new TruckMate Monitor.
Click the down arrow next to this button to access the various functions of the new TruckMate Monitor.
Remember Position / Size
Selecting this option will maintain the program window position and size upon close. When the program is re-opened, it will appear the same.
Screen Layout
For more information regarding the Screen Design mode, click here.
Synergize Indexing
![]() This option is the second step in Image Indexing available for users of TMW-Synergize™ Imaging software. The behavior of the application depends on the selected mode.
This option is the second step in Image Indexing available for users of TMW-Synergize™ Imaging software. The behavior of the application depends on the selected mode.
If the selected mode is 'View Single Document', when selecting this button, the user will have to select a specific Synergize 'Workflow' (as defined in the Codes Maintenance program > Imaging Tab > Microdea > Workflow Tab). Once the 'Workflow' has been determined, the Image Indexing window will appear with one image in the Synergise image viewer window.
For an explanation of how the Image Indexer behaves while in the 'View Single Document' mode, see this User Case Example.
-
Upon selection of a 'Workflow ID' from the Select Workflow window, TruckMate automatically requests the first available imaged document in the Workflow queue.
-
TruckMate automatically causes the document to display in the Synergize viewer window, and returns a 'Document ID' to TruckMate:
-
A document may not be 'available' if it has already been requested by another user, as Synergize will lock documents once they have been retrieved from the Workflow queue. In this case, TruckMate will move to the next available document.
-
If there are no more documents available in the Workflow queue, a non-error notification will be shown to the user, indicating that processing has been completed.
-
-
TruckMate will attempt to look up the 'Document ID' from step 1 in Customer Service:
-
If none is found, a new, empty bill will be inserted automatically and left in edit-mode. The 'Document ID' from step 1 will be added as a Trace number.
-
If one is found, it will be displayed in the Customer Service window and left in edit-mode.
-
-
The user will then Post the Freight Bill (to obtain a TruckMate bill number), and the Indexer will complete the following:
-
TruckMate automatically sends this bill number, the customer ID, and any other trace numbers on the bill to Synergize, which causes the document to be indexed with these values.
-
Depending on the Workflow settings in Synergize, this will cause the bill to be removed from the Workflow queue.
-
-
Finally, TruckMate automatically requests the next available imaged document in the Workflow queue, and returns to step 2.
If the selected mode is 'View List of Documents', when selecting this button, a grid will popup with a list of available documents. The grid will display columns containing information about each listed document. Filters are available to help the user locate the desired documents easily and quickly. This feature is only available if 'Display Columns' checkbox is selected from Codes Maintenance > Imaging > Imaging Vendor Configuration > TMW-Synergize™ Imaging > Workflow Tab. The user can select the document to be indexed individually via manual selection.
|
In both described Indexing modes, when a user opens an image for indexing, a lock for this image will be enforced. As a result, other users cannot open this image for indexing purpose. The lock will be released once the user posts TruckMate information to Synergize, skips the image or exits indexing mode. To monitor image locks and release locks that cannot be auto-released (in case unexpected shutdown or users terminate TruckMate abnormally), users can open the Codes Maintenance program > Imaging > Microdea > Workflow Tab > Locks Tab. Erroneous locks can be removed from the list. If a document is locked by a user, that user can still open the document without requesting removing locks but other users would have to have locks removed. This functionality is only available for Users with TMW - Synergize software installed and correctly configured, and that have checked the 'Workflow Enabled' flag on the Workflow Tab in Codes Maintenance (see above link). |
Help Menu
TruckMate Help
![]() Selecting this button will open the Quick Bill Entry topic in the TruckMate Online Help file (the page you are currently viewing).
Selecting this button will open the Quick Bill Entry topic in the TruckMate Online Help file (the page you are currently viewing).
Service Portal
![]() Selecting this button will open an instance of your default Internet browsing software, with the https://www.tmwcare.com login page displayed.
Selecting this button will open an instance of your default Internet browsing software, with the https://www.tmwcare.com login page displayed.
About
![]() Selecting this button will open the standard TruckMate About window, which contains important information about the application you are currently using, including its version number (important for support calls).
Selecting this button will open the standard TruckMate About window, which contains important information about the application you are currently using, including its version number (important for support calls).
Toolbar
Synergize Indexing
![]() This option is only available for users of TMW-Synergize™ Imaging software. This option is used in two steps. The first step is selecting the mode. use the drop don list to select one of the available options. The second step would be to perform the indexing by selecting the button (
This option is only available for users of TMW-Synergize™ Imaging software. This option is used in two steps. The first step is selecting the mode. use the drop don list to select one of the available options. The second step would be to perform the indexing by selecting the button (![]() ).
).
The options available in the first step are:
-
Update Synergize Document
This option updates the Synergize database with changes in TruckMate. When you make changes in TruckMate to image information, select this option to reflect the change made in TruckMate in Synergize database. -
View Single Document
This option activates the 'View Single Document' mode in Image Indexing. When in this mode and the user selects the indexing button ( ), the User will have to select a specific Synergize 'Workflow' (as defined in the Codes Maintenance program > Imaging Tab > Microdea > Workflow Tab). Once the 'Workflow' has been determined, the Image Indexing window will appear with one image in the Synergise image viewer window.
For an explanation of how the Image Indexer behaves while in the 'View Single Document' mode, see the User Case Example in the Tools Menu section above.
-
View List of Documents
This option puts the image viewing process in a different mode. In this mode, users can select a specific document from among a list of documents. When the user selects the indexing button () while in this mode, a grid will popup with a list of available documents. The grid will display columns containing information about each listed document. Filters are available to help the user located the desired documents easily and quickly. This feature is only available if 'Display Columns' checkbox is selected from Codes Maintenance > Imaging > Imaging Vendor Configuration > TMW-Synergize™ Imaging > Workflow Tab. The user can select the document to be indexed individually via manual selection.
After selecting the mode, the second step can be performed. You can select the indexing button (![]() ) to perform the indexing according to the selected mode in the first step. The indexing step can also be performed from an option in the Tools menu.
) to perform the indexing according to the selected mode in the first step. The indexing step can also be performed from an option in the Tools menu.
General Information
Document Imaging
To access Document Imaging in the Quick Bill entry program, simply right-click any unused portion of the application window (ex. in a grey area) and select the 'View Images via..' option that corresponds to the Document Image you would like to access. If you are working with a consolidated Master Bill, you can view Document Images related to any of the original Freight Bills included in the consolidation.
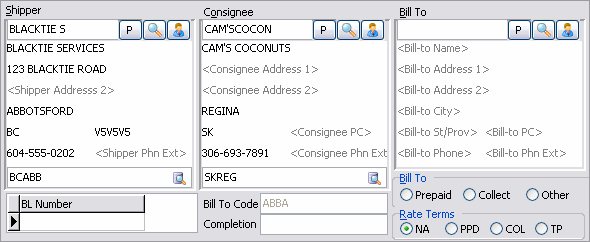
Shipper / Consignee / Bill To
The Shipper specified in the Quick Bill Entry program is the equivalent of the Shipper specified in the Customer Service program. The Consignee is the equivalent of the Consignee in the Customer Service program. The Bill To is the customer who will be charged for the freight bill.
Customer Selection Buttons
The ability of a user to edit a customer profile from the 'Quick Bill Entry' program depends on a configuration option 'Audit / Vet Client Changes' in PROFILE.EXE, if set to either 'Auditing Only' (A) or 'Both Auditing and Vetting' (B) then the client profile update features from 'Quick Bill Entry' program are disabled, and changes to customer profiles can only take place in the Customer and Vendor Profiles program. If set to 'Niether' (N) then the client profile update features from 'Quick Bill Entry' program are enabled. These buttons can be used for each of the Shipper, Consignee and Bill To areas of the Quick Bill Entry program.
| The authority to change 'Address Fields' is controlled by the security setup option 'CSERV - Allow Edit of Address Information' that can be set in the Security Setup Program > Security > Allow Changes. If this option is set to 'False' (Not Checked) the user is not able to edit any of the address fields. |
P
This function requires the user to have the 'CSERV - Alow Addition of Client Profile' security setting checked (set to true) via SECSETUP > Business Events > Allow Changes. If so,after manually entering a customer’s name and address information into the Shipper/Consignee/Bill To header fields, the user can select the image:QuickBillEntry/image14.pngProfile button to create a Customer Code based on that information for further use in TruckMate. One of two things will happen, depending on the setting of the Application Configurator program > PROFILE.EXE > 'Auto Gen Client Key' option:
-
If 'False', a prompt will appear, asking the user to enter a 'Customer Code' value for the Customer, using the keyboard, and then select 'OK'. The Customer Code will be created as entered and will have the name and address information saved.
-
If 'True' or 'Client Info' the 'Customer Code' will be auto-generated and displayed to the user as a prompt. If the code is satisfactory, the user can select 'Yes' to accept it. The format of the auto-generated Customer Code will be based on the 'Auto Gen Client Key' option’s value (see the link above for more information).
If the user’s security settings allow (see the SECSETUP.EXE > Business Events > Misc > Profiles > 'Allow Enter Client ID in Client Info Mode' option), they can cancel the auto-generated Customer Code prompt and enter one manually, as if the 'Auto Gen Client Key' config option was set to 'False'.
A pop-up form will then appear, asking for some other additional details.
| Client Codes can only consist of letters and numbers (i.e. no special characters). |
Customer Search
Select the Customer Search button to choose a Customer Code from those available on your system.
Additional Customer Information
Select this button to see some additional details for the selected Customer. These details are pulled from the Customer & Vendor Profiles program.
Shipper
Shipper Code
Enter the customer code (as configured in the Customer & Vendor Profiles program) of the freight bill’s shipper. Use the magnifying glass icon to the right of the Shipper Code field to display a search form, where you can paste the customer code and information by double-clicking on the desired entry (or striking the <Enter> key). You can enter partial data in the Shipper Code field, then click the search icon to display a list of code that match the characters you entered.
Shipper Name and Address
Will default according the customer code selected. The name and address values from the Customer & Vendor Profiles program will be used.
If you did not enter a customer code, manually enter the name and address details in these fields. The order of the fields is Customer Name, Address 1, Address 2, City, Province / State, Postal Code / Zip Code and Telephone Number. You can enter Shipper details by entering partial-match data in the shipper name or address fields.
Instead of entering a shipper code, enter partial shipper Name or shipper Address data, then strike the <F12> function key. This will invoke the Customer Search form and displayed all customers with matching data. To paste the desired customer details, highlight the entry in the search form and double-click or hit the <Enter> key. The partial match logic works in all fields except the postal code field.
Shipper Zone
Will default according to the zone specified in the shipper’s profile (configured in the Customer & Vendor Profiles program). You can manually enter the shipper zone by clicking the search button to display a search form. This value is the equivalent of the Start Zone in the Customer Service program.
Consignee
Consignee Code
Enter the customer code (as configured in the Customer & Vendor Profiles program) of the freight bill’s consignee. Use the magnifying glass icon to the right of the Consignee Code field to display a search form, where you can paste the customer code and information by double-clicking on the desired entry (or striking the <Enter> key). You can enter partial data in the Shipper Code field, then click the search icon to display a list of code that match the characters you entered.
Consignee Name and Address
Will default according the customer code selected. The name and address values from the Customer & Vendor Profiles program will be used.
If you did not enter a customer code, manually enter the name and address details in these fields. The order of the fields is Customer Name, Address 1, Address 2, City, Province / State, Postal / Zip Code and Telephone Number. You can enter Consignee details by entering partial-match data in the consignee name or address fields. Instead of entering a consignee code, enter partial consignee Name or consignee Address data, then strike the F12 function key. This will invoke the Customer Search form and displayed all customers with matching data. To paste the desired customer details, highlight the entry in the search form and double-click or hit the <Enter> key. The partial match logic works in all fields except the postal code field.
Consignee Zone
Will default according to the zone specified in the consignee’s profile (configured in the Customer & Vendor Profiles program). You can manually enter the Consignee Zone by clicking the search button to display a search form. This value is the equivalent of the End Zone in the Customer Service program.
Bill To (Code)
Bill To Code
Enter the customer code (as configured in the Customer & Vendor Profiles program) of the customer to whom you want to bill the freight bill’s charges. Use the magnifying glass icon to the right of the Bill To Code field to display a search form, where you can paste the customer code and information by double-clicking on the desired entry (or striking the <Enter> key). You can enter partial data in the Shipper Code field, then click the search icon to display a list of code that match the characters you entered. You can configure the 'Bill To' Code to default to the Shipper or the Consignee Code by using the 'Default Bill To' option in the Application Configurator program (CSERV.EXE).
Bill To Name and Address
Will default according the customer code selected. The name and address values from the Customer & Vendor Profiles program will be used.
The order of the fields is Customer Name, Address 1, Address 2, City, Province / State, Postal / Zip Code and Telephone Number. You can enter Bill To details by entering partial-match data in the bill to name or address fields. Instead of entering a bill to code, enter partial bill to Name or bill to Address data, then strike the F12 function key. This will invoke the Customer Search form and displayed all customers with matching data. To paste the desired customer details, highlight the entry in the search form and double-click or hit the <Enter> key. The partial match logic works in all fields except the postal code field.
Charges
The value of the Charges radio buttons will be automatically determined based on a comparison of the Bill-To code and the Shipper and Consignee codes. If the charge is determined to be 'Other' (that is, the Bill-To does not match the Shipper or Consignee), the values in the Bill-To field will be displayed on the Customer Service program > Contacts Tab. The customer code of the customer to whom the bill is charged displays below the Charges radio buttons.
| This determination is not made until the record is posted on the navigator bar. |
Completion
If a completion - type status code (as configured in the Codes Maintenance program) has been assigned to the freight bill, the date and time that status was assigned will display in this field. Completion status codes are assigned by default when a freight bill is delivered in the Dispatch program. Status code can also be manually assigned in the Customer Service program > Status Tab.
BL Number
You can enter a single BL Number directly into the 'BL Number' field. This is equivalent to a Bill of Lading type Trace number in the Customer Service program. To enter multiple trace numbers of varying types, use the <Ctrl><R> key combination to display an entry form. If multiple trace numbers have been entered, the system will display the first bill of lading type trace number entered in the trace form in the BL Number field. If no bill of lading type trace numbers were entered, it will display the first trace number entered in the trace form in the BL Number field.
Bill To
The radio option selected here will determine which rating Rating Term (see below) will be used when Rating the selected Freight Bill. One of these options may automatically be selected based on a comparison of the Bill-To code and the Shipper and Consignee codes. If the charge is determined to be 'Other' (that is, the Bill-To does not match the Shipper or Consignee), the values in the Bill-To field will be displayed on the Customer Service program > Contacts Tab. The customer code of the customer to whom the bill is charged displays below the Charges radio buttons.
| This determination is not made until the record is posted on the navigator bar. |
Rating Terms
The Rating Terms section allows you to flag a Freight Bill for special Rating procedures, and works in concert with new logic added to the Rates Maintenance program (and other Rating Module applications). The radio options correspond as follows:
-
N/A (Not Applicable): When this option is selected, the Freight Bill will be rated normally. The Rate Sheet attached to the Client will be used, and failing the availability of a Client-specific Rate Sheet, the default Base Rates will be used (or manual Rating).
-
COL (Collect): When this option is selected, the Freight Bill will be flagged for 'Collect' style Rating. The Rating logic will then apply the correct 'Collect' Rate Sheet, as defined by the availability of 'Collect' style Rate Sheets (attached to a FB party, or defined by Zone Code / Zip Code range) and the established Rate Precedence. For more information on Rate Precedence, see the Rates Maintenance program > Rate Sheets > Misc Tab.
-
PPD (Pre-Paid): When this option is selected, the Freight Bill will be flagged for 'Pre-Paid' style Rating. The Rating logic will then apply the correct 'Pre-Paid' Rate Sheet, as defined by the availability of 'Collect' style Rate Sheets (attached to a FB party, or defined by Zone Code / Zip Code range) and the established Rate Precedence. For more information on Rate Precedence, see the Rates Maintenance program > Rate Sheets > Misc Tab.
-
TP (Third Party): When this option is selected, and the Freight Bill indicates a party other than the 'Shipper', 'Consignee', or Shipper or Consignee’s default 'Bill-To' party (as defined in the Customer & Vendor Profiles program) as the payor of the freight charges, 'Third Party' styled rating will apply. A pricing program published for the account of the Third Party Payor will take precedence over all other pricing programs.
-
AH (Ad-Hoc): Ad Hoc rating means that a user can manually choose a different customer to use for rating purposes, other than the currently selected Bill-To Client. The TLORDER Table field that is used to override during Ad-Hoc rating is set in the Application Configurator program > RATES.EXE section using the 'Ad-Hoc Rating Client Field' option.
Depending on the default 'Rating Term' setting chosen for the Bill-To Client in the Customer & Vendor Profiles program > Customer > Billing Tab > Rating Terms section, a radio option may default here. If no default Rating Term is found in the Client’s Profile, this option may default based on the category.
For more information on this new Rating functionality, be sure to see the Rates Maintenance program > Rate Sheets > Misc Tab.
Drivers & Trailers
You can enter Driver Codes in the 'Pickup Driver' and 'Delivery Driver' fields, a Power Unit code in the 'Pickup Unit' field, and Trailer Codes in the 'Pickup Trailer' and 'Delivery Trailer' fields. (Driver and trailer codes are configured in the Driver Profiles and the Trailer Profiles program respectively.) The field logic will attempt to match codes based on partial entry. You can use the drop down list boxes to select driver and trailer codes. To clear the fields, click on the icon to the right of each field. The values in these fields are used by the Local Dispatch program to determine the Pickup Driver, Pickup Trailer, Delivery Driver and Delivery Trailer. Also, the Pickup Driver and Delivery Driver are displayed on the Customer Service program > Driver Pay Tab. These assignments have no effect on the driver or trailer’s current status, as used by the Dispatch program.
When you are entering a new freight bill, if you strike the <Tab> key when the cursor position is in the Delivery Trailer field, the Trace Number form can be configured to display automatically. If either the Shipper or the Consignee has the Trace Popup box checked in the Customer & Vendor Profiles program, the Trace Number form will display.
OP Code
Use the search button to select an Operation Code. Operation Codes are defined in the Codes Maintenance program > Operation Codes.
Bill Number / Date / Service Level

Bill Number
Is assigned when you post the freight bill on the navigator bar. You can also create freight bills with manually entered freight bill numbers. To do this, click the 'M' button to the left of the navigator bar to enter the record, rather than the Add button on the navigator bar. Bill numbers follow a predetermined sequence with a preset sequence limit set by a system administrator. If the limit is reached and you try to post a bill, the system will roll-back the entire transaction. This could cause work disruption and embarrassment if a customer is waiting on the phone. To avoid such a situation, you can use an application configuration option in Application Configurator program > Billing > CSERV.EXE - Raise Error Message When Reaching the End of Bill Number Sequence. If this option is set to 'True', the system will check the Bill Number sequence on bill posting, if the sequence limit is reached, an error message will be displayed 'The limit of bill number sequence is reached. Please contact IT Dept.', allowing you to increase the sequence limit without rolling-back the entire transaction.
Date
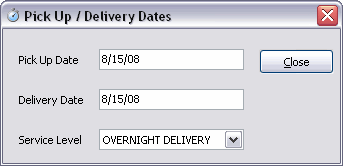
Is automatically assigned based on the date selected in the bottom-left corner of the screen. This date is the equivalent to the Billing Date in the Customer Service program. To enter a Pickup or Delivery Date for the Freight Bill, enter the <Ctrl><D> hot key combination to access the Pick Up / Delivery Dates window (see Pickup / Delivery Dates section below).
Service Level
Defaults according to the configuration of the selected Site. Service Levels are created in the Codes Maintenance program. Sites are configured in the Site Setup program. When you first invoke the Quick Bill Entry program, you are prompted to select a Site. You can change the site that is currently selected by clicking on the arrow buttons to the right of the Site field at the bottom of the screen.
The Service Level has an impact on the calculation of the Deliver By Date, which can be viewed in the Customer Service program.
Pickup / Delivery Dates
While working with a Freight Bill in the Quick Bill Entry program, the User can enter a Pickup and/or Deliver Date at any time by entering the <Ctrl><D> hot key combination. Doing so will open the Pick Up / Delivery Dates window, which allows the User to set the respective dates, as well as a Service Level for the Freight Bill.
Interliners
Data entered in the Interliner fields will be posted to the Interliner module when the Billing Register program processes the freight bill.
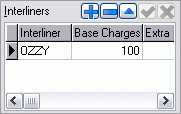
Interliner
Enter the Interliner’s Vendor Code (as configured in the Customer & Vendor Profiles program) in the Interliner field. Double click for a selection form.
Base Charges
Enter the amount that will be paid to the Interliner.
Extra Charges
In the Customer Service program, you can enter an Extra Charge for an Interliner. That amount will display in this field. You cannot enter an Extra Charge for an Interliner in the Quick Bill Entry program.
Amount
Will display the sum of the Base Charges and the Extra Charges. This is the equivalent of the Total Charges field on the Customer Service program > Interline Payable Tab.
Protected Charge
Set the value in this field to 'True' to include the Interliner charges in the freight bill’s total charges (as displayed in the Total field). If a freight bill’s interliner charges are protected, you will bill your customer for amounts from Detail lines, Accessorial Charges (as applicable), and the interliner charges. If the interliner charges are not protected, they will not be added to the freight bill’s total charges, and your customer will only be billed for the amounts from Detail lines, and the amounts from Accessorial Charges (as applicable). The amount of interliner protected charges will display in the 'Prot' field in the Totals section.
Probill
Enter the interliner’s probill number. The number entered here will become a trace number for the freight bill.
Advance / Beyond
Enter the letter 'A' to indicate an Advance carriage; enter the letter 'B' to indicate a beyond carriage. Advance interlining is a freight movement where the interliner transports the freight from a shipper to a junction point. The main carrier takes it from the junction to the destination. Beyond interlining is a movement where the main carrier takes the freight to a junction point and transfers it to an interliner, who carries it to its destination.
Auto Assigned
This field allows you to set automatically assign the Carrier chosen in the 'Interliner' field to a Freight Bill (setting the 'AUTO_ASSIGNED' field of the ORDER_INTERLINER Table to 'True' or 'False'). Double click in the grid field to toggle.
COD
Data entered in the COD (Collect on Delivery) field will be posted to the COD module when the Billing Register program processes the freight bill.

COD Amount
Enter the amount that the driver is to collect. This corresponds to COD Amount entered on the Customer Service program > COD Tab.
Totals
Currency
Defaults to the currency assigned to the Bill To customer in their Profile (as configured in the Customer & Vendor Profiles program). You can select a different currency, as created in the Codes Maintenance program, from the drop down list box.
Pcs / Wgt / Area
Display the total number of pieces, the total weight and the total area as entered on the Details tab.
Chrgs
Displays the total charges for all detail lines entered on the Details tab.
Extras
Displays the total of the extra charges entered on the Extra Charges tab.
Prot
Displays the total of the interliner Protected charges.
GST
Is the equivalent of the Tax 1 value configured in the Tax Calculation Configuration program. It will be automatically assessed if the freight bill fits the criteria specified for Tax 1 in the Tax Calculation Configuration program.
PST
Is the equivalent of the Tax 2 value configured in the Tax Calculation Configuration program. It will be automatically assessed if the freight bill fits the criteria specified for Tax 2 in the Tax Calculation Configuration program.
Total
Displays the sum of the Charges, Extra Charges, GST and PST.
Cash Collect
Will be automatically checked if the Bill To customer has the Cash Collect box checked in their profile (as configured in the Customer & Vendor Profiles program).
No Charge
If checked, the freight bill will be ignored by the Billing Register program, will not be posted to the customer’s account, and no GL posting will be made. If you check the No Charge box, the Charges field on all Detail records will be set to zero.
Footer
At the bottom of the Quick Bill Entry screen, there are several functions that affect the default values for freight bill entry.
Date
This field is in the bottom left-hand corner of the screen and is unlabeled. The date specified in this field will become the default billing date for the freight bill. The Billing Date is displayed in the top right corner of the screen.
Bill Sort
If this box is checked, when you scroll through freight bills using the navigator bars, the freight bills will display in order of the freight bill number. When this box is not checked, the freight bills display in the order of the date and time that they were entered.
M
Stands for 'Manual Add'. Click this button to add a freight bill with a manually assigned freight bill number, rather than a freight bill number that is assigned automatically based on the current Site. The Site is selected when you open the Quick Bill Entry program. You can change the Site by clicking the arrow buttons beside the Site field. Sites are configured in the Codes Maintenance program > Site Setup.
Site
When you first open the Quick Bill Entry program, the Select Site window appears, prompting you to select the Site from which the bills are being entered. Sites are configured in the Codes Maintenance program > Site Setup. Defaults such as the bill number structure, the default Service Level, and the Default Delivery Zone can be configured for multiple sites. The site description is displayed; use the arrow buttons to scroll through other available sites. The selected site can also be changed from within the Quick Bill Entry program by using the arrow buttons next to the 'Site' field.
Notes
By entering the <Ctrl><N> keyboard hot-key combination, Users can access a Notes window similar to that found in the Customer Service program, and enter Notes against this Freight Bill record into the TLORDER Table.
For more information on specific uses of the Notes window, see the Customer Service program > Notes window documentation.
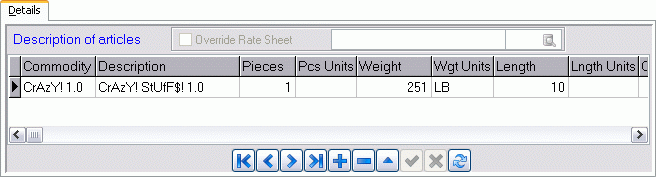
Details Tab
The Details Tab is used to record information about the freight being carried on this freight bill. Multiple detail lines can be entered for a single freight bill. Post each detail line using the navigator bar on the Details tab. When all detail lines are entered, post the changes to the freight bill using the main navigator bar. All fields in the grid are optional; you only need to enter data in those fields that are pertinent to you for informational or rating purposes. To manually rate detail line items, you must set the value in the Manual Rate field to 'True'.
| You can configure the system to automatically calculate weight, cube and pallets based on the 'Conversion from Pieces' factors entered in the Codes Maintenance program. After configuring these values, you will only need to enter the commodity code and the number of pieces; piece unit, weight, weight unit, cube, cube unit and number of pallets will be automatically filled in. |
Warnings
If the commodity code that you selected has been flagged as Dangerous Goods in the Codes Maintenance program, a warning symbol will display in the Warnings column. If the commodity has been flagged as a Temperature Controlled commodity in the Codes Maintenance program, a thermometer symbol will be displayed in the Warnings column.
Commodity / Description
If the Bill To customer has a Primary Commodity specified in their profile (in the Customer & Vendor Profiles program), that commodity code and description will default when you begin to add the detail line. If not, double-click in the Commodity field to select a commodity code. The Short Description of the commodity (as entered in the Codes Maintenance program) will default.
TruckMate will check the effectiveness of the selected commodity. This is done by comparing the Pick up Date with the date range specified by the commodity’s Effective Date and the Expiry Date fields in Customer & Vendor Profiles program. If the Pick up Date falls outside that range, TruckMate will issue an error.
Pieces / Pcs Unit
Enter the number of pieces in the Pieces field. If there is a Default Unit of Measurement that is of the type 'Pieces' (as configured in the Codes Maintenance program) specified in the Bill To customer’s profile, that value will default in the 'Pcs Units' field. Otherwise, double-click to display and select a pieces unit.
Weight / Wgt Units
Enter the numerical weight value in the Weight field. If there is a Default Unit of Measurement that is of the type 'Weight' (as configured in the Codes Maintenance program) specified in the Bill To customer’s profile, that value will default in the 'Wgt Units' field. Otherwise, double-click to display and select a weight unit.
If this field is left blank, the default weight unit, as specified in the Codes Maintenance program > Units Tab, will be used.
Rate
If the Manually Rate checkbox is not checked, the system will attempt to automatically rate the freight bill based on the configuration in the Rates Maintenance program.
If successful, the rate per unit will be displayed in the Rate field, and the rate per unit multiplied by the number of rating units will be displayed in the Charges field. If a discount has been configured for the Bill To customer (in the Customer & Vendor Profiles program) the amount in this field will be reduced by the discount percentage. Do not confuse this with discounts configured in the Rates Maintenance program, which are displayed in the Discount and Discount Rate fields. In the Application Configurator program, you can configure whether rates should round to two decimal places, or whether all four available decimal places should be displayed and used for the calculation.
Rate Per
Enter the rate per unit amount in a numerical value.
Sub Cost
Displays the Rate multiplied by the number of rating units (ie, number of pounds, number of pieces, etc). If As Rating was used on this detail line, the Sub Cost field will display the As Rate multiplied by the number of rating units. If you are manually rating a detail line, enter the charge in this field.
Charges
The Charges field will display the value in the Subtotal field minus the value in the Discount field. This field is read-only, and cannot be modified. If the currency of the Bill To customer varies from the currency of the rate sheet, the Rate amount will be converted based on the currency conversion values configured in the. However, this conversion will not be performed until the record is posted on the main navigator bar (not the navigator bar on the Details tab.) Also, discounts are not computed until the record is posted on the main navigator bar.
Discount
If a discount has been configured for this customer in the Rates Maintenance program, the amount of the discount will be displayed in this field. The Discount Rate is multiplied by the value in the Subtotal field to determine the Discount amount. This field will not be computed until the record is posted on the main navigator bar (not the navigator bar on the Details tab).
Rated As / As Rate
If 'As Rating' has been allowed on the rate sheet (as configured in the Rates Maintenance program), the system will compare the rate yielded by the next break level on the rate sheet multiplied by the lowest unit amount for the next break level. If it results in a lesser charge than that yielded by the true unit amount multiplied by the rate, the Rated As field will show the lowest unit amount for the next break level, and the As Rate will show the rate for the next break level.
Distance / Dst Units
Enter the numerical distance value in the Distance field. If there is a Default Unit of Measurement that is of the type 'Distance' (as configured in the Codes Maintenance program) specified in the Bill To customer’s profile, that value will default in the 'Dst Units' field. Otherwise, double-click to display and select a distance unit.
Length / Lngth Units
Enter the numerical length value in the Length field. If there is a Default Unit of Measurement that is of the type 'Length' (as configured in the Codes Maintenance program) specified in the Bill To customer’s profile, that value will default in the 'Lngth Units' field. Otherwise, double-click to display and select a length unit.
Cube / Cube Units
Enter the numerical cubic value in the Cube field. If there is a Default Unit of Measurement that is of the type 'Cube' (as configured in the Codes Maintenance program) specified in the Bill To customer’s profile, that value will default in the 'Cube Units' field. Otherwise, double-click to display and select a cube unit.
Pallets
For information and reporting purposes, you can enter the number of pallets associated with the detail line. This information is not used elsewhere in the system.
Pallet Units
In this field, the user can specify the pallet units being used.
Rate Units
Enter the numerical rate value in the Rate field. If there is a Default Unit of Measurement that is of the type 'Rate' (as configured in the Codes Maintenance program) specified in the Bill To customer’s profile, that value will default in the 'Rate Units' field. Otherwise, double-click to display and select a rate unit.
Volume / Vol Units
Enter the numerical liquid value in the Liquid field. If there is a Default Unit of Measurement that is of the type 'Volume' (as configured in the Codes Maintenance program) specified in the Bill To customer’s profile, that value will default in the 'Vol Units' field. Otherwise, double-click to display and select a volume unit.
Area / Area Units
Enter the numerical area value in the Area field. If there is a Default Unit of Measurement that is of the type 'Area' (as configured in the Codes Maintenance program) specified in the Bill To customer’s profile, that value will default in the 'Area Units' field. Otherwise, double-click to display and select an area unit.
Time / Time Units
Enter the numerical time value in the Time field. If there is a Default Unit of Measurement that is of the type 'Time' (as configured in the Codes Maintenance program) specified in the Bill To customer’s profile, that value will default in the 'Time Units' field. Otherwise, double-click to display and select a time unit.
Dang. Goods / Temp Controlled
Will display the value 'True' if the detail line’s commodity is flagged (in the Codes Maintenance program) as a dangerous good or a commodity requiring temperature control. Otherwise, the value 'False' will be displayed.
Field One / Field Two / Field Three
Are general purpose fields that can be used to store miscellaneous information about the detail line.
Requested Equipment
Can be used to store an equipment class (as created in the Codes Maintenance program). Double-click to view and select an equipment class. If your automatic rating is configured to use the Requested Equipment field, it refers to the Requested Equipment value on the Summary tab, not this field.
Manual Rate
To enter a manual rate for a detail line, change the volume in this field to 'True', and enter the charge in the 'Sub Cost' (subtotal) field. This field can be set by default by configuring the 'Manual Rate Checked' value in the Application Configurator program.
Rate ID
If this detail line rated automatically, the ID number of the Rate Sheet (as configured in the Rates Maintenance program) will display in this field.
Height / Height Unit
Enter the numerical height value in the Height field. Double-click in the Height Unit column to see If there is a Default Unit of Measurement that is of the type 'Height' (as configured in the Codes Maintenance program) specified in the Bill To customer’s profile, that value will default in the Height Units field.
Width / Width Unit
Enter the numerical width value in the Width field. Double-click in the Width Unit column to see If there is a Default Unit of Measurement that is of the type 'Width' (as configured in the Codes Maintenance program) specified in the Bill To customer’s profile, that value will default in the Width Units field.
Commodity Group
Specify which commodities are available to a shipper, and define commodity groups, which a shipper may use. These are defined in Profiles. When adding bills in the Customer Service program or Quick Bill Entry program only allowable commodities and commodity groups will be available to add to a freight bill. When a commodity group is added, all commodities that are part of that group are added as well. The user may specify a default commodity or commodity group, which will be added to every freight bill as soon as a commodity is added. This works to replace the currently existing Primary Commodity, which is set up using the Codes Maintenance program.
Activate this functionality by using the Application Configurator program > PROFILE.EXE, Client Commodities option. Upon activation, you’ll notice a 'Commodity' button on the Profiles, General screen where you can bring up a dialog box and create commodity groups.
Items
The Items fields contain information relevant to Pallet Tracking functionality. When you enter an integer value in this field, the same number of UPC Bar Code entries will be generated.
MP Seq
This displays the multi-point sequence. This field is read only.
Rate Cube
This displays the rate cube being used. This field is read only.
Rate Cube Units
This displays the rate cube units being used. This field is read only.
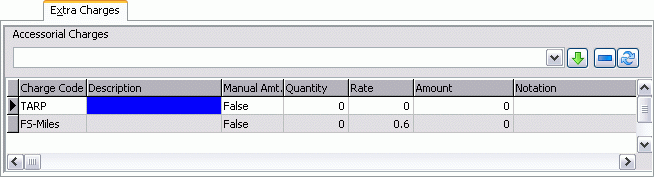
Extra Charges Tab
Accessorial Charges are extra charges assigned to freight bills here on the Extra Charges Tab. They are defined in the Codes Maintenance program. They can be configured to automatically apply to every freight bill, to apply only to specific customers (configured in the Rates Maintenance program), or they can be manually applied on the Extra Charges tab. Codes that are configured in the Codes Maintenance program to 'Auto-Assign by Default' will be created automatically. To manually assign an Accessorial Charge, select the desired code from the drop down list, then click on the green arrow to add it to the grid.
| The available Accessorial Charge codes in the drop down list box depend on whether the code is configured as Custom Code Only in the Codes Maintenance program. If it is, it will not be displayed in the drop down list unless it has been assigned to the Bill To customer in the Rates Maintenance program. |
Amount
Will be calculated based on the Quantity value multiplied by the Rate. You can manually change this value. Enter a value in the Amount field or click on the right-mouse button when the mouse pointer is anywhere on the grid. Then select the 'Edit Manual Amount' menu option. And edit form will be displayed. The Quantity is multiplied by the Rate to calculate the value in the Amount.
Notation
To enter a notation for an Accessorial Charge, begin typing in the field, or click on the right-mouse button when the mouse pointer is anywhere on the grid. Then select the 'Edit Manual Amount' menu option. An edit form will be displayed.
Requested Code
Refers to the ability to configure Accessorial Charge Code Substitutions for specific customers in the Rates Maintenance program. The Requested Code field will display the code that would apply if no substitution were configured.
Position
Enter the Position number in this field.
IP Split
Double click to select if an Interline Payables Split is required. If so, select 'True'; otherwise, select 'False'.
Bill To Code
Enter a 'Bill To' code manually, or by double clicking.
Other Bill Number
If required, enter a second Bill Number in this field.
Context Menu
Force (Automatic) Recalculation
Will look up Accessorial Charge parameters in the Codes Maintenance program and re-set the record to its original values, over-riding any manual changes. The value in the 'Manual Amt.' field will be changed back to 'False'.
Recalculate All
Will recalculate the charges for all Accessorial Charge entries.
Edit Manual Amount
Is used to change the entries in the record’s Quantity field, Rate field, Amount field or Notation field. An edit form will be displayed.
Change Bill To
Creates a new Freight Bill with the Accessorial Charge you right click, and assigns it to the 'Bill To' customer you choose.
Custom Definitions and Check List tabs
The Custom Definition tab contains fields that store information that will appear with the created Bill. These are user defined 'Custom' fields. See the Codes Maintenance program for more information.
For more information on the Check List Tab, see the details regarding the Customer Service program > Check List Tab.