Dispatch Load Listing
| As of TruckMate 2023.1, Dispatch Load Listing is no longer an option in the TruckMate Menu or Task List. If you want this option added, contact Trimble Transportation Support. |

The Dispatch Load Listing report is used to generate freight bill listings. You can select freight bills based on a combination of criteria regarding pickup, delivery, shipment, status and dispatch information. The report is previewed on the screen and then can be sent to a printer or saved to a file. See the Crystal Reports Reference for more information about the report functions.
To access Dispatch Load Listing:
| From this location | Go to |
|---|---|
TruckMate Menu and TruckMate Task List |
TruckMate 2022.x and earlier: Dispatch > Brokerage > Dispatch Load Listing |
Windows Start Menu |
TruckMate 20xx > Dispatch Load Listing |
Windows Explorer |
C:\Program Files (x86) > TruckMate 20xx > Dls.exe |
How Do I?
How do I Print a Freight Bill Listing?
The Dispatch Load Listing report is used to generate Freight Bill listings. You can select Freight Bills based on a combination of criteria regarding pickup, delivery, shipment, current status and dispatch information. The report is previewed on the screen and then can be sent to a printer or saved to a file. See the Basics documentation for more information about the report functions.
-
Open the Dispatch Load Listing program (DLS.EXE).
-
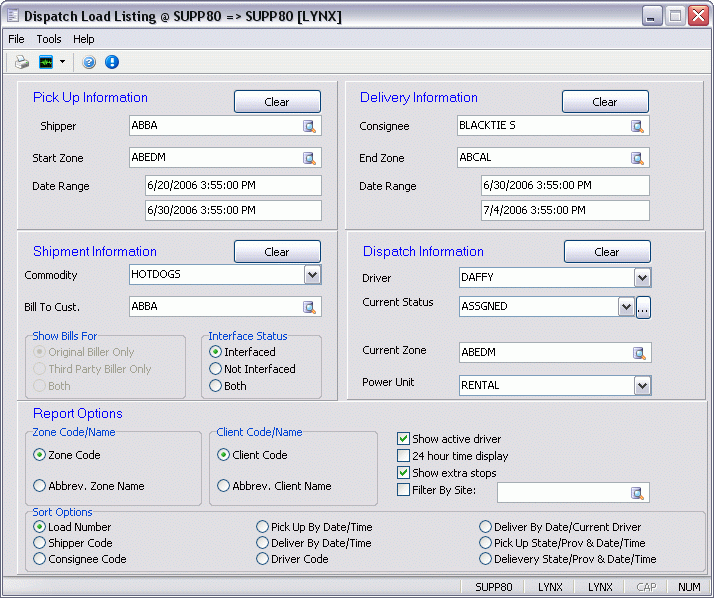
Fill in the Pick Up Information (left-hand side of the screen) using a variety of methods: by double-clicking, typing in partial data, and/or selecting the drop-down button. The Enter key can also be used to open a Shipper Code or Date lookup box. The Pick Up Information can be left blank to return all Freight Bills.
-
Fill in the Delivery Information (right-hand side of the screen) using a variety of methods: by double-clicking, or typing in partial data, and/or selecting the drop-down button. The Enter key can also be used to open a Delivery Code or Date search box. The Delivery Information can be left blank to return all Freight Bills.
-
Fill in the Shipment Information (middle left-hand side of the screen) using a variety of methods: by double-clicking, or typing in partial data, and/or selecting the drop-down button. The Enter key can also be used to open a Client Code search box for the 'Bill to Cust'. The Shipment Information can be left blank to return all Freight Bills.
The Interface Status must be one of the three options, Interfaced (Order is Complete, Billing Register has been run), Not Interfaced (Billing Register has not been run), or Both (All Orders).
-
Fill in any required Dispatch Information. Select a driver from the Driver box, status from the Current Status box, Current Zone and Power Unit from their respective drop downs. One or all of these boxes can be left empty to return all Freight Bills. The Current Status also has the option to select or exclude up to 8 different status codes by clicking the status search button.
-
The generated list of Freight Bills in the report will be limited by each of the boxes that are completed. To be considered, the Freight Bills must match all of the information entered.
-
The Report Options allow the user some formatting and sorting changes prior to generating a report. The Zone Code/Name options will allow either the display of the Zone Code or an abbreviation of the Short Description for the Freight Bills' Current Zone. The Client Code/Name will show the Client Code or an abbreviation of the Clients Name. The 24-hour time display option will switch from an AM or PM type-component to the military type 24-hour display. If the Show Extra Stops option is not checked then any "Child" ("-AA", "-AB", etc.) Freight Bill will not be included in the generated report.
The report can be sorted by six different methods: Load Number (Freight Bill Number), Shipper Code, Consignee Code, Pick Up By Date/Time (Scheduled not Actual), Deliver By Date/Time (Scheduled not Actual), or by the Driver Code.
-
Click on the Build Report button to generate a preview of the Freight Bill listing.
How do I Select Freight Bills for a Trip?
-
Open the Dispatch Load Listing program (DLS.EXE).
-
These are hard coded reports where we can select preferred options and then start the report procedure. In the section called "Interface Status" you can select Bills that were Billed (Interfaced), Bills not Billed Yet (Not Interfaced) or Bills of any Status (Both).
-
Your selections will determine which Freight Bills will show on the report.
Menu Bar / Toolbar
File Menu
Print Reports
The Dispatch Load Listing program uses a pre-formatted internal report, rather than a Crystal Reports template. You will not be prompted to select a report template. The report will preview to the screen.
See the Crystal Reports Reference for more information on Report Functions.
Exit
Selecting this option will close the Dispatch Load Listing program.
Multi-Company
For more information on the Multi-Company options available from the Menu Bar, see the Multi-Company documentation.
Tools Menu
TruckMate Monitor
Click the down arrow next to this button to access the various functions of the new TruckMate Monitor.
Remember Position / Size
Selecting this option will maintain the program window position and size upon close. When the program is re-opened, it will appear the same.
Help Menu
TruckMate Help
Selecting this button will open the Dispatch Load Listing topic in the TruckMate Online Help file (the page you are currently viewing).
About
Selecting this button will open the standard TruckMate About window, which contains important information about the application you are currently using, including its version number (important for support calls).
Service Portal
(Accessible from 'Help' menu). Selecting this button will open an instance of your default Internet browsing software, with the https://www.tmwcare.com login page displayed.
Pickup Information
Shipper
Enter the shipper’s customer code in this field. Shipper information is entered in the Customer Service program, in the Shipper section, or in the Quick Bill Entry program in the Shipper section. Customer codes are configured in the Customer & Vendor Profiles program.
Start Zone
The freight bill’s Start Zone is entered in the Customer Service program, under the Shipper fields. In the Quick Bill Entry program, it is displayed under the Shipper fields. Enter the Short Description of the desired zone code in this field. To use the selection menu, you must enter the starting character(s) of the zone’s short description before clicking the search button. Zone codes are configured in the Codes Maintenance program.
Date Range
Enter a range of Pick Up By dates in these fields. The Pick Up By date is displayed in the Customer Service program under the Shipper section; in the Quick Bill Entry program it defaults to the date the freight bill was entered. Double click for a calendar selection form.
Delivery Information
Consignee
Enter the Consignee customer code in this field. The Consignee customer is displayed in the Customer Service program in the Consignee section. In the Quick Bill Entry program, the Consignee customer code is displayed in the Consignee section of the screen. To use the selection menu, you must enter the starting character(s) of the Consignee customer code before clicking the search button. Customer codes are configured in the Customer & Vendor Profiles program.
End Zone
The freight bill’s End Zone is entered in the Customer Service program, under the Consignee fields. In the Quick Bill Entry program, it is displayed under the Consignee fields. Enter the Short Description of the desired zone code in this field. To use the selection menu, you must enter the starting character(s) of the zone’s short description before clicking the search button. Zone codes are configured in the Codes Maintenance program.
Date Range
Enter a range of Deliver By dates in these fields. The Deliver By date is displayed in the Customer Service program under the Consignee section; in the Quick Bill Entry program it defaults to the date the freight bill was entered. Double click for a calendar selection form.
Shipment Information
Bill To Cust
Enter the Bill-To customer code in this field. The Bill-To customer is indicated in the Customer Service program by the Bill To radio buttons located on the top left side of the screen. In the Quick Bill Entry program, the Bill To customer code is displayed in the Bill To section of the screen. To use the selection menu you must enter the starting character(s) of the Bill To customer code before clicking the search button. Customer codes are configured in the Customer & Vendor Profiles program.
Commodity
You may specify a commodity in this field. Any freight bill with a Detail line that specifies that commodity will be included. Details lines can be viewed in the Customer Service program and Quick Bill Entry program on the Details tab. Click the down arrow to select a commodity code from the drop down menu. Commodity codes are configured in the Codes Maintenance program.
Interface Status
When freight bills have been updated to the Accounts Receivable, COD and Interliner modules using the Billing Register program, they are considered "interfaced". Select the interface status of the freight bills you wish to include in the report by clicking on one of the radio button
Dispatch Information
Driver
You may select freight bills that were assigned to the same trip as a specific driver. Enter the driver code in this field, or select a driver from the drop down list box. Drivers and freight bills are assigned to trips in the Dispatch program. Driver codes are configured in the Driver Profiles program.
Current Status
To include freight bills of a specific current status, select a status code from the drop down list box. To select multiple statuses, or to exclude one or more statuses from being included in the report, click the search button. In the form that displays, you have the ability to select multiple status codes. Check the Exclude Statuses box to generate a report that does not include and freight bills of the specified statuses. The current status of a freight bill can be viewed on the Summary tab of the Customer Service program. Status codes are configured in the Codes Maintenance program.
Current Zone
You can select freight bills based on their Current Zone. In the Dispatch program, freight bills are assigned to trips. As trip movements are processed, the Current Zone of the freight bills gets updated. To select a zone code, enter the first few characters of the Short Description then click the search button to select from the drop down list box. Zone codes are configured in the Codes Maintenance program.
Power Unit
You may select freight bills that were assigned to the same trip as a specific power unit. Enter the power unit code in this field, or select a power unit from the drop down list box. Power units and freight bills are assigned to trips in the Dispatch program. Power unit codes are configured in the Power Unit Profiles program.
Report Options
Zone Code / Name
On the report, pickup, delivery and current zones are displayed for each freight bill. You can choose to display the zones in the form of the Zone Code, or you can display the zone’s Short Description (which will be truncated as necessary). Click a radio button to make your selection. Zone codes are configured in the Codes Maintenance program.
Client Code / Name
On the report, the shipper and consignee are displayed for each freight bill. You can choose to display the customers in the form of their customer code, or you can display the customers' name (which will be truncated as necessary).
Show Active Driver
On the report, the current Driver will be displayed.
24 hour time display
On the report, the Pick Up By and Deliver By dates are displayed. If you check the 24 hour time display button, the times will also be displayed (in 24 hour format). If you uncheck the box, no times will be displayed. You can view the Pick Up By and Deliver By times for a freight bill in the Customer Service program, under the Shipper and Consignee sections respectively.
Show extra stops
Extra stop freight bills are sub-orders of a main freight bill. They are identified by a two character suffix after the freight bill number. Check this box if you want extra stop freight bills to display on the report. If the box is not checked, only the main freight bills will be displayed. Extra Stops are created in the Customer Service program.
Filter By Site
If you check the 'Filter By Site' option, you can choose a Site from your Site list using the search button to the right.
Sort Options
The radio button selected here determines the order in which the freight bills are displayed on the report.