R&M Configuration

The R&M Configuration program is used to define the codes used throughout the Repairs & Maintenance module. Use this program to set up Part Codes, components, transaction codes, and other code categories.
For those users who would like to customize the appearance of the R&M Configuration program, there are a set of options within the Application Configurator program that allow you to change the global naming conventions within the program. If, for example, you would like to change the 'Part Group' tab into something that reflects your company’s use of VMRS Codes (see note below), you may change 'Part Group' into 'VMRS'. Once changed, every instance of 'Part Group' within the program will now appear as 'VMRS'.
Vehicle Maintenance Reporting Standard Codes are also included within the Repair and Maintenance module of TruckMate. Developed by the American Trucking Association, VMRS codes are numeric codes that are used to identify parts, equipment, part manufacturers, etc. across the International trucking industry. Consisting of 84 'Code Keys' combined into 14 'Instruction Sets', VMRS codes cover every possible R&M issue, and will make your Repairs much easier to handle.
Note: To incorporate the use of VMRS codes into your version of TruckMate, you must subscribe to a separate service. Contact Trimble Transportation Support for more information.
To access the R&M Configuration program:
| From this location | Go to |
|---|---|
TruckMate Menu and TruckMate Task List |
Repair & Maintenance > R&M Configuration |
Windows Start Menu |
TruckMate 20xx > R&M Configuration |
Windows Explorer |
C:\Program Files (x86) > TruckMate 20xx > RMConfig.exe |
How Do I?
How do I Define the Codes used throughout the R&M module?
The R&M Configuration program is used to define the codes used throughout the Repairs & Maintenance module. Use this program to set up part codes, components, transaction codes, and other code categories.
-
Open the R&M Configuration program (RMCONFIG.EXE), click: Start > Programs > TruckMate > Repair & Maintenance > R&M Configuration
-
Use the '+' button to enter codes on each of the relevant tabs:
-
The Part Class tab is used to group similar types of part codes into groups.
-
The Part Group tab is used to combine interchangeable parts.
-
The Components tab is optional and is used when several part codes can be combined to create one component.
-
The Part Codes tab is used to identify specific parts.
-
The Transactions tab is used to enter activity codes that identify the action, part class and from-to locations.
-
The Jobs tab is used to enter a combination of activities and parts to create a commonly used function or "job".
-
The Part Packages tab is used to enter a combination of parts that will be used together.
-
The Shops tab is used to identify shop locations.
-
The Mechanic tab is used to enter codes that identify each of your mechanics.
-
The GL tab is used to enter information that will, upon instruction, be posted to your GL accounts.
-
The Misc tab is used to enter Markup Rates which will determine the markup applied to parts, and labour.
-
The Trace tab is used to configure your Trace Types for use in the R&M Module.
-
The Invoice tab is used to create 'Sites' for use in the R&M Module.
-
The Outside Equipment tab is used to detail any equipment that is used during R&M that is either rented or borrowed from off-site.
-
How Do I Import / Setup VMRS Codes in TruckMate?
Importing VMRS Codes is as simple as clicking two buttons in RMCONFIG.EXE, but there are other configuration steps you might like to take.
Note: This process assumes you have purchased a VMRS License from TMW Systems Inc. and have the 'CK33.txt' file in your TruckMate system folder.
Open the R&M Configuration program (RMCONFIG.EXE), click: Start > Programs > TruckMate > Repair & Maintenance > R&M Configuration
-
Click the 'Part Group' tab and click the 'Import VMRS' button in the lower right corner. The VMRS Codes will be imported and inserted into the 'Part Group' grid.
-
Click the 'Component' tab and click the 'Import VMRS' button. You will be prompted to select how many segments you want to import here, and because you only require the first '2' segments (the 'System Code' and 'Assembly Code'), you will enter '2' here, then click on 'OK' to start the import. You do have the option of choosing 1-3 segments, with '1' segment being the most basic level of reporting and '3' segments being the most detailed reporting.
-
Once this is complete, it is suggested that you change the name of these two tabs in the RMCONFIG.EXE program to reflect the inclusion of the VMRS Codes.
-
Open the Application Configurator program (CONFIGEXPLORER.EXE), click: Start > Programs > TruckMate > Utilities > Application Configurator
-
Select the RMCONFIG.EXE option from the left side menu. The options for the program will appear on the side of the program screen. Find the option entitled 'Rename "Part Group"' and double click it. A small window will appear. Enter the text 'VMRS Codes' into the blank field and click 'OK'. You’ll notice that the 'value' field in the Application Configurator window now has the text 'VMRS Codes' in it.
-
Find the option entitled 'Rename "Component"' and double click it. A small window will appear. Enter the text 'Sys/Assembly' (or some variation of 'System/Assembly') into the blank field and click 'OK'. You’ll notice that the 'value' field has changed again.
-
Close both the Application Configurator and R&M Configuration programs to save the changes. When you next open RMCONFIG.EXE, you will notice that the tab names have changed. If you would like to rename the Grid Labels within these tabs, you will have to right-click within the Grid and select the Customize Grid option, click the 'Grid Layout' tab, and change the 'Field Name' value to one more appropriate.
Further VMRS Configuration
If you have a VMRS License purchased from TMW Systems Inc., there are some further suggested configuration steps. These are optional, and depending on your usage you may not require these changes. However, these changes can make the RMCONFIG.EXE application easier to navigate after VMRS Codes have been implemented.
Note: You should complete the above topic ('How do I import/setup VMRS Codes in TruckMate?') before completing this topic.
-
Open the Application Configurator program (CONFIGEXPLORER.EXE), click: Start > Programs > TruckMate > Utilities > Application Configurator
-
As in the above topic, it is suggested that you change the names of the following program tabs to match their VMRS functionality:
| Original tab Name (& App Config Option) | New tab Name |
|---|---|
Part Code |
Part Number |
Jobs |
Maintenance Jobs |
Trace |
Cross Reference |
Cause/Effect/Remedy |
Reason for Repair/Part Failure/Work Accomplished |
How Do I Match a Shop Code to a particular Inventory Control account?
TruckMate allows you to keep an Inventory Control account for each shop you maintain inventory for. So, unlike A/R, where you can have only one A/R Control account per currency, you can have more than one Inventory Control account per currency. So what does this mean? Basically it means that you must have some way to match a shop code to a particular Inventory Control account. This is where the GL distribution configuration for R&M Work Orders comes in. The simplest scenario is a very general expense distribution set up that specifies a single account for a particular Part Class and Shop. If you have only one Shop, the system can guess which Inventory Control account you want to use to balance against the expense. In that case, you’d see something like this:
| Part Class | ResCode | Inventory | Expense |
|---|---|---|---|
FL |
SASK |
<blank> |
00-5100 |
Note: ResCode represents the Shop Code- in this case the Saskatoon shop. It can also represent a Power Unit or Trailer. It depends on the ResType you specify for the distribution.
If you have more than one Shop, you are going to have to set up a distribution for each shop that specifies a Part Class, Shop code and Inventory Control account. In this case, you would then set up something like this:
| Part Class | ResCode | Inventory | Expense |
|---|---|---|---|
FL |
SASK |
00-3100 |
00-5100 |
FL |
SASK |
00-3200 |
00-5100 |
At the other end of the complexity scale, you can create an expense distribution that is specific all the way down to a Part Class, Part Code, Shop, and Power Unit (or Trailer or Special Equipment). But, in this scenario, it does not matter if you have only one shop. You’d have to, as a minimum, specify an Inventory Control account to credit for the Part Class and Shop. The setup would look something like this:
| Part Class | Part Code | ResCode | Inventory | Expense |
|---|---|---|---|---|
FL |
ESSO |
MACK10 |
<blank> |
00-5110 |
FL |
ESSO |
MACK15 |
<blank> |
00-5115 |
FL |
<blank> |
SASK |
00-3100 |
<blank> |
Menu and toolbar options
There are no menu and toolbar options and functionality that are specific to the R&M Configuration window.
For information about common menu and toolbar options (i.e. File menu, Refresh, Multi-Company, etc.), see General menu and toolbar options.
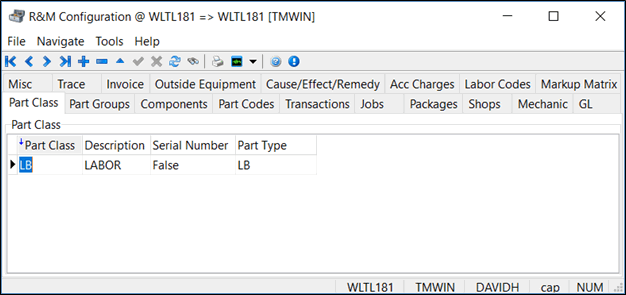
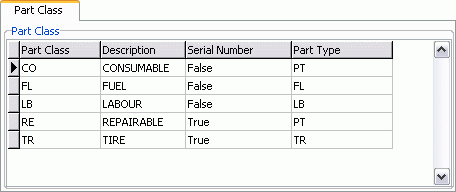
Part Class tab
Part Class codes are used to group similar types of Part Codes into groups, and are configured on the Part Class tab. Part Classes are used throughout the Repairs & Maintenance module for reporting purposes, and for determining serial number requirements. Because every Part Code requires a Part Class, Part Classes must be set up before Part Codes. Part Class codes are 2 digits long, letters and/or numbers and are stored in the RM_CLASS table. We recommend that, until you are familiar with the Repairs & Maintenance module, you do not delete the predefined codes, as other predefined data items refer to them.
Part Class
Enter your Part Class code here. This value is tied directly to the part in your inventory.
Description
Enter a description for your Part Class. The description is used for reporting purposes.
Serial Number
If parts included in this Part Class have serial numbers, enter 'True' in this field. Users will be prompted to enter serial numbers for transactions involving parts where the Part Class Serial Number field is set to 'True'.
Part Type
This is an internal grouping used by the system. Select one of the four types:
-
PT* (Part)
-
FL* (Fuel)
-
LB* (Labour)
-
TR* (Tire)
Part Groups tab
Part Groups are created on the Part Groups tab, and are used to define Part Codes that are interchangeable. Part Group codes are stored in the RM_GROUP table. For example, a certain weight of oil may be specified in a scheduled maintenance work order. If the shop is currently out of stock in that weight, another weight may be accepted as a substitution, rather than having to postpone the job until the specified oil weight is back in stock. When Part Codes are identified as members of the same part group, these substitutions will be suggested.
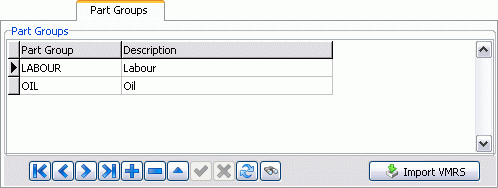
Note: If you have purchased a VMRS subscription from TMW Systems., you do not have to define your own Part Group Codes, for they are already done for you. Simply click the 'Import VMRS' button.
Part Group
Enter a part group code.
Description
Enter a part group description.
Import VMRS
Clicking the Import VMRS button will begin the process of setting up VMRS Codes for use in the R&M Module. You will be prompted to 'OK' the import of a VMRS 'CK' file, which will reside in your TruckMate directory (..\VMRS\CK33.txt). The VMRS Codes will then be added into your Part Group list of codes.
Those users who are subscribed to the TruckMate VMRS program might want to change the 'Part Group' tab’s title to something like 'VMRS Codes'. See the Need to know How? page for info on how to accomplish this task.
Components tab
Component codes are optional, and are entered on the Components tab. They are defined for the purpose of costing and reporting, and are stored in the RM_COMPONENT table. Part codes can be attached to Component Codes, allowing reports to be selected and sorted based on the Component Code.
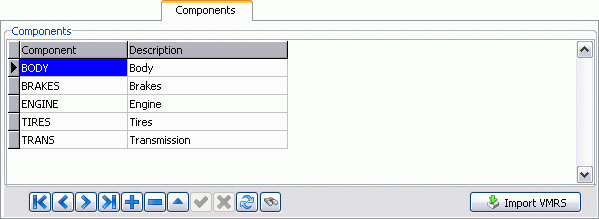
Component
Displays the Component Code. To enter a a new Component Code, click the '+' button and enter a text name in the space provided.
Description
Enter a component description.
Import VMRS
If you have imported the VMRS codes already, you will need to import the 'Sys/Assembly' codes here. To do this, click on the 'Import VMRS' button. A VMRS code is broken up into 3 segments of 3 digits: System Code/Assembly Code/Part Code. You will be prompted to select how many segments you want to import here, and because you only require the first 2 segments (the System Code & the Assembly Code), you will enter '2' here, then click on 'OK' to start the import. You do have the option of choosing 1-3 segments, with '1' segment being the most basic level of reporting to '3' segments being the most detailed reporting.
Part Codes tab
The Part codes you enter here on the Part Codes tab are used throughout the Repair & Maintenance module, in the R&M Work Orders program, the Stock Receipts program, and the R&M Maintenance program. A Part Code should be defined for each specific, discrete part item that your shop uses. Labour charges are treated as Part Codes. Part codes can also be entered 'on the fly' in the Stock Adjustments program, the Stock Receipts program and the R&M Work Orders program. Part Codes are stored in the RM_PART table.

Note: It is important to note, however, that Part Codes can only be set up after the 'Part Group' and 'Component' tabs are already completed.
Part Codes
Part Code Filter
The Filter drop-down menu at the top of the screen allows you to filter on 'All' Parts, 'Inactive' Parts or 'Active' Parts with the default set as Active Parts.
Code
Enter a Part Code (up to twenty characters long). In most cases, the more intuitive the code, the easier the system will be for multiple users. This is your internal Part Code; the vendor’s Part Code is entered on another tab, in a field called Vendor Part Code (see below).
Inactive
Check this option if the Labor Code has been deemed Inactive. Inactive Labor Codes can be filtered out when doing searches.
Tax 1 / Tax 2 Exempt
These two flags designate the tax exemptions available for a specific part in your inventory. Both the 'Tax 1' and 'Tax 2' amounts are defined in the Tax Calculation Configuration program. By selecting one (or both) of these fields, you can exempt the selected part from taxation.
Note: These fields can be defaulted for all newly created Part Codes by using the 'Tax 1 / Tax 2 Exempt Parts' options in the Application Configurator program > RMCONFIG.EXE section.
Superseded Code
This text field will display the 'Superceded Code' for a selected part, if that part’s number has been replaced by a new Part Code in the selected shop.
If the value for the 'Part Code Replace' option is set to 'True' in the Application Configurator program > RMCONFIG.EXE, you can set any available Part Code to be superseded. If you would like to change the Part Code for a selected part, first create a new Part Code with the same details as the one being Superceded. Save that part with the new Part Code, and return to the old part’s code. Once at the old part, click the 'Supersede Code' button and select the new code that you have created. The system will ask for confirmation, and then will update the database with the new code, and will automatically check the 'Inactive' flag of the old Part Code.
Warning: As this function modifies table data in you database, use it with caution.
Description
Enter a description for this Part Code. This will display in reports, and throughout the Repairs & Maintenance module as appropriate.
Description 1 / Description 2
May be optionally filled in for reporting and information purposes.
Value 1 / Value 2
These only affect labour-type Part Codes. Value 1 is used to store a labour rate. Labour rates can also be based on mechanic rates- there is a flag on the Misc tab to specify which rate is used. Value 2 is used to store the amount of time involved in a single unit of this labour code.
Class
Double click to select a Part Class. Part Classes are configured on the Part Class tab. Click the search button for more choices.
Group
Double click to select a Part Group. Part groups are only used to define Part Codes that are interchangeable. Part groups are configured on the Part Group tab. Click the search button for more choices.
Component
Double click to select a Component Code. Component Codes are optional. They are defined for the purpose of costing and reporting. Components codes are configured on the Components tab. Click the search button for more choices.
Make
You may optionally enter the make of the Part Code here. It may be useful for reporting.
Model
You may optionally enter the model of the Part Code here. It may be useful for reporting.
Unit of Measure
Click the search button to select the default Unit of Measurement for this Part Code.
Default Vendor
Optionally, enter a Default Vendor code for use in running re-order reports. Double click for a selection form. Click the search button for more choices.
Retail Price
You may optionally enter the retail price of the Part Code here. It may be useful for reporting. The price entered here will be used in the R&M Work Order program context menu option 'Set to Retail'.
Track Warranty
Place a checkmark in the box provided if you wish to track the warranty time frame for this Part Code.
Warranty Length (months)
Enter the warranty time frame, in months.
Disposal Fee
Enter a disposal fee for this Part Code, if applicable.
Default Cause
Click the search button to select a default 'Cause' (reason for repair) code. These codes are set up in the Cause/Effect/Remedy tab of the R&M Configuration Program.
Default Effect
Click the search button to select a default 'Effect' (part failure) code. These codes are set up in the Cause/Effect/Remedy tab of the R&M Configuration Program.
Context Menu
Copy Part Code
Select this option to quickly copy the details of the selected Part Code into a new Part Code.
Attach/Open Related Files
Available from the Header section (and anywhere else besides a grid), this option allows you to interface with your Third Party Imaging software. See the Codes Maintenance program for more information on setting up your Imaging software, and the Document Imaging Overview for more information on specific Third Party providers.
Buttons
Inventory Button
Clicking this button will bring up a search dialog box, which will allow users to check inventory for a particular part.
History Button
Clicking this button will bring up a history window where you may view the history of a selected part. The 'History' screen is divided into two sections: the top 'Filter' section, and the bottom 'Display' grid. Use the Filters to narrow a range for the part’s history, depending on what data you would like to view, and click the 'Refresh' button to display the values which fall into your Filter range.
Print Button
Clicking this button will bring up a Report Selection and Print window, similar to those found in other TruckMate programs. For more information on Report Printing, see the Crystal Reports Reference.
Notes sub-tab
General notes can be entered on the Notes tab. You have a choice of 'General' notes or 'Install' notes via the two tabs at the bottom of the 'Notes' text area. If the notes you are recording relate to the part in question, use the 'General' tab; if the notes relate to the installation of said product, use the 'Install' tab. This field is for reporting and informational purposes only.
Images & Docs
Clicking the 'Images & Docs' button will open the Attach / Open Related Files window, which allows you to add images or documents to the selected record.
Shop Information sub-tab
The Shop Information tab allows location and stock details pertinent to each shop code to be specified.
Shop Code
Enter the shop code here, as configured on the Shop tab. Double-click to see a list of defined codes.
Bin #
If recording stock locations within the shop are useful to you, enter a location description in the Bin # field. This number is used in the Cycle Count process. If a Bin # is not included here, this part will be excluded from any Cycle Counts conducted.
Min Stock
Enter minimum stock levels here. This value is used by stock re-order reports.
Default
Automatically set to 'True' upon addition of a 'Shop Code' record. Sets the current Shop to your default for use in other R&M Modules.
Max Stock
Enter maximum stock levels here. This value is used by stock re-order reports.
Auto Calc Mins
Automatically set to 'True' upon addition of a 'Shop Code' record. Look at your company’s usage numbers and suggests your minimum and maximum stock values. This functionality also takes into account 'seasonal' needs by noticing any large changes in your ordering during specific periods. Uses the 'AutoMin Check Months', 'AutoMin Min' and 'AutoMin Max' values of the Application Configurator program.
Auto Reorder
For customers using Purchase Orders to order inventory. Automatically creates Purchase Orders for items that are approaching their minimum stock values. This value is set to 'True' upon creation of a new 'Shop Code', and will function automatically; if set to 'False' by the user, they can do this process manually by clicking the 'Parts PO' button below the Shop Information grid.
Auto Vendor Bump
When set to 'True' in the Application Configurator program, looks at the price of an item (gathered from the Stock Receipt information from the 'Transactions' table) in your system. When you post from the Stock Receipts Register program, the system will change the 'Default Vendor' value to the Vendor with the cheapest price.
Default Vendor
Sets the 'Default' Vendor for the currently selected Shop.
Secondary Vendor
Sets the 'Secondary' Vendor for the currently selected Shop.
Alternate Vendor
Sets an 'Alternate' Vendor for the currently selected Shop.
Parts PO Button
When this button is clicked, you will be prompted to select a Shop Code to reorder parts for. The system will then display what parts are needed for reorder (based on the Min/Max values for the selected Shop) from each Vendor in the system. This button automatically queries each Vendor in the system and specifies what you should order.
Vendor Bump Button
If the 'Auto Vendor Bump' option is set to 'False' within the Application Configurator program, you can accomplish a Vendor Bump manually by clicking this button. The process is similar to the one outlined in the 'Auto Vendor Bump' process described above.
Group sub-tab
The Group tab displays Part Codes that share the same Part Group as the currently displayed Part Code. Part groups are configured on the Part Group tab, and assigned to Part Codes on the main part of the Part Code screen.
Vendor Parts sub-tab
For re-order purposes, you may enter your Vendor’s corresponding Part Code on the Vendor Part Codes tab. Multiple vendors and vendor Part Codes can be entered for each Part Code. Vendor Part Codes can also be entered 'on the fly' in the Stock Adjustments program, the Stock Receipts program and the R&M Work Orders program.
Vendor Code
Enter the vendor code here, as configured in the Customer & Vendor Profiles program. Double-click for a vendor ID code selection form.
Vendor Part Code
Enter the Part Code that the vendor uses to refer to this item.
Current Price
Enter the Current Price for this Vendor Part.
Last Date
Enter the Last Date this Part was ordered.
User Defined sub-tab
The User Defined tab allows you to set additional information. The labels for these fields are configured within the Application Configurator program.
Part Prices sub-tab
The Part Prices tab displays the prices of various parts by shop. This tab consists entirely of read-only data populated by the system.
Note: TruckMate only uses an 'Average Pricing System', meaning that costs will always be determined by their average over a period of purchasing.
Transactions tab
The Transaction Codes that are setup on the Transactions tab form the basis of all activity within the Repairs & Maintenance module.
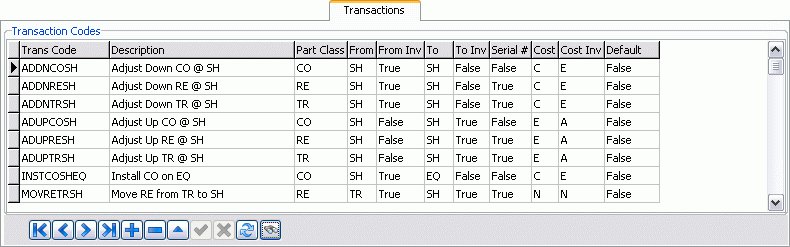
Trans Code
Enter a transaction code. This can be up to ten characters long.
Description
Enter a description for the transaction code. This is used for reporting and reference purposes.
Part Class
Double-click to select from a list of Part Classes. Part Classes are configured on the Part Class tab.
From
Enter a From location code that describes the origin of the parts or labour. For example, a transaction code describing a receipt of stock from a vendor would have a From code of 'VE' (vendor) and a To code of 'SH' (shop). Pulling a tire off a trailer and adding it to shop stock would have a From code of 'TR' (trailer) and a To code of 'SH' (shop). Double-click to see a list of available location codes.
From Inv
Specify whether stock used for the transaction reduces the From location’s inventory. For example, if this transaction involves installing a consumable part on a power unit, the shop’s stock is diminished and the 'From Inv' value should be set to 'True'.
To
Enter a To location code that describes the destination of the parts or labour. For example, a transaction code describing a receipt of stock from a vendor would have a From code of 'VE' (vendor) and a To code of 'SH' (shop). Pulling a tire off a trailer and adding it to shop stock would have a From code of 'TR' (trailer) and a To code of 'SH' (shop). Double-click to see a list of available location codes.
To Inv
Specify whether stock used for the transaction increases the To location’s inventory. For example, if this transaction involves pulling a tire off a trailer and adding it to shop stock, the shop’s stock is increased and the 'To Inv' value should be set to 'True'.
Serial #
Specify whether the transaction involves inventory that has serial numbers. This field is especially important for new parts coming into the shop.
Cost
Three codes are allowed in the Cost field. These codes determine how costs are handled in the Stock Receipts program. 'C’alculate tells the system to calculate the cost based on previously entered stock entries. 'E’nter identifies this transaction type as one where a cost must be entered by the operator. 'N’ot Applicable means the cost is not an issue with this type of transaction. Double-click to toggle available values.
Cost Inv
Cost Inventory affects the G/L posting of the transaction. 'N’ot Applicable is self-explanatory. 'A’dd to inventory means that the value of your inventory stock will be increased. 'E’xpense means inventory value will be unaffected and the stock item will be directly expensed. Double-click to toggle available values.
Search
Brings up a 'Select Transaction Code' dialog box where you can search by transaction code or description.
Default
This field specifies if the current Detail Line’s Transaction Code is a default Code. You may change the value to 'True' (is Default) simply by typing in the field.
We have created a set of codes in the RM_TRANSACTION table of your database that you can use and expand upon if you wish. The value of the pre-defined codes is that, within each code itself, the action, Part Class and from-to locations are abbreviated, so simply looking at the code explains the nature of the transaction. The pre-defined transaction codes adhere to a coding system that makes the codes meaningful and easy to interpret, regardless of how complicated they look at first. They are structured as follows: the first part is the 'action', the second part the 'Part Class', the third part is the 'from' location, the last part the 'to' location.
Jobs tab
Job Codes form the basis of maintenance work orders, and are created on the Jobs tab. Job actions are the components of a job code. A Job Code usually consists of numerous Job Actions, which are combinations of Part Codes, transaction codes, and remarks. Notice that as both parts and labour can make up a job, you must have Part Codes set up for 'Labour' as well as 'Parts'. Job Codes are stored in the RM_JOB table.
Job Codes and Job Actions Grid
Job Code
Enter a Job Code (up to ten characters in length). When you assign jobs to a work order, you select job codes.
Description
Enter a Job Code Description. This is used for information and reporting purposes.
Component
Allows you to add a Component code to the current record. Double click within the text field to select a Component code.
Job Code Notes
Enter relevant notes in the space provided.
Job Actions tab
The Job Actions tab will display the tasks (in order) required to complete the selected maintenance work for the selected record in the 'Job Codes and Job Actions' grid. When 'Check Brakes' is selected, as it is above, the various tasks for that job will be broken down here, in this example being only one job. The more complex a job, the more job 'actions' will be listed here. Click the '+' button to add a new 'action' to a job.
Child Jobs tab
A 'Child Job' is any job 'action' that should be completed in tandem with those listed in the 'Job Actions' field. If, when conducting a brake inspection, you would like to have an oil inspection as well, you can add such a task to the Child Jobs tab. Then, whenever someone at your shop is conducting a brake inspection, they will know to also conduct an inspection of the power unit’s oil levels.
Part Code Grid
Part Code
Double click for a selection form of configured Part Codes.
Trans Code
Double click for a selection form of configured transaction codes.
Quantity
Enter the number of items of this Part Code that will be used. For labour items, this will become the time estimate in the Labour tab of the R&M Work Orders program. For part items, this will become the Quantity of parts in the R&M Work Orders program > Part tab.
Remarks
Can be used to a description of this job action. This is for reporting and reference purposes only.
Search
Brings up a 'Select Job Code' dialog box where you can search by job code or description.
Context Menu
Imaging
Available from the Header section (and anywhere else besides a grid), this option allows you to interface with your Third Party Imaging software. See the Codes Maintenance program for more information on setting up your Imaging software, and the Document Imaging Overview for more information on specific Third Party providers.
Packages tab
When the same part types and quantities are always used together as a group on certain maintenance jobs, set up a part package on the Package tab. In the R&M Work Orders program, rather than adding each part type and quantity individually to a work order, you can specify the part package. This will automatically add all the part types and quantities defined in the part package. Part Package Codes are stored in the RM_PARTPACKAGE table.
Name
Enter a name for the part package. When you select a part package for a work order, you will select according to this code.
Part Code
Double click for a Part Code selection form. You can enter multiple Part Codes against the same part package name.
Quantity
Enter the number of items of this Part Code that will be used each time this part package is assigned to a work order.
Remarks
You can enter free form remarks here for reporting and informational purposes.
Search
Brings up a 'Select Part Package' dialog box where you can search by name.
Shops tab
Shop Codes identify your shop locations. Enter code, description, name and address details for each shop your company maintains. Your Shop Codes will be stored in the RM_SHOP table. The Shops tab also contains many 'User Defined' fields that you may setup within the Application Configurator program.
Note: To account for situations where different shops might be located in different provinces/states and thus different tax rates might apply, tow additional fields are available in the grid within the 'Shops tab' , 'Tax 1' and 'Tax 2'. Enter the tax rate that applies to where the selected shop is located. If a tax rate is entered this rate will be used in all tax calculations. If no tax rates were entered for the selected shop the tax calculations will be based on the rates entered in the Misc tab described later.
Context Menu
Imaging
Available from the Header section (and anywhere else besides a grid), this option allows you to interface with your Third Party Imaging software. See the Codes Maintenance program for more information on setting up your Imaging software, and the Document Imaging Overview for more information on specific Third Party providers.
Mechanic tab
Setup a 'Mechanic Code', 'Name', and 'Hourly Rate' (as well as other details) for each of your mechanics on the Mechanic tab. Mechanic Codes are stored in the RM_MECH table.
Note: The rate specified here can be overridden by the rate specified for the Part Code, depending on the setting of the Labour Rate Calculation section of the Misc tab.
Password
This field is used to enter the password that the Mechanic will use to access the R&M Time Clock program.
Context Menu
Imaging
Available from the Header section (and anywhere else besides a grid), this option allows you to interface with your Third Party Imaging software. See the Codes Maintenance program for more information on setting up your Imaging software, and the Document Imaging Overview for more information on specific Third Party providers.
GL (General Ledger) tab
When you enter information (one row for each Part Class) in the appropriate fields of the GL tab, you will be instructing the program to post the required entries to your General Ledger accounts which will tie into your Accounting modules accordingly.
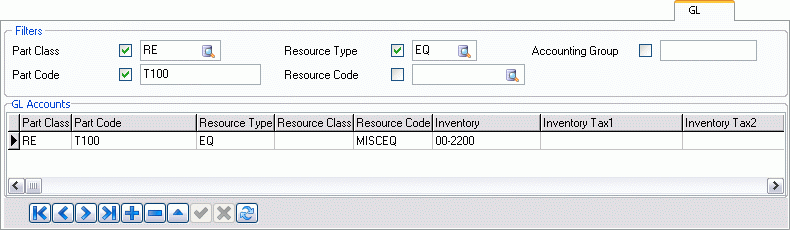
Note: You do have the option, however, of not tying the R&M registries to the General Ledger in TruckMate. To do this, open the Application Configurator program, then select the 'RMCONFIG.EXE' and change the value from 'False' to 'True' for the 'Default No GL' option.
Filters
To Filter your GL Account records by any of these options, place a check in the option you would like to use.
Part Class
Enter your Part Class code here. Use the search button for more choices.
Part Code
Enter a Part Code (up to twenty characters long). In most cases, the more intuitive the code, the easier the system will be for multiple users. This is your internal Part Code; the vendor’s Part Code is entered on the Part Code tab > Vendor Parts tab, in a field called 'Vendor Part Code'. Use the search button for more choices.
Resource Type
Select one from the choices shown in the image above. Use the search button to view these choices. Once you have selected a Type from the options above, the records will be filtered by this value.
Resource Code
Your Resource Code is dependant on the Resource type chosen. Choose the Resource type first, and then narrow your search specifics further by using the resource code. Use the search button to view your choices after you select your resource type.
Accounting Group
Enter an R&M Accounting Group to filter by.
GL Accounts Grid
Part Class
Enter your Part Class code here. Use the search button for more choices.
Part code
Enter a Part Code (up to twenty characters long). In most cases, the more intuitive the code, the easier the system will be for multiple users. This is your internal Part Code; the vendor’s Part Code is entered on another tab, in a field called Vendor Part Code (see below). Use the search button for more choices.
Resource type
Usually pre-populated automatically.
Resource code
Dependant on the Resource type. Choose a Resource type before entering your Resource code.
Inventory
Enter the account code number. This code is usually your inventory account code. The inventory field is also used to indicate which GL account the inventory adjustment is to be removed from.
Inventory Tax1
Inventory tax 1 and Inventory tax 2 are used by Stock Receipts program where you first determine the inventory account number to use, then where the GST (or other tax) should go, and where the PST (or other tax) should go.
Inventory Tax2
Inventory tax 1 and Inventory tax 2 are used by Stock Receipts program where you first determine the inventory account number to use, then where the GST (or other tax) should go, and where the PST (or other tax) should go.
Cost of Goods Sold (COGS)
Enter the COGS account code number to be used by the Work Order Program to create a sale entry in the R&M Work Orders program.
Sales
Enter the Sales account code to be used by the R&M Work Order Program to create a sale entry in the R&M Work Orders program.
Sales Tax1
Enter a Sales Tax account code number to be used by the Work Order Program to create a sale entry in the R&M Work Orders program.
Sales Tax2
Enter a Sales Tax account code (a second one) number to be used by the Work Order Program to create a sale entry in the R&M Work Orders program.
Expense
Enter an account code to be used in the R&M Work Orders program to identify account(s) charged for vehicle work completed.
Expense Tax1
Enter an account code to be used in the R&M Work Orders program to identify account(s) charged for vehicle work completed.
Expense Tax 2
Enter an account code (a second one) to be used in the R&M Work Orders program to identify account(s) charged for vehicle work completed.
Write Off
Enter the General Ledger account number associated with the Inventory Adjustment program used to adjust inventory numbers.
RM Acct Group
Displays the R&M Accounting Group attached to this Part.
ID
Displays the R&M Part ID number attached to this Part.
Misc tab
The Misc tab allows you to enter some additional miscellaneous information for use throughout the Repairs and Maintenance module. This information is stored in the RM_MISC table.
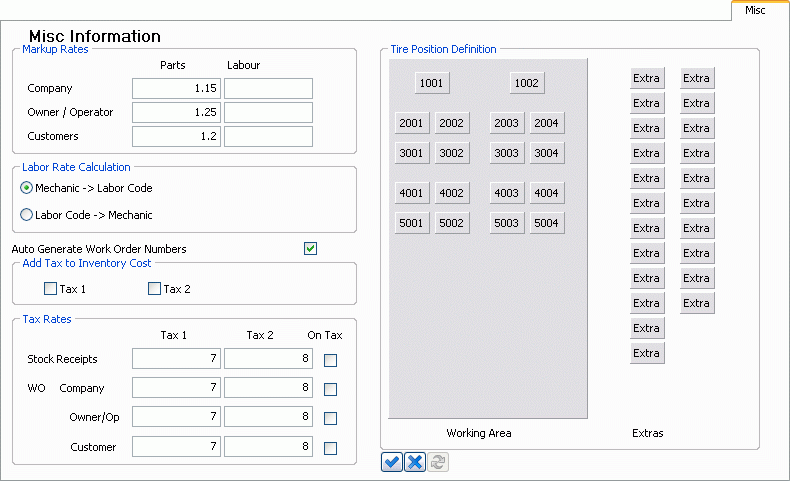
Markup Rates
Will determine the markup applied to parts, and labour. The Markup Rates determine the markup that will be applied to work orders depending on whether the work was done for a customer, an Owner / Operator, or on company equipment. If you do not charge a markup, enter a markup rate of `1.00'. These are the default numbers that the R&M Work Order program uses but you can input your own company rates.
Parts
Enter the rate that will be used to markup inventory cost of a part.
Labour
Enter the rate that will be used to markup a mechanic’s code rate. To view the Mechanic’s Code rate see R&M Configuration’s Mechanic tab.
Labour Rate Calculation
Specify whether the labour rate set up for the mechanic code is used before the labour rate set up for the Part Code, or vice versa. If the option 'Mechanic → Labour Code' is selected, the labour rate specified in the Mechanic tab will be used first. Instead, if the option 'Labour Code → Mechanic' is selected, the labour rate specified for the Part Code on the Labour tab will be used first. If the labour rate specified first is not set up, the second labour rate will be used.
Auto Generate Work Order Numbers
If you want the system to create work order numbers, check this box. If you want to enter your own numbers, leave it blank.
Add Tax to Inventory Cost
If you wish to include the tax charged by your vendors in your inventory costs, check these boxes. Tax 1 and Tax 2 refer to the two taxes set up in the Tax Calculation Configuration program. You may include one or both of the taxes.
Tax Rates
Specify the rate of tax to be charged on work orders in the R&M Work Order program, in various circumstances:
Stock receipts
Enter the rate amount automatically calculated on receipt of stock.
WO Company
Enter the rate amount of tax charged in each circumstance.
Owner/OP
Enter the rate amount of tax charged in each circumstance.
Customer
Enter the rate amount of tax charged in each circumstance.
Tire Position Information
This layout form is used in the Tire Move grid of the R&M Work Order program to provide visual cues. Each box represents a tire; change the labels by clicking the right-mouse button on the boxes. Using the left mouse button, drag the boxes to whatever position best represents your standard equipment. In the example here, tires P1 to P10 represent the tractor tires; tires T1 to T8 represent trailer tires; E1 to E6 are tires on a P&D van. Add extra tires to the layout by dragging the Extra tires onto the Working area, then use the right-mouse button to rename them.
Trace tab
In R&M Configuration, go to the Trace tab and enter the names of your Trace Types. You can create names with up to 20 characters. Your Trace Types will be stored in the RM_TRACE table. If problems occur, refresh your data. Once entered, you can attach a trace type to a work order and a trace number. In R&M Work Orders program > Trace tab Trace tab, use the '+' sign to enter a new record, then double-click in the Trace Type column and view your entries from the R&M Configuration program and select one. Enter a trace number and press 'Save'.
Invoice tab
The R&M Configuration Invoice tab works similar to the Codes Maintenance program > Site Setup tab but is used to setup Invoicing criteria which will be used in conjunction with the R&M Work Orders program. For example, you might want to set up site for each shop. Say, for example, you have a site in Langley and another in Vancouver, then you’d set up a site for each. The Invoice Codes created here are stored in the RM_INV table.
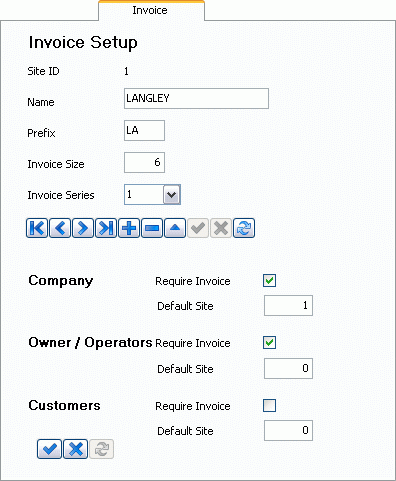
Site ID
Use the '+' button to add a new record.
Name
Enter the site name.
Prefix
Enter a prefix of say the first letter of the name. For example, if the site name is Langley, you could use 'L' as the prefix.
Invoice Size
The amount of characters you wish the invoice to be.
Invoice Series
Determines the numbering convention used for invoices generated from this site. The Invoice Series feature allows you to assign the same bill numbering series to two different sites. For example you may have Site 1 set with the prefix 'A' so that the invoice number appears as 'A0001'. Site 2 may be set with the prefix 'B' so that the invoice number appears as 'B0001'. If you assign the same bill series to both of these sites, the system will number them consecutively. For Example: A0001, A0002, B0003, A0004, B0005, … Notice that the prefix changes depending on the site, but the rest of the invoice numbers increase as if they were from the same site. You can have up to twenty five bill series. If you want each site to have it’s own bill series (eg: A0001, A0002, B0001, B0002, A0003, …); make sure that you select a separate bill series for each.
Company
You may want to modify information used for a company, owner/operator, or customers and this area gives you the flexibility to do so. You can decide if an invoice is required, and if so, what the default site (if applicable) would be used.
Require Invoice
Place a checkmark in the box provided if an invoice is required.
Default Site
Double-click in the field provided to bring up a site search dialog box where you can search by site ID, name, or prefix.
Owner / Operators
You may want to modify information used for a company, owner/operator, or customers and this area gives you the flexibility to do so. You can decide if an invoice is required, and if so, what the default site (if applicable) would be used.
Require Invoice
Place a checkmark in the box provided if an invoice is required.
Default Site
Double-click in the field provided to bring up a site search dialog box where you can search by site ID, name, or prefix.
Customers
You may want to modify information used for a company, owner/operator, or customers and this area gives you the flexibility to do so. You can decide if an invoice is required, and if so, what the default site (if applicable) would be used.
Require Invoice
Place a checkmark in the box provided if an invoice is required.
Default Site
Double-click in the field provided to bring up a site search dialog box where you can search by site ID, name, or prefix.
Outside Equipment tab
The Outside Equipment tab allows you to setup information pertaining to your outside equipment. This tab offers the ability to track non-company owned outside equipment for repair and maintenance purposes only. Outside Equipment codes are stored in the RM_OUTSIDE_EQUIP table.
Unit ID
Enter a specific identification for this unit. You have up to 10 characters.
Make
Enter the make of the piece of equipment.
Model
Enter the model of the piece of equipment.
Year
Enter the year of the piece of equipment.
Class
Enter the class of the piece of equipment or use the search button to view Equipment Classes already entered on your system.
Engine
Enter the engine type for the piece of equipment or use the search button to view Engines already entered on your system.
Fuel Type
Enter the fuel type. You have two characters so enter something like 'D' or 'DS' for diesel, etc.,
Transmission
Enter the transmission type for the piece of equipment or use the search button to view Transmissions already entered on your system.
Plate
Enter the plate number for this piece of equipment.
VIN
Enter the Vehicle Identification Number (sometimes the same as the serial number).
Client ID
Enter the Client ID for the piece of equipment or use the search button to view Client IDs already entered on your system, and make a selection.
Cost Center
Click the search button to select a GL Account to be used as the 'Cost Center' value.
Acct Group
Enter the Accounting Group name in the space provided.
User Fields 1-10
Enter in information in these user definable fields for information or reporting purposes.
Search
Brings up a 'Select Outside Equipment' window where you can search by 'Unit ID', 'Client ID', 'Plate #' or 'VIN #'.
Context Menu
Imaging
Available from the Header section (and anywhere else besides a grid), this option allows you to interface with your Third Party Imaging software. See the Codes Maintenance program for more information on setting up your Imaging software, and the Document Imaging Overview for more information on specific Third Party providers.
Cause/Effect/Remedy tab
Accepted standards within the industry require more control being exercised on vehicle repairs. For example, if a vehicle has an incident where a wheel fell off. In this instance, you would locate the cause, which would a malfunctioning bolt and nut. The effect would be that the wheel fell off, and the remedy would be that you replaced the malfunctioning bolt and nut with a new one. Following these standards allows you to build history on these items.
On the Cause / Effect / Remedy tab use the '' sign to add a new cause, effect, and remedy code to the grids. These new codes will be accessible when in the R&M Work Orders program > Parts tab and are stored in the RM_CAUSE_CODES table. Ensure your parts list entry has been posted, proceed to the R&M Work Order Billing tab and post the invoice, select the 'Set Complete' button. Change your filter below to the 'Complete' filter. Proceed to the R&M Work Order Trace tab and use the '' sign to add a new record. Double-click in the cause, effect, and remedy columns to view your entered cause, effect, and remedy codes, and make your selections. Back in the R&M Work Order Parts tab, tab through the columns until you reach the 'Remedy Description' column, use your context menu and select 'Set Remedy'.
Import VMRS
Clicking the Import VMRS button will begin the process of setting up VMRS Codes for use in the R&M Module. You will be prompted for a to 'OK' the import of a VMRS 'CK' file, which will reside in your TruckMate directory (..\VMRS\CK33.txt). The VMRS Codes will then be added into your Part Group list of codes.
Those users who are subscribed to the TruckMate VMRS program might want to change the 'Part Group' tab’s title to something like 'VMRS Codes'. See the Application Configurator program for info on how to accomplish this task.
Cause Codes sub-tab
Code
Enter a code of up to 10 characters.
Description
Enter a brief description explaining the code purpose.
Cause Code Notes
Enter any relevant notes pertaining to the Cause code.
Acc Charges tab
The Acc Charges tab is used to setup Accessorial R&M Charges, usually to account for various shop odds and ends, including cleaning materials or a shop supply percentage where you charge a percentage for the use of your facility, for example. R&M Accessorial codes are stored in the RM_ACC_CH_CODE table.
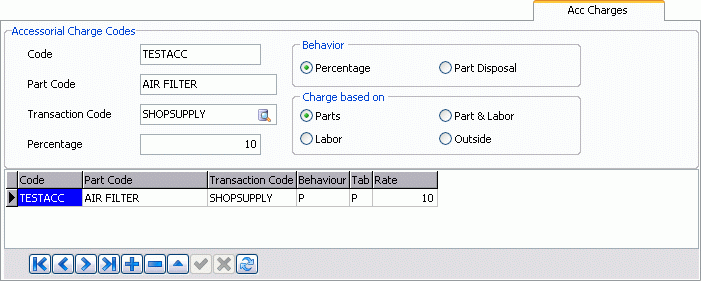
Accessorial Charge Codes
Code
Enter a relevant accessorial charge code. In this example, you could enter 'SHOPSUPPLY'. You have ten characters.
Part Code
Select the search button to bring up the Part Code options and make a selection.
Transaction Code
Click the search button to bring up the Transaction Code options and make a selection. You could enter an Accessorial Charge in the R&M Configuration program > Transaction Code tab.
Percentage
Enter a number which will serve as a percentage. For example, if you enter '3', the program will read this amount as '.03.
Behaviour
Make your selection as a percentage or part disposal. Part Disposal means that there may be an extra flat charge amount added whenever this part is used on a work order.
Percentage
Select this option to charge a percentage.
Part Disposal
Select this option to charge a part disposal fee.
Charge Based On
Allows you to specify what the percentage is being taken from: parts, labour, or outside.
Parts
Selecting this option means that the percentage will be taken from the retail cost of the parts.
Labour
Selecting this option means that the percentage will be taken from the retail cost of the labour.
Outside
Selecting this option means that the percentage will be taken from the retail cost of the outside labour.
Labor Codes tab
The Labor Codes tab allows you to view the Labor Code information already setup on your system, or to create new Labor Codes for use throughout the Repair & Maintenance module. Labor codes are stored in the RM_PART table.
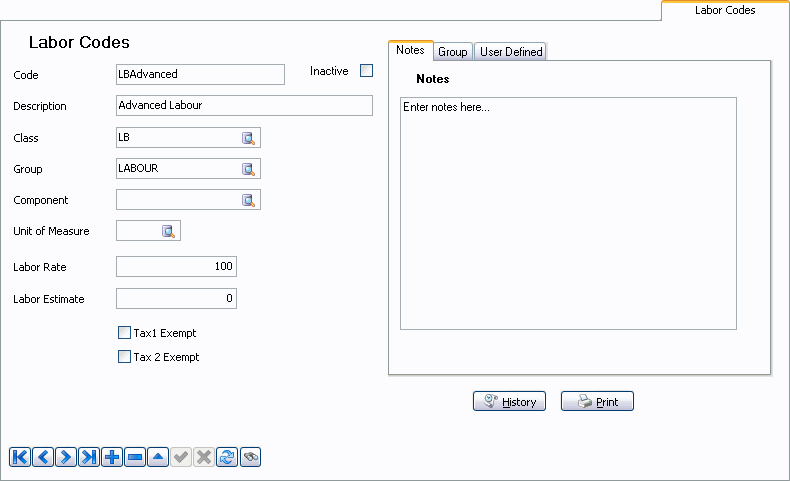
Code
This field displays the Labor Code that you are currently viewing. To add a new Labor Code, simply click the '+' button in the TruckMate Navigation bar, and type the new Code name into this field.
Inactive
Check this option if the Labor Code has been deemed Inactive. Inactive Labor Codes can be filtered out when doing searches.
Description
Displayes a text description of the Labor Code selected. When creating a new Labor Code, simply type a short description of what the Code entails into the space provided.
Class
Displays the Part Class that the Labor Code belongs to. When creating a new Labor Code, click the search button to bring up a selection menu where you can choose a Part Class from those available on your system. Part Classes are set up in the Part Class tab of the R&M Configuration program.
Group
Displays the Part Group that the Labor Code belongs to. When creating a new Labor Code, click the search button to bring up a selection menu where you can choose a Part Group from those available on your system. Part Groups are set up in the Part Group tab of the R&M Configuration program.
Component
Displays the Component that the Labor Code includes. When creating a new Labor Code, click the search button to bring up a selection menu where you can choose a Component from those available on your system. Component Codes are set up in the Component tab of the R&M Configuration program.
Unit of Measure
Displays the Unit of Measure that the Labor Code uses. When creating a new Labor Code, click the search button to bring up a selection menu where you can choose a Unit of Measure from those available on your system. Unit of Measure Codes are set up in the Codes Maintenance program.
Labor Rate
Displays the Labor Rate expected for this Labor Code. When creating a new Rate, simply type a dollar value into this field.
Labor Estimate
Displays the total Estimated Labor expected for completion of this Labor Code. When creating a new Estimate, simply type a dollar value into this field.
Tax 1 / Tax 2 Exempt
These two flags designate the tax exemptions available for a specific Labor Code in your R&M system. Both the 'Tax 1' and 'Tax 2' amounts are defined in the Tax Calculation Configuration program. By selecting one (or both) of these fields, you can exempt the selected Labor Code from taxation.
Note: These fields can be defaulted for all newly created Labor Codes by using the 'Tax 1 / Tax 2 Exempt Labor' options in the Application Configurator program > RMCONFIG.EXE section.
Markup Matrix tab
The Markup Matrix tab allows you to setup multiple Markup Categories and assign them markup rates depending on the different price ranges of various items in TruckMate’s R&M module.
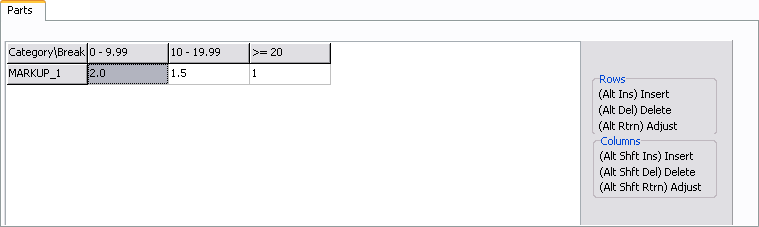
From inside the Markup Matrix tab, the user will be able to setup either the 'Parts' price markup matrix or the 'Labor' price markup matrix by using their respective sub-tab . The information specified on the right side of the Markup Matrix tab informs the user of the various hot keys used to Add, Remove, or Modify columns and rows into the Parts and Labor matrixes. The user may also use the right-click Context Menu from either the Parts or Labor tabs to access these commands.
When a markup category (row) is added either in the Parts or the Labor tab, a popup screen will come appear, allowing the User to name the new 'Markup Category':
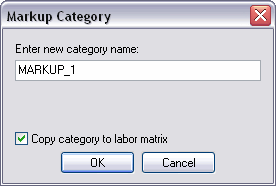
From either matrix, the user will be able to create a markup category and mirror the creation in the other matrix by using the 'Copy category to parts/labor matrix' option. The mirrored-creation of markup categories in both matrixes will be the default behavior.
Note: A new table, named RM_MARKUP_CAT, has been added to the TruckMate database to store the markup categories defined in the system for both the Parts and Labor matrixes. The table contains 2 columns: 'CAT_NAME' and 'CAT_TYPE'. The maximum length of a category name allowed in the system will be 10 characters, and the category type will allow the letter 'P' for Parts or 'L' for Labor.
Similarly, when a Price Break (column) is added either in the Parts tab or the Labor tab, a popup screen will appear, allowing the User to specify the new Price Break. The system will always assume that '0.00' (zero dollars) is the minimum, and there will be no limit to the maximum price range in the system. Therefore, the user will only need to specify the price breaks above $0.00:
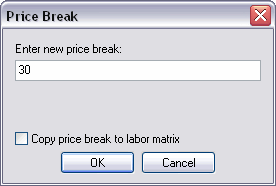
Note that in the case of price breaks, the default behavior is not to copy the price break from one matrix to the other. This is due to the fact that the price breaks could be very different between the Parts and the Labor matrixes.
When the price breaks are created and saved in the system, the titles for the price breaks columns will be updated with the price ranges (and not the price breaks). If for example, there is only a 50.00 price break stored in the system; the grid will contain one column titled '$0.00 $49.99' and another column titled '> $50.00'.
Once all the markup categories and price breaks are defined and set up in the system, the user will be able to input the markup rates for each markup category and its corresponding price break.
Note: A new table, named RM_MARKUP_MATRIX, will be added to the TruckMate database to track the Parts and Labor price markup matrixes, as well as the Price Breaks for those Matrixes. The table will store the combination of markup categories, the different price breaks, and their corresponding markup rates defined in each of the matrixes. It will contain the following columns:
-
MARKUP_TYPE: Allows the letter 'P' for parts or 'L' for Labor.
-
MARKUP_CAT: Will be copied from the MARKUP_CAT.CAT_NAME column
-
MARKUP_BREAK: Will be copied from the MARKUP_CAT.CAT_NAME column
-
MARKUP_RATE
The RM_MARKUP_MATRIX table will be used by the R&M Work Order application to lookup the markup rate(s) associated with each customer depending on the part price they are purchasing and/or the Labor costs.